Transcription
2016 OUTLANDEROwner’s Handbook
PLEASE PLACE COPIES OF THE FOLLOWING ITEMS IN THE POCKET BELOW:1.Pre-Delivery Inspection Form (Customer Copy)2.Triple Diamond Delivery Checklist (Customer Copy)3.Salesperson or Key Dealership Contact’s Business Card
1Table of ContentsDriver’s View. Page 2-3Thank you for buying a Mitsubishi Outlander. There’s no doubt you’ve already realized howwell your car drives on the open road. What you may not know is all the great features thathelp your car perform the way it does. In the pages ahead we’re going to run through thebasics and prepare you for the road.We’d also love to hear from you regarding your overall Mitsubishi experience. Within a weekor so after your purchase, we’ll be sending you a very brief survey to complete. We wouldappreciate it so much if you could take a minute or two to tell us how we did. We highly valueyour comments.We hope you will visit the Mitsubishi Owner’s site where we store the latest Mitsubishi newsand special offers. Here you can also keep track of your car’s warranty and servicing needs,get Roadside Assistance Information and tap into other owner-centric details. Just log on towww.Mitsubishicars.com/ownersonly.Controls. Page 4-5Own the Road. Page 6Switches. Page 7ECO Driving. Page 8Folding and Stowingthe Second and ThirdRow Seat. Page 9Technology . Page 10Homelink WirelessControl System. Page 11Audio System. Page 12Display Audio System(if equipped). Page 13-14Bluetooth . Page 15FAQ’s. Page 16-17
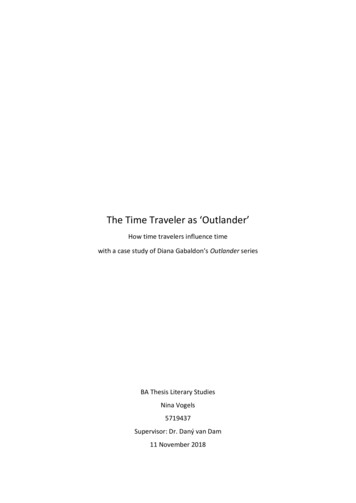
2Driver’s View1Climate Controls. Page 42Headlights. Page 43De-Icer Controls (if equipped). Page 44Side Mirror Adjustment. Page 55Windshield Wiper Lever. Page 56Cruise Control / Adaptive CruiseControl (if equipped). Page 67Drive Mode Selector. Page 68Paddle Shifters (GT only). Page 69Seat Heater Switch (if equipped) . Page 6138210 Lane Departure Warning (LDW) andForward Collision Mitigation (FCM)(if equipped). Page 71511 Power Liftgate Main Switch(if equipped). Page 71812 ECO Mode Switch. Page 813 Multi Information Display (MID). Page 101014 Start/Stop Engine Switch(if equipped with F.A.S.T.-key). Page 1015 Audio Remote Control Buttons. Page 1116 Homelink (if equipped). Page 1117 Display Audio/Navigation(if equipped). Page 12-1318 Bluetooth Controls. Page 144
31617861412571 3119
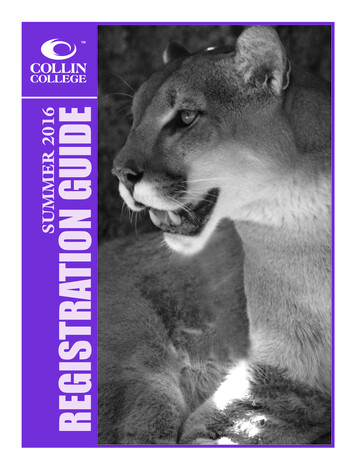
4CONTROLSRegular HeadlightsAutomatic Headlights (if equipped)Headlights and other lights on.Parking, tail, front and rear sidemarker lights, license plate and instrument panel lights on.Turns headlights on or off automatically in accordance with the outside light level (GT and OPTSEL). Otherwise, headlights turn off automatically when the ignition switch is turned off and thedoor is open.AUTODual-Zone Automatic Climate Controls (if equipped)AABCDEFGHA - Push to select the desired temperatureB - Push to select outside air (Indicator light off) or recirculated air (Indicator lighton)C - Push for air conditioning ON/OFFD - Push to select the blower speedE - Push to select the position of air flowing from the ventsF - Push to defog windshield.G - When the AUTO switch is pushed, the settings are automatically controlled.Passenger’s side temperature will be changed to the same temperature set as thedriver’s sideH - Push to defog the rear windows and to activate the De-Icer Controls (if equipped)
CONTROLS (continued)Windshield WipersSide Mirror AdjustmentThe wipers will operate once.AINT: Intermittent intervals can beadjusted by turning the knob AAUTO: The wipers will be operatedautomatically by rain sensor(if equipped).SlowFastThe outside rearview mirrors can beadjusted when the ignition switch is in the“ON” or “ACC” position or the operationmode is put in ON or ACC.Move the lever (A) to the same side as themirror you wish to adjust.Adjust switchFolding Side Mirrors (if equipped)Automatically folds in when the car doorsare locked and ignition is offRear Window Wiper and WasherTurn the knob B to operate the rearwindow wiper.The wiper operates continuouslyfor several seconds then operatesintermittently at intervals of about 8seconds.Washer fluid is sprayed, the wiper willautomatically operate 2 or 3 times.Power Folding Side Mirror Switch (if equipped)Press switch to fold in mirrors if needed5
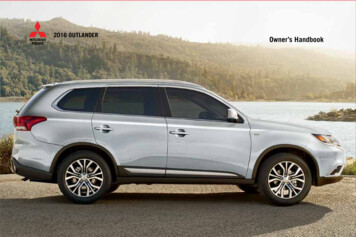
6OWN THE ROADPaddle Shifters (GT only)– :SHIFT DOWN :SHIFTUPSimply upshift ordownshift with a tap ofyour fingers – withoutmoving your hands fromthe steering wheel.Drive Mode Selector (if equipped)You can return to the “D”operation by pulling the (SHIFT UP) side paddleshifter rearwards (towardthe driver) and holdingfor over 2 seconds.Cruise Control / Adaptive Cruise Control (if equipped)ABCDEA - CANCEL: To deactivate the ACC or cruise controlB - RES : To increase the set speed or resumecontrol after cancelling the ACC or cruisecontrol function.C - SET-: To set the desired speed and to reduce theset speed.D - ON / OFF: To turn cruise control ON or OFFE - ACC Distance Switch - Used to set or change thefollowing distance between your vehicle and thevehicle in front of you.To set a cruising speed1. Press D and the “ACC” (if equipped) or “CRUISE” indicators will appear in the multiinformation display.2. Accelerate or decelerate to your desired speed (above 25 mph). Press C and remove yourfoot from the accelerator pedal.To accelerate or decelerate speedPush up B to increase set cruising speed.Push down C to decrease set cruising speed.To cancel the cruising speed Press A or press brake pedal, or press D .The drive mode can be switchedby pressing the drive mode buttonwhile the ignition switch is in the ONposition.Pressing the button will change thedrive mode in order to:AWC ECO, NORMAL, SNOW, LOCKSeat Heater Switch (if equipped)PositionHI -NEUTRAL LO -ActionFor quick heatingHeater offTo keep the seat warm
SWITCHESActive Stability Control (ASC) Off SwitchLane Departure Warning (LDW) Switch (if equipped)You can deactivate the system bypressing down the “ASC OFF” switch for3 seconds or longer.When the ASC is deactivated, thedisplay/indicator will turn on. Toreactivate the ASC, momentarily pressthe “ASC OFF” switch; the display/indicator is turned off.Power Liftgate Main Switch (if equipped)When the power liftgate main switch (located in thelower center dash area) is ACTIVE, the power liftgatecan be operated using either the power liftgate switchon the F.A.S.T.-key, the driver’s side power liftgateswitch or the open/close switches on the powerliftgate.When you press the LDW switch, the “LDW” indicator on theinformation screen of the multi information display turns OFFand the LDW system is inactive.Press the switch again, the system will activate.Forward Collision Mitigation (FCM) Switch (if equipped)Power Liftgate Switch (if equipped)The power liftgate can be opened bypressing the Power Liftgate Switch.Every time the operation mode is turned to “ON”, the FCMwill automatically be turned on.To turn off the FCM, press and hold the FCM switch. A buzzerwill sound and the “FCM OFF” message andindicator will appear in the multi informationdisplay.To change the warning distance mode, brieflypress the FCM switch.7
8ECO DRIVINGECO indicatorECO mode switchThis indicator will be displayed when fuelefficient driving is achieved.ECO mode is an eco-driving supportsystem which automatically controlsthe engine, air conditioning system,4WD system (if equipped) andS-AWC (if equipped) to improvefuel efficiency.To activate, press the ECO modeswitch.ECO Drive AssistThis function displays how fuelefficiently you are driving underdifferent driving conditions.To show, press the multiinformation display switch.ECO drive levelLowThe ECO drive assist isdisplayed only when vehicle isdriven with the selector leverin the “D” (DRIVE) positionor when vehicle is driven inthe sport mode (for vehiclesequipped with sportronicsteering wheel paddle shifter).HighMulti informationdisplay switchECO ScoreECO drive levelLowHighECO score indicates the pointsyou have scored on fuel-efficientdriving by the number of leaves.To show, press the multiinformation display switch.Momentary fuel consumption displayWhile driving, the momentary fuelconsumption is shown with a bargraph.The “ ” mark in the momentaryfuel gauge shows the average fuelconsumption.When the momentary fuel consumption surpasses the average fuelconsumption, the momentary fuel consumption is displayed with a greenbar graph.Maintaining your fuel consumption above the average fuel consumptionpoint will help increase your mileage per gallon.To show, press the multi information display switch.Tire Pressure Monitoring System (TPMS)The Tire Pressure Monitoring System light illuminateswhen one or more of your tires is significantly underinflated. Please note that changes in the outsidetemperature may decrease tire pressure causing theTPMS light to turn on. If the TPMS light remainsilluminated, check your tire pressure.If the warning light illuminates, take the necessary measures referring to theowner’s manual.
FOLDING AND STOWING THE SECOND AND THIRD ROW SEATFolding the second row seatsUnfolding the second row seats1. When folding the left side second row seat, store the seatbelt for the middle seating position of the second row seat.Refer to “Detachable center seat belt for second row” inyour Owner’s Manual for help.1. Raise the seatback until it locks securely into place.2. Lower the head restraint for second row middle seatingposition to its lowest position.3. Push down the seat cushion until it locks securelyinto place.3. Pull the strap (A) and tilt forward the head restraints forsecond row outside seating position.4. On vehicles with the secondrow seat slide function, movethe second row seat fullybackward. Refer to “To adjustthe seat forward or backward”in your Owner’s Manual forhelp.NOTE: If you do not move the secondrow seat fully backward, you may not beable to fold the second row seat.5. Pull the strap (B) to flip the seatcushion forward.6. Fold forward the seat belt buckle.7. Pull up the lever (D),then fold the seatbackforward.2. While lifting the seat belt buckle (A), gently lowerthe seat cushion. Make sure that there is a hook (B)at the position shown in the illustration.4. Make sure that all seat belt buckles are properlypositioned on the seat cushion.5. If the center seat belt is stored; Pull out the detachable anchor plate (D) from theseatback. Pull the small latch plate (E) slowly and insert itinto the detachable anchor plate until a click isheard. Make sure that the seat belt is not twisted.Folding the third row seat (Seating 7 passengers)1. Remove the head restraints from the thirdrow seats. (Refer to “Head restraints” in yourOwner’s Manual for help).2. Pull up the strap (A), then fold the seatbackforward.3. Stow the removed head restraints in theluggage floor box with their front faces facingdownward.Unfolding the third row seatCAUTION: Do not allow any person to sit on the flipped seatcushion, and do not place luggage on it. The seat’s mountingfittings could bend under the weight, making it impossible forthe seat cushion to be secured when it returns to the originalposition.1. Pull the strap (A), then raise theseatback until it locks securely intoplace. Push lightly on the seatbackto confirm that it has actually beensecured.2. Install the head restraints.9
10TECHNOLOGYKeyless Entry SystemMulti Information Display SwitchNormal KeyF.A.S.T.-Key1. LOCK ( ) button2. UNLOCK ( ) button3. Power liftgate button(if equipped)4. PANIC button5. Operation indicator lightIf the F.A.S.T.-key battery is not operating properlyInsert the F.A.S.T.-key into the key slot in the instrument panel.Starting the engine and changing the operation mode should benow possible. Remove the F.A.S.T.-key from the key slot afterstarting the engine or changing the operation mode.AWhile carrying the F.A.S.T.-key, pressthe driver’s or front passenger’s doorlock/unlock switch A .Each time the multi information displayswitch is operated, the buzzer sounds andthe multi information display changesbetween information such as warnings,trip odometer, average and momentary fuelconsumption, distance range, etc.Start/Stop Engine Switch (if equipped with F.A.S.T.-key)How to start engineWhile carrying the F.A.S.T.-key within the operating range, the Start/Stop button can be used to start the engine. Move the selector lever in “P” position and hold the brake pedal down firmly, push the Start/Stop button. To stop the engine, stop the vehicle completely and move the selector lever in “P” then press the Start/Stop button.Function explanation* If you have to bring the engine to an emergency stop while driving, press and hold the Start/Stop button for 3 seconds or more, or press itquickly 3 times or more. If you press the Start/Stop button without depressing the brake pedal, you can change the operation mode in the order of OFF, ACC, ON, OFF. If the engine cannot be started or the operation mode cannot be changed, check the position of the F.A.S.T.-key or the battery performance ofthe F.A.S.T.-key.
HOMELINK WIRELESS CONTROL SYSTEM (IF SO EQUIPPED)Programming a new HomeLink To program HomeLink to operate a garage door, gate, or entry door opener, home or office lighting, you need tobe at the same location as the device.1. Press the HomeLink button that you would like to program. The indicator light (A) will flash orange slowly.2. Position the end of your hand-held transmitter (B) 1 to 3 inches (2 to 8 cm) away from the HomeLink buttonwhile keeping the indicator light in view.3. Press and hold the hand-held transmitter button while watching the indicator light (A). Continue pressing thebutton until the indicator light (A) changes from slowly flashing orange to either rapidly flashing green (rollingcode) or continuously lit green (fixed code). Now you may release the hand-held transmitter button.4. Press the just-trained HomeLink button and observe the indicator light. If the indicator light stays on constantly green, programming is complete and your device should operatewhen the HomeLink button is pressed and released. If the indicator light rapidly flashes green, firmly press, hold for 2 seconds and release the programmedHomeLink button. Repeat the “press/hold/release” sequence a second time, and, depending on thebrand of the garage door opener (or other rolling code equipped device), repeat this sequence a third timeto complete the programming process. At this point if your device operates, programming is complete. If the device does not operate, continue with “Programming a new HomeLink ” steps 5 to 7 to completethe programming of a rolling code equipped device.5. At the garage door opener receiver (motor-head unit) in the garage, locate the “Learn” or “Smart” button. Thiscan usually be found where the hanging antenna wire is attached to the motor-head unit (see the garage dooropener manual to identify the “Learn” button.6. Firmly press and release the “Learn” or “Smart” button. (The name and color of the button may vary bymanufacturer.) There are typically 30 seconds to initiate step 7.7. Return to the vehicle and firmly press, hold for 2 seconds and release the programmed HomeLink button.Repeat the “press/hold/release” sequence a second time, and, depending on the brand of the garagedoor opener (or other rolling code equipped device), repeat this sequence a third time to complete theprogramming process. HomeLink should now activate your rolling code equipped device.NOTE: Some hand-held transmitters may actually train better a distance of 6 to 12 inches (15 to 20 cm). Keepthis in mind if you have difficulty with the programming process.1- HomeLink button 12- HomeLink button 23- HomeLink button 311
12AUDIO SYSTEMUSB and iPod Input DBCAVOLUMEUPTo enter frequencies into the memory (AM/FM/SAT)1. Press A to turn on the audio system.2. Press B to select the desired band (AM/FM/SAT).3. Press C to Seek Station4. Hold down one of the Memory select buttons D(1-6) until it beeps in order to save that station tomemory.To adjust the clock1. Press and hold the PAGE or MENU key and theclock display flashes2. Press the various buttons to adjust.H- “Hour” settingPress this key to fast-forward the “hours”M- “Minutes” settingPress this key to fast-foward the “minutes”3. Press the PAGE or MENU key to finish adjusting thetime.When the adjustment is completed, the clockdisplay stops flashing.NOTE:Please refer to your Owner’s Manual for moredetailed information on how to use your audiosystem. Audio RemoteControl ButtonSEEKChangestationor trackVOLUMEDown MODEChangetheaudiosource 1. Park your vehicle in a safe place and turn the ignition switch toLOCK position.2. Connect the cable (cable is not included with the vehicle) to theUSB memory device or the Dock connector to the iPod .3. Open the cover in the floor console box. Connect the cable tothe USB input terminal .4. Turn the ignition switch to the “ACC” position. Turn on the audiosystem.5. Press MEDIA several times to switch to the USB mode. The inputmode changes as follows:CD USB Bluetooth 6. Depending on your USB device, it may take longer for playback tostart.7. Once the device is selected, playback starts.With Display Audio System, follow steps 1 through 4 above5. Press MENU on the touch screen.6. Touch USB.7. Touch Folder then select a track and begin playback.
DISPLAY AUDIO SYSTEM (if equipped)AFBGCDHEIA - Eject Button for CDB - Selects AM/FM, and/or Sirius (if equipped)C - Selects type of Media (CD, MP3 and BT-A)D - Bluetooth for PhoneE - Power and Volume knobF - Clock settingG - Seek stations or CD track - up or downH - Displays all radio & media modes availableI - Tune stations / adjust sound settingsTo Adjust the ClockYou can adjust the time and date by touching the “Clock” F buttonThisis topa settingitemby touching Time Setting.on theright ofthedisplayeddisplay audio.Settings name Settings valueTimeAdjustmentSettings contentPSDProgram Service Data: Contributes to the superior userexperience of HD Radio Technology. Presents song name, artist,station IDs, HD2/HD3 Channel Guide, and other relevant datastreams.HD2/HD3Adjacent to traditional main stations are extra local FMchannels. These HD2/HD3 Channels provide new, original musicas well as deep cuts into traditional genre.Digital SoundDigital, CD-quality sound. HD Radio Technology enables localradio stations to broadcast a clean digital signal. AM sounds liketoday’s FM and FM sounds like a CD.TimeTouch the corresponding orand change the date and time.Time DisplaySettingsThis HD Radio receiver enables: DateTimeThe date and time display format can be set.12h or 24h display can be set.13
14NAVIGATION AUDIO (if equipped)MMCS AudioSetting an AddressAEBCFDGHABCDEFGHIJ-I1. Click on the NAV button at the bottom right of the screen2. Click on Address/Intersection3. If the state is correct – touch on All Cities. If not correct, touch on theState displayed and type in the correct state4. Touch in All Cities and type in the correct city5. Touch All Streets and type in the correct street6. Touch All House Numbers and type in the correct house #7. Touch SetJPWR – Turns Audio on or off and Volume ControlRadio – Select between AM/FM/ & Sirius stationsMedia – Selects CD/SD/USB / & BT AudioPhone – Controls Your PhoneTune – Tune stations or push knob for Sound ControlSeek / Track – Locate stations or CD tracks up or downOpen / Close – Eject CD or Gain Access to SD cardsNavi Control – Access a variety of Navi functionsMap - Provides Real Time Map & LocationInfo set – Provides other information or setting functionsSetting a Home Address1. Click on the NAVI button at the bottom right of the screen2. Click on Home button on bottom left of screen. If Home Location notset, it will ask if you want to jump to Personal Settings to register –Select Yes3. Click on Address/Intersection – New4. If the state is correct – touch on All Cities. If not correct, Touch on theState showing and type in thecorrect state5. Touch in All Cities and type inthe correct city6. Touch All Streets and type inthe correct street7. Touch All House Numbers andtype in the correct house #8. Touch Set
Bluetooth ControlsTo Make a Call For a list of compatible Bluetooth devices please go tohttp://www.mitsubishicars.com/ownersA SPEECH button:Change to voicerecognition ABBPICK-UP button:Answer anincoming callCHANG-UP buttonEnd a call or voicerecognitionCPairing a Bluetooth device with the Bluetooth 2.0 interface(Pairing is required only when the device is used for the first time.)Step 1: Stop your vehicle in a safe area , put the selector lever inthe “P” (PARK) position and pull the parking brake lever.Step 2: Press the PHONE button either on the Display Audio orMMCS Navi unitStep 3: If you haven’t paired your phone, then the pairing processbegins immediately. Follow the pairing features for yourphone.Step 4: Enter the 4-digit code in your phone that is shown on thedisplay screen and submit. This process may take a fewseconds.Step 5: The pairing process is complete. A new message will show“Import entire phonebook from this phone.” Either selectyes or no.Press Yes to download your phonebook. This process maytake a few minutes.Press No to complete the pairing process at this time.Please refer to the Owner’s Manual for additional pairing options.**See Display Audio Owner’s ManualBLUETOOTH OPERATION WITH DISPLAY AUDIOThere are 3 ways to make a call: By Saying a Telephone Number, By using theBluetooth 2.0 interface’s phonebook, and by redialing a telephone number.Saying A Telephone Number1. Press the Speech Button or PICK-UPbutton.2. Say “Dial.”3. After the voice guide says “Numberplease,” say the telephone number.4. The voice guide will say “Dialing numberrecognized ”. The Bluetooth 2.0 interfacewill then make the call. When theconfirmation function is on, the systemwill confirm the telephone number again. To continue with that number,answer “Yes.” To change the telephone number, answer, “No.” The systemwill say “Number please.” then say thetelephone number again.Making A Call Using A PhonebookNumber:1. Press the SPEECH button (except forvehicles with the Mitsubishi MultiCommunication System - MMCS) or PICKUP button (for vehicles with MMCS).2. Say “Call” (Note: You must have namesstored in the Phonebook or it will say “The vehicle phonebook is empty.Would you like to add a new entry now?”)3. After the voice guide says, “Name please.” Say the name you want tocall, from those registered in the phonebook. If there is only 1 match, thesystem voice guide will say “Calling name ” and will dial the telephonenumber. If there are 2 or more matches, the voice guide will say “Morethan one match was found, would you like to call repeats name . If thatperson is the one you want to call, answer “Yes.” If not the person, answer“No.” The name of the next matching person will bementioned by the voice guide.RedialingPress the SPEECH button (except for vehicles with theMitsubishi Multi-Communication System - MMCS) or PICKUPbutton (for vehicles with MMCS). Say “Redial”. The last phonenumber used in the system will then redial.15
16FAQ’sQ:A:Is my phone compatible with the factory Mitsubishi Bluetooth Hands Free System?Check the list of compatible phones, www.mitsubishicars.com/owners to see if the phone is Bluetooth supported.Q:A:How do I use Bluetooth Audio (if equipped)?Please refer to your Owner’s Manual for instructions.Q:A:Why does my Anti-Lock Braking System (ABS) make a noise?Each time your vehicle is started and driven a short distance, you will hear the sound of the ABS motor operating from the right front enginecompartment. This is the normal sound the Anti-Lock Braking System makes when performing a self check.Q:A:Why does the Audio System take so long to upload my music from my audio music device?The Mitsubishi system can read multiple device structures in order to catalog the music files for easy playing and listening. Depending on the amountof music you have on your device, this may take a few minutes.Q:What are the different ways of playing music from my portable music player through the stereo system in my vehicle, when equipped with the FUSE Hands-freeLink System ?There are two ways of playing music through your vehicle’s sound system. USB port - The FUSE system will find the songs in your device and categorize them according to Artist, Album, and Genre. Then you can have theFUSE system find and play the song in your device that you prefer without physically searching your device. This is done via voice commands. Bluetooth Streaming - Once your device is paired to the FUSE system, you can stream music from your device through the FUSE system to yourvehicles sound system. No wires or cords. Your music stops and restarts at the same song when you exit and when you re-enter the vehicle. Voicecommands are not available.A:Q:A:Why can’t I control the music track selection via voice commands while Bluetooth streaming?The Mitsubishi system uses AVRCP 1.3 (Audio/Video Remote Control Profile) which does support song information (title, artist, track, etc.). However,you must have a device that also supports AVRCP 1.3 to supply that information to the Mitsubishi system.Q:A:My Outlander is equipped with “Micron Air Filtration”. Where is the filter located and does it need servicing?The micron air filter is a small filter element which is located in the HVAC box just behind the lower glove box. The filter should be inspectedfrequently for debris. The filter works well at filtering incoming air however the filter will clog and lead to reduced outlet air volume if not serviced on aregular basis.Q:A:I am having trouble with my Power Liftgate working properly. Sometimes it works and sometimes it doesn’t. Am I doing something wrong?First check the ACTIVE/OFF button located below the climate control unit and check to see that this button is set to ACTIVE. If so, then you will find thatthe system needs to have ALL the doors unlocked for the unit to work properly. If only the driver’s door is unlocked, the power liftgate button will notwork.15
17Q:A:My Outlander has two 12V accessory outlets. What devices can be plugged into these outlets?Both of these outlets are protected with 15 amp fuses. Always check the current draw rating of any device prior to use in the vehicle. If thedevice is rated above 12 amps, this could lead to circuit overload and the electrical fuse opening (no current flow).Q:A:How can I get the MPG stated on the window sticker?Vehicle driving styles will greatly affect MPG. Avoid sudden abrupt starts from a stop and let the vehicle coast to the traffic light. Both of thesestyles will increase mileage and reduce brake lining wear. Vehicles are designed to achieve the best fuel mileage when they are driven at the speed limits on the freeway. Avoid driving over 65 mph. Under inflated tires will increase rolling resistance and will reduce fuel mileage. Check tire pressure frequently to increase miles per gallon.Proper tire pressure also ensures optimum tire performance (including tire wear.)Q:A:How does the Navigation System choose a certain route?The system takes into account traffic conditions, road types, distance and road width to recommend the route.Q:A:Why do my Rain Sensing Windshield Wipers operate on their own when it’s not raining? When the lever is in the AUTO position, the rain sensor detects rain or snow and automatically turns on the wipers. The wipers may automatically operate when things such as insects or foreign objects are affixed to the windshield on top of the rain sensoror when the windshield is frosted over. To stop the wipers, place the lever in the OFF position.Q:A:Why does my check engine light come on after I put gas in my car?There are many reasons why your check engine light may illuminate. Before calling your dealership, make sure the fuel cap is fully engaged andyou have heard three clicks when tightening it. After checking and hearing three clicks and the light is still on, contact your dealership.Q:A:How do I use the emergency key when the F.A.S.T.-key battery or vehicle battery is run down?If your Outlander is equipped with a One Touch Start button and the door does not open, take the key out from the fob and unlock the doormanually. Put the key back into the fob and insert it into the slot provided below the Climate Control Switches. Starting the engine and changingthe operation mode should now be possible. Remove the F.A.S.T.-key from the key slot after starting the engine or changing the operation mode.Product features and descriptions are subject to change without notice. Not all features listed are standard or available on all trim lines.For any product related questions, please consult your dealership or the actual Owner’s Manual.
2016 OUTLANDERwww.mitsubishicars.comACAD-P08000 (4/15)
A - Push to select the desired temperature B - Push to select outside air (Indicator light off) or recirculated air (Indicator light on) C - Push for air conditioning ON/OFF D - Push to select the blower speed E - Push to select the position of air flowing from the vents F - Push to defog windshield. G - When the AUTO switch is pushed, the settings are automatically controlled.