Transcription
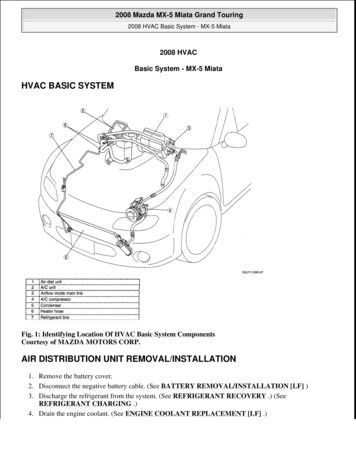
2008 Mazda MX-5 Miata Grand Touring2008 HVAC Basic System - MX-5 Miata2008 HVACBasic System - MX-5 MiataHVAC BASIC SYSTEMFig. 1: Identifying Location Of HVAC Basic System ComponentsCourtesy of MAZDA MOTORS CORP.AIR DISTRIBUTION UNIT REMOVAL/INSTALLATION1. Remove the battery cover.2. Disconnect the negative battery cable. (See BATTERY REMOVAL/INSTALLATION [LF] )3. Discharge the refrigerant from the system. (See REFRIGERANT RECOVERY .) (SeeREFRIGERANT CHARGING .)4. Drain the engine coolant. (See ENGINE COOLANT REPLACEMENT [LF] .)MicrosoftThursday, July 09, 2009 3:44:353:44:30 PMPage 1 2005 Mitchell Repair Information Company, LLC.
2008 Mazda MX-5 Miata Grand Touring2008 HVAC Basic System - MX-5 Miata5. Disconnect from A/C unit in the order in Fig. 2 .CAUTION: If moisture or foreign material enters the refrigeration cycle,cooling ability will be lowered and abnormal noise or othermalfunction could occur. Always plug open fittings immediatelyafter removing any refrigeration cycle parts.Fig. 2: View Of A/C Unit Pipe Lines & Components (With Torque Specifications)Courtesy of MAZDA MOTORS CORP.6. Remove the following parts:1. Console (See CONSOLE REMOVAL/INSTALLATION .)2. Glove compartment (See GLOVE COMPARTMENT REMOVAL/INSTALLATION .)3. Side wall (See SIDE WALL REMOVAL/INSTALLATION .)4. Console panel (See CONSOLE PANEL REMOVAL/INSTALLATION .)5. Center panel unit (See CENTER PANEL UNIT REMOVAL/INSTALLATION .)6. Lower panel (See LOWER PANEL REMOVAL/INSTALLATION .)7. Knee bolsterMicrosoftThursday, July 09, 2009 3:44:31 PMPage 2 2005 Mitchell Repair Information Company, LLC.
2008 Mazda MX-5 Miata Grand Touring2008 HVAC Basic System - MX-5 Miata8. Column cover (See COLUMN COVER REMOVAL/INSTALLATION .)9. Driver-side air bag module (See DRIVER-SIDE AIR BAG MODULEREMOVAL/INSTALLATION .)10. Steering wheel (See STEERING WHEEL AND COLUMN REMOVAL/INSTALLATION .)11. Combination switch (See COMBINATION SWITCH REMOVAL/INSTALLATION .)12. Steering shaft (See STEERING WHEEL AND COLUMN REMOVAL/INSTALLATION .)13. Meter hood (See METER HOOD REMOVAL/INSTALLATION .)14. Instrument cluster (See INSTRUMENT CLUSTER REMOVAL/INSTALLATION .)15. Side panel (See SIDE PANEL REMOVAL/INSTALLATION .)16. Hood release lever (See HOOD LATCH AND RELEASE LEVERREMOVAL/INSTALLATION[ADVANCED KEYLESS SYSTEM] .)17. Female bracket (See CONVERTIBLE TOP DISASSEMBLY/ASSEMBLY .)18. A-pillar trim (See A-PILLAR TRIM REMOVAL/INSTALLATION .)19. Scuff plate (See SCUFF PLATE REMOVAL/INSTALLATION .)20. Front side trim (See FRONT SIDE TRIM REMOVAL/INSTALLATION .)21. Fuse box No.122. Dashboard (See DASHBOARD REMOVAL/INSTALLATION .)7. Remove the air distribution unit and A/C unit.MicrosoftThursday, July 09, 2009 3:44:31 PMPage 3 2005 Mitchell Repair Information Company, LLC.
2008 Mazda MX-5 Miata Grand Touring2008 HVAC Basic System - MX-5 MiataFig. 3: View Of Air Distribution Unit & A/C UnitCourtesy of MAZDA MOTORS CORP.8. Disassemble the air distribution unit as shown in Fig. 4 .9. Install in the reverse order of removal.10. Perform the refrigerant system performance test. (See REFRIGERANT SYSTEM PERFORMANCETEST .)MicrosoftThursday, July 09, 2009 3:44:31 PMPage 4 2005 Mitchell Repair Information Company, LLC.
2008 Mazda MX-5 Miata Grand Touring2008 HVAC Basic System - MX-5 MiataFig. 4: Identifying Air Distribution UnitCourtesy of MAZDA MOTORS CORP.AIR DISTRIBUTION UNIT DISASSEMBLY/ASSEMBLY1. Disassemble in the order indicated in Fig. 5 .CAUTION: If a non-specified grease is used, it may result in abnormalnoise or improper operation of the links. Apply only thespecified grease to each link.MicrosoftThursday, July 09, 2009 3:44:31 PMPage 5 2005 Mitchell Repair Information Company, LLC.
2008 Mazda MX-5 Miata Grand Touring2008 HVAC Basic System - MX-5 MiataFig. 5: Exploded View Of Air Distribution Unit ComponentsCourtesy of MAZDA MOTORS CORP.2. Assemble in the reverse order of disassembly.A/C UNIT REMOVAL/INSTALLATION1. Remove battery cover.2. Disconnect the negative battery cable. (See BATTERY REMOVAL/INSTALLATION [LF] .)3. Discharge the refrigerant from the system. (See REFRIGERANT RECOVERY .) (SeeREFRIGERANT CHARGING .)4. Drain the engine coolant. (See ENGINE COOLANT REPLACEMENT [LF] .)5. Disconnect from A/C unit in the order in Fig. 6 .CAUTION: If moisture or foreign material enters the refrigeration cycle,cooling ability will be lowered and abnormal noise or othermalfunction could occur. Always plug open fittings immediatelyafter removing any refrigeration cycle parts.MicrosoftThursday, July 09, 2009 3:44:31 PMPage 6 2005 Mitchell Repair Information Company, LLC.
2008 Mazda MX-5 Miata Grand Touring2008 HVAC Basic System - MX-5 MiataFig. 6: View Of Refrigerant Line From A/C Unit & Components (With Torque Specifications)Courtesy of MAZDA MOTORS CORP.6. Remove the A/C unit and air distribution unit. (See AIR DISTRIBUTION UNITREMOVAL/INSTALLATION .)7. Disassembly the A/C unit as shown in Fig. 7 .8. Install in the reverse order of removal.9. Perform the refrigerant system performance test. (See REFRIGERANT SYSTEM PERFORMANCETEST .)MicrosoftThursday, July 09, 2009 3:44:31 PMPage 7 2005 Mitchell Repair Information Company, LLC.
2008 Mazda MX-5 Miata Grand Touring2008 HVAC Basic System - MX-5 MiataFig. 7: Identifying A/C UnitCourtesy of MAZDA MOTORS CORP.A/C UNIT DISASSEMBLY/ASSEMBLY1. Disassemble in the order indicated in Fig. 8 .CAUTION: If a non-specified grease is used, it may result in abnormalnoise or improper operation of the links. Apply only thespecified grease to each link.If the air mix damper is removed and reinstalled improperlybecause the original installation position cannot be specified,the air mix damper and air mix actuator may be damaged whenit is operated. Therefore, set the air mix to the middle positionbefore disassembling so that the installation position can bespecified.2. Assemble in the reverse order of disassembly.MicrosoftThursday, July 09, 2009 3:44:31 PMPage 8 2005 Mitchell Repair Information Company, LLC.
2008 Mazda MX-5 Miata Grand Touring2008 HVAC Basic System - MX-5 MiataFig. 8: Exploded View Of A/C Unit Components (With Torque Specifications)Courtesy of MAZDA MOTORS CORP.EVAPORATOR TEMPERATURE SENSOR ASSEMBLY NOTE1. Assemble the evaporator temperature sensor as shown in Fig. 9 .MicrosoftThursday, July 09, 2009 3:44:31 PMPage 9 2005 Mitchell Repair Information Company, LLC.
2008 Mazda MX-5 Miata Grand Touring2008 HVAC Basic System - MX-5 MiataFig. 9: Assembling Evaporator Temperature SensorCourtesy of MAZDA MOTORS CORP.EVAPORATOR INSPECTION1. Inspect the evaporator for damage, cracks and oil leakage. If there is any malfunction, replace the evaporator.2. Visually inspect the fins for bending. If there is any bending, use the end of a flathead screwdriver to straighten the fins.HEATER CORE INSPECTION1. Inspect the heater core for damage, cracks and water leakage. If there is any malfunction, replace the heater core.2. Visually inspect the fins for bending. If there is any bending, use the end of a flathead screwdriver to straighten the fins.3. Visually inspect the heater hose for deformation. Repair with pliers if there is deformation. If there is any malfunction, replace the heater core.MicrosoftThursday, July 09, 2009 3:44:31 PMPage 10 2005 Mitchell Repair Information Company, LLC.
2008 Mazda MX-5 Miata Grand Touring2008 HVAC Basic System - MX-5 MiataAIRFLOW MODE MAIN LINK REMOVAL/INSTALLATION1. Remove the battery cover.2. Disconnect the negative battery cable. (See BATTERY REMOVAL/INSTALLATION [LF] .)3. Remove the airflow mode actuator. (See AIRFLOW MODE ACTUATORREMOVAL/INSTALLATION .)4. Remove the airflow mode main link as shown in Fig. 10 .5. Install in the reverse order of removal.Fig. 10: View Of Airflow Mode Main LinkCourtesy of MAZDA MOTORS CORP.A/C COMPRESSOR REMOVAL/INSTALLATION1.2.3.4.5.6.7.Remove the battery cover.Disconnect the negative battery cable. (See BATTERY REMOVAL/INSTALLATION [LF] .)Discharge the refrigerant from the system. (See REFRIGERANT CHARGING .)Remove the air cleaner. (See INTAKE-AIR SYSTEM REMOVAL/INSTALLATION [LF] .)Remove the PCM. (See PCM REMOVAL/INSTALLATION [LF] .)Remove the drive belt. (See DRIVE BELT REPLACEMENT [LF] .)Do not allow remaining compressor oil in the A/C compressor and pipes to spill, and remove in the orderindicated in Fig. 11 .MicrosoftThursday, July 09, 2009 3:44:31 PMPage 11 2005 Mitchell Repair Information Company, LLC.
2008 Mazda MX-5 Miata Grand Touring2008 HVAC Basic System - MX-5 MiataCAUTION: If moisture or foreign material enters the refrigeration cycle,cooling ability will be lowered and abnormal noise or othermalfunction could occur. Always plug open fittings immediatelyafter removing any refrigeration cycle parts.Fig. 11: View Of A/C Compressor Pipe Hose & Lines (With Torque Specifications)Courtesy of MAZDA MOTORS CORP.8. Install in the reverse order of removal.9. Perform the refrigerant system performance test. (See REFRIGERANT SYSTEM PERFORMANCETEST .)MicrosoftThursday, July 09, 2009 3:44:31 PMPage 12 2005 Mitchell Repair Information Company, LLC.
2008 Mazda MX-5 Miata Grand Touring2008 HVAC Basic System - MX-5 MiataA/C COMPRESSOR INSTALLATION NOTECAUTION: Due to the high moisture-absorption characteristics of thecompressor oil, it may absorb moisture if left over a long period oftime thereby negatively affecting A/C operation. Drain thecompressor oil and refill within 10 min. of each other.1. Rotate new A/C compressor shaft six to eight revolutions while draining new refrigerant oil in a cleanmeasuring device. Use this refrigerant oil to refill new compressor. Do not allow refrigerant oil to becomecontaminated.2. Rotate old A/C compressor shaft six to eight revolutions while draining old refrigerant oil in a separate,clean measuring device.3. Compare those oil amounts. The amount of the oil drained from the new A/C compressor should begreater than the old one.4. Pour the same amount oil of drained from the old A/C compressor back into the new A/C compressor.A/C compressor oil typeDH-PRA/C compressor oil sealed volume (approx. quantity)130 ml {130 cc, 4.39 fl oz}MicrosoftThursday, July 09, 2009 3:44:31 PMPage 13 2005 Mitchell Repair Information Company, LLC.
2008 Mazda MX-5 Miata Grand Touring2008 HVAC Basic System - MX-5 MiataFig. 12: Pouring Drained Oil From Old A/C Compressor Into New A/C CompressorCourtesy of MAZDA MOTORS CORP.CONDENSER REMOVAL/INSTALLATION1.2.3.4.5.Remove the battery cover.Disconnect the negative battery cable. (See BATTERY REMOVAL/INSTALLATION [LF] .)Discharge the refrigerant from the system. (See REFRIGERANT CHARGING .)Remove the splash shields.Remove the under cover.MicrosoftThursday, July 09, 2009 3:44:31 PMPage 14 2005 Mitchell Repair Information Company, LLC.
2008 Mazda MX-5 Miata Grand Touring2008 HVAC Basic System - MX-5 Miata6. Remove the cooling pipe installation bolts.7. Do not allow remaining compressor oil in the condenser and pipes to spill, and remove in the orderindicated in Fig. 13 .CAUTION: If moisture or foreign material enters the refrigeration cycle,cooling ability will be lowered and abnormal noise or othermalfunction could occur. Always plug open fittings immediatelyafter removing any refrigeration cycle parts.MicrosoftThursday, July 09, 2009 3:44:31 PMPage 15 2005 Mitchell Repair Information Company, LLC.
2008 Mazda MX-5 Miata Grand Touring2008 HVAC Basic System - MX-5 MiataFig. 13: View Of Cooling Pipe & Components (With Torque Specifications)Courtesy of MAZDA MOTORS CORP.8. Install in the reverse order of removal.MicrosoftThursday, July 09, 2009 3:44:31 PMPage 16 2005 Mitchell Repair Information Company, LLC.
2008 Mazda MX-5 Miata Grand Touring2008 HVAC Basic System - MX-5 Miata9. Perform the refrigerant system performance test. (See REFRIGERANT SYSTEM PERFORMANCETEST .)CONDENSER INSTALLATION NOTE1. When replacing the new condenser, add compressor oil to the refrigeration cycle.Supplemental amount (approx. quantity)20 ml {20 cc, 0.7 fl oz}CONDENSER INSPECTION1. Inspect the condenser for cracks, damage, and oil leakage. If there is any malfunction, replace the condenser.2. Visually inspect the fins for clogging of foreign material. If any fins are clogged, remove the foreign material.3. Visually inspect the fins for bending. If there is any bending, use the end of a flathead screwdriver to straighten fins.REFRIGERANT LINES REMOVAL/INSTALLATION1.2.3.4.5.6.7.Remove the battery cover.Disconnect the negative battery cable. (See BATTERY REMOVAL/INSTALLATION [LF] .)Discharge the refrigerant from the system. (See REFRIGERANT CHARGING .)Remove the air cleaner. (See INTAKE-AIR SYSTEM REMOVAL/INSTALLATION [LF] .)Remove the splash shield.Remove the under cover.Do not allow remaining compressor oil in the piping and connecting parts to spill, and remove in theorder indicated in Fig. 14 .CAUTION: If moisture or foreign material enters the refrigeration cycle,cooling ability will be lowered and abnormal noise or othermalfunction could occur. Always plug open fittings immediatelyafter removing any refrigeration cycle parts.MicrosoftThursday, July 09, 2009 3:44:31 PMPage 17 2005 Mitchell Repair Information Company, LLC.
2008 Mazda MX-5 Miata Grand Touring2008 HVAC Basic System - MX-5 MiataFig. 14: View Of Refrigerant Lines & Components (With Torque Specifications)Courtesy of MAZDA MOTORS CORP.8. Install in the reverse order of removal.9. Perform the refrigerant system performance test. (See REFRIGERANT SYSTEM PERFORMANCETEST .)REFRIGERANT LINE REMOVAL NOTE1. Disconnect the block joint type pipes by grasping the female side of the block with pliers or similar tooland holding firmly, and then remove the connection bolt or nut.MicrosoftThursday, July 09, 2009 3:44:31 PMPage 18 2005 Mitchell Repair Information Company, LLC.
2008 Mazda MX-5 Miata Grand Touring2008 HVAC Basic System - MX-5 MiataFig. 15: Disconnecting Block Joint Type PipesCourtesy of MAZDA MOTORS
2008 HVAC Basic System - MX-5 Miata HVAC BASIC SYSTEM Fig. 1: Identifying Location Of HVAC Basic System Components Courtesy of MAZDA MOTORS CORP.
