Transcription
Samsung LTE Mobile HotSpot PROL T EM O B I L EH O T S P O TUser ManualPlease read this manual before operating yourdevice and keep it for future reference.
Warning! This product contains chemicals known to the State of California to cause cancer and reproductive toxicity.Intellectual PropertyAll Intellectual Property, as defined below, owned by or which is otherwise the property of Samsung or its respective suppliersrelating to the SAMSUNG Phone, including but not limited to, accessories, parts, or software relating there to (the “PhoneSystem”), is proprietary to Samsung and protected under federal laws, state laws, and international treaty provisions. IntellectualProperty includes, but is not limited to, inventions (patentable or unpatentable), patents, trade secrets, copyrights, software,computer programs, and related documentation and other works of authorship. You may not infringe or otherwise violate therights secured by the Intellectual Property. Moreover, you agree that you will not (and will not attempt to) modify, preparederivative works of, reverse engineer, decompile, disassemble, or otherwise attempt to create source code from the software. Notitle to or ownership in the Intellectual Property is transferred to you. All applicable rights of the Intellectual Property shall remainwith SAMSUNG and its suppliers.Open Source SoftwareSome software components of this product incorporate source code covered under GNU General Public License (GPL), GNU LesserGeneral Public License (LGPL), OpenSSL License, BSD License and other open source licenses. To obtain the source code coveredunder the open source licenses, please visit:http://opensource.samsung.com.Disclaimer of Warranties; Exclusion of LiabilityEXCEPT AS SET FORTH IN THE EXPRESS WARRANTY CONTAINED ON THE WARRANTY PAGE ENCLOSED WITH THE PRODUCT, THEPURCHASER TAKES THE PRODUCT "AS IS", AND SAMSUNG MAKES NO EXPRESS OR IMPLIED WARRANTY OF ANY KINDWHATSOEVER WITH RESPECT TO THE PRODUCT, INCLUDING BUT NOT LIMITED TO THE MERCHANTABILITY OF THE PRODUCT ORSM-V100T UM English MI1 PS 121813 F6
ITS FITNESS FOR ANY PARTICULAR PURPOSE OR USE; THE DESIGN, CONDITION OR QUALITY OF THE PRODUCT; THEPERFORMANCE OF THE PRODUCT; THE WORKMANSHIP OF THE PRODUCT OR THE COMPONENTS CONTAINED THEREIN; ORCOMPLIANCE OF THE PRODUCT WITH THE REQUIREMENTS OF ANY LAW, RULE, SPECIFICATION OR CONTRACT PERTAININGTHERETO. NOTHING CONTAINED IN THE INSTRUCTION MANUAL SHALL BE CONSTRUED TO CREATE AN EXPRESS OR IMPLIEDWARRANTY OF ANY KIND WHATSOEVER WITH RESPECT TO THE PRODUCT. IN ADDITION, SAMSUNG SHALL NOT BE LIABLE FORANY DAMAGES OF ANY KIND RESULTING FROM THE PURCHASE OR USE OF THE PRODUCT OR ARISING FROM THE BREACH OFTHE EXPRESS WARRANTY, INCLUDING INCIDENTAL, SPECIAL OR CONSEQUENTIAL DAMAGES, OR LOSS OF ANTICIPATED PROFITSOR BENEFITS.Modification of SoftwareSAMSUNG IS NOT LIABLE FOR PERFORMANCE ISSUES OR INCOMPATIBILITIES CAUSED BY YOUR EDITING OF REGISTRY SETTINGS,OR YOUR MODIFICATION OF OPERATING SYSTEM SOFTWARE.USING CUSTOM OPERATING SYSTEM SOFTWARE MAY CAUSE YOUR DEVICE AND APPLICATIONS TO WORK IMPROPERLY. YOURCARRIER MAY NOT PERMIT USERS TO DOWNLOAD CERTAIN SOFTWARE, SUCH AS CUSTOM OS.Samsung Telecommunications America (STA), LLCHeadquarters:1301 E. Lookout DriveRichardson, TX 75082
Customer Care Center:1000 Klein Rd.Plano, TX 75074Toll Free Tel: 1.888.987.HELP (4357)Internet Address:http://www.samsung.com 2013Samsung Telecommunications America, LLC. Samsung is a registered trademark of Samsung Electronics Co., Ltd.Do you have questions about your Samsung Mobile Device?For 24 hour information and assistance, we offer a new FAQ/ARS System (Automated Response System) at:www.samsung.com/us/supportThe actual available capacity of the internal memory is less than the specified capacity because the operating system and defaultapplications occupy part of the memory. The available capacity may change when you upgrade the device.microSD and the microSD logo are Trademarks of the SD Card Association.Wi-Fi is a registered trademark of the Wireless Fidelity Alliance, Inc.LTE is a trademark of ETSI
Table of ContentsSection 1: Getting Started . 3Understanding this User Manual . . . . . . . . . . . . 3Setting Up Your Device . . . . . . . . . . . . . . . . . . . 4Installing the Optional microSD Memory Card . . 9Turning Your Device On and Off . . . . . . . . . . . 11Factory Reset of Your Device . . . . . . . . . . . . . 12Section 2: Understanding Your Device . 13Features of Your Device . . . . . . . . . . . . . . . . .Front View . . . . . . . . . . . . . . . . . . . . . . . . . . .Side Views . . . . . . . . . . . . . . . . . . . . . . . . . . .On-Screen Indicators . . . . . . . . . . . . . . . . . . .13131415Installing the USB drivers for variousOS types . . . . . . . . . . . . . . . . . . . . . . . . . . .Connecting your Computer to the HotSpotvia USB . . . . . . . . . . . . . . . . . . . . . . . . . . . .Factory Reset via the Web Portal . . . . . . . . . .Using the Battery Pack Feature . . . . . . . . . . . .20212223Section 4: Home Page .24Mobile HotSpot Home Page . . . . . . . . . . . . . . 24Section 5: Network Page .27Mobile HotSpot Network Page . . . . . . . . . . . . 27Wi-Fi Configuration . . . . . . . . . . . . . . . . . . . . 29Section 3: Connecting Your Device . 16Section 6: Securing Your Device .30System Requirements . . . . . . . . . . . . . . . . . .Before You Begin a Connection . . . . . . . . . . .Initial Connection to Your Device . . . . . . . . . .Accessing Your HotSpot via a Browser . . . . . .Configuring Your HotSpot . . . . . . . . . . . . . . . .Preparing your HotSpot for File Access . . . . . .Mobile HotSpot Security Page . . . . . . . . . . . . .SIM PIN Tab . . . . . . . . . . . . . . . . . . . . . . . . . .MAC Filtering Tab . . . . . . . . . . . . . . . . . . . . . .Port Filtering Tab . . . . . . . . . . . . . . . . . . . . . .Port Forwarding Panel . . . . . . . . . . . . . . . . . .16161717181930303132351
Section 7: Configuring Your Device .37Mobile HotSpot Configuration Page . . . . . . . . . 37Settings Tab . . . . . . . . . . . . . . . . . . . . . . . . . . 37Software Update Tab . . . . . . . . . . . . . . . . . . . . 38DLNA Tab . . . . . . . . . . . . . . . . . . . . . . . . . . . . 39Tools Tab . . . . . . . . . . . . . . . . . . . . . . . . . . . . 39Factory Reset via Web Portal . . . . . . . . . . . . . . 41Section 8: Messaging on Your Device .42Mobile HotSpot Messaging Page . . . . . . . . . . . 42Section 9: Troubleshooting .44Technical Support . . . . . . . . . . . . . . . . . . . . . . 44Connection Tips and Tricks . . . . . . . . . . . . . . . 44Section 10: Health and SafetyInformation .46Exposure to Radio Frequency (RF) Signals . . . . 46Specific Absorption Rate (SAR) CertificationInformation . . . . . . . . . . . . . . . . . . . . . . . . . 46FCC Part 15 Information to User . . . . . . . . . . . 48Radio Frequency (RF) Energy . . . . . . . . . . . . . . 48Knowing Radio Frequency Safety . . . . . . . . . . 48FCC Radio Frequency Emission . . . . . . . . . . . . 492Samsung Mobile Products and Recycling . . . . .49UL Certified Travel Charger . . . . . . . . . . . . . . .50Display / Touch-Screen . . . . . . . . . . . . . . . . . .51Battery Use and Safety . . . . . . . . . . . . . . . . . .51Care and Maintenance . . . . . . . . . . . . . . . . . . .53Operating Environment . . . . . . . . . . . . . . . . . .54Restricting Children's Access to YourWireless Mobile Device . . . . . . . . . . . . . . . .56FCC Notice and Cautions . . . . . . . . . . . . . . . . .56Other Important Safety Information . . . . . . . . .57Section 11: Warranty Information . 58Standard Limited Warranty . . . . . . . . . . . . . . .58End User License Agreement for Software . . . .63Index . 71
Section 1: Getting StartedUnderstanding this User ManualThe sections of this manual is laid out to assist your withsetup and follow the UI features of your device.A robust index for features begins on page 71.Also included is important safety information, beginning onpage 46, that you should know before using your device.This manual gives navigation instructions according to thedefault display settings.Before using your device for the first time, you’ll need toinstall and charge the battery and install the micro SIM card.Note: Instructions in this manual are based on default settings,and may vary from your device, depending on thesoftware version on your device, and any changes to thedevice’s Settings.Unless stated otherwise, instructions in this User Manualstart with the device at the Home screen.All screen images in this manual are simulated. Actualdisplays may vary, depending on the software version ofyour device and any changes to the device’s firmware.The micro SIM card is loaded with your subscription details,such as your PIN, available optional services, and many otherfeatures.Unless otherwise specified, all instructions in this manualassume you are starting from the Home screen.Getting Started3
Special TextThroughout this manual, you’ll find text that is set apart fromthe rest. These are intended to point out importantinformation, share quick methods for activating features, todefine terms, and more. The definitions for these methodsare as follows: Notes: Presents alternative options for the current feature, menu,or sub-menu. Tips: Provides quick or innovative methods, or useful shortcuts. Important: Points out important information about the currentfeature that could affect performance. Warning: Brings to your attention important information toprevent loss of data or functionality, or even prevent damage toyour phone.4Text ConventionsThis manual provides condensed information about how touse your device. To make this possible, the following textconventions are used to represent often-used steps: Arrows are used to represent the sequence ofselecting successive options in longer, orrepetitive, procedures.Note: From the Web portal home screen, select Messagingtab.Setting Up Your DeviceThese steps take you through an out-of-the-box setupprocess. These procedures are intended to help you get yourdevice setup, activated, and assist you with your initialconnection.
Removing the Back Cover1. Hold the device firmly and locate the cover releaselatch (1).Important! Before removing or replacing the battery cover,make sure the device is switched off. To turn thedevice off, hold down thekey.2. Place your fingernail in the groove and firmly “pop” thecover off the device (2).Installing the 4G LTE microSIM Card With the battery removed, carefully slide the microSIMcard into the SIM card slot until it “clicks” into placewith the label side facing up.Release LatchNeT- tworPass Mobile Brk Name/wordoadb SSID:: 1234an5678 d ##NetT-M workPasswoobile BroName/Srd: 123 adbandSID:45678 ##Important! The 4G LTE microSIM Card MUST remain in thedevice when in use.Getting Started5
Caution! Do not bend or scratch your microSIM Card. Avoidexposing it to static electricity, water, or dirt.Removing the 4G LTE microSIM Card1. Remove the battery and cover (page 7).2. Carefully slide the 4G LTE SIM card out of the SIM cardsocket.NeT- tworPass Mobile Brk Name/wordoadb SSID:: 1234an5678 d ##Important! If your SIM card is ever separated from the deviceor damaged, your device will not function.6If you experience any issues with your device, visit us at:http://support.t-mobile.com/welcome or contact CustomerService at 1-877-453-1304 or visit your nearest U.S.T-Mobile retail location.Installing the BatteryYour device is powered by a rechargeable, standard Li-Ionbattery. A Wall/USB Charger (Charging Head and USB cable)are included with the device, for charging the battery.Note: The battery comes partially charged. You must fullycharge the battery before using your device for the firsttime.After the first charge, you can use the device whilecharging.Important! Before removing or replacing the battery cover,make sure the device is switched off. To turn thedevice off, hold down thekey.
1. Insert the battery as shown, making sure to align thegold contacts (1).2. Press down gently to secure the battery (2).Removing the Battery Replacing the Back Cover1. Position the battery cover over the batterycompartment (1).2. Press down firmly along the edges of the cover (2).Grip the battery at the top end (3) and lift it up and outof the battery compartment (4).Installing BatteryNetT-M work NamPasswoobile Broe/SSrd: 123 adband ID:45678 ##NeT-M tworkPassw obile BroName/SSord:1234adband ID:5678 ##NeT-M tworkPassw obile BroName/SSord:adba ID:123456nd78 ##Removing BatteryGetting Started7
Charging the BatteryYour device is powered by a rechargeable Li-ion battery. Awall charger, which is used for charging the battery, isincluded with your device. Use only approved batteries andchargers. Ask your local Samsung dealer for further details.Before using your device for the first time, you must fullycharge the battery.Charging HeadNote: Verify that the battery is installed prior to connecting thewall charger. If both the wall charger is connected andthe battery is not installed, the device can power cyclecontinuously and prevent proper operation. Failure tounplug the wall charger before you remove the battery,can cause the device to become damaged.Important! It is recommended you fully charge the batterybefore using your device for the first time.1. Connect the USB cable to the charging head.2. Locate the Charging port.3. Insert the USB cable into the device’s Charger/Accessory jack.USB Cable84. Plug the charging head into a standard AC poweroutlet. The device turns on and indicates both itscharge state and percent of charge.
Warning! While the device is charging, if the screen does notfunction due to an unstable power supply unplug theUSB power adapter from the power outlet or unplugthe USB cable from the device.Installing the Optional microSDMemory CardNote: The installation of an optional microSD card can provideadditional storage and access to additional files such asdocument, image, and other multimedia content.1. Using your fingertip (1), slide the mini USB connectorout from its current location (2).Charging port5. When charging is finished, first unplug the charger’spower plug from the AC wall outlet, then disconnectthe charger’s connector from the device.mini USB CableGetting Started9
2. Pull the cable all the way round the unit (3) and thencarefully remove the other USB connector from itsslot (4). This action exposes the internal microSD cardslot.3. Slide the memory card into the card slot until it “clicks”into place.USB slotmicroSD card slot10
4. Replace the USB cable firmly into its corresponding slot(1).Turning Your Device On and OffTurning Your Device On Press and hold(Power) to turn the device on.USBconnectormini USB connector5. Pull the cable around the side of the device (2) andcarefully re-insert the mini USB connector back into itscorresponding slot (3).Turning Your Device Off With the device on, press and holdturn the device off.(Power) toGetting Started11
Factory Reset of Your DeviceResetting your device restores all factory defaults. You mayneed to reset your device if you cannot connect device(s) toyour Wi-Fi HotSpot or can not regain access to the Webportal.1. Locate the Power and WPS keys along the top of thedevice.2. Press and hold these two keys for 5 seconds to displayan on-screen Factory Reset message.3. Press the Power key to reset the device. Oncecompleted, the power should recycle and the mainscreen will re-appear.– or –Press the WPS key to cancel the reset operation.12
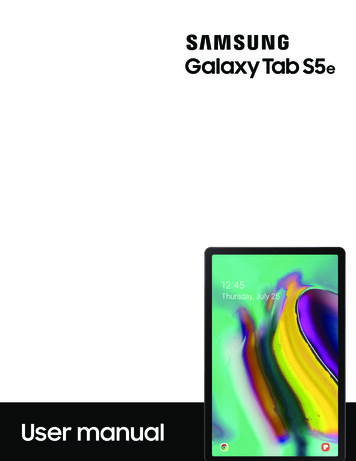
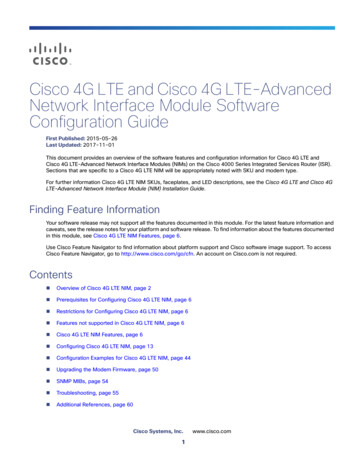
Section 2: Understanding Your DeviceThis section outlines key features of your device. It alsodescribes the device’s keys, screen and the icons thatdisplay when the device is in use.Features of Your DeviceYour device is lightweight, easy-to-use and offers manysignificant features. The following list outlines a few of thefeatures included in your device. Delivers data speeds faster than the current 3G networktechnology by using 4G LTEFront ViewThe following illustrations show the main elements of yourdevice. The following list correlates to the illustrations.1. Notification bar shows information about theconnection status, signal strength, battery level, andtime, and displays notifications about incomingmessages, and other action1 Wi-Fi Capability Able to receive and send text messages via Web Portal Expandable memory slot - supports up to 64GB microSD Portable Wi-Fi HotSpot and USB Tethering-capability23Understanding Your Device13
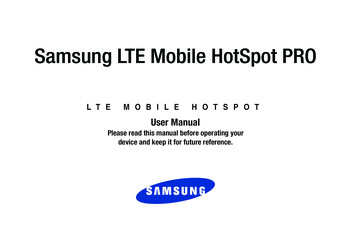
2. Display shows all the information needed to operateyour device, such as the number of wirelesslyconnected devices, number of received messages(along with date, time and phone number), and datausage.3. USB Connector provides a direct connection forUSB-capable devices using this connector type.Side ViewsThe following illustration shows the side elements:2131. Power keyends switches the phone off and on.2. WPS key allows you to pair with devices currently usinga WPS connection. The WPS (Wi-Fi Protected Setup)feature allows you to pair your Wi-Fi-capable devicewithout the need for entering a passcode. This processis similar to Wi-Fi Direct pairing.3. Charging Port allows you to connect a compatiblepower cable.Caution! Please use only an approved charging accessory tocharge your device. Improper handling of thecharging port, as well as the use of an incompatiblecharger, may cause damage to your device and voidthe warranty.4. Mini USB Connector provides a mini USB for connectionto devices using this type of connector.45. microSD Card Slot (internal) allows you use a microSDcard to expand the memory of your device.65146. USB Connector provides a USB plug for connection todevices using this type of connector. This provides yourtarget device with wired Internet access.
On-Screen IndicatorsDisplays when connected to the 3G network.Displays your current signal strength. The greaterthe number of bars, the stronger the signal.Displays when your device is connected to andcommunicating with the 3G network.Indicates there is no signal available.Displays when connected to the HSPA network.Displays when there is no microSIM card in thedevice.Displays when connected to and communicatingwith the HSPA network.Displays your current battery charge level. Iconshown is fully charged.Displays when your device is communicatingwith the 4G LTE network.Displays your battery is currently charging.Displays when Wi-Fi is active and indicates thenumber of externally connected devices.Shows your current battery only has a fewminutes of power remaining and will soonshutdown.Displays when there is a new text message.Displays your current data usage.Displays when connected to the EDGE network.Displays when your phone is communicating withthe EDGE network.Understanding Your Device15
Section 3: Connecting Your DeviceWith your new Wi-Fi HotSpot and your computer, a wirelessInternet connection can always be at your fingertips.System RequirementsIf you choose to connect with an external device via a directUSB cable connection, your target device will need the meetthe following minimum system requirements: One open Type-A USB Port (ex: Laptops, Desktops, etc.) One open mini USB Port (ex: portable devices, mobile phones,etc.)Note: Up to 10 simultaneous devices can be connected to theHostSpot.Note: It is recommended the battery be fully charged in orderto use your device via Wi-Fi for the first time, or connectyour device to the AC wall charger for power.16Before You Begin a Connection Press and hold(Power) to turn the device on.The following should occur once your device turns on: The battery indicator shows a solid green color (if there is morethan a 15% charge.) Once your device has been activated, it automatically connectsto the Internet provided that your cellular network broadbandservice is available. Confirm a network indicator icon, such as, appears inthe Notification area at the top of the display. This indicates thedevice is in service and ready to connect.
Initial Connection to Your Device1. Locate the internal sticker that provides both the SSIDand Password information for access to the device’sportal.Note: The default password is also the last 8-digits of thedevice 15-digit IMEI.For example: If the IMEI number is “123456789012345”,the password is “89012345”.Accessing Your HotSpot via a BrowserNetwork Name/SSID:T-Mobile Broadband ##Password: 123456781. With your device now connected to the HotSpot, launchan available Browser on your target device.2. Within the Browser’s Address field, enter: http://mobile.hotspotNeT-M tworPassw obile Brk Name/SSord: oadb1234 and ID:5678 ##Note: If there are any issues accessing the HotSpot using theabove url, use 192.168.43.1.3. From the HotSpot’s main Web portal, locate thePassword field.2. Enable the Wi-Fi connection on your target device andbegin to scan for available Wi-Fi networks.3. The SM-V100T HotSpot appears as a secured devicenamed: “T-Mobile Broadband ##”.4. Enter the HotSpot’s Administrator (Web portal)password information and click Apply.Note: The default Administrator password is “admin”.4. Enter the default password located on the sticker toestablish your initial connection.Connecting Your Device17
Note: The default connection state for the HotSpot is secured.Use the Web portal to configure the various settings.Configuring Your HotSpotChanging your Web Portal AdministratorPasswordChanging this password prevents other users from enteringthe default “admin” password and gaining access to yourWeb portal and changing the device’s settings.1. Access the Web portal and select the Configuration Tools tab.Changing your Wi-Fi Access PasswordThis password is different from the administrator passwordthat provides access to the Web portal. The Wi-Fi passwordis used by external devices to gain a connection to theHotSpot.1. Access the Web portal and select Network.2. From the bottom of the screen, tap the Password field,and enter your new password.3. Click Apply. Any currently connected devices will needto update their connection passwords.Changing your SSID Name2. Select the New Password field and enter your updatedpassword information.1. Access the Web portal and select Network.3. Re-enter your new password within the Verify NewPassword field.3. Delete the current information and enter a new name.Caution! Write down this new administrator password. If youloose or forget it, you will need to do a Factory Reseton the device to regain access. For more information,refer to “Factory Reset of Your Device” on page 12.4. Click Apply.182. Select the Network Name (SSID) field.4. Click Apply. Any currently connected devices will needto forget their previous connections and reconnect tothe newly named HotSpot.
Assigning Data LimitsPreparing your HotSpot for File Access1. Access the Web portal and select Network.2. Tap the Data Limits checkbox to enable the feature.3. Tap the adjacent field, enter a numeric value, andselect either GB (Gigabytes) or MB (Megabytes).4. Click Apply. Once you reach your assigned data limit,an on-screen notification will appear.Hiding Your HotSpot1. Access the Web portal and select Network.2. From the bottom of the screen, tap the Broadcast SSIDenable checkbox. Removing the checkmark stopsbroadcasting your SSID.3. Tap the checkbox field again to re-enable SSIDbroadcast.Note: You can select MTP or USB Tethering only when USB isconnecting to the computer.1. Access the Web portal and select(Home).2. Scroll down the page and enable the Mediadevice(MTP) option.3. Click OK.4. Follow the USB connection procedures described onpage 21.Files can also be accessed from the internal microSDmemory card by enabling the DLNA functionality. For moreinformation, refer to “DLNA Tab” on page 39.Connecting Your Device19
Installing the USB drivers for variousOS typesThere two separate types of drivers required for connectionto the device. These drivers can be found within the usbdriver folder on the HotSpot shown below. Mac OS (requires the Escape drive) Windows OS - (XP and Windows8 need RNDIS driver)Installation of the Escape Driver1. With the HotSpot not yet connected, locate the Mac version of the Samsung USB Driver for Mobile Phones(Escape) found on product page @ www.samsung.com.2. Run the installation package for the file named:ssud v1.4.10 mac for rndis.dmg.zip.3. Select the disk where you would like the software to beinstalled and click Continue.Important! It is important that you select the disk running theOSX operating system. Choosing a different diskcan result in an installation failure.4. If prompted, enter your username and passwordinformation into the User Authentication window andclick OK.Important! If an installation failure occurs, unplug the device,reboot the machine, and rerun the installationprocedures above.5. Connect the HotSpot to the computer using the USBconnector (page 21).20
Installation of the RNDIS windows USB Driver1. With the HotSpot not yet connected, locate theWIndows version of the Samsung USB Driver forMobile Phones (RNDIS) found on product page @www.samsung.com.2. Run the installation package for the file named:SAMSUNG USB Driver for Mobile Phones v1.5.25.o.exe.Connecting your Computer to theHotSpot via USBThis method can be used to provide USB Tethering to yourcomputer.1. Using your fingertip (1), slide the mini USB connectorout from its current location (2).3. Follow the on-screen instructions.Important! It is important that you select the disk running theWindows operating system. Choosing a differentdisk can result in an installation failure.Important! If an installation failure occurs, unplug the device,reboot the machine, and rerun the installationprocedures above.4. Connect the HotSpot to the computer using the USBconnector (page 21).mini USB CableConnecting Your Device21
2. Pull the cable all the way round the unit (3) and thencarefully remove the other USB connector from itsslot (4).4. Locate the USB port on your target device and firmlyinsert the HotSpot’s USB plug.5. Open your computer’s local file browsing applicationand locate the connected HotSpot that appearsconnected as an external drive.3. Re-insert the mini USB cable back into itscorresponding port along the side of the device.Factory Reset via the Web Portal1. Access the Web portal and select the Configuration Tools tab.2. Follow the on-screen instructions to complete theprocess. For more information, refer to “Factory Resetvia Web Portal” on page 41.22
Using the Battery Pack FeatureThe HotSpot can also be used to charge external devices viaeither the mini USB connector or via the USB port.Charging a external device by using the mini USB connector:1. Carefully remove the mini USB connector from the sideof the device.3. Confirm the external device is charging.Charging an external device via the USB port:1. Remove the USB connector from the side of the device(1). Make sure to leave the mini usb connector pluggedin (2).Open USB port2. Carefully insert the mini USB connector into theavailable travel adapter/Power jack on a compatibledevice.2. Insert an external USB cable into the open USB port onthe HotSpot3. Plug the other end of the USB cable into the externaldevice’s power port.4. Confirm the external device is charging.mini USB CableConnecting Your Device23
Section 4: Home PageAfter accessing the Web portal, the default screen in theHome page. This page provides overall system information. Data Sent: For the current Internet connection, the amount ofdata sent to your Wireless Provider’s network. Data Remaining: The amount of data usage remaining. Thisvalues is set by either your current carrier data plan, or via theData Limit field. Days Remaining: The amount of days remaining in your currentmonthly period of usage.Mobile HotSpot Home Page1. Access the Web portal and select Connected Time: For the current Internet connection, the period(Home).2. Scroll down the page to review the availableinformation. The Home page Web portal lists thefollowing basic status information and options:Data Usage Network Name: The name of the current cellular provider. Data Received: For the current Internet connection, the amountof data received from your Wireless Provider’s network. Data Used: For the current Internet connection, the amount ofdata received through the HotSpot and used by the connecteddevices.24of time which has elapsed since the connection was established.Data Usage Buttons Mobile HotSpot off: This button allows you to turn of the HotSpotfunctionality off (this does not turn the device off). Press theexternal WPS key to re-enable the HotSpot functionality.System InformationThis section provides the information for both the HotSpotand any currently connected devices such as: Device Name,Mobile Number, SIM ID, Manufacturer, IMEI, and SW Version.
Visit My T-Mobile My T-Mobile: This button allows you to quickly access youraccount information via the current Browser. Community: This button provides ready-access to the onlineT-Mobile Community website. Device Support: This button provides ready-access to the onlineT-Mobile Tech Support website.My HotSpot Connection IP Address: Internet Protocol address assigned to your MobileHotSpot. Security: The current Wi-Fi security protocol used by the HotSpot. Subnet Mask: The network mask associated with the current IPAddress.USB Connection Coverage Map: This button provides to the online coverage areaWeb page from where you can check your current coverageareas. Contact Us: This button displays the T-Mobile Contact Us Webpage.T-Mobile Network IP Address: The externally accessible IP address
Samsung LTE Mobile HotSpot PRO. SM-V100T_UM_English_MI1_PS_121813_F6 . This manual gives navigation instructions according to the default display settings. . T-Mobile retail location. Installing the Battery Your device is powered by a rechargeable, standard Li-Ion battery. A Wall/USB Charger (Charging Head and USB cable)