Transcription
Automatic Feeding System (AFS)Setup Guide
Table of ContentsAUTOMATIC FEEDING SYSTEM – INTRODUCTION . 3FEATURES . 3PHYSICAL INSTALLATION . 3Initial Connections. 3Startup . 4VERIFY THE INSTALLATION . 4CONFIGURING AND TESTING THE AFS . 4PROGRAMMING EXAMPLES. 5METHOD #1 - USING THE FEED WIZARD . 5METHOD #2 - ADVANCED PROGRAMMING EXAMPLES . 5EXCEPTIONS YOU CAN INCORPORATE IN YOUR FEED STRATEGY . 6NEPTUNE SYSTEMS LIMITED WARRANTY . 9
AUTOMATIC FEEDING SYSTEM – INTRODUCTIONCongratulations on your purchase of this Apex AquaController expansion accessory. The Automatic FeedingSystem is the first of its kind – a fully integrated feeding solution for your aquarium. You can incorporate anyof the Apex program features into your feeding strategy – control your pumps and lights; vary feedings bytime of day or day of week; suspend feedings if certain probe values are exceeded there’s no end to thecontrol you get with the Apex AquaController and the Automatic Feeding System.FEATURES Easily connects to ANY Apex via the AquaBus interface Compatible with all Apex Systems – Apex, Lite or Jr. Feeds pellet or flake food in varying amounts as often as you like ‘Stay Dry’ sealed food container keeps out moisture All Apex program functions are available giving you flexibility to feed when and how you want Mounts to the side of acrylic and glass tanks or sits on a flat surface Powered via the Aquabus – will work worldwide, 15’ Aquabus cable included Multiple feeders can be connected to the Apex – stock with different dry foodsPHYSICAL INSTALLATIONThe feeder can be mounted to the rim of your tank using the included mounting bracket or can sit on a flatsurface. Four self-stick rubber feet are included that may be applied to the bottom of the feeder if you’re notgoing to use the bracket. Pull the drum out of the housing and pop off the lid to fill with your preferred dry foodthen just push the drum back into the housing on the rotation shaft. Adjust the orange slider (- ) to controlhow much food is released on each drum rotation.INITIAL CONNECTIONSAutomatic Feeding System (AFS)- Setup GuidePage 3
Before connecting your AFS to your system insure you are on a compatible firmware level. The AFS requiresfirmware of at least 4.30 BA13. You can determine the firmware version your controller is running by lookingat the beginning of any XML report or by going to the Network Setup web page and looking at the bottom of thepage. If your firmware is not at that level or greater, please download and apply the latest version fromNeptune’s support web page at www.neptunesystems.com/support/sw-updates/ where you’ll find updates forboth PC’s and Mac’s as well as complete instructions. Your controller will not recognize the AFS or create theappropriate outlet if you are not on a compatible level of firmware.Plug one end of the included AquaBus cable into either of the AquaBus ports on the AFS and the other end intoan available AquaBus port anywhere on your existing Apex system. It makes no difference which AquaBus portis used and you do not need to power down the system when connecting AquaBus accessories as the system isplug-and-play.WARNING: NEVER plug standard USB devices into any AquaBus connector or AquaBus accessories intocomputer USB ports. Damage to the AquaBus accessory and/or USB device may result.STARTUPAs soon as the AFS is connected to an active AquaBus, it will power up and begin to initialize. When firstconnected to an Apex Base Unit (through the AquaBus), the AFS will automatically be assigned an AquaBusaddress and be added to the Apex list of outlets. The LED Status indicator on the AFS will flash yellow while it isbeing initialized. This only takes a second or two. Once initialized, the LED Status indicator will be solid green.VERIFY THE INSTALLATIONVerify the AFS was initialized and added to the Apex configuration:Apex Display: Setup – Module Setup – Modify Name – from this screen, you can see all AquaBusmodules installed on the system.Web Interface: Configuration – Module Setup – Verify the AFS is listed in the Apex Module List andnote the module number assigned to it.An outlet will be automatically created called ‘Feeder X 1’ where ‘X’ represents the module numberassigned to the AFS. For example, if your feeder was assigned Aquabus address #4 the outlet would benamed ‘Feeder 4 1’. Like any other outlet, you can change this name if you wish.CONFIGURING AND TESTING THE AFSThere is no configuration necessary with the AFS. Once the outlet is created you can begin programming it. Totest the outlet to see if it’s active, simply set the outlet to ON via the Dashboard, the Display or your smartphone app. The feeding drum should extend, rotate one time then retract back into the AFS. You can then turnthe outlet to AUTO and begin programming.Automatic Feeding System (AFS)- Setup GuidePage 4
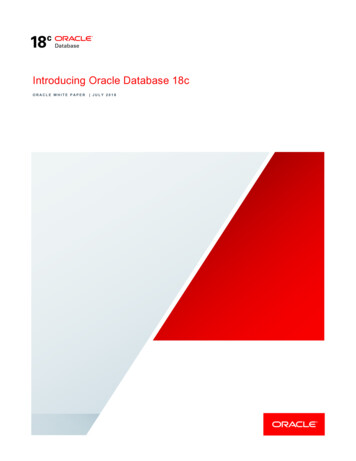
PROGRAMMING EXAMPLESThe following examples will help you quickly program your system to use the AFS. Refer to the Apex Setup andProgramming Guide or the Comprehensive Reference Manual for detailed instructions on how to configure andprogram outlets as well as a complete definition of all programming statements and syntax.METHOD #1 - USING THE FEED WIZARDTo use the wizard, make sure ‘Feeder’ is selected for Control Type in the Outlet Configuration web page. Thefeed wizard will look like this:First Feeding Time – The time each day of your first (or only) feeding.Feeding Repeat Interval – If you are going to have multiple feedings, how farapart should they be? If you only intend a single feeding, you can ignore thisand leave it at 60.Drum Rotations per Feeding – How many drum rotations per feeding?Feedings per Day – Used with Feeding Interval to space multiple feedingsstarting with Feeding TimeFeed Timer (A-D) – Used to select one of the built-in Feed timers as an override to your AFS feed programHere’s a chart to help you understand how to use the Feed Wizard to get the feed times you desire:ScenarioFeed one time atnoon with a singledrum rotationFeed three timesper day at 9am,Noon and 3pm;single drumrotation each timeFeed twice a day at1pm and 5pm; 3drum rotationseach timeFeeding TimeFeeding IntervalDrum RotationsFeedings per Day12:00Value ignored119:001801313:0024032METHOD #2 - ADVANCED PROGRAMMING EXAMPLESAutomatic Feeding System (AFS)- Setup GuidePage 5
At any point you can switch programming modes and use the ‘Advanced’ mode to enter your program yourself.Optionally, you can begin with the Wizard (see above), let the wizard create the program then switch modes toAdvanced and modify the program the Wizard created for you.Here’s the program created by the Wizard in the first scenario: Single feeding at Noon, single rotation:OSC 000:00/000:30/000:30 Then Onif Time 00:00 to 12:00 Then Offif Time 12:02 to 00:00 Then Offif FeedA 000 Then OnThe key to programming the AFS is understanding that the feeder drum will rotate once every time power isapplied. That’s where the Oscillate statement comes in. It turns the outlet ON for 30 seconds then OFF. The‘If Time’ statements keep the outlet OFF the rest of the time – in this example all day with the exception of12:00:00 – 12:01:59. The Oscillate statement starts at 12:00 with 30 seconds OFF followed by 30 seconds ON(which causes the feed drum to extend, rotate and retract). This happens once and the outlet then goes OFFuntil the next day at noon.Here’s the code created by the Wizard for the last example: Feed twice a day at 1pm and 5pm, 3 drumrotations each time:OSC 000:00/000:30/000:30if Time 00:00 to 13:00 Thenif Time 13:04 to 17:00 Thenif Time 17:04 to 00:00 Thenif FeedA 000 Then OnThen OnOffOffOffNote that each ‘If Time.’ statement is longer – 4 minutes instead of 2 which gives you the 3 x 1 minuterotations plus a little time so the outlet doesn’t turn OFF too early. If you wanted a different number of drumrotations at each feeding, simply adjust the times accordingly – 2 minutes for a single rotation, 3 minutes for 2rotations, 4 minutes for 3 rotations, etc. This way you could have 2 rotations at the 1pm feeding but 4rotations at the 5pm feeding.One final note about the program the wizard creates. You’ll note there’s a ‘If Feed ’ statement automaticallyinserted at the end of the program. This gives you the ability to manually activate the feeder whenever youwant and get a single feed rotation. Simply select that feed timer from the Display module, the Dashboard oryour smart phone application and the AFS will be activated for a single drum rotation feed.EXCEPTIONS YOU CAN INCORPORATE IN YOUR FEED STRATEGYSince the AFS understands all the Apex commands, probes and switches, you can incorporate these into yourfeed program for the ultimate in control. For example, you can suspend feeding if your water quality is below acertain point by checking your ORP or pH levels:OSC 000:00/000:30/000:30if Time 00:00 to 13:00 Thenif Time 13:04 to 17:00 Thenif Time 17:04 to 00:00 ThenThen OnOffOffOffAutomatic Feeding System (AFS)- Setup GuidePage 6
if FeedA 000 Then OnIf ORP 300 Then OFF Add this statement at the end of your programYou can also suspend feeding if any alarm conditions are TRUE simply by checking the condition of your emailalarm outlet. For example, add the following at the end of your feed program:If Outlet EmailAlm I5 ON Then OFFAnother possible exception, suppose you want to suspend feeding on a particular day each week. Again, withthe Apex controller it’s easy to do. Add the following code to the end of your feed program if you want to skipfeedings on Saturdays (for more information on the Day of Week command, see the Comprehensive ReferenceManual at Neptune’s support web site):If DOW ------S Then OFFSuppose you make use of float switches as part of your aquarium control strategy – perhaps to tell you yoursump is low or your skimmer waste reservoir is full. Maybe you use a toggle switch to indicate a maintenanceperiod has begun. You can incorporate a switch condition in your feed program:If Switch3 CLOSED Then OFFIf Switch3 indicated you were in a maintenance mode and perhaps your pumps and skimmer are turned off, thiswould tell the feeder to skip this feeding. As soon as you complete maintenance mode and Switch3 goes backto OPEN, when the next feeding time arrives, the feeder will operate normally.Automatic Feeding System (AFS)- Setup GuidePage 7
One final example. Here we want a complete feeding workflow:Initiate Feed cycle turn off return and skimmer wait 1 minute feed wait 10 min turn on return wait 5 min turn on skimmerHere’s how you would accomplish that. First, you’ll need a virtual outlet (for information on how to createvirtual outlets, see the Comprehensive Reference Manual). We’ll start with a simple one time a day, singlerotation feeding but you can adapt for any number of feedings:[v-feed]Set OFFIf Time 12:00 To 12:01 Then ON[skimmer]Set ONIf Outlet v-feed ON Then OFFDefer 15:00 Then ON[return]Set ONIf Outlet v-feed ON Then OFFDefer 10:00 Then ON[feeder 3 1]Set OFFIf Outlet v-feed ON Then ONDefer 1:00 Then ONAs you can see, it’s really up to your imagination on what you can do with a fully integrated Automatic FeedingSystem and an Apex AquaController. And if you ever get stuck on how to accomplish something, Neptunesupport and the Neptune Community Forums are ready and waiting to ystems.comAutomatic Feeding System (AFS)- Setup GuidePage 8
NEPTUNE SYSTEMS LIMITED WARRANTYNeptune Systems warrants this product to be free from defects in material andworkmanship for a period of 1 year from the date of purchase. If repair or adjustment isnecessary and has not been the result of abuse, Neptune Systems warrants this product tobe free from defects in material and workmanship for a period of 1 year from the date ofpurchase. If repair or adjustment is necessary and has not been the result of abuse,misuse, or accidental damage, within the 1-year period, please return the product withproof of purchase, and correction of the defect will be made without charge.For your protection, items being returned must be carefully packed to prevent damage inshipment and insured against possible damage or loss. Neptune Systems will not beresponsible for damage resulting from careless or insufficient packaging. Before returningplease obtain a return authorization (RMA) number from Neptune Systems. Returnedmerchandise will not be accepted without a RMA number. To obtain assistance with yourNeptune Systems product, contact Neptune Systems technical support by phone or via theTechnical Support Contact Web Page at https://www.neptunesystems.com.Except for the warranty set forth above, Neptune Systems is not responsible for anydamages including, but not limited to, consequential damage occurring out of or relating tothe delivery, use or performance of Neptune Systems’ products. Buyer’s remedies forbreach of warranty shall be limited to repair, or replacement and full or partial adjustmentto purchase price.Neptune Systems15750 Vineyard Blvd, Suite 150Morgan Hill, CA ms.comPhone 1 408-779-4090 Fax 1 408-762-2042 2017 Neptune Systems - All Rights ReservedAutomatic Feeding System (AFS)Setup Guide 1.1Automatic Feeding System (AFS)- Setup GuidePage 9
The symbols to the right mean that according to local laws andregulations your product should be disposed of separately fromhousehold waste. When this product reaches its end of life,take it to a collection point designated by local authorities.Some collection points accept products for free. The separatecollection and recycling of your product at the time of disposalwill help conserve natural resources and ensure that it isrecycled in a manner that protects human health and theenvironment.Automatic Feeding System (AFS)- Setup GuidePage 10
Automatic Feeding System (AFS)- Setup Guide Page 3 AUTOMATIC FEEDING SYSTEM - INTRODUCTION Congratulations on your purchase of this Apex AquaController expansion accessory. The Automatic Feeding System is the first of its kind - a fully integrated feeding solution for your aquarium. You can incorporate any