Transcription
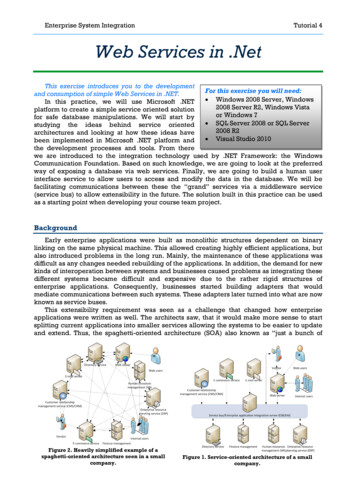
Enterprise System IntegrationTutorial 4Web Services in .NetThis exercise introduces you to the developmentFor this exercise you will need:and consumption of simple Web Services in .NET. Windows 2008 Server, WindowsIn this practice, we will use Microsoft .NET2008 Server R2, Windows Vistaplatform to create a simple service oriented solutionor Windows 7for safe database manipulations. We will start by SQL Server 2008 or SQL Serverstudying the ideas behind service oriented2008 R2architectures and looking at how these ideas have VisualStudio 2010been implemented in Microsoft .NET platform andthe development processes and tools. From therewe are introduced to the integration technology used by .NET Framework: the WindowsCommunication Foundation. Based on such knowledge, we are going to look at the preferredway of exposing a database via web services. Finally, we are going to build a human userinterface service to allow users to access and modify the data in the database. We will befacilitating communications between these the “grand” services via a middleware service(service bus) to allow extensibility in the future. The solution built in this practice can be usedas a starting point when developing your course team project.BackgroundEarly enterprise applications were built as monolithic structures dependent on binarylinking on the same physical machine. This allowed creating highly efficient applications, butalso introduced problems in the long run. Mainly, the maintenance of these applications wasdifficult as any changes needed rebuilding of the applications. In addition, the demand for newkinds of interoperation between systems and businesses caused problems as integrating thesedifferent systems became difficult and expensive due to the rather rigid structures ofenterprise applications. Consequently, businesses started building adapters that wouldmediate communications between such systems. These adapters later turned into what are nowknown as service buses.This extensibility requirement was seen as a challenge that changed how enterpriseapplications were written as well. The architects saw, that it would make more sense to startsplitting current applications into smaller services allowing the systems to be easier to updateand extend. Thus, the spaghetti-oriented architecture (SOA) also known as “just a bunch ofFigure 2. Heavily simplified example of aspaghetti-oriented architecture seen in a smallcompany.Figure 1. Service-oriented architecture of a smallcompany.
Enterprise System IntegrationTutorial 4web services” (JBOWS) was born. Even today, a large proportion of enterprise software is builtusing this architecture despite it being deprecated by most major vendors.The problem with JBOWS was the amount of dependencies between the services (seeFigure 2). This meant that a change in one service was likely to affect several other servicesthat would have to be updated as well. Another effect of the dependency-heavy design was thatfailure of any service could potentially cause other services to fail as well. In order to reducethe number of dependencies in systems and ease integration of legacy systems, enterpriseapplication integration (EAI) servers (also known as B2B (Business-to-business) and B2C(business-to-consumer) servers depending on their deployment scenario) were introduced.The benefits of such architecture in the reduced dependencies can be easily seen whencomparing Figure 1 with Figure 2.EAI servers were usually statically linked to different services and offered mainly routingservices (if necessary, transforming the messages to confirm to different interoperationinterfaces). Nowadays these EAI servers have evolved into enterprise service buses (ESB),which allow continuous integration, business process monitoring, high availability, dynamicand loose interfacing of services, orchestration of services, data access and many otherservices in addition to routing and transforming messages. On Microsoft platform, one wouldnormally use Microsoft BizTalk Server as an integration server. Using a fully featured ESB as adevelopment platform, one can reduce the development effort several times compared toalternative platforms. However, the high licensing fees of EAI servers and ESBs has led tocompanies building their own simplified service bus services instead of using a full ESB.The architecture, we are creating in this practice is composed of three services: the datastorage service, a mediation service, and user interface. It might seem that having a separatemediation service in the middle is unnecessary; however, having it will significantly simplifythe development in the next practices.Suggested reading and viewing Gijs in 't Veld „Guidance for Integration Architecture on the Microsoft Business Platform“ inService Technology Magazine Issue LXI, April soft “Learning Snack: Enterprise Application Integration Using Microsoft BizTalkServer”,http://snackbox.microsoft.com/ ault.html? &mode Play-DownloadPart O – Windows Communication Foundation BasicsMicrosoft .NET Framework uses Windows Communication Foundation (WCF) to defineservice interfaces. It follows the same “ABC” mantra as Web Service Definition Language(WSDL): Address (Where?), Binding (How?), Contract (What?). When creating WCF serviceendpoints, you start by defining the operations the service provides (the contract). Afterdefining the contract, you define the serialisation format, encryption, transport and othersecurity features needed to speak with the service (the binding). Finally you specify, where isthe service located (the address). One contract can be published or consumed via differentbindings, which can be associated with many different addresses. This means, you can easilypublish yours services through different endpoints at once. For example, you can publish onecontract via SOAP, REST, and RPC at multiple addresses (and different authentication methods)without the need to recompile or change your application’s source code (the changes can bemade at runtime).The configuration of WCF services is usually stored in web.config or app.config files. Whileit is possible to edit these manually, there are graphical tools for manipulating these as well.The easiest way to use these is to right click on a configuration file in Solution Explorer and
Enterprise System IntegrationTutorial 4choosing to Edit WCF configuration . Alternatively, the same tool can be found in the Toolsmenu. The tool offers help and wizards for accomplishing most tasks you might need to.WCF development tools come with a web service testing tool wcftestclient. This tool canbe started from Visual Studio Command Prompt which can be found in the Windows Startmenu. This tool will be automatically launched when you start debugging your Web ServiceApplication project and have a .svc or .xamlx file open in the foreground. If the application isstarted automatically, the service reference is already given to the application, otherwise youneed to specify it by manually adding a service (using a context menu or File menu). Keep inmind that you need to give the address to the endpoint published by the hosting process of theservice not the file in the file system. On local system, the services are published on randomports, which you can identify by checking the hosting process status from the windowsnotification bar.Part A – Publishing SQL Server Database as a ServiceThere are several different options for publishing SQL Server databases through serviceinterfaces. The preferred way of doing that is by creating a WCF service application to mediatesuch communication. This is similar to what we did in the previous .NET lab session. We willbegin by setting up a project structure that follows the best practices for team projects usingVisual Studio. Then we will publish several database operations as via REST endpoint. This willcorrespond to the blue layers in Figure 3.Setting up a Visual Studio Solution1. Create a new project in Visual studio (from File menu or opening screen)a. Choose Other Project Types Visual Studio Solutions from the templates tree(left panel).b. Make sure .NET framework 4 is chosen in the top panel.c. Choose Blank Solution from the templates list (middle panel).d. Name the solution appropriately (e.g. ESIProject).e. Click OK.2. Add a folder to the solution (right click on the solution in Solution Explorer (See Viewmenu if you cannot find it) and choose Add New Solution Folder)Figure 3. The architecture of the solution to be created in this lab.
Enterprise System IntegrationTutorial 4a. Name it as “01-Data Services”.3. Add another solution folder named “02-Middleware”.4. Add another solution folder named “03-User Interfaces”.Creating a Database Project1. Right click on “01-Data Services” and choose Add New project a. Choose Database SQL Server from the templates category.b. Choose SQL Server 2008 Database Project from the templates list.c. Name the project appropriately (e.g. ESIDatabase).d. Click OK.Adding a New SchemaTo distinguish between database objects created by different solutions or for different purposes, weuse database schemas. On every SQL Server database, there are already two default schemas: sys (forsystem objects) and dbo (for database objects). We are going to add a schema esi for the course relatedobjects.2. Open Schema View (menu View Database Schema View).3. Right click on the database in Schema View and choose Add Schemaa. Name the schema “esi”.b. Click Add.4. Close the opened file.5. Right click on the database project in Solution Explorer and choose Propertiesa. Change the default schema to read “esi” and save all.b. Close the project properties.Adding a Data Table6. In Schema View expand the database and its schemas.7. Right click on esi schema and choose Add Table a. Name the table as “Vendor” and click Add.8. Change the table as following:CREATE TABLE [esi].[Vendor]([VendorId] int NOT NULL identity(1,1),[Name] nvarchar(200) NOT NULL,[Contact] nvarchar(200) NULL,PRIMARY KEY([VendorId]))9. Save all.Adding a View10. Add a new view called “uv Vendor” to esi schema (it is added the same way weadded the table).11. Change the view as following (to benefit from the intellisense, you should add theFROM section before adding the selectors):CREATE VIEW [esi].[uv Vendor] .[Vendor] AS v12. Save all.
Enterprise System IntegrationTutorial 4Adding a Stored Procedure13. Add the following new stored procedure called “sp AddOrUpdateVendor” to theesi schema:CREATE PROCEDURE [esi].[sp AddOrUpdateVendor]@vendor id int 0,@name nvarchar(200),@contact nvarchar(200)ASBEGINSET NOCOUNT ONIF EXISTS (SELECT * FROM [esi].[Vendor] WHERE [VendorId] @vendor id)BEGINUPDATE [esi].[Vendor]SET[Name] @name,[Contact] @contactWHERE[VendorId] @vendor idRETURN SELECT @vendor idENDELSEBEGININSERT INTO [esi].[Vendor] ([Name], [Contact])VALUES (@name, @contact)RETURN SELECT SCOPE IDENTITY()ENDEND14. Save all.Deploying the Database to a Server15. Right click on the database project in Solution Explorer and choose Properties.16. Go to Deploy tab and add a connection to your SQL Server. In Sandstorm(deployment server) you need to specify SANDSTOR/ESIINSTANCE and change thedatabase name to your sandstorm database name (see SQL Server lab sessionmaterials for details).17. Change Deploy action to deploy the script to database as well.18. Save all.19. Right click on your database project and choose Deploy.Creating the Database WCF Service1. You can close open files.2. Right click on “01-Data Services” in Solution Explorer and add a new projecta. Choose Visual C# Web from templates catalogue (you can choose otherlanguage if you want as well).b. Choose WCF REST Service Application as the template (this template can bedownloaded using Tools Extensions Manager and searching for “REST”).c. Name the project appropriately (e.g. ESIDatabaseService).d. Make sure you have chosen .NET Framework 4 from the top panel.e. Click OK.3. Delete SampleItem.cs and Service1.cs from project (right click on the file in SolutionExplorer and choose Delete).
Enterprise System IntegrationTutorial 4Adding Data Model to the Service4. Right click on the database service project and choose to Add New Itema. From templates categories choose Data.b. Choose ADO.NET Entity Data Model as the template.c. Name it appropriately (e.g. ESIDataModel.edmx).d. Click Add.e. Generate the model from your database views and procedures (see SQLServer lab for detailed instructions). Do not include tables in the model.f. Rename entity “uv Vendor” to “Vendor”.g. Map the entity Insert and Update operations to stored proceduresp AddOrUpdateVendor.h. Ensure that VendorId is the sole key for the entity.5. Save All.Defining the Service ContractThe service contract defines, how to serialise messages and what operations and data types will beused in interactions. The contract is defined as an interface (with attribute ServiceContract), datatypes(classes with attribute DataContract or CollectionDataContract) and operations (methods with attributeOperationContract). In case of REST, we will be using web server for routing. This routing is set up usingWebInvoke attribute, which specifies the incoming and outgoing message formats (XML or JSON), the URIfor those calls and method to be used. If method GET is used, one can use attribute WebGet instead ofWebInvoke to save typing time. One limitation of REST services is that any parameters used in the URIwill be strings and need to be converted and verified manually. One should prefer using System.Convertclass methods for conversions as this will avoid exceptions (but be aware of the defaults).6. Add new item to the database service projecta. Choose Code template category.b. Choose Interface template.c. Name it appropriately (e.g. “IVendorManagement.cs”).d. Click Add.7. Add [ServiceContract] attribute to the interface.8. Make the interface public.9. Add method List Vendor ListVendors() to the interface.10. Annotate method ListVendors with attribute[WebGet(UriTemplate "ListVendors")].11. Add following methods and attributes:[WebInvoke(Method "POST", UriTemplate "AddVendor")]void AddVendor(Vendor v);[WebInvoke(Method "PUT", UriTemplate "UpdateVendor?id {id}")]void UpdateVendor(string id, Vendor v);[WebInvoke(Method "UPDATE", UriTemplate "UpdateVendorName?id {id}&name {name}")]void UpdateVendorName(string id, string name);12. Save all.13. Add new Code File to the database service projecta. Name it appropriately (e.g. VendorManagement.cs).14. Add a public class of the same name to the file (tip: type public class and press tabtwice).15. Make the class extend the service contract interface (append “:IVendorManagement” to the row defining the class name – you can use resolve toadd the missing using declaration)16. Right click on IVendorManagement and choose Implement Interface.17. Add mentsMode AspNetCompatibilityRequirementsMode.Allowed)] to the class.18. Add code to implement the methods appropriately.
Enterprise System IntegrationTutorial 419. Replace all occurrences of “Service1” with “VendorManagement” in Global.asax.20. Build the service and test it using a web browser (the service is published locally athttp://localhost: port /VendorManagement).Part B – Creating a Integration Service to Republish the Database ServiceBefore designing a human user interface, we might want to have the database access to bemediated by a gateway. In current lab, we are going to create a simple middleware to translatethe database service REST queries to SOAP queries for the user interface. This will correspondto the golden layers in Figure 3.Creating a WCF Service Library1. Right click on “02-Middleware” in Solution Explorer to add a new projecta. Choose template category Visual C# WCF.b. Choose WCF Service Library template.c. Name it appropriately (e.g. ESIApplication.Services).d. Click OK.2. Delete Service1.cs and IService1.cs from the project.3. Add new class called “Vendor” to the project.4. Make the class public and add[DataContract] attribute to it.5. Add the following properties to the class:You can add properties easily bya. int VendorIdtyping “prop” and pressing tab key.b. string VendorName6. Add attribute [DataMember] to the newlyadded properties.7. Save All.8. Add new class called “VendorCollection” to the project.9. Make the class public.10. Make the class inherit List Vendor .11. Add CollectionDataContract attribute to the class.12. Save all.13. Build project.Creating Workflow Activity Library (Consuming REST Service)Workflow is an execution flow graph built out of activities. These activities can be simple like memberassignment or more complex like interactions with other services. Some activities might even containother activities (e.g. loops). There are several ready-made activities in .NET Framework, however, there isno simple activity for consuming REST services. So we are going to build one activity for consuming ourREST service and another activity for converting the REST response of list of vendors into a list of vendorobjects.Each activity gets documents as inputs and outputs other documents. In .NET framework , documentsare represented by objects. When implementing an activity, we define attributes that need to be suppliedto an activity as InArgument and outputs as OutArgument type properties (which are actually templatesallowing you to specify the types for the arguments). There is also a special argument typeInOutArgument, which can be changed by the activity replacing the original value.14. Right click on “02-Middleware” in Solution Explorer to add a new projecta. Choose template category Visual C# Workflow.b. Choose Activity Library template.c. Name it appropriately (e.g. ESIApplication.Activities).d. Click OK.15. Delete Activity1.xaml from the project.16. Add new item Workflow Code Activity called “SendHttpRequestActivity”.17. Replace “InArgument string Text” with “InArgument string Uri”.
Enterprise System IntegrationTutorial 418. Add “InArgument string Method”, “InArgument string Request”,“OutArgument string Response”, and “OutArgument Exception Failure”properties to the class.19. Change the Execute method so that it would call a http REST service with givenrequest parameters. The code should look similar to this:try{using (WebClient wc new WebClient()){string response "";if (context.GetValue string (this.Request) null){response wc.DownloadString(context.GetValue string (this.Uri));}else{response wc.UploadString(context.GetValue string (this.Uri),context.GetValue string (this.Method),context.GetValue string (this.Request));}context.SetValue string (this.Response, response);}}catch (Exception e){context.SetValue Exception (this.Failure, e);}20. Save all.21. Add new Code Activity called “DeserialiseVendorEntitiesActivity”.a. This activity should get a string as input and should output aVendorCollection object. You need to add a reference to the service libraryproject to use VendorCollection class.22. Build project.Creating WCF Service Application (Publishing Simple SOAP Workflow Service)23. Right click on “02-Middleware” in Solution Explorer to add a new projecta. Choose template category Visual C# WCF.b. Choose WCF Workflow Service Application template.c. Name it appropriately (e.g. ESIApplication).d. Click OK.24. Add reference to the service library project and workflow activities project.25. Delete Service1.xamlx from the project.26. Save all.Adding a Vendor Listing Operation Flow27. Add new Item Workflow WCF Workflow Service called “VendorService” to theproject.28. Delete the “ReceiveRequest” and “SendRequest” shapes from the workflow.29. Drag and drop a Parallel shape from the Toolbox’s Control Flow section to theworkflow into the “Sequential Service” shape.30. Drag and drop a ReceiveAndSendReply shape from the Toolbox’s Messaging sectioninto the “Parallel” shape.31. Rename the “Sequence” shape to “ListVendorsSequence”.32. Open the properties of the “Receive” shape and make following changes:a. Set CanCreateInstance.b. Change ServiceContractName to “{http://tempuri.org/}IVendorOperations”.c. Change OperationName to “ListVendors”.
Enterprise System IntegrationTutorial 433. Expand Variables section in the workflow and add a new string variable called“dbServiceUri” to the variables lista. Set scope to “Sequential Service”.b. Set default value to the address of your database service (surround withquotes).34. Add a new string variable called “vendorsListUri” to the variables list in scope“ListVendorsSequence”a. Set the default value to “dbServiceUri "ListVendors"”.35. Add a string variable named “vendorsListXml” to the workflow (scope“ListVendorsSequence”).36. Add a VendorCollection variable named “vendorsList” to the workflow (scope“ListVendorsSequence”).37. Drag SendHttpRequest shape from the Toolbox onto the workflow under“ReceiveRequest” shapea. Set the method to “GET” (with quotes).b. Set Response to “vendorsListXml” (without quotes).c. Set Uri to “vendorsListUri”.38. Drag DeserialiseVendorEntities activity from the Toolbox to the workflow underneaththe “SendHttpRequest” activitya. Set EntityXML to “vendorsListXml”.b. Set Vendors to “vendorsList”.39. Set “SendReplyToReceive” shape’s property Content to:a. Message data: “vendorsList”b. MessageType: “ESIApplication.Services.VendorCollection”40. Save all.Adding a Vendor Name Change Operation Flow1. Drag and drop a ReceiveAndSendReply shape from the Toolbox’s Messaging sectioninto the “Parallel” shape.2. Rename the “Sequence” shape to “UpdateNameSequence”.3. Open the properties of the “Receive” shape and make following changes:a. Set CanCreateInstance.b. Change ServiceContractName to “{http://tempuri.org/}IVendorOperations”.c. Change OperationName to “UpdateVendorName”.d. Change the content (click on ) to Parameters and add followingparameters:NameTypeAssign . Expand Variables section in the workflow and add a new string variable called“updateVendorNameUri” to the variables list (scope to “UpdateNameSequence”)a. Set the default value to “dbServiceUri "UpdateVendorName?"“.5. Add a string variable named “vendorName” to the sequence.6. Add an Int32 variable named “vendorId” to the workflow.7. Drag Assign shape from the Toolbox’s Primitive section to the workflow underneaththe “Receive” shapea. Set the left side to “updateVendorNameUri”.b. Set the right side to “updateVendorNameUri "id " vendorId.ToString() "&name " vendorName.8. Drag SendHttpRequest shape from the Toolbox onto the workflow under“ReceiveRequest” shapea. Set the method to “UPDATE” (with quotes).b. Set Uri to “updateVendorNameUri”.9. Save all.10. Build the project and test it.
Enterprise System IntegrationTutorial 4Part C – Creating Web InterfaceFinally, we need to create a unified user interface for all the services in the application. Weare going to accomplish this by creating a ASP.NET Web Application. This will correspond tothe green layers in Figure 3.Creating a ASP.NET Web Application1. Right click on “03-User Interfaces” in Solution Explorer to add a new projecta. Choose template category Visual C# Web.b. Choose ASP.NET Empty Web Application template.c. Name it appropriately (e.g. ESIWeb).d. Click OK.2. Add a Master Page called “ESIWeb.Master” to the project.3. Add a folder “VendorManagement” to the project.4. Add a Web Form using Master Page called “VendorsList” to the“VendorManagement” folder (use the master page created previously).5. Add service reference to the VendorService created in Part B.6. Switch to design view of VendorsList.aspx.7. Drag and drop Data GridView from the Toolbox into the ContentPlaceHolder.8. Click on the GridView and expand the action menu by clicking on the sign.9. Choose Edit Columns .a. Add two Bound Fields:i. DataField: “VendorId”, Visible: Falseii. DataField: “VendorName”, HeaderText: “Vendor”10. Open the properties of the grid viewa. Set (ID) to “VendorsGridView”.b. Set AutoGenerateColumns to False.11. Right click on VendorsList.aspx and choose View Code.12. In method Page Load add following code:if (!this.Page.IsPostBack){BindData ();}13. Add a new method to the class:private void BindData(){VendorService.VendorOperationsClient vc new ce.VendorCollection lvr vc.ListVendors(new idView.DataSource s.Session["VendorsList"] lvr;}14. Save all.15. Right click on VendorsList.aspx in Solution Explorer and choose View in Browser totest the page.16. Open VendorsList.aspx in design view.17. Click on the VendorsGridView and open its properties.18. Set AutogenerateEditButton to True.19. Open Events tab (lightning icon) in Properties panel and double click on RowEditingrow.
Enterprise System IntegrationTutorial 420. Insert the following code://Set the edit index.this.VendorsGridView.EditIndex e.NewEditIndex;//Bind data to the GridView control.RebindData();21. Add a new method to the class:protected void RebindData(){this.VendorsGridView.DataSource nd();}22. Back in design view of VendorsList.aspx, generate event handles forVendorsGridview events RowCancelingEdit and RowUpdating (similar to how youadded event handler to RowEditing event)protected void VendorsGridView RowCancelingEdit(object sender, GridViewCancelEditEventArgs e){//Reset the edit index.this.VendorsGridView.EditIndex -1;//Bind data to the GridView control.RebindData();}protected void VendorsGridView RowUpdating(object sender, GridViewUpdateEventArgs e){//Update the values.GridViewRow row this.VendorsGridView.Rows[e.RowIndex];int vendorId aItemIndex].VendorId;string vendorName ervice.VendorOperationsClient vc new ndorName(vendorId, vendorName);vc.Close();//Reset the edit index.this.VendorsGridView.EditIndex -1;// Bind the data from new call to the service.BindData();}23. Save all and test the changes.
Nowadays these EAI servers have evolved into enterprise service buses (ESB), which allow continuous integration, business process monitoring, high availability, dynamic . companies building their own simplified service bus services instead of using a full ESB. . Enterprise Application Integration Using Microsoft BizTalk Server",