Transcription
EBOOKAUTHORSLEX HEGTMARKBRIMBLE
2Table of Contents1Authors . 52Foreword . 73Modern Integration . 8Scenario . 84API Management API Apps . 9Objective . 9Prerequisites . 9Steps . 9Create Service Bus Namespace . 10Create an API Management instance . 12Create an Azure API App . 14Test your API App locally . 20Publish API App to Azure . 23Manage your API in Azure API Management . 29Import the Order API in API Management . 29Add the Order API to the Starter product . 32Call the Order API from the Developer Portal . 345Service Bus Enterprise Integration Pack On-premises Data Gateway . 38Objective . 38Prerequisites . 39Steps . 39Install and configure the On-Premises Data Gateway . 40Register the gateway in Azure . 47Import the LegacyOrderSystem data in the on-premises SQL Server . 48Create a schema for validation in Visual Studio 2015 . 52Create an Integration Account . 55Upload schema to the Integration Account . 57Provision a Logic App. 58Associate the Integration Account with the Logic App . 59Build the Logic App Definition . 60
3Test the Solution . 696Logic Apps BizTalk 2016: Hybrid Integration. 77Objective . 77Prerequisites . 77Steps . 77Install Logic Apps adapter . 78Created IIS applications for Logic App adapter . 81Add Management application . 82Add BizTalk ReceiveService application . 83Create Service Bus Namespace . 85BizTalk application . 87Import. 87Create Receive Location from Logic App . 90Create Send Port to database . 98Create Receive Location from database .103Create Send Port to Service Bus .111Create Logic App which communicates with on premises BizTalk.119Testing the lab .1247Logic Apps and Azure Functions: Better Together .128Objective .128Prerequisites .128Steps .129Create a Storage Account .130Create Strorage Container .132Create Storage Table.134Provision the Function App .139Building a Function .141Provision a Logic App.145Building a Logic App Definition .148Test the Solution .1628IoT Hub Stream Analytics DocumentDB PowerBI (IoT).166Objective .166
4Prerequisites .166Steps .166Create IoT Hub .167Create DocumentDB.169Register device .170Create simulated device .174Create Stream Analytics job .177Add input .177Add outputs .178Set query .181Testing the lab .1849Final Words .187
51 AuthorsRob FoxRob is specialized in system integration with his main focus on theMicrosoft stack, like BizTalk Server, .Net and Microsoft Azure. But his focuslately also shifts to open source initiatives like RabbitMQ and Kafka. Withthe concept of micro services (re-)emerging, all these products are gettingmore and more important.His experience goes all the way back to 2006 when he first started his job.And now, over 10 years later, he is still constantly busy integrating the hellout of everything. You can sometimes hear him talk at events and he is also an active contributorto the BizTalk community.Rob is an active blogger at www.robfox.io, blogging about IT related stuff, but also some of hisother passions. He can be found on Twitter at @xrobfox.Tomasso GroenendijkTomasso Groenendijk is an Application Architect at Motion10, a leadingMicrosoft service integrator in the Netherlands. Tomasso has over 15 yearsof experience in software development and software design. He specializesin applications integration with a strong interest in Windows Azure cloudplatform. In 2014, 2015 and 2016 Tomasso was awarded with theMicrosoft Azure MVP award. He is an active contributor to the BizTalkcommunity through his work on MSDN TechNet forums, TechNet Wiki andhis blog on www.ithero.nl. Tomasso is also a board member of the DutchMicrosoft Integration User Group (MIUG.NL). He can be found on Twitter at @tlagroenendijk.Eldert GrootenboerEldert is a Microsoft Azure MVP and Integration Architect from theNetherlands, currently working at Motion10, mainly focused on IoT andBizTalk Server and Azure integration. He comes from a .NET background,and has been in the IT since 2006. He has been working with BizTalk since2010 and since then has expanded into Azure and surroundingtechnologies as well. Eldert loves working in integration projects, as eachproject brings new challenges and there is always something new to learn.In his spare time Eldert likes to be active in the integration community andget his hands dirty on new technologies. He can be found on Twitter at @egrootenboer and has ablog at http://blog.eldert.net/.
6Steef-Jan WiggersSteef-Jan Wiggers has 15 years of experience as a technical leaddeveloper, application architect and consultant, specializing in customapplications, enterprise application integration (BizTalk), Web servicesand Windows Azure. He currently works at Macaw as PrincipalConsultant. He is very active in the BizTalk community as a blogger,Wiki author/editor, forum moderator, writer and public speaker in theNetherlands and Europe. For these efforts, Microsoft has recognizedhim a Microsoft MVP for the past 6 years.Steef-Jan is an active member and moderator on the MSDN BizTalk Server Forums, TechNetWiki, and Code Gallery contributor. He also currently holds MCTS: BizTalk Server 2006 R2, andBizTalk Server 2010 certifications. He is a board member of the Dutch Microsoft IntegrationUser Group (MIUG.NL).Steef-Jan has written the “BizTalk Server 2010 Cookbook” published by Packt Publishing and hasbeen involved in reviewing several other BizTalk related books. He is also the author of the“Supportability and Operation of BizTalk Server” and “WCF-BasicHttpRelay Adapter Deep Dive”whitepapers and reviewer for other whitepapers published through BizTalk360 website. SteefJan maintains a blog at https://blog.steef-jan-wiggers.com.You can contact Steef-Jan at: SteefJan@msn.com and be found on Twitter at @SteefJan.Foreword by Gijs in ‘t VeldGijs in ‘t Veld is the chairman of the Dutch Microsoft Integration UserGroup (MIUG.NL) and former 7 times Microsoft Integration MVP. Inhis daily work life, he’s the CTO at Motion10 and specializes inintegration architecture on the Microsoft platform. Gijs frequentlywrites and speaks about all things Microsoft integration. He blogs onwww.indafield.com/BizTalkNotes and can be followed on Twitter at@gintveld.
72 ForewordOn August 18th, 2016 Mandi Ohlinger (Senior Content Developer at Microsoft) tweeted:My first reaction at that time was:Which resulted in lots of reactions by the great Microsoft Integration Community. Tweets fromall around the world, discussing the need for local boot camps. We took the discussion offlinewith Mandi and quickly decided that a Microsoft Integration version of the Global AzureBootcamp would be a wonderful idea. The rest is history!A Slack channel was created, and Sven van den Brande, Eldert Grootenboer, Steef-Jan Wiggers,Tomasso Groenendijk, Martin Abbott, Rob Fox and many more folks got involved to work thingsout.The first ever Microsoft Global Integration Bootcamp was a fact. Hosted by sixteen locations in12 different countries. 650 Integration specialists trained in the latest and greatest MicrosoftiPaaS and on-premise integration technologies in one day, hands-on! Which probably is a worldrecord; Guinness Book of Records, anyone? Check out https://www.globalintegrationbootcamp.com for more details (a big thank you to RobFox for building this fantastic website by the way). I’m confident that this will not be a one-off.Our great integration community is known for its fair amount of volunteer work when it comesto building and sharing knowledge, and this seems one of the great vehicles for that, so staytuned Eldert, Rob, Steef-Jan and Tomasso worked relentlessly to develop the presentations and, moreimportantly the very nice labs. This book contains the five labs, for you to try out things. Andhopefully become another great member of our every growing “Microsoft integration family”.Happy integrating!Cheers,Gijs in ‘t VeldChairman of the Dutch Microsoft Integration User Group (MIUG.NL)
83 Modern IntegrationIn this eBook, we will discuss several of the modern integration scenarios by leveraging the fullMicrosoft Integration Platform. A platform that consists of various Azure Services such asService Bus, API Management, Logic Apps, API apps, Flow, Functions, Storage, IoT Hub, StreamAnalytics, DocumentDB, PowerBI and some on premise technology like the EnterpriseIntegration Pack, On Premise Data Gateway and BizTalk Server 2016. Therefore, you will bepresented a couple of walkthroughs (labs) to provide you some insights of building solutions withthese capabilities: API Management API AppsService Bus Enterprise Integration Pack On-prem GatewayLogic Apps BizTalk 2016 (Hybrid Integration)Logic Apps (cloud adapters) Azure Functions: Better TogetherIoT Hub Stream Analytics DocumentDB PowerBI (IoT)The walkthroughs will enable you to learn the various Microsoft Azure services and products.You’ll get acquainted with its characteristics and gain hands on experience.ScenarioSETR is a computer technology company which sells computers and related products andservices. They are currently using BizTalk for their processes and SQL for their customer data.They also have various on premise systems for their delivery, warehousing and invoicing, whichare connected via BizTalk.As SETR wants to expand its business, they are looking into ways to easily connect new vendors,and scale up systems without having to invest heavily in new hardware. They also want to beable to bring more innovations in a fast pace to their customers, to keep ahead of thecompetition.To handle the current load and the expected new load, they are also looking into replacing someof their existing systems with SaaS solutions, as the old custom built systems no longer providethe necessary functionalities. Another focus point is to automate more tasks which are currentlybeing done by the employees, so they can focus more on the company’s growth and the tasksthat brings with it.
94 API Management API AppsObjectiveIn this first lab, we will be creating an API app which is protected using API Management. TheAPI will be used by vendors to place orders, and allows for fast innovations to be rolled out. Byusing API Management SETR can easily and flexibly give new vendors access to their orderingsystem. Once the order has been received, it will be placed in a Service Bus queue, where thenext system will pick it up, giving us a loosely coupled ordering service which can keep runningeven if any of our downstream services are down due to maintenance or upgrades.Prerequisites Azure account - You can Open an Azure account for free or Activate Visual Studiosubscriber benefits.Service Bus ExplorerVisual Studio 2015 with the Azure SDK for .NET - The SDK installs Visual Studio 2015automatically if you don't already have it.StepsTo build the solution in this lab, you must follow the steps described in this section. From a highlevel view the steps are:1.2.3.4.5.6.7.8.Create Service Bus namespaceCreate an API Management instanceCreate an Azure API AppTest your API App locallyPublish API App to AzureImport the Order API in API ManagementAdd the Order API to the Starter productCall the Order API from the Developer Portal
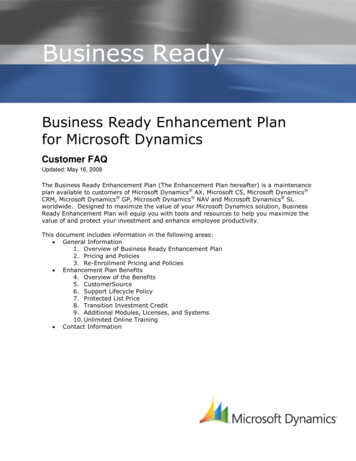
10Create Service Bus NamespaceAs we will be sending our outgoing messages to a Service Bus queue, we will also need to createthis in Azure. Go to the Service Bus blade in the portal, and add a new namespace (this should bea unique namespace). This namespace should be created on the Standard tier, as this is the tierfrom where topics are included as well. (Topics are needed in one of the other labs)Once the namespace has been created, we will need to add the queue. For this we will useService Bus Explorer, a great tool when working with Azure Service Bus. Start by retrieving theconnection string for the RootManageSharedAccessKey, which we will use to manage ournamespace from Service Bus Explorer.
11Now start Service Bus Explorer, and connect using the connection string we just retrieved.Next add a queue called neworders, and keep all the default settings.
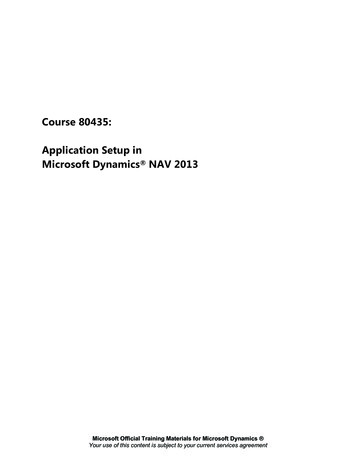
12Create an API Management instanceThe first step in working with API Management is to create a service instance.1. Sign in to the Azure Portal and click New, Web Mobile, API Management.2. For Name, specify a unique sub-domain name to use for the service URL.Choose the desired Subscription, Resource group and Location for your service instance.Enter SETR for the Organization Name, and enter your email address in the AdministratorE-Mail field.NoteThe email address is used for notifications from the API Management system.
13NoteAPI Management service instances are available in three tiers: Developer, Standard, andPremium. You can complete this lab by using the Developer tier.3. Click Create to start provisioning your service instance.4. The Deployment takes several minutes. Click in the Header toolbar on Notifications tofollow the Deployment5. Once the service instance is created, click on the notification to open API Management.The next step is to import the Order API.
14Create an Azure API AppThe second step in this lab is to create an API App in Visual Studio and test it locally.1. Start Visual Studio and select New Project from the Start page. Or, from the File menu,select New and then Project.2. In the Templates pane, select Installed Templates and expand the Visual C# node.Under Visual C#, select Cloud. In the list of project templates, select ASP.NET WebApplication. Name the project "GB.OrdersAPI" and click OK.3. In the New ASP.NET Project dialog, select the Azure API App template.and click OK.
15NoteMake sure that the checkbox “Host in the cloud” is unchecked. Hosting in Azure will bedescribed in the step: Publish API App to Azure.4. Open the web.config file and add the ServiceBus connection string to the appSettings. configuration appSettings add key "Microsoft.ServiceBus.ConnectionString"value "Endpoint AccessKeyName RootManageSharedAccessKey;SharedAccessKey [your secret]" / /appSettings 5. Add models for the order to the API App project. A model is an object that represents thedata in your application. If Solution Explorer is not already visible, click the View menuand select Solution Explorer. In Solution Explorer, right-click the Models folder. From thecontext menu, select Add then select Class.
166. The following models need to be created:public class Customer{public string CustomerNumber { get; set; }}public class Product{public int ProductNumber { get; set; }public int Amount { get; set; }}public class Products{public List Product Product { get; set; }}public class{publicpublicpublic}OrderCustomer Customer { get; set; }List Product Products { get; set; }DateTime OrderedDateTime { get; set; }public class CreateOrder{public Order Order { get; set; }}7. In Solution Explorer, right-click the GB.OrdersAPI project. Select Add and thenselect New folder.8. Name the folder: Repositories and press Enter.9. Add a repository class to the project. A repository is an object that encapsulates theServiceBus layer. In Solution Explorer, right-click the Repositories folder. From thecontext menu, select Add then select Class.Name the class ServiceBusRepository and tap Add.10. Replace the code in this file with the ystem.Xml;System.Xml.Serialization;namespace GB.OrdersAPI.Repositories{
17public class ServiceBusRepository{public void Send(CreateOrder order){string xmlObject GetXMLFromObject(order);string connectionString eBus.ConnectionString"];string queueName "NewOrders";var client tring, queueName);var message new rivate string GetXMLFromObject(object o){StringWriter sw new StringWriter();XmlTextWriter tw null;try{XmlSerializer serializer new XmlSerializer(o.GetType());tw new XmlTextWriter(sw);serializer.Serialize(tw, o);}catch (Exception ex){//Handle Exception Code}finally{sw.Close();if (tw ! null){tw.Close();}}return sw.ToString();}}}11. Add a Controller to the project. A controller is an object that handles HTTP requests.In Solution Explorer, right-click the Controllers folder. Select Add and thenselect Controller.In the Add Scaffold dialog, select Web API Controller - Empty. Click Add.
1812. In the Add Controller dialog, name the controller "OrdersController". Click Add.The scaffolding creates a file named OrdersController.cs in the Controllers folder.If this file is not open already, double-click the file to open it. Replace the code in this filewith the rdersAPI.Repositories;namespace GB.OrdersAPI.Controllers{public class OrdersController : ApiController{// POST onse(HttpStatusCode.Created)]public IHttpActionResult Post([FromBody]CreateOrder order){try{ServiceBusRepository reposistory newServiceBusRepository();reposistory.Send(order);
19return Ok();}catch (Exception ex){return InternalServerError();}}}}13. Delete the Values Controller that is added out the box. Right click theValuesController.cs file and select Delete.14. In the OrderAPI project in Solution Explorer, open the App Start\SwaggerConfig.cs file,then scroll down and uncomment the following code./*}).EnableSwaggerUi(c {*/The SwaggerConfig.cs file is created when you install the Swashbuckle package in a project. Thefile provides a number of ways to configure Swashbuckle.The code you've uncommented enables the Swagger UI that you use in the following steps.When you create a Web API project by using the API app project template, this code iscommented out by default as a security measure.
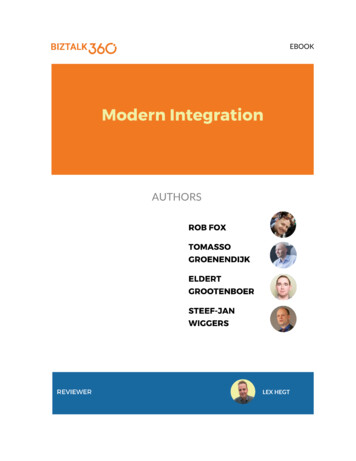
20Test your API App locallyIn this section, we are going to test the created API locally on your Development machine1. Press F5 or click Debug Start Debugging to run the project in debug mode.2. In your browser address bar, add swagger to the end of the line, and then press Return.(The URL is http://localhost:45914/swagger .)3. When the Swagger UI page appears, click Orders to see the methods available.4. Click Post, and then click the box under Model Schema.Clicking the model schema prefills the input box where you can specify the parametervalue for the Post method. (If this doesn't work in Internet Explorer, use a differentbrowser or enter the parameter value manually in the next step.)5. Change the JSON in the order parameter input box so that it looks like the followingexample, or substitute your own description text:{"Order": {"Customer": {"CustomerNumber": "A1000"},"Products": [{"ProductNumber": 200,"Amount": 1}],"OrderedDateTime": "2017-03-01T19:10:33.294Z"}}
216. Click Try it out.The Order API returns an HTTP 200 response code that indicates success.7. Check in the Service Bus Explorer tool if the order message is sent to the NewOrdersqueue. Open the Service Bus Explorer, right click the NewOrders queue and selectReceive Messages.
228. Select the Peek radio button and click on Ok.
239. Click on the MessageId to see the content of the message.Publish API App to AzureIn this section, you use Azure tools that are integrated into the Visual Studio Publish Web wizardto create a new API app in Azure. Then you deploy the Order API project to the new API app andcall the API by running the Swagger UI.1. In Solution Explorer, right-click the Order API project, and then click Publish.2. In the Profile step of the Publish Web wizard, click Microsoft Azure App Service.
243. Sign in to your Azure account if you have not already done so, or refresh your credentialsif they're expired.In the App Service dialog box, choose the Azure Subscription you want to use, and thenclick New.The Hosting tab of the Create App Service dialog box appears.Because you're deploying a Web API project that has Swashbuckle installed, VisualStudio assumes that you want to create an API App. This is indicated by the API AppName title and by the fact that the Change Type drop-down list is set to API App.4. Enter an API App Name that is unique in the azurewebsites.net domain. You can acceptthe default name that Visual Studio proposes.
25If you enter a name that someone else has already used, you see a red exclamation markto the right.The URL of the API app will be {API app name}.azurewebsites.net.5. In the Resource Group drop-down, click New, and then enter"GlobalIntegrationBootcamp" or another name if you prefer.A resource group is a collection of Azure resources such as API apps, databases, VMs,and so forth. For this tutorial, it's best to create a new resource group because thatmakes it easy to delete in one step all the Azure resources that you create for the tutorial.This box lets you select an existing resource group or create a new one by typing in aname that is different from any existing resource group in your subscription.6. Click the New button next to the App Service Plan drop-down.The screen shot shows sample values for API App Name,
Service Bus Enterprise Integration Pack On-prem Gateway Logic Apps BizTalk 2016 (Hybrid Integration) Logic Apps (cloud adapters) Azure Functions: Better Together IoT Hub Stream Analytics DocumentDB PowerBI (IoT) The walkthroughs will enable you to learn the various Microsoft Azure services and products.