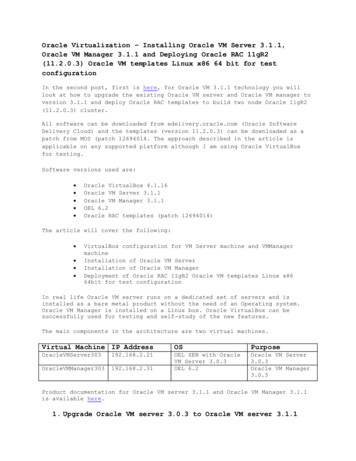
Transcription
Oracle Enterprise GatewayAn Oracle White PaperJune 2011SonicMQ - Oracle Enterprise GatewayIntegration Guide1 / 24
Oracle Enterprise GatewayDisclaimerThe following is intended to outline our general product direction. It is intended for informationpurposes only, and may not be incorporated into any contract. It is not a commitment to deliverany material, code, or functionality, and should not be relied upon in making purchasingdecisions. The development, release, and timing of any features or functionality described forOracle’s products remains at the sole discretion of Oracle.2 / 24
Oracle Enterprise Gateway1. Introduction . 5Prerequisites . 6Configuration Steps . 62. Setting up the SonicMQ environment . 7Download SonicMQ . 7Installation of SonicMQ . 7Start SonicMQ and configure JMS settings . 73. Setting up the OEG environment . 9Download OEG Gateway software . 9Load SonicMQ Provider files onto the OEG Gateway . 9Preparing the jar files for upload: . 94. Configuring the Gateway to read from a SonicMQ Queue . 13Creating a JMS Session: . 13Create a “Route to SonicMQ” Policy . 14Ensure policies are updated on the Gateway . 17Test the configuration to place message on SonicMQ Queue . 17Configure SonicMQ Test Client . 18Load a sample message into OEG Service Explorer . 18Send Message and check SonicMQ Queue . 185. Configuring the Gateway to place messages on SonicMQ Queue . 20Create Policy that will be invoked with message read from SonicMQ .20Creating a JMS Session: . 22Ensure policies are updated on the Gateway . 23Testing to read messages from a queue . 236. Conclusion . 253 / 24
Oracle Enterprise Gateway1. IntroductionPurposeThis document describes how to configure the Gateway to perform protocol translation.This will be demonstrated by the following:1.The Gateway will listen for messages on a HTTP interface.Messages read from this interface will be placed on a message queue.2.The Gateway will listen for messages on a message queue.Messages read from the queue will be sent to an email account via SMTP.The message flow is as follows:This guide applies to Oracle Enterprise Gateway, from version 6.0 upwards.In this guide the message queuing system that will be used is SonicMQ.JMS ArchitectureThe Gateway utilises JMS (Java Message Service) for sending and receivingmessages from messaging systems. JMS API which was developed by Sundefines a common set of interfaces and associated semantics that allow theGateway to communicate with various messaging applications in a standard way.4 / 24
Oracle Enterprise GatewayMessaging system products (IBM WebSphere MQ, JBossMQ, SonicMQ,Fiorano, and OpenJMS) provide implementations of JMS which can be pluggedinto the Gateway.The Gateway has been designed to allow 3rd party JMS providers to be"plugged in". To plug in new JMS providers, you must install the JMS provideron the Gateway machine. The messaging system vendors can provide animplementation of the JMS provider which is normally in the form of jar filesand configuration settings to be entered in the OEG Policy Studio.Prerequisites SonicMQ available from http://www.sonicsoftware.com Oracle Enterprise Gateway Software available from www.oracle.com Java Virtual Machine. SonicMQ will install the appropriate JVM or usean existing installation if there is one available.Configuration Steps1.2.3.4.5.6.Download and install SonicMQConfigure SonicMQInstall OEG GatewayConfigure Gateway to send messages to SonicMQConfigure Gateway to listen for messages from SonicMQ queueTest Setup5 / 24
Oracle Enterprise Gateway2. Setting up the SonicMQ environmentDownload SonicMQSonicMQ is available /eval downloads/index.sspThe most current version (at time of writing) is SonicMQ V7.6Installation of SonicMQ1. Once SonicQM has been downloaded extract the files and run setup.bat2. This will create a directory “Sonic” containing the following directories:Archives, Docs7.6, InstallLogs7.6 and MQ7.6.Start SonicMQ and configure JMS settingsStart the SonicMQ by completing the following steps:1. Start "SonicMQ Domain Manager"2. Start "Management Console" and go to "Tools - JMS AdministeredObjects".- Select "JNDI Naming Service" radio button and check "Sonic Storage"checkbox.- Leave other input fields empty and hit "Connect" button. A new objectshould appear under "JMS Object Stores" on the left. Click on the newobject.- A new dialog box will appear with two tabs, "Destinations" and"Connection Factories".- Create a new destination clicking on "Destinations" Tab, and click a "New"button (located at the bottom of the window, may be not visible if windowis not expanded to the full screen).3. Enter new "Lookup name", "Type" and "Destination Name".- Any Lookup name could be used. The Destination name should be thesame as the name of the existing queue/topic in SonicMQ.4. For this guide "SampleQ1", "Queue", "SampleQ1" is as the Destinationvalues.5. Click on "Connection Factories" tab, and hit the "New" button.6. Enter new "Lookup Name" (For this guide 'OEGConnectionFactory' isused).7. Enter "Connection URL(s)" (Use 'localhost:2506')8. Hit "Update" button to save the entry.6 / 24
Oracle Enterprise Gateway3. Setting up the OEG environmentDownload OEG Gateway softwareContact your Oracle Representative for more information if needed.Load SonicMQ Provider files onto the OEG GatewaySonicMQ provides a particular JMS provider that the Gateway will use toconnect to SonicMQ. The JMS provider takes the form of Java archive files (i.e.JAR files). Once SonicMQ is installed it is a simple matter to drop the JMSprovider JAR files onto the OEG Gateway.Instructions for OEG:Preparing the jar files for upload:The first thing to do is to prepare the jar files that the Gateway requires.As there might be more than one jar file, the easiest way is to add all theJAR files to a tar file before uploading it to the appliance.The required JAR files are stored in the lib directory of the Sonicinstallation directory, e.g. /Sonic/libAdd all the following jar files to a tar archive file: sonic Client.jar sonic XA.jar mfcontext.jarFor Windows: Open an application capable of creating tar files. Select thefiles above and archive to a tar file.For Linux: Add the necessary jar files to a tar file by using the tarcommand. Browse to the directory where the jar files reside and run thefollowing command: tar –cvf jar.tar *.jarThe next step is to upload the archive to the appliance. This can be doneusing either the web interface or the command line.iUpload via the web interface:1. Log on to the Web Administrator Interface via a browser at thefollowing URL: https://IP OF Appliance:100007 / 24
Oracle Enterprise Gateway2. Login using the user credentials assigned. The default Username is“admin” with a default password of “changeme”.3. Click on the Upload and Download option on the top menu options.4. Click on the Browse button and browse to the tar file that contains allthe jar files.5. Upload the file to the /opt/OEG/OEG product dir/ext/libdirectory.6. For ease of use it is recommended to select “Yes” when prompted andthen click the Delete button next to the Extract Tar files option.7. Click on Upload. This will upload the tar file, extract it, and then deletethe tar file from the appliance.8. If this has succeeded, a confirmation screen will be displayed showingthe list of files that were uploaded.The following screenshot shows the Upload and Download screen on the WebAdministrator Interface of the Appliance:The confirmation screen showing the list of uploaded files appears as follows:8 / 24
Oracle Enterprise GatewayAlternatively upload the jar files via command line:Note: The directory where jar files should be placed on the applianceis as follows:/opt/OEG/OEG product dir/ext/lib (where OEG product diris the version of the gateway installed)On Unix/Linux:Run SCP using the following command syntax to perform the upload:1. Browse to directory where the tar file was created.2. At the prompt type: scp [options] [[user@]host1:]filename1 .[[user@]host2:]filename2Example: scp jar.tar root@IP OF APPLIANCE:/opt/OEG/OEGgateway/ext/lib3. You will be prompted for the user (root) password before the transferbegins.For more information on how to use the scp command type scp –help orman scp at the prompt.Extracting TAR file manually:1. Use SSH to connect to the appliance securely by typing the followingcommand from the prompt: ssh root@IP OF APPLIANCEExample: ssh root@192.168.2.3002. You will be prompted for the user (root) password to complete theconnection.3. Browse to /opt/OEG/OEG product dir/ext/lib to extract the filefrom the tar file with the following command: tar -xvvf myfile.tarExample: tar –xvvf jar.tarOn Windows:Use PSCP to copy files to the Appliance:1. PSCP can be used to transer files securely from Windows to theAppliance. It can be downloaded fromhttp://www.chiark.greenend.org.uk/ sgtatham/putty/download.html.2. Open a Windows command prompt and run pscp using the followingsyntax: pscp filename username@ipadress:where to place on remoteExample: pscp jar.tar acting the TAR file manually:Use SSH to connect to the appliance securely using a program like Putty.Browse to /opt/OEG/OEG product dir/ext/lib9 / 24
Oracle Enterprise GatewayExtract the tar file with the following command: tar -xvvf myfile.tarExample: tar –xvvf jar.tarInstructions for Software install:Copy the following jar files from the /Sonic install dir/lib directory to theOEG product dir/ext/lib directory sonic Client.jar sonic XA.jar mfcontext.jar10 / 24
Oracle Enterprise Gateway4. Configuring the Gateway to read from a SonicMQ QueueThe gateway will be configured to place messages it receives on a queue (i.e.destination) named “SampleQ1” in SonicMQ.Creating a JMS Session:1. In Policy Studio External Connections navigation panel, right click onJMS Services and Add a JMS Service then configure the following fields:ñ Name: SonicMQñ Provider URL: IP OF SonicMQ:2506 (where IP OF SonicMQpoints to the machine on which SonicMQ has been installed)ñ Initial Context yñ Connection Factory: OEGConnectionFactoryñ Username: adminñ Password: admin (or whatever was configured during installation)2. Click on Ok to save the JMS service before proceeding with the CustomMessage Properties3. Right click on the SonicMQ service and click on Edit then click Add toconfigure each of the following Custom Message Properties: Name: com.sonicsw.jndi.mfcontext.domainValue: Domain1 Name: java.naming.factory.initialValue: com.sonicsw.jndi.mfcontext.MFContextFactory Name: java.naming.provider.urlValue: IP OF SonicMQ:2506 (where IP OF SonicMQ points to themachine on which SonicMQ has been installed)4.Click on the Services navigation panel. Right click on the OEG Gatewayprocess and in Messaging System choose to Add JMS Session.5. Select SonicMQ and not to allow duplicates then OK.Create a “Route to SonicMQ” PolicyCreate a small test policy to route messages on to the SonicMQ Queue bycompleting the following steps:11 / 24
Oracle Enterprise GatewayOpen Policy Studio and the Policies navigation panel. Create a new Policytitled “Route to SonicMQ” by right clicking on Policies and select AddPolicy. Create a new relative path on the Gateway Process called “/ToSonicMQ”by going to Services navigation panel and expanding Processes, thenexpand OEG Gateway and right click on Default Services to add the newpath Map the /ToSonicMQ path to the policy called “Route to SonicMQ”.This means that when a message is received by the Gateway on the path“/ToSonicMQ”, it will be passed to the “Route to SonicMQ” policy, whichwill then process the message. Configuring the Messaging System FilterWhen a policy that routes to a JMS provider (such as SonicMQ) is created, thepolicy must contain a Messaging System filter, which can be found under theRouting category of filters in the Policy Studio. To configure this filter,complete the following steps:1. Go back to the “Route to SonicMQ” policy canvas. Drag a MessagingSystem from the Filter Pallette on the right onto the policy field.2. Under the Request tab select the JMS Service that has been configuredabove (titled “SonicMQ”) from the JMS Session dropdown.3. Set the Destination to “SampleQ1”, which was configured during theSonicMQ destination configuration.4. The Message Type should be specified. For example, in "Message Type",select "Use content.body attribute to create a message in the formatspecified in the ‘SOAP over JAVA Message Service’".5. All other settings may be left at default.6. Click on the Response tab and select ‘No Response’7. Click on FinishNote on Message Type:Here is an explanation of how the various serializations (from OEG message to JMSmessage work)- Use content.body attribute to create a message in the format specified in the"SOAP over Java Messaging Service" proposal:If this option is selected, messages will be formatted according to the SOAP over JMSproposal. This is the default option since, in most cases; it is the message body that is tobe routed to the messaging system. This will result in a ByteMessage being sent to thequeue/topic and JMS a property will contain the Content-Type (i.e. text/xml)- Create a MapMessage from the java.lang.Map in the attribute named below:12 / 24
Oracle Enterprise GatewaySelect this option to create a javax.jms.MapMessage from the OEG message attributenamed below that consists of name-value pairs.- Create a ByteMessage from the attribute named below:Select this option to create a javax.jms.ByteMessage from the OEG message attributenamed below.- Create an ObjectMessage from the java.lang.Serializable in the attribute namedbelow:This option can be selected in order to create a javax.jms.ObjectMessage from the OEGmessage attribute named below.- Create a TextMessage from the attribute named below:A javax.jms.TextMessage can be created from the message attribute named below byselecting this option from the dropdown.To complete the test policy create the following flow:1. Messaging System Filter: This filter should be configured as describedabove. This is a mandatory filter in the policy.2. Set Message Filter: Used to set the content of an XML response messagethat can be returned to the client to acknowledge that the message has beenplaced on the Open JMS queue. This step is not mandatory, but is usefulfor informational purposes. This filter can be found in the Conversioncategory of filters.How the Set Message filter has been configured:13 / 24
Oracle Enterprise Gateway3. Reflect Filter: Routes the customized response back to the client, ifnecessary. The Reflect filter can be found under the Utility category offilters.Once configured, the policy will appear as follows:14 / 24
Oracle Enterprise GatewayHaving configured the JMS Session and the “Route to SonicMQ” policy, we will be ableto place messages on the SonicMQ “SampleQ1” queue.Ensure policies are updated on the Gateway Open the Policy Studio.Click on Settings.Select “Deploy” to ensure that the changes made are propagated to thelive Gateway.Test the configuration to place message on SonicMQ QueueOEG Service Explorer will be used as the client to test the integration. Theentire transaction will be tested from the client, through the Gateway, and on toa SonicMQ queue.The following diagram shows the flow of the message from the client through theGateway to SonicMQ:15 / 24
Oracle Enterprise GatewayConfigure SonicMQ Test Client1. Start JMS Test Client using the Start menu or from Sonic ManagementConsole Tools - JMS Test Client menu.2. Create new connection: Enter 'localhost' for "Broker Host" and anything(like '123') for "Connect ID". Hit "Connect" button.3. Create new session: Click on the localhost: in on the left. Choose 'Queue'for a "Type" and some string for "Name". Click "Create" button.4. Create receiver: Click on "Receivers" on the left. Enter 'SampleQ1' for the"Queue" and hit "Create" button.5. Inspect queue: Click on the "SampleQ1" on the left, you will see themessages sent to 'SampleQ1' queue here.Load a sample message into OEG Service ExplorerLoad a sample XML message into OEG Service Explorer. Ensure that the URLfield in OEG Service Explorer points to the Gateway and in particular to the“SonicMQ” path on the Gateway.The screenshot below shows a sample SOAP Request loaded in the OEG ServiceExplorer:Send Message and check SonicMQ QueueBy sending messages using OEG Service Explorer, the Gateway will route themessages to the SonicMQ Queue, in this case “Sample1” as configured.16 / 24
Oracle Enterprise GatewayOnce test messages have been sent, open the SonicMQ Management Console.It should show a total number of messages that have been delivered to“queue1”.Having sent the SOAP request, the response will be displayed in the SOAP Responsepanel, as displayed in the screenshot below:Once test messages have been sent, open the SonicMQ Management Console.1. Start JMS Test Client using the Start menu or from Sonic ManagementConsole Tools - JMS Test Client menu.2. Click on the "SampleQ1" on the left, you will see the messages sent to'SampleQ1' queue here.Messages received by SonicMQ from OEG Service Explorer:Four messages have so far been received in this case17 / 24
Oracle Enterprise Gateway5. Configuring the Gateway to place messages on SonicMQ QueueThe Gateway will be configured to read the messages from “SampleQ1”Create Policy that will be invoked with message read from SonicMQTo create the second policy that the JMS consumer will point to:In Policy Studio go to the External Connections panel and right click onSMTP Servers Select Add a SMTP Server and configure the filter with credentials andsettings of a mail server and account that can be used to send emails to.(e.g. below) With the Policies panel selected right click on Policies Click Add Policy and create a new policy titled “Read from SonicMQQueue”. Click on the newly created Policy. Drag an SMTP filter from the Routing group located in the palette onthe right of the Policy Studio. Configure the filter with newly created SMTP server setting and testmessage settings.SMTP Filter settings used for test: 18 / 24
Oracle Enterprise GatewaySMTP Server Settings:19 / 24
Oracle Enterprise GatewayCreating a JMS Session:NOTE: If a JMS Session has already been created as per section 4.1, skip tonumber 4 below to add a JMS consumer to the existing JMS Session.3.1. In Policy Studio External Connections navigation panel, right click onJMS Services and Add a JMS Service then configure the following fieldsClick on Ok to save the JMS service before proceeding with the CustomMessage Propertiesñ Name: SonicMQñ Provider URL: IP OF SonicMQ:2506 (where IP OF SonicMQpoints to the machine on which SonicMQ has been installed)ñ Initial Context yñ Connection Factory: OEGConnectionFactoryñ Username: adminñ Password: admin (or whatever was configured during installation)2. Click on Ok to save the JMS service before proceeding with the CustomMessage PropertiesThe following Custom Message Properties should be configured:ñ Name: com.sonicsw.jndi.mfcontext.domainValue: Domain1ñ Name: java.naming.factory.initialValue: com.sonicsw.jndi.mfcontext.MFContextFactoryñ Name: java.naming.provider.urlValue: IP OF SonicMQ:2506 (where IP OF SonicMQ points to themachine on which SonicMQ has been installed4. Right click on the JMS Service and add a JMS Session. Select not to allowduplicates.5. Right click on the JMS Session and add a JMS Consumer and configure asfollows:ñ Destination: "SampleQ1"ñ Extraction Method: For simplicity, select "Create a content.bodyattribute based on SOAP Over JMS draft specification"ñ Point the JMS Consumer to the “Read from SonicMQ Queue”policy.Ensure policies are updated on the GatewayComplete the following steps to refresh the policies:1.Open the Policy.2.Studio Click on Settings.20 / 24
Oracle Enterprise Gateway3.Select “Refresh Server” to ensure that the changes made arepropagated to the live Gateway.Testing to read messages from a queueThe Gateway has also been configured to let the JMS service consume themessage on the queue and to forward it to a mail client via SMTP.By creating the JMS consumer and the policy that it pointed to (i.e. “Read fromSonicMQ Queue”) that contains a SMTP filter, the messages have been readfrom “SampleQ1” and sent to a mail client as configured in the SMTP filter.The flow demonstrates messages read from SonicMQ, passing back through the Gatewayto the SMPT client:The screenshot below shows the inbox of the email recipient that is configured in theSMPT filter that reads all messages off the queue and sends it over SMTP21 / 24
Oracle Enterprise Gateway22 / 24
Oracle Enterprise Gateway6. ConclusionThis document is a simplistic demonstration on how to setup the connection from aOracle Enterprise Gateway to the SonicMQ provider using the JMS Service and filteroptions in the Gateway.This connection can be part of a larger policy, including features such as XML threatdetection and conditional routing, features which are out of scope in this documentbut are covered in other documents which can be obtained from the Oracle site.Please direct any support questions to http://support.oracle.com23 / 24
Oracle Enterprise GatewayOracle Enterprise Gateway\Copyright 2011, Oracle and/or its affiliates. All rights reserved. This document is provided for information purposes only and theMay 2011contents hereof are subject to change without notice. This document is not warranted to be error-free, nor subject to any otherAuthor:warranties or conditions, whether expressed orally or implied in law, including implied warranties and conditions of merchantability orfitness for a particular purpose. We specifically disclaim any liability with respect to this document and no contractual obligations areOracle Corporationformed either directly or indirectly by this document. This document may not be reproduced or transmitted in any form or by anyWorld Headquartersmeans, electronic or mechanical, for any purpose, without our prior written permission.500 Oracle ParkwayRedwood Shores, CA 94065Oracle and Java are registered trademarks of Oracle and/or its affiliates. Other names may be trademarks of their respectiveU.S.A.owners.Worldwide Inquiries:AMD, Opteron, the AMD logo, and the AMD Opteron logo are trademarks or registered trademarks of Advanced Micro Devices. IntelPhone: 1.650.506.7000and Intel Xeon are trademarks or registered trademarks of Intel Corporation. All SPARC trademarks are used under license and areFax: 1.650.506.7200trademarks or registered trademarks of SPARC International, Inc. UNIX is a registered trademark licensed through X/Openoracle.comCompany, Ltd. 041024 / 24
5. Upload the file to the /opt/OEG/OEG_product_dir/ext/lib directory. 6. For ease of use it is recommended to select "Yes" when prompted and then click the Delete button next to the Extract Tar files option. 7. Click on Upload. This will upload the tar file, extract it, and then delete the tar file from the appliance. 8.