Transcription
Technical ReportVMware Configuration Guide for E-Series SANtricityiSCSI Integration with ESXi 6.x and 7.xSolution DesignDarshan Hosad, Joe McCormick, Kelly Kemnitz, NetAppNovember 2020 TR-4789AbstractFor full information about supported iSCSI host ports on a particular NetApp E-Seriessystem, see the NetApp Hardware Universe.
TABLE OF CONTENTSOverview of E-Series in VMware Environments . 3What This Document Covers .3E-Series and VMware iSCSI Architecture . 3Environments Using iSCSI Host Interfaces .3iSCSI HA Architecture .3Path Management .6VMware ESXi 6.X and 7.Xwith Volume Groups and Dynamic Disk Pool Configuration.6VMware Network and iSCSI Storage Adapter Configuration Details .7Configuring One vSwitch Configuration with Two iSCSI Ports on Each Controller .7iSCSI Initiator/Target Configuration on ESXi Hosts .12Create and Configure Hosts and Clusters in SANtricity .15Tuning VMware Settings to Maximize Performance .21I/O Operation Limit—Performance Implications.22Jumbo Frames.23Performance Degradation with Data-Assurance-Enabled Volumes and iSCSI .29VMware Port Binding .32Conclusion . 32Appendix A: Changing Jumbo Frame Settings from a VMware vSphere Web Client . 33Change the MTU on a Virtual Switch from a VMware vSphere Web Client .33Change the MTU on VMkernel Adapters .34Appendix B: Configuring iSCSI CHAP Authentication . 35VMware vSphere Web Client View .35Related Resources .37Where to Find Additional Information . 37Version History . 37LIST OF FIGURESFigure 1) VMware HA architecture with E-Series storage systems—a single-vSwitch configuration with four iSCSI HICports per controller. .4Figure 2) VMware HA architecture with E-Series storage systems—a single-vSwitch configuration with two iSCSIbase ports per controller. .52VMware Configuration Guide for E-Series SANtricity iSCSIIntegration with ESXi 6.x and 7.x 2020 NetApp, Inc. All Rights Reserved.
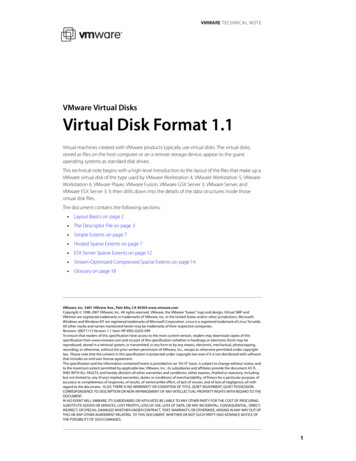
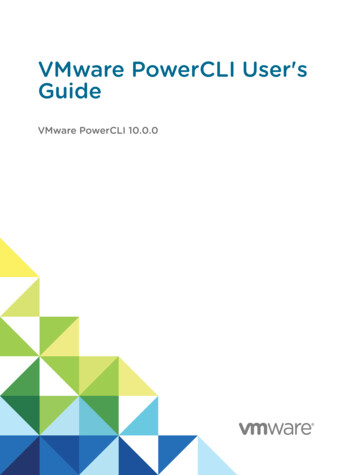
Overview of E-Series in VMware EnvironmentsNetApp E-Series storage systems integrate seamlessly with existing or new VMware environments. Theflexible host interfaces and easy-to-integrate, understand, and manage storage configuration featuresmake E-Series systems a natural choice for storage administrators and IT directors. Customers who needto balance the total cost of ownership with superior performance and features will enjoy the flexibilitydelivered by the range of E-Series products.Using the NetApp SANtricity System Manager software, storage administrators can quickly deploy ESeries systems in most configurations with little guidance or training. The intuitive E-Series SANtricityStorage Manager interface provides the tools needed to perform the following functions: Discover and name the storage system Manage software Complete systemwide implementation settings such as storage-system alerts and NetAppAutoSupport Monitor and maintain the platform hardware over timeNetApp SANtricity System Manager can be used to create new VMware hosts, create and map volumes(LUNs), control E-Series copy service functions, and monitor the system for faults.With ease of integration, system reliability, and service flexibility, NetApp E-Series storage systems offercost-effective storage for customers who use VMware tool sets to manage the day-to-day complexities oftheir data centers.What This Document CoversThis technical report describes the steps needed to configure iSCSI integration with VMware. For VMwareExpress configuration, see NetApp E-series and SANtricity 11 Documentation Center, SANtricity SoftwareExpress Configuration for VMware.This document does not cover VLANs, virtual machine (VM)/iSCSI pass through, or distributed vSwitches.For information about these topics, see VMware Storage and Availability Technical Documents.E-Series and VMware iSCSI ArchitectureNetApp E-Series storage systems support up to four 25Gb optical iSCSI ports on each controller thatinterface with servers running the VMware vSphere ESXi OS. The VMware native multipathing (NMP)feature provides multipath management without adding the complexity associated with other OS-basedmultipath drivers used in bare-metal server implementations. The path policy defaults to round robin andcan be tuned to force alternate path selections on a smaller number of I/O requests.Environments Using iSCSI Host InterfacesVMware environments often use the iSCSI protocol to connect ESXi hosts to a multivendor storageplatform in the data center. Unfortunately, the vast tuning and configuration options available with iSCSIimplementations can make this protocol choice very complicated. Careful planning is required to properlylay out the iSCSI network for a given implementation so that all target-to-initiator paths are strictly layer 2.Layer 3 routing of I/O between ESXi host initiators and E-Series storage targets is not supported.iSCSI HA ArchitectureE-Series storage systems offer full redundancy when the paths from a single ESXi host are spread acrossthe A-side and B-side controllers on each storage system. This configuration is indicated by the blue3VMware Configuration Guide for E-Series SANtricity iSCSIIntegration with ESXi 6.x and 7.x 2020 NetApp, Inc. All Rights Reserved.
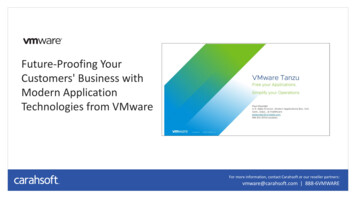
(controller A) and red (controller B) paths in Figure 1 and Figure 2. The only difference between the twoconfigurations shown is the number of iSCSI ports on the controller.Figure 1 has four iSCSI HIC ports per controller and thus has four VMkernel ports on each ESXi host.Figure 2 has two iSCSI ports per controller and thus has two VMkernel port on each ESXi host.For both architectural configurations, all VMkernel ports reside in the same vSwitch and can share thephysical NICs for basic link redundancy within the vSwitch. Under link-fault conditions using the defaultVMware ESXi settings, the configurations have the same failover behaviors. The use of one configurationrather than the other should be based on the number of paths between host and storage array.For more information about supported ports and speed on E-Series hardware, see Introduction to NetAppE- Series E2800 Arrays and Introduction to NetApp E-Series E5700 Arrays.Figure 1) VMware HA architecture with E-Series storage systems—a single-vSwitch configuration with four iSCSI HIC portsper controller.4VMware Configuration Guide for E-Series SANtricity iSCSIIntegration with ESXi 6.x and 7.x 2020 NetApp, Inc. All Rights Reserved.
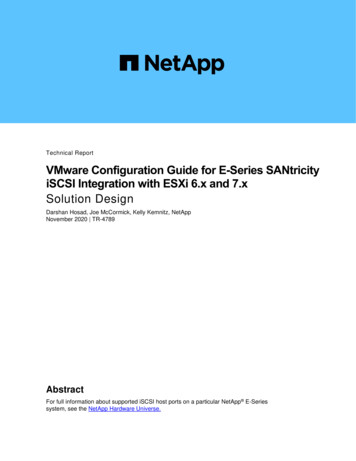
Figure 2) VMware HA architecture with E-Series storage systems—a single-vSwitch configuration with two iSCSI baseports per controller.Note:5The VMware ESXi 6.x and 7.x documentation states that up to eight paths from an ESXi host to asingle LUN are supported. As a result, each controller host port pair must be in a different IPsubnet. Failure to put the port pairs (that is, Controller A Port 1 and Controller B Port 1, ControllerA Port 2 and Controller B Port 2, and so on) in individual subnets can result in the hostdiscovering more than eight paths to each LUN or potentially not discovering all of the intendedeight paths to each LUN.VMware Configuration Guide for E-Series SANtricity iSCSIIntegration with ESXi 6.x and 7.x 2020 NetApp, Inc. All Rights Reserved.
The Figure 1 configuration uses a single vSwitch and four iSCSI HIC ports per controller. Each ESXi hostcan establish eight physical paths to each storage LUN, four active-optimized paths through the controllerwith LUN ownership, and four active, nonoptimized paths through the alternate controller in the storagesystem.The Figure 2 configuration uses a single vSwitch and two iSCSI base ports per controller. Each ESXi canestablish four physical paths to each storage LUN, two active-optimized paths through the controller withLUN ownership, and two active nonoptimized paths through the alternate controller in the storage system.Best PracticePlace each controller host port pair in a different IP subnet or VLAN.Path ManagementBy default, ESXi 6.x and 7.x contains storage claim rules associated with the paths from VMware devicesto NetApp E-Series storage systems. A path policy defined in the ESXi claim rules specifies round robinfor all NetApp E-Series devices. Specifically, the path failover for the one-vSwitch architecture is handledin the vSwitch.The physical storage LUNs from the E-Series storage system are assigned to the ESXi host by using theE-Series SANtricity System Manager. Each HIC port is configured with an IP address in a local subnet toa specific NIC port on the ESXi host, as shown in Figure 1. This method divides traffic by using thesubnets. However, both controllers should have access to all subnets so that the VMware multipath policyon each host manages all available paths to the storage system correctly.Best PracticeAll ESXi hosts that are connected to a single storage system should use the same vSwitch andmultipath settings to avoid inconsistent load balancing behaviors on the storage system host interfaceports.VMware ESXi 6.x and 7.x with Volume Groups and Dynamic Disk PoolConfigurationOptions for using E-Series volume groups or NetApp Dynamic Disk Pools (DDPs) for the storageconfiguration supporting VMware are shown in Figure 1 and Figure 2. VMware ESXi 6.x and 7.x softwarewrites a variable segment size of up to 128KB. Therefore, standard RAID-based volume groups that aretuned to match specific segment sizes or DDP volumes that have a default nontunable 128KB segmentsize are well suited for VMware workloads. As a result, either E-Series storage configuration can be usedto meet the requirements for individual storage implementations. In VMware, E-Series volumes arecommonly used as VMFS datastores, but they can also be used for raw device mappings (RDMs).All the possible storage and LUN mapping options can deliver low-latency I/O at various levels of IOPSand throughput for random I/O. However, volume group configurations that use the VMware RDM optionare best suited for large sequential I/O.Best PracticeFor random workloads, DDPs match the performance of and in some cases outperform comparableRAID 6 volume group configurations. As a result, when reliability, availability, and serviceability are theoverriding considerations and VMware disks greater than 2TB are required, NetApp recommends ESeries DDPs with the VMware RDM feature. For LUNs smaller than 2TB, NetApp recommends ESeries DDPs with VMware virtual disks.6VMware Configuration Guide for E-Series SANtricity iSCSIIntegration with ESXi 6.x and 7.x 2020 NetApp, Inc. All Rights Reserved.
Host Block Size RequirementsFor EF300 and EF600 E-Series systems, a volume can be set to support a 512-byte block size (alsocalled sector size) through the SANtricity System Manager. You must set the correct value during thevolume creation process. If possible, the System Manager interface suggest the appropriate defaultvalue. Before setting the volume block size, read the following limitations and guidelines. At this time, VMware require a 512-byte block size and does not support 4KiB. The type of drives you select for your pool or volume group also determines what volume block sizesare supported, as follows: If you create a volume group using drives that write to 512-byte blocks, then you can only createvolumes with 512-byte blocks. If you create a volume group using drives that write to 4KiB blocks, then you can create volumeswith either 512-byte or 4KiB blocks. If the array has an iSCSI host interface card, all volumes are limited to 512-byte blocks (regardless ofvolume group block size). This is due to a specific hardware implementation. You cannot change block size once it is set. If you need to change a block size, you must delete thevolume and re-create it.For more information about how to set the host block size for volumes within the SANtricity SystemManager, see the SANtricity System Manager Online Help.VMware Network and iSCSI Storage Adapter Configuration DetailsVMware allows multiple configurations of virtual networks to accommodate redundancy and throughputrequirements. In many cases, an ESXi server must drive workflows by using multiple 10Gb or 25Gb linksto an E-Series storage system. In that case, care must be taken so that traffic uses all available paths in abalanced manner. Various configurations have been tested so that performance and link-faultcharacteristics are well documented.This VMware configuration guide uses a virtual switch configuration in which all VMK ports are associatedwith a single storage system. In this configuration, each VMK is assigned a unique IP address and subnetthat is then associated with an assigned primary vmnic.Based on the physical network architecture and IP scheme, each VMK port is configured to access twopaths for each LUN on the E-Series storage system. One path is through controller A and one path isthrough controller B. By using the architecture in .For more information on supported ports and speed on E-Series hardware, see Introduction to NetApp ESeries E2800 Arrays and Introduction to NetApp E-Series E5700 Arrays.The configurations in Figure 1 support a maximum of eight paths to any LUN on the storage system. Byusing the Figure 2 architecture, the configuration supports four paths to any LUN on the storage system.The following section describes the configuration of E-Series and VMware connectivity over iSCSI usingthe second architecture (Figure 2).Please use the following video as a visual guide for configuring a vSwitch on an ESXi host. There arealso instructions regarding setting up an iSCSI initiator and target as well as instructions for configuringthe host on SANtricity.Configuring One vSwitch Configuration with Two iSCSI Ports on Each ControllerTo configure one vSwitch on an ESXi host, complete the following steps:1. Create the vSwitch and add uplinks:a. On the ESXi Host on the Navigator tab, select Networking Virtual Switches.7VMware Configuration Guide for E-Series SANtricity iSCSIIntegration with ESXi 6.x and 7.x 2020 NetApp, Inc. All Rights Reserved.
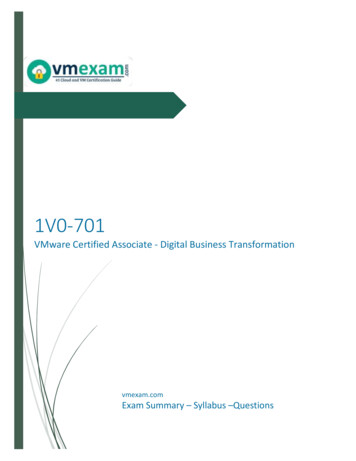
b. Click Add Standard Virtual Switch and choose the specific vmnic on the Uplink1 option. ClickAdd.c.You can add only one uplink at a time. To add more uplinks, select the virtual switch you alreadycreated, click Add Uplink, and select the specific vmnic on the Uplink 2 options. Then click Save.Each vmnic should be connected to a different physical switch to eliminate a single point of failureon the physical switch.d. Verify that a switch with two uplinks has been created.8VMware Configuration Guide for E-Series SANtricity iSCSIIntegration with ESXi 6.x and 7.x 2020 NetApp, Inc. All Rights Reserved.
2. Add a VMkernel NIC and assign the IP address:a. Go to Networking VMkernel NICs and click Add VMkernel NIC.b. From the Virtual Switch drop-down menu, select the virtual switch that you created in step 1.c.In the New Port Group field, enter the port group name (for example, iSCSI-1).d. In the IPv4 settings, select Static.e. From the drop-down menu, assign the IP address for the VMkernel NIC.f.Click Create.g. Repeat step 2 to create additional VMkernel NICs. Click Create.h. Verify that the VMkernel NICs have been created with IPv4 address.9VMware Configuration Guide for E-Series SANtricity iSCSIIntegration with ESXi 6.x and 7.x 2020 NetApp, Inc. All Rights Reserved.
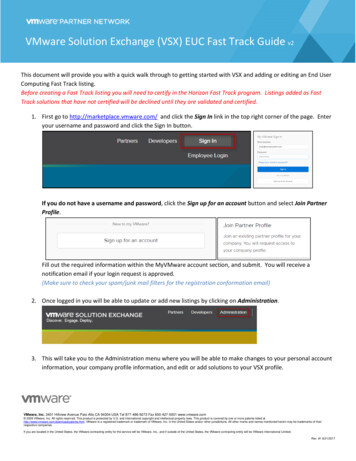
3. Configure port groups:a. Go to Networking Port Groups, select iSCSI-1, and click Edit Settings.b. Click NIC Teaming and then click Yes for Override Failover Order.c.Select one active vmnic, with the rest set to Standby for each port group. Click Save.The choice of which vmnic to activate depends on which subnet the VMkernel NIC equivalent tothe port group is on. For example, iSCSI-1 is on subnet 192.168.1.X. vmnic5 is connected tothe iSCSI port on the storage on subnet 192.168.1.X, and vmnic1 is connected to an iSCSIport on the storage on subnet 192.168.2.X. Therefore, vmnic5 should be set to Active andvmnic1 should be set to Standby for that port group.d. Click Save.10VMware Configuration Guide for E-Series SANtricity iSCSIIntegration with ESXi 6.x and 7.x 2020 NetApp, Inc. All Rights Reserved.
e. Override the failover order of vmnics on the iSCSI-2 port group.11VMware Configuration Guide for E-Series SANtricity iSCSIIntegration with ESXi 6.x and 7.x 2020 NetApp, Inc. All Rights Reserved.
4. Configure the vSwitch on the other ESXi host.iSCSI Initiator/Target Configuration on ESXi HostsTo configure the iSCSI initiator/target on ESXi hosts, complete the following step:1. In SANtricity, go to Settings System iSCSI settings Configure iSCSI Ports.To configure all iSCSI ports with IPv4 addresses on Controller A and Controller B, complete the followingsteps:1. Click Controller A and then click Next.12VMware Configuration Guide for E-Series SANtricity iSCSIIntegration with ESXi 6.x and 7.x 2020 NetApp, Inc. All Rights Reserved.
2. From the drop-down menu, select the port on Controller A and then click Next.3. In the iSCSI Ports window, enable IPv4 and enable ICMP ping responses. Click Next.4. Select the Manually Specify Static Configuration option and enter the IP address for the iSCSI port.Click Finish.13VMware Configuration Guide for E-Series SANtricity iSCSIIntegration with ESXi 6.x and 7.x 2020 NetApp, Inc. All Rights Reserved.
5. Go to Settings System iSCSI settings and copy the target IQN from SANtricity.6. On the ESXi host, go to Storage Adapters Configure iSCSI:a. In the Static Targets menu, click Add Static Target.b. For the Target option, paste the target IQN that you copied in step 2.c.In the Address field, enter the IP address of the iSCSI port that you configured in step 1. Keepport 3260 as the default.d. Enter all the static targets. The number of static targets is equal to the number of iSCSI portsconfigured on the storage array.e. In the Dynamic Target menu, add one of the static IP addresses that you have already set. Keepport 3260 as the default. Click Save Configuration.14VMware Configuration Guide for E-Series SANtricity iSCSIIntegration with ESXi 6.x and 7.x 2020 NetApp, Inc. All Rights Reserved.
7. Follow steps 1 through 3 to configure iSCSI targets on other ESXi hosts.Create and Configure Hosts and Clusters in SANtricityTo create hosts in SANtricity after creating volumes from the DDP, complete the following steps:1. Go to Storage Hosts Create Host.2. Select VMware as the Host Operating System Type.3. Under Host Ports, specify the IQN of the ESXi host. Click Create.15VMware Configuration Guide for E-Series SANtricity iSCSIIntegration with ESXi 6.x and 7.x 2020 NetApp, Inc. All Rights Reserved.
Repeat step 1 to create additional hosts in SANtricity. The number of hosts depends on the numberof ESXi hosts in the environment. The architectures illustrated in .For more information about supported ports and speed on E-Series hardware, see Introduction toNetApp E- Series E2800 Arrays and Introduction to NetApp E-Series E5700 Arrays.Figure 1 and Figure 2 have two ESXi hosts.4. (Optional) Create a cluster.In a VMware environment, hosts typically need concurrent access to some volumes for HA purposes.For example, volumes used as datastores often need to be accessible by all hosts in the VMwarecluster. Volumes that need to be accessed by more than one host must be mapped to a host cluster.Make sure that you have created at least two hosts before creating a cluster.a. To create a cluster, go to Storage Hosts Create Host Cluster.b. Enter a name for the cluster and select the host to add to the cluster. Click Create.16VMware Configuration Guide for E-Series SANtricity iSCSIIntegration with ESXi 6.x and 7.x 2020 NetApp, Inc. All Rights Reserved.
Assign volumes to a host.Note:This step applies only to volumes that are accessed by a single host, which are typically bootLUNs or standalone ESXi hosts. See step 5 to map volumes to a host cluster.a. Select the host and then click Assign Volumes. Select the volumes and then click Assign.17VMware Configuration Guide for E-Series SANtricity iSCSIIntegration with ESXi 6.x and 7.x 2020 NetApp, Inc. All Rights Reserved.
b. Repeat step 3-a to assign volumes to other hosts.c.After assigning volumes, each host shows one additional volume, which is theaccess volume/LUN.Unassign the access LUN. Access LUNs are used for in-band array management, whichrequires running SANtricity on the host. Because this is not possible with ESXi, you canunassign the access LUN using the following steps.a. Select the host and click Unassign Volumes.b. In the Unassign Volumes window, check the Access LUN and enter unassign. ClickUnassign.18VMware Configuration Guide for E-Series SANtricity iSCSIIntegration with ESXi 6.x and 7.x 2020 NetApp, Inc. All Rights Reserved.
Best PracticeUnassign the access LUN when using ESXi.Assign volumes to a cluster.Note:This step applies only to volumes that are to be shared between ESXi hosts.a. Select the cluster and then select the Assign Volumes option. Select the volumes and then clickAssign.19VMware Configuration Guide for E-Series SANtricity iSCSIIntegration with ESXi 6.x and 7.x 2020 NetApp, Inc. All Rights Reserved.
5. Verify that the volumes are mounted on the ESXi host.a. Log into both ESXi hosts and verify that volumes are mounted. In the Navigator tab, go toStorage Devices.b. Click Rescan and Refresh.c.If volumes did not show up after the rescan and refresh, you can try rebooting the host. From theNavigator tab, go to Host Actions.d. From the drop-down menu, Click Enter Maintenance Mode and then click Yes. After the hostenters maintenance mode, click Reboot.20VMware Configuration Guide for E-Series SANtricity iSCSIIntegration with ESXi 6.x and 7.x 2020 NetApp, Inc. All Rights Reserved.
Tuning VMware Settings to Maximize PerformanceVMware ESXi 6.x and 7.x defaults to a round-robin multipath policy to balance I/O for each storage LUNacross the available optimized paths to the storage system. After the NetApp E-Series devices (LUNs)have been discovered by an ESXi host, view the Manage Paths window for each E-Series device to verifythat the paths are set up as expected.1. On the VMware vSphere web client, select the ESXi host and go to Configure Storage Devices.2. Select any iSCSI disk, go to Properties, and select Edit Multipathing.With a fully configured E-Series storage system (using all four iSCSI ports) connected to two NICports on an ESXi host, there should be two active I/O paths and two active (nonoptimized) paths foreach device.21VMware Configuration Guide for E-Series SANtricity iSCSIIntegration with ESXi 6.x and 7.x 2020 NetApp, Inc. All Rights Reserved.
3. You can also check the path by clicking Configure Storage Devices.4. Select any iSCSI disk and go to Path.I/O Operation Limit—Performance ImplicationsBy default, the VMware multipath round-robin policy balances I/O requests across the available active(I/O) paths for each LUN by switching paths for each one thousand I/Os (IOOperations Limit).Testing in our lab showed that the default IOOperations Limit (1,000) did not maximize load balancing onthe host NIC ports. However, when the default I/O limit was adjusted to 250, the I/O load was much moreevenly distributed between the two NIC ports on each host. For more information, see Adjusting RoundRobin IOPS limit from default 1000 to 1 (2069356).22VMware Configuration Guide for E-Series SANtricity iSCSIIntegration with ESXi 6.x and 7.x 2020 NetApp, Inc. All Rights Reserved.
To view the current IOOperations Limit setting on the ESXi host, run the esxcli storage nmp psproundrobin deviceconfig get –d device ID command. # esxcli storage nmp psp roundrobin deviceconfig get -d naa.60080e50002935dc00003c7d540f7619Byte Limit: 10485760Device: naa.60080e50002937e0000044dd540f7483 IOOperation Limit: 1000The default IOOperations Limit can be adjusted on an existing device as required by running the followingcommand:esxcli storage nmp psp roundrobin deviceconfig set -d device ID -t iops -I 1 to 1000 Setting the value to 1 forces the ESXi server to send each I/O through a different path from the previousI/O whenever multiple active (I/O) paths are available. To return the setting to the default value of 1,000,run the esxcli storage nmp psp roundrobin deviceconfig set -d device ID -tiops -I 1000 command. # esxcli storage nmp psp roundrobin deviceconfig set -d naa.60080e50002935dc00003c7d540f7619 -tiops -I 1000 # esxcli storage nmp psp roundrobin deviceconfig get -d naa.60080e50002935dc00003c7d540f7619Byte Limit: 10485760Device: naa.60080e50002935dc00003c7d540f7619 IOOperation Limit: 1000 Limit Type: IopsTo automatically set the IOOperations limit when a new device is created in the ESXi host, create a claimrule that overrides the ESXi systemwide claim rule for E-Series storage systems by running the esxclistorage nmp satp rule add -s "VMW SATP ALUA" -V "NETAPP" -M "INF-01-00" -P"VMW PSP RR" -O "iops 1 to 1000 " command. After new devices are created, be sure toconfirm that the setting was successful by using the esxcli storage nmp psp roundrobindeviceconfig get device ID command.Jumbo FramesIn addition to setting the round-robin parameters, it is important to change the jumbo frames defaultsetting to an MTU of 9,000 for all network interfaces in the I/O path between the host and the storage.This is not a global setting in the ESXi host and instead must be set in multiple locations, once on thevirtual switch and again on each iSCSI VMkernel adapter. This task can be performed through the ESXihost and the VMware vSphere web client. Changing the jumbo frame setting from the VMware vSphereweb client is shown in Appendix A.To change the jumbo frames setting using the ESXi interface, complete the following these steps:1. In the VMware ESXi host view, log in to the ESXi host from the web browser.2. To change the MTU on a virtual switch from the Navigator tab, go to Networking Virtual Switches andclick the virtual switch. Click Edit Settings.23VMware Configuration Guide for E-Series SANtricity iSCSIIntegration with ESXi 6.x and 7.x 2020 NetApp, Inc. All Rights Reserved.
3. In the resulting window, change the MTU to 9000 and click Save.4. To change the MTU on the VMkernel adapters, complete the following steps:a. From the Navigator tab, go to Networking VMkernel NICs and click the iSCSIVMkernel NIC. Select Edit Settings.e. In the resulting window, change the MTU to 9000 and click Save.24VMware Configuration Guide for E-Series SANtricity iSCSIIntegration with ESXi 6.x and 7.x 2020 NetApp, Inc. All Rights Reserved.
f.Be sure to do this on all iSCSI VMkernel NICs.5. In addition to the VMware configuration, jumbo frames must be enabled for each HIC port on the ESeries controllers. To change the jumbo frame setting on E-Series controllers, complete the followingsteps:a. Log in to the E-series array SANtricity System Manager and go to Settings System.b. In the iSCSI settings, select Configure iSCSI Ports.25VMware Configuration Guide for E-Series SANtricity iSCSIIntegration with ESXi 6.x and 7.x 2020 NetApp, Inc. All Rights Reserved.
c.Select the controller and click Next.d. Select the HIC port from the drop-down menu and click Next.26VMware C
Monitor and maintain the platform hardware over time NetApp SANtricity System Manager can be used to create new VMware hosts, create and map volumes (LUNs), control E-Series copy service functions, and monitor the system for faults. With ease of integration, system reliability, and service flexibility, NetApp E-Series storage systems offer