Transcription
Dell Engineered Solutions for VMwareEVO:RAILVersion 1.2.1 Management and MaintenanceUser’s Guide
Notes, cautions, and warningsNOTE: A NOTE indicates important information that helps you make better use of your computer.CAUTION: A CAUTION indicates either potential damage to hardware or loss of data and tells youhow to avoid the problem.WARNING: A WARNING indicates a potential for property damage, personal injury, or death.Copyright 2015 Dell Inc. All rights reserved. This product is protected by U.S. and international copyright andintellectual property laws. Dell and the Dell logo are trademarks of Dell Inc. in the United States and/or otherjurisdictions. All other marks and names mentioned herein may be trademarks of their respective companies.2015 - 10Rev. A00
Contents1 EVO:RAIL Management. 5Access EVO:RAIL Management.5Create VMs.5Monitor VMs. 8Monitor appliance health. 9Add EVO:RAIL Appliances to an EVO:RAIL cluster.10Prerequisites. 10Procedure. 10Ongoing configuration. 11Activating EVO:RAIL licenses. 11Localizing GUI.12Updating appliance software. 122 EVO:RAIL Maintenance. 15Access vSphere WebClient.15Logging and Events. 15Events. 15vRealize Log Insight. 15Support Logs.16Live Logging.16Hardware replacement .16Appliance shutdown.163 Appendix A – VM size by guest OS . 174 Appendix B — Security profile details . 19Risk Profile 1.19Risk Profile 2. 19Risk Profile 3.205 Appendix C: EVO:RAIL appliance shutdown or restart.21EVO:RAIL cluster shutdown. 21EVO:RAIL cluster restart . 27EVO:RAIL single appliance shutdown. 28EVO:RAIL single appliance restart . 296 Getting help. 31Contacting Dell.313
Documentation matrix. 314
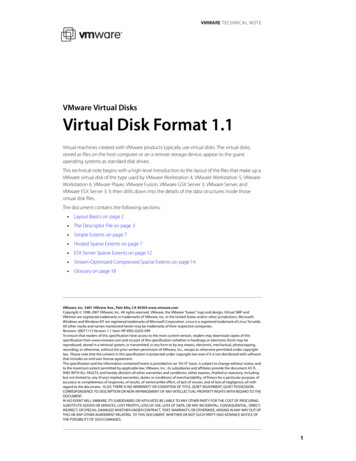
EVO:RAIL Management1After your initial EVO:RAIL Appliance is deployed and configured, EVO:RAIL Management is where youperform your day-to-day tasks such as: Create virtual machines (VMs) Monitor virtual machines (VMs) Monitor the status of an EVO:RAIL cluster, appliances, and nodes Add EVO:RAIL appliances Enter appliance licenses Select localization setting Update EVO:RAIL software componentsAccess EVO:RAIL ManagementTo access EVO:RAIL Management: From your EVO:RAIL workstation or laptop, browse through the EVO:RAIL IP address https:// evo:rail-ip-address :7443. Log in to EVO:RAIL management console by using username as adminstrator@vsphere.localand the password specified during EVO:RAIL Initial Configuration.The latest versions of Firefox, Chrome, and Internet Explorer 10 and later are all supported. The minimumrecommended screen resolution is 1280x1024.Create VMsEVO:RAIL Management streamlines the creation of VMs with simple selections for: Guest operating system (OS) Virtual machine size Network segment (VLAN) Security optionsIn EVO:RAIL Management, use the following procedure to create a VM:1.Click Create VM in the left pane to begin the VM creation process. You have the option to either clickCancel or Go Back to a previous step.5
Figure 1. EVO:RAIL Management — Create VMs2.In the Enter VM Name box, type a name for your VM.3.To load your ISO image file to be used for your Guest OS, follow one of these procedures:a.If you are uploading the ISO image file for local storage, click Upload Image.1.Click Choose File to open the standard file selection dialog box.2.Locate the ISO image file on your local file system and select it.3.Click Open to return to EVO:RAIL Management.4.Click Upload Image. The ISO image that is copied to the Virtual SAN datastore.NOTE: If the file is too large to upload, see the resolution section of VMware KnowledgeBase Article 2109915.b.c.If you are uploading the ISO image file from a network drive, click Mount NFS/CIFS.1.Click the protocol of the network drive you are accessing: NFS or CIFS2.Type the URL format:[protocol]:/[host]/path/to/file.iso.3.Click Mount Remote Image. The ISO image is copied to the Virtual SAN datastore.If you are using a previously uploaded guest OS, you can reuse an existing image by doubleclicking the guest OS name.NOTE: The ISO image file must have a unique name from those already loaded onto the VirtualSAN datastore. If the name is identical to one or more, you are unable to proceed after themessage is displayed until you refresh your browser to clear the dialog box.6
NOTE: EVO:RAIL Management does not support importing existing prebuilt copies of VMs inOVA/OVF format. Workaround is to use the vSphere Web Client interface to create VMs from anexisting OVA/OVF format. The template can then be viewed in EVO:RAIL Management as a VM,which you can use to clone to make a VM from the template.4.Confirm Guest OS Version that was loaded from the drop-down menu, click Continue.5.Select a VM size: Small, Medium or Large.NOTE: EVO:RAIL has a set of predefined VM sizes based on standard VMwarerecommendations for each Guest OS. See the Appendix A section in this document.6.Click VM Size.7.Select one or more network segments the VM should connect to.8.Click Select VM Networks.9.Select the security policy: No Policy, Risk Profile 3, Risk Profile 2, or Risk Profile 1.These profiles are a collection of VM Advanced Settings, based on a particular Risk Profile from thevSphere 5.5 Security Hardening Guide, http://vmware.com/security/hardening-guides. For moreinformation about the technical settings, see the Appendix B section in this document. No Policy: Indicates that no security configuration options are applied to the VM. Risk Profile 3: Indicates guidelines that must be implemented in all environments. These areVMware best practices for all data centers. Risk Profile 2: Indicates guidelines for more sensitive environments or small/medium/largeenterprises that are subject to strict compliance rules.7
Risk Profile 1: Indicates guidelines for the highest security environments, such as top-secretgovernment or military installations, or anyone with sensitive data or in a highly regulatedenvironment.NOTE: By selecting a more secure policy, you lose some VM functionality, such as automatedtools, inability to shrink VM disks, persistent mode only, no logging and performanceinformation, blocked device interactions, and limited remote console connections. See thehardening guides for more details.10. Click Create and Start a New VM.11. After the VM is created, the EVO:RAIL Management interface is displayed.Monitor VMsEVO:RAIL Management allows users to view all VMs in a grid. Use the Filter By and Sort By lists in theupper-right corner to arrange the VMs. Use the Search box to search for VMs by name.If you click a VM, you can have the following options depending on the state of your VM. To view all theoptions, click the VM. Install VMware ToolsNOTE: To install VMware Tools, your guest OS must already be installed on your VM, and the guestOS ISO disk must be ejected from the virtual CD drive. Rename VM Eject ISO Open console Clone VMNOTE: The VM is same as the original. A message is displayed asking you to type a new CMname. Suspend or Resume DeleteNOTE: Only accessible if VM is shut down or turned off.8
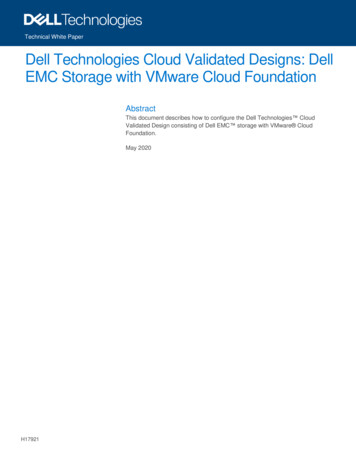
Turn on or turn offMonitor appliance healthEVO:RAIL Management simplifies live compute management with health monitors for CPU, memory,storage, and VM usage for an entire EVO:RAIL cluster, individual appliances, and individual nodes. Click Health in the left pane.Status is displayed on the appliance health page for the nodes, HDD, SSD, ESXi device, and NIC. Ifeverything is normal, a green checkmark is displayed. In case of an issue, a yellow color triangle isdisplayed. A critical alarm is indicated with a red color triangle. All alarms and warnings are from vCenterServer.Figure 2. EVO:RAIL Management — Monitor appliance health9
Add EVO:RAIL Appliances to an EVO:RAIL clusterEVO:RAIL Management revolutionizes the scale-out feature. Increasing compute, network, and storageresources is as easy as turning on a new appliance to join an existing EVO:RAIL cluster.PrerequisitesDell recommends that all VMware components (ESXi, vCenter Server, and EVO:RAIL) are of the sameversion on all EVO:RAIL appliances in an EVO:RAIL cluster. See Appendix A in the EVO:RAIL CustomerRelease Notes for supported configurations.ProcedureWhenever EVO:RAIL detects a new appliance, the following message and button are displayed on theEVO:RAIL Management page:EVO:RAIL automatically distributes the configuration to seamlessly add new appliances with zeroadditional configuration. All you do is supply the passwords you created in EVO:RAIL Configuration; theother fields are grayed-out if you’ve configured enough IP addresses as shown in the following figure.CAUTION: Only one appliance can be added at a time. To add multiple appliances; turn on one ata time, making sure that each is properly configured before turning on the next appliance.To add an EVO:RAIL appliance,1.Click ADD EVO:RAIL APPLIANCE.2.If more IP addresses are not required, the input areas are grayed out. If you are required to enter IPaddresses, you must ensure that none of them conflict with existing IP addresses in your network.a. Enter the New Starting and Ending addresses for the ESXi IP Pool for the new appliance.b. Enter the New Starting and Ending addresses for the vMotion IP Pool for the new appliance.c. Enter the New Starting and Ending addresses for the Virtual SAN IP Pool for the new appliance.3.Type the Appliance ESXi Password.4.Type the Appliance vCenter Server Password.5.Click ADD EVO:RAIL APPLIANCE.6.When the process is complete, click Finish.10
Ongoing configurationThe ongoing configuration tasks in EVO:RAIL Management include licensing, localization, and updates. Allthese can be found when you click Config in the left pane.Activating EVO:RAIL licensesTo license your EVO:RAIL Appliance,1.You receives an e-mail from Dell with your Partner Activation Code (PAC).2.Go to https://www.vmware.com/oem/code.do?Name DELL-AC and type your PAC(s).3.Click Config in the left pane.4.Under the Licensing tab, type your license key(s):5.Click License Appliance.a. You receive an e-mail with your license key(s).11
6.If the license is part of the vSphere Loyalty Program in EVO:RAIL Release 1.2, do the following:a.Go to https://my.vmware.com/web/vmware/login to group the required set of licenses into asingle license key.1.Create a folder within MyVMware with the licenses called EVORAIL.2.Send a service request, to the VMware license team with the license keys you needcombined into a single license key.b.Type the single license key obtained above, and then click License Appliance.c.Ensure that you want to you use this license, and then click License Appliance.d.No other licenses are required. Your EVO:RAIL appliance is now fully licensed.Localizing GUIEVO:RAIL Management is available in English, French, German, Japanese, Korean, Simplified Chinese, andTraditional Chinese. To select your language,1.Click Config in the left pane.2.Select General Choose your Language Selection.Updating appliance softwareEVO:RAIL supports vCenter, ESXi, and EVO:RAIL software patch and upgrade. With a minimum of fourindependent ESXi hosts in an EVO:RAIL cluster, updates are nondisruptive and require zero downtime. Create a snapshot or backup copy of the vCenter Server virtual appliance. This can be accomplishedby connecting to VMware vSphere Web Client through https:// hostname :9443, where hostname is the IP address or hostname of EVO:RAIL. All files must be uploaded from www.my.vmware.com into a directory accessible from your EVO:RAILManagement workstation or laptop. See the Release Notes for updated files list.12
To update an appliance software version:1.Click Config in the left pane.2.Under the Updates tab, click Upload, and browse through to the directory with the components youare updating: vmware-marvin-release-build .rpm EVO RAIL release-build. .zip terepo .zip (if applicable) ESXI-release-build .zip (if applicable)a. Select a file, and click Open.b. Repeat for each component in the EVO:RAIL Release3.Click Check now. If the EVO:RAIL check succeeds, the Offline Updates box adds a switch for you toenable to perform the update.4.Click to change the state of Offline Updates from No to Yes.5.Click Update.After the update is complete, you will receive a notification that you were disconnected fromEVO:RAIL Management. It can take up to 5 minutes for the new EVO:RAIL RPM to initialize. It cantake up to 15 minutes for the vCenter Server to restart and for all of services to initialize. The updatetime for ESXi depends on the quantity of VMs and might take a few hours to complete; however, theappliance will function as normal during that time.6.After EVO:RAIL Management restarts, you are prompted to log in.NOTE: If EVO:RAIL Management is not fully present after the automatic restart, refresh the webbrowser. For more information, see the VMware Knowledge Base Article 2101828.Updating appliance firmware, driver, BIOSDell Power Tools Cluster Services Manager (CSM) provides a cluster-aware solution integrated into theEVO:RAIL UI for updating firmware (FW), drivers and BIOS. CSM provides notification whenever a hostcomponent’s firmware or software is determined to be out of date. By using the CSM user interface, you13
can update the system across the cluster automatically. The CSM manages the migration of the virtualmachines, performs all of the updates, and brings the host back online one at a time (also known asrolling updates).For more information, see the Dell Power Tools Cluster Services Manager User’s Guide at Dell.com/support/home.14
EVO:RAIL Maintenance2EVO:RAIL has provided many facilitated maintenance procedures. This section describes the EVO:RAILmaintenance procedures such as: Access vSphere Web ClientLogging and EventsHardware ReplacementAppliance ShutdownAccess vSphere WebClientEVO:RAIL Management allows you to access the vSphere Web Client to perform more complicated tasksthan those found in the streamlined EVO:RAIL interface.1.Click the VMware vSphere Web Client icon in the upper right corner of the EVO:RAIL ManagementVMS page.2.Log in with the administrator login and password you set up during EVO:RAIL Configuration.NOTE: From vSphere Web Client, do not use service datastores when creating or moving VMs.These datastores are only to be used by Dell for serviceability.NOTE: If you use the vSphere Web Client to perform tasks that are automated by EVO:RAIL, youmay run into situations where the automated flow does not work properly.Logging and EventsEVO:RAIL Management provides several ways to access log information: Events — displays EVO:RAIL tasks and critical alarms in the EVO:RAIL Management interface.vRealize Log Insight — provides access to the default EVO:RAIL logging mechanism. You mayalternately select an existing third-party syslog server during initial configuration.Support Logs — combines diagnostic information for vCenter Server, ESXi, and EVO:RAIL into onebundle to send to support.EventsEVO:RAIL Management provides you access to the list of events occurring in EVO:RAIL Management,either initiated by EVO:RAIL or by the user. This is available from Events in the left pane. Events can beorganized by on the basis of criticality (Critical) and time (Most Recent).vRealize Log InsightEVO:RAIL is deployed with vRealize Log Insight. However, you may choose to use your own third-partysyslog servers. To use vRealize Log Insight, point your browser to the configured IP address; the15
username is admin. If you ssh to Log Insight, the username is root. The password, in either case, is theone you specified for vCenter Server. See VMware vRealize Log Insight Documentation.If you configured an existing third-party syslog server, follow the instructions supplied with that product.Support LogsEVO:RAIL Management combines diagnostic information for vCenter Server, ESXi, and EVO:RAIL into onelog bundle. This log bundle can be uploaded to technical support as part of a support request (SR). Togather the log information from your EVO:RAIL appliance, follow these steps:1.Click Config in the left pane.2.Under the Support tab, click Generate Support Bundle.NOTE: This process can take from 20 minutes to several hours. It is run in the background, soyou can continue to use EVO:RAIL Management.3.After the Support Log is generated, click Download Support Bundle.The .zip file is downloaded to your workstation.Live LoggingEVO:RAIL Management provides you to access a live stream of EVO:RAIL log messages as each messageis created. To access this feature:1.Click Config in the left pane.2.Under the Support tab, click Show EVO:RAIL Live Logging.A window opens at the bottom of the EVO:RAIL Management interface. You have the ability tosearch for key words, show only alarms, only errors, or all messages. The arrows can be used toexpand or collapse the viewer.3.To turn off live logging, click Config in the left pane.4.Under the Support tab, click Hide EVO:RAIL Live Logging.Hardware replacementEVO:RAIL supports the replacement of the following Field Replacement Units (FRUs): node, CPU,motherboard, memory, storage adapter, ESXi boot device, HDD, SSD, and the PSU. Contact Dell forspecific hardware replacement procedures.Appliance shutdownAn EVO:RAIL appliance can be turned off and restarted manually. See the Appendix C section in thisdocument.16
3Appendix A – VM size by guest OSTable 1. VM size by guest OSGuest OSEVO:RAIL SizevDiskvCPUCorevMEMRed Hat Enterprise Linux 7 (64-bit)Small16 GB111 GBRed Hat Enterprise Linux 6 (64-bit)Medium24 GB212 GBLarge32 GB416 GBGuest OSEVO:RAIL SizevDiskvCPUCorevMEMMicrosoft Windows Server 2012 (64bit)Small40 GB111 GBMedium60 GB214 GBLarge80 GB418 GBGuest OSEVO:RAIL SizevDiskvCPUCorevMEMMicrosoft Windows Server 2003 (64bit)Small16 GB111 GBMedium32 GB214 GBLarge60 GB418 GBGuest OSEVO:RAIL SizevDiskvCPUCorevMEMMicrosoft Windows 8 (64-bit)Small32 GB112 GBMedium40 GB214 GBLarge60 GB218 GBRed Hat Enterprise Linux 5 (64-bit)Ubuntu Linux (64-bit)CentOS 4/5/6 (64-bit)Table 2. VM size by guest OSMicrosoft Windows Server 2008 (64bit)Table 3. VM size by guest OSTable 4. VM size by guest OS17
Table 5. VM size by guest OSGuest OSEVO:RAIL SizevDiskvCPUCorevMEMMicrosoft Windows 7 (64-bit)Small32 GB111 GBMedium40 GB214 GBLarge60 GB218 GBGuest OSEVO:RAIL SizevDiskvCPUCorevMEMMicrosoft Windows XPSmall16 GB111 GBMedium32 GB212 GBLarge60 GB214 GBTable 6. VM size by guest OS18
Appendix B — Security profile details4The policies that match the VMware Security Hardening Guide for vSphere 5.5 Update 1 (http://www.vmware.com/security/hardening-guides) are found in the VM advanced settings (key/value) foreach of the three security risk profiles.Risk Profile 1Guidelines that should only be implemented in the highest security environments, for example, topsecret government or military-sensitive data.isolation.tools.autoInstall.disable trueisolation.tools.diskShrink.disable trueisolation.tools.diskWiper.disable trueisolation.tools.hgfsServerSet.disable truelogging falseisolation.monitor.control.disable trueisolation.tools.ghi.autologon.disable trueisolation.bios.bbs.disable trueisolation.tools.getCreds.disable trueisolation.tools.ghi.launchmenu.change e le trueisolation.ghi.host.shellAction.disable trueisolation.tools.dispTopoRequest.disable trueisolation.tools.trashFolderState.disable trueisolation.tools.ghi.trayicon.disable trueisolation.tools.unity.disable e trueisolation.tools.unity.taskbar.disable trueisolation.tools.unityActive.disable trueisolation.tools.unity.windowContents.disable trueisolation.tools.unity.windowContents.disable trueisolation.tools.vmxDnDVersionGet.disable trueisolation.tools.guestDnDVersionSet.disable trueisolation.tools.vixMessage.disable trueRemoteDisplay.maxConnections 1tools.setInfo.sizeLimit 1048576isolation.device.connectable.disable trueisolation.device.edit.disable trueRisk Profile 2Guidelines that should be implemented for more sensitive environments. For example, those handlingmore sensitive data, are subjected to stricter compliance rules.isolation.tools.autoInstall.disable trueisolation.tools.diskShrink.disable trueisolation.tools.diskWiper.disable trueRemoteDisplay.maxConnections 1log.keepOld 1019
log.rotateSize 100000tools.setInfo.sizeLimit 1048576isolation.device.connectable.disable trueisolation.device.edit.disable trueRisk Profile 3Guidelines that should be implemented in all environments.isolation.tools.diskShrink.disable trueisolation.tools.diskWiper.disable trueRemoteDisplay.maxConnections 2log.keepOld 10log.rotateSize 100000tools.setInfo.sizeLimit 1048576isolation.device.connectable.disable trueisolation.device.edit.disable true20
Appendix C: EVO:RAIL applianceshutdown or restart5The following are manual procedures for: Appliance shutdown and appliance restart. For theseprocedures, there are two categories of VMs:Service: Includes VMware vCenter Server Appliance, VMware vCenter Log Insight, and any Dell SolutionVMs.Client: Included of all other VMs.EVO:RAIL cluster shutdownThe following manual procedure is for graceful cluster shutdown of a complete cluster (single or multipleappliances):1.From the RAIL Management menu, click VMS in the left pane.2.Turn off all client VMs by doing the followinga. If a VM is turn on, click Power Off/Shutdown.b. A confirmation message is displayed, click Confirm Shutdown.c. Repeat for each VM.NOTE: Do not turn off any Dell VMs.3.Click the VMware vSphere Web Client icon in the upper-right corner, and then login withadministrator privileges.4.Click vCenter in the left pane. The vCenter home page is displayed.21
5.22Migrate all the Service VMs (VMware vCenter Server Appliance, VMware vCenter Log Insight, and anyDell VMs) by using the following steps:a.From the Inventory Lists menu, select Virtual Machines.b.Right-click the VM and select Migrate.c.On Select Migration Type, select Change host, and then click Next.d.On Select Destination Resourcee, select Marvin-Virtual-SAN-Cluster- id , and then clickNext.e.On Select Host, select the first ESXi host, such as esxi-node01.vm.vmworld.local, and then clickNext.f.On Select vMotion Priority, select Reserve CPU for optimal vMotion performance(Recommended), and then click Next.g.Review all information and click Finish.h.Repeat for all Service VMs. (VMware vCenter Server Appliance, VMware vCenter Log Insight, andany Dell VMs)
6.Enable Maintenance Mode on all but the first ESXi host by using the following steps:a.Return to the vCenter Home page.b.From the Inventory Trees menu, select Hosts.c.For each ESXi host 02, 03, 04, right-click and select Enter Maintenance Mode.d.Select the Move powered-off and suspended virtual machines to other hosts in the clustercheck box.e.Select No data migration from the Virtual SAN data migration drop-down menu.f.Click OK.23
7.24Disable High Availably by using the following steps:a.Return to vCenter Home page.b.From the Inventory Trees menu, select Clusters.c.Select MARVIN-Virtual-SAN-Cluster- id in either the left or center panes.d.Select Manage, and then Settings in the center pane.e.Under Services, select vSphere HA.f.If the center pane says vSphere HA is Turned ON, click Edit.g.Clear the Turn ON vSphere HA check box.h.Click OK.
8.Enable automatic start for all Service virtual machines (VMware vCenter Server Appliance, VMwarevCenter Log Insight, and any Dell VMs) by using the following steps:a.Return to the vCenter Home page.b.From the Inventory Trees menu, select Hosts.c.Select the first ESXi host, such as esxi-node01.vm.vmworld.local.d.Select Manage, and then Settings in the center pane.e.Under Virtual Machines, select VM Startup/Shutdown.f.Click Edit in the center pane.g.Select Automatically start and stop the virtual machines with the system.h.Select each service VM, use the up arrow key to move each to the Automatic Startup section inthe following required order:i.1.VMware vCenter Server Appliance (Set Startup Delay to 30 seconds)2.VMware vCenter Log Insight3.Dell VMs, if any are presentClick OK.25
9.26Turn off all Service VMs (VMware vCenter Server Appliance, VMware vCenter Log Insight, and anyDell VMs) by using the following steps:a.Return to the vCenter Home page.b.From the Inventory Trees menu, select Virtual Machines.c.Right-click the Service VM and select Shut Down Guest OS.d.To turn off the services, click Yes.e.Repeat until all Service VMs are turned off.
10. For each appliance, turn off all nodes. The vSphere web Client is no longer accessible. Therefore,your options are:a.Press the power button on each EVO:RAIL node, orb.Use out-of-band management if ACPI is available, orc.Use the vSphere C# Client to connect to each node and use the shutdown command.EVO:RAIL cluster restartThe cluster is restarted in the reverse order:1.Turn on each EVO:RAIL appliance. Turn on Node 1, last.NOTE: It may take up to 15 minutes for all services to be fully restored and for EVO:RAILManagement to be accessible.2.Log in to vSphere Web Client as by using an account with administrator privileges.3.Click vCenter in the left pane and the vCenter Home page is displayed.4.Enable High Availably with the following steps:a.b.c.d.e.f.g.From the Inventory Lists, select Clusters.Select MARVIN-Virtual-SAN-Cluster-id in either the left or center panesSelect Manage,, and then Settings in the center pane.Under Services, select vSphere HA.If the center pane says vSphere HA is Turned OFF, click Edit.Check Turn ON vSphere HA.Click OK.27
Figure 3. EVO:RAIL appliance restart5.Exit the Maintenance Mode on the ESXi by using the following steps:a. Go to the vCenter Home page.b. From the Inventory Lists menu, select Hosts.c. Right-click the ESXi host and select Exit Maintenance Mode.6.From EVO:RAIL Management, click VMS in the left pane.7.For each client VM, click Power On.EVO:RAIL single appliance shutdownThe following manual procedure is for graceful cluster appliance shutdown of a single appliance in amulti appliance cluster:1.Iden
Update EVO:RAIL software components Access EVO:RAIL Management To access EVO:RAIL Management: From your EVO:RAIL workstation or laptop, browse through the EVO:RAIL IP address https:// evo:rail-ip-address :7443. Log in to EVO:RAIL management console by using username as adminstrator@vsphere.local and the password specified during .