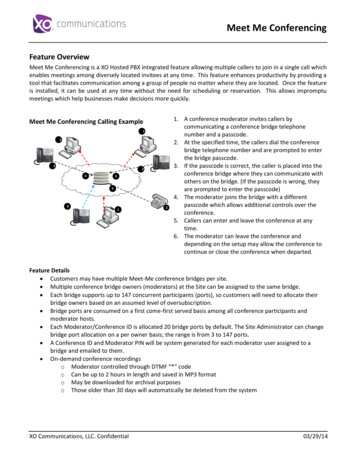
Transcription
Net ConferencingPowered by MicrosoftOffice Live Meeting User Guide1.2.3.4.Getting Started . . . . . . . . . . . . . . . . . . . . . . . . . . . . . . . . . . . . . . . . . . . . . . . . . . . . . . . . . . . 2A.Console Features . . . . . . . . . . . . . . . . . . . . . . . . . . . . . . . . . . . . . . . . . . . . . . . . . . . . . . . . . . . . . . . 2B.Setting Meeting Options . . . . . . . . . . . . . . . . . . . . . . . . . . . . . . . . . . . . . . . . . . . . . . . . . . . . . . . . . 7C.Showing Meeting Information and Setting Phone Information . . . . . . . . . . . . . . . . . . . . . . . . . . . . 9D.Setting Presenter Information . . . . . . . . . . . . . . . . . . . . . . . . . . . . . . . . . . . . . . . . . . . . . . . . . . . . 10Working With Presentations . . . . . . . . . . . . . . . . . . . . . . . . . . . . . . . . . . . . . . . . . . . . . . . 11A.Importing a Presentation . . . . . . . . . . . . . . . . . . . . . . . . . . . . . . . . . . . . . . . . . . . . . . . . . . . . . . . . 11B.Choosing a Presentation . . . . . . . . . . . . . . . . . . . . . . . . . . . . . . . . . . . . . . . . . . . . . . . . . . . . . . . . 12C.Selecting and Showing Slides . . . . . . . . . . . . . . . . . . . . . . . . . . . . . . . . . . . . . . . . . . . . . . . . . . . . 13D.Inserting New Slides. . . . . . . . . . . . . . . . . . . . . . . . . . . . . . . . . . . . . . . . . . . . . . . . . . . . . . . . . . . . 14E.Working With Annotation Tools . . . . . . . . . . . . . . . . . . . . . . . . . . . . . . . . . . . . . . . . . . . . . . . . . . . 23F.Maintaining Presentations and Slides . . . . . . . . . . . . . . . . . . . . . . . . . . . . . . . . . . . . . . . . . . . . . . 26G.Starting a Cycling Slide Show . . . . . . . . . . . . . . . . . . . . . . . . . . . . . . . . . . . . . . . . . . . . . . . . . . . . 30H.Allowing Participants to Review Slides . . . . . . . . . . . . . . . . . . . . . . . . . . . . . . . . . . . . . . . . . . . . . 31I.Printing to PDF . . . . . . . . . . . . . . . . . . . . . . . . . . . . . . . . . . . . . . . . . . . . . . . . . . . . . . . . . . . . . . . . 31Sharing With Participants . . . . . . . . . . . . . . . . . . . . . . . . . . . . . . . . . . . . . . . . . . . . . . . . . 33A.Sharing Contents Within the Sharing Frame . . . . . . . . . . . . . . . . . . . . . . . . . . . . . . . . . . . . . . . . . 34B.Sharing an Application . . . . . . . . . . . . . . . . . . . . . . . . . . . . . . . . . . . . . . . . . . . . . . . . . . . . . . . . . . 35C.Sharing Your Desktop. . . . . . . . . . . . . . . . . . . . . . . . . . . . . . . . . . . . . . . . . . . . . . . . . . . . . . . . . . . 35D.Giving Sharing Control to a Participant . . . . . . . . . . . . . . . . . . . . . . . . . . . . . . . . . . . . . . . . . . . . . 36E.Receiving Sharing Control . . . . . . . . . . . . . . . . . . . . . . . . . . . . . . . . . . . . . . . . . . . . . . . . . . . . . . . 37F.Retaking Sharing Control . . . . . . . . . . . . . . . . . . . . . . . . . . . . . . . . . . . . . . . . . . . . . . . . . . . . . . . . 37G.Setting Up Sharing Color Options . . . . . . . . . . . . . . . . . . . . . . . . . . . . . . . . . . . . . . . . . . . . . . . . . 37Interacting With Participants and Presenters. . . . . . . . . . . . . . . . . . . . . . . . . . . . . . . . . 39A.Working With Questions . . . . . . . . . . . . . . . . . . . . . . . . . . . . . . . . . . . . . . . . . . . . . . . . . . . . . . . . . 39B.Seeing Who Is Attending . . . . . . . . . . . . . . . . . . . . . . . . . . . . . . . . . . . . . . . . . . . . . . . . . . . . . . . . 42C.Chatting . . . . . . . . . . . . . . . . . . . . . . . . . . . . . . . . . . . . . . . . . . . . . . . . . . . . . . . . . . . . . . . . . . . . . 43D.Reviewing the Seating Chart and Indicating Feedback . . . . . . . . . . . . . . . . . . . . . . . . . . . . . . . . 44Appendix A. Keyboard Equivalents . . . . . . . . . . . . . . . . . . . . . . . . . . . . . . . . . . . . . . . . . . . . . 46
User Guide1. Getting StartedWelcome to the MCI Net Conferencing powered by Microsoft Office Live Meeting User Guide. Thisguide tells you how to use Live Meeting to hold highly interactive Internet meetings anywhere in theworld, at anytime. Using the meeting console, you can present slides, chat with other presentersand participants, receive and respond to questions, and much more.This chapter introduces you to Live Meeting and tells you how to complete initial set-up tasksto get ready for a meeting. Before you start the presentation, make sure that you are prepared: Become familiar with console features and learn how to navigate in the console Set meeting options Set meeting informationAfter you complete these tasks, see the remainder of the guide that tells you how to upload slide setsand work with slides, share views and applications, and interact with participants.1 A. Console FeaturesThe largest area of the console displays the slides that you show to the participants. Around theperimeter of the slide display area is a toolbar and collapsible, movable panels that you use to showslides, insert new slides, monitor questions, chat with others, and view the seating chart appear.At the presenter’s discretion, he or she can select meeting options that allow participants touse some or all of the presenter controls with the exception of the Question Manager and meetinginformation features. For more information about the options, see “Setting meeting options” onpage 7.Current slide being shownAnnotation toolbarMenu commandsToolbarPresentation PanelAttendee panelUsing the console panels and controls, you can: Select a presentation and show individual slides. Your prepared slides are grouped in apresentation. You decide which presentation to load and when to show a slide to participants.You can show a variety of different slide types including Text, Polling, White Board, Sharing,and Web slides. Insert new slides on the fly. Click the Insert Slide buttons to add new slides into yourpresentation. For example, click the White Board button to insert a bland slide upon which youcan draw using the Annotation tools. Or click the Text Slide to insert a blank Text slide upon whichyou can type text.2
User Guide Share your view and applications. Use the Sharing feature to share a view of the informationon your computer. Sharing a view is a great way to demonstrate a new software application, showthe real-time manipulation of data in a spreadsheet, or lead the audience through a new process.When you share your view, it’s like having the audience watch over your shoulder as you work onyour computer. View participants’ mood. Use audience seat colors to monitor the success and tempo of yourpresentation. The seat color empowers your audience, allowing them to constantly keep youaware of their understanding or level of interest. Before you begin, and during your presentation,you can ask the audience to change their seats to a different color to spontaneously andcontinually let you know whether they understand your presentation. See who’s in the audience. Allow participants to chat with one another. Presenters may review and respond to participant questions. Questions provide an excellentopportunity to emphasize key points or elaborate on areas important to the participants. Let audience members address all participants by “taking the floor.” The presenter canretake the floor at any time. Cycle slides. Present a continuously cycling slide show without requiring a presenter tobe present. Print a presentation. This is an easy way to provide a hard copy of meeting information includingpost-meeting notes that include all annotations, agendas, and task lists that you develop duringthe meeting.1 A 1. Changing the Console Panel LayoutAs shown in “Console features” on page 2, the console is made up of a variety of collapsible andmovable panels that contain different controls and information that help you present your slides andmonitor participants. For example, the Presentation panel shows a list of slides and provides controlsfor selecting a slide, while the Attendees panel shows who is attending the meeting with controls forchatting or blocking chat.At any time, you can minimize (hide) or restore (display) a panel, or move it to a different location onthe console. For example, if you don’t want to view the seating chart, simply minimize it. If you preferto place a panel on the right of the console, select and drag it to that side of the console. If you wantto use the entire console to show slides, you can hide all panels.To hide a panel Click the Minimize buttonthat appears to the left of the panel title. The panel closes and thebutton changes to the Restore button.The following shows the Minimize button in the Attendees panel.Minimize buttonTo restore a minimized panel Click the Restore buttonthat appears to the left of the Panel title. The panel opens, and theicon changes to the Minimize button.The following shows the Attendee panel minimized, and the Restore button next to the panel title.3
User GuideTo hide all panels On the View menu at the top of the console, click Hide Panels.All panels are removed from view, allowing the entire console to show a selected slide.Use the toolbar at the tip of the console to show and insert slides.To show all panels at once On the View menu on the top of the console, click Show Panels.Use this toolbar to show and insert slides when in full screen mode.4
User GuideTo hide a specific panel On the View menu, click the name of the panel that you want to hide. The check markpreviously associated with the panel name is removed.To move a panel Click the panel title and drag the panel to a new location.To restore the default panel layout On the View menu, click Restore Default Menu Layout.1 A 2. NavigatingFor most tasks, you have the flexibility of performing them several different ways: Short-cut commands. In each panel, you can click the right mouse button or click thepanel menu button to display a list of commands appropriate for that panel. For example,if you click a participant in the Attendees panel, and then click this button, the followingmenu commands appear.Click this button to see short-cut commandsYou can then click the command that you want to use. Buttons in panels. Each panel has buttons appropriate for performing tasks for that panel.For example, the Presentation panel provides short cuts for changing presentations, InsertNew Slides, Moving slides, Deleting Slides, and Renaming slides.5
User Guide Toolbar. A toolbar at the top of the console appears with buttons that are applicable to a varietyof different panels and tasks.Menu commands toolbarAnnotation toolbarNote: The Annotation buttons (shown in previous example) appear on the toolbar only when youshow a PowerPoint slide or a White Board. The Polling buttons appear on the toolbar only whenyou show a Polling slide. Additional toolbars appear in the Choose Presentation window that youuse to maintain presentations and slides. Menu commands. You can use the menu commands to perform tasks. For example, one way toinsert a slide is to click a command on the insert menu.Menu commandsControl key commands Control Keys. Many of the commands and buttons have keyboard equivalents (a combination ofkeys that you can press) that you can use to complete a task. For example, to insert a Web slide,you can press Ctrl 3. (Hold down the Ctrl key and press the number “3.”) For a complete list ofcontrol keys, see Appendix A, “Keyboard equivalents.”1 A 3. Using an 800x600 DisplayIf you set your monitor display to 800x600 pixels, the console looks slightly different from the way itlooks with a 1024x768 setting: the slide display area appears, but all of the control panels are hidden.(This is the same view that you see if you click Hide Panels on the View menu.) The toolbar stillappears at the top of the console.To show and insert slides1. Click a button on the toolbar to show and insert the slides that you want to use. The toolbarprovides the same buttons as when you use a 1024x768 monitor setting.Move slidesChoose apresentationImport apresentationInsertwhiteInserttext slideInsertInsert Websharing slideslideInsertsnapshot slideInsertpoll slide6
User GuideTo show other panels2. On the View menu, click Panels, and then click the panel that you want.Note: If you show all panels in a meeting, and then exit from the console and enter anothermeeting, all panels are hidden in the new meeting. If you reset your monitor from 800x600 to1024x786 after you launch the meeting console, you still need to use the View menu and Panelcommands to display all panels.1 B. Setting Meeting OptionsYou must join the meeting as a presenter (leader) to use this feature. Use the Meeting Options toindicate the features that you want to allow participants to use during your presentation. At any timeduring a presentation, you can change these settings.Note: You may have as many presenters (leaders) as you would like. A presenter is determined bythe passcode they use to join the meeting.To set meeting options1. On the Edit menu, click Meeting Options.A new window will appear.7
User Guide2. Select or clear meeting option check boxes to allow or disallow participant’s abilities, such asasking questions of the presenters. After you select or clear a check box, the image of theconsole shown in the Meeting Options is updated to reflect your changes. For example, if youclear the “See who is attending” check box, the Attendees panel is removed from the MeetingOptions image.Table 1. Meeting OptionsOptionPrint to PDFReview SlidesAsk QuestionsAnnotate/Edit SlidesInteractSee Who Is in AttendanceIf SelectedThe Print to PDF command appearsin the File menu. Participant canprint the contents of the loadedpresentation to a PDF file.The Review Slides command appearsin the View menu, allowing participantswho don’t have presenter privileges toreview the loaded presentation on their own.The Ask a Question button appearsin the console allowing participantsto send questions to the presenter.Allows participants to use the annotationtools and allows them to open and closepolls for a Polling slide. In addition, thischeck box is related to the Show/HidePolling buttons. If this check box isselected, the Show/Hide Polling buttonsare not available in the console, andyou cannot hide polling results.Allows you to select among the nextthree options that provide tools forinteracting with other participants. Ifyou select this check box, by defaultthe following three interact optionsare selected: See Who Is in Attendance,View Seating Cart and Mood Indicators,and Chat with other AttendeesThe Attendees panel appears in theconsole, allowing participants to see alist of who is attending the meeting.If ClearedThe Print to PDF commandappears dimmed.The Review Slides commandappears dimmed.The Ask a Question buttondoes not appear.The Annotation tools are notavailable to participants, andparticipants cannot open andclose the polls on a Polling slide.The Show/Hide PollingResults buttons are availablein the Presenterconsole.The following three interactoptions are unavailable.The Attendees panel doesnot appear.8
User GuideView Seating Chartand Mood IndicatorsChat With Other AttendeesUse Slide Set ToolsChoose Slides From ListCreate New SlidesSelect/import PresentThe Seating Chart panel appears in theconsole allowing participants to see aseating chart that indicates the “mood” ofeach participant. (Mood is a color indicatorthat participants select in response to aquestion, such as “How is the tempo ofthe presentation?”)The Chat button appears in theAttendees panel, allowing aparticipant to chat with anotherparticipant. This feature requires thatyou also select the See Who Is inAttendance feature.Allows you to select among the nextthree options that allow participantsto present slides. If you select thischeck box, by default the followingthree options are selected.Allows participants to select and showslides to the other attendees.Allows participants to use the InsertSlide buttons to create new slidesand insert them into the presentation.Allows participants to choose andimport presentations into the console.The Seating Chart panel doesnot appear.The Chat tab button does notappear in the Attendees panel.The following three optionsare unavailable.Participants cannot control theselection and display of slides.The Insert Slide buttons arenot available to participants.The Choose Presentation andImport Presentation featuresare not available to participants.1 C. Showing Meeting Information and Setting Phone InformationYou must join the meeting as a presenter to use this feature. To be a presenter, you must use thepresenter passcode when joining.The meeting information that appears in the console tells you how to join the meeting. Typically,this information includes the meeting ID and password, along with a conference call number or URLfor streaming audio.To show meeting information Click Meeting Information on the View menu.To set meeting information1. If the meeting panel does not appear in the console, click Meeting Information on theView menu.2. In the Meeting Information panel, click Edit.9
User Guide3. In the Attendee Phone Information box, enter the conference call number and passcode for aconference call, or enter a URL if you are using streaming audio.4. If the presenter phone information is the same as the attendee information, select the Same asAttendee check box, and then skip to Step 6. (The presenter information is hidden from view sinceit is not different. Clear the check box if you want it to appear.)5. In the Presenter Phone Information, enter the conference call number and passcode for aconference call, or enter a URL if you are using streaming audio.6. Click OK.1 D. Setting Presenter InformationTo set the information that appears in the Now Presenting panel, you use the Add-in for PowerPointto define information within the PowerPoint presentation, before you upload the presentation to themeeting. You can set the presenter’s name and add a GIF image if you want.10
User Guide2. Working With PresentationsA critical component of your meeting is the presentation — the slides that you show to participants.With MCI Net Conferencing powered by Microsoft Office Live Meeting, you can import PowerPointpresentations and select and show the slides that you want to use. In addition, you can insert newslides “on-the-fly” including interactive Polling slides, White Boards, and Text slides. To help youmaintain your presentation, Live Meeting provides a set of tools that you can use to duplicate, delete,and rename presentations and slides.Typically, to work with a presentation you perform the following tasks: Import a presentationChoose (load) the presentation into the consoleSelect and show slidesInsert new slides as neededMaintain presentations and slidesBefore or after the meeting, you might take advantage of other features that let you: Start a cycling slide show (presenter only) Review slides at your leisure Print a PDF of the presentation2 A. Importing a PresentationAs a presenter, you can import presentations after you join the meeting. You may also giveparticipants the ability to import a presentation under Meeting Options. Presenters (leaders)join with the leader passcode.To import a presentation1. On the File menu, click Import presentation, or click the Import Presentation button on thetoolbar. You can also click the Import Presentation button in the Choose Presentation window.Choose apresentationImport apresentation2. Locate the PowerPoint presentation or the PWP file (PowerPoint presentation converted for usewith Microsoft Office Live Meeting) that you want to show during your meeting, then click Open.If you import a PPT file, the process automatically converts it for use in the meeting. A messageappears telling you when the presentation is loaded into the meeting. If another presentation isshowing while this one is being loaded, it will not disrupt the presentation in progress. The newpresentation is available when you “Choose a presentation.”11
User Guide3. Click Done.2 B. Choosing a PresentationIf a presentation is not loaded to the console, or if you want to choose a different presentation,complete the following procedure. After you choose a presentation, all of the slides that it containsappear in the Presentation panel in the console.Note: Before you can choose a presentation, you must import it to the meeting. All importedpresentations appear in the Choose Presentations window. If a meeting is not in progress when youimport a presentation, it is automatically selected and loaded into the console. For more informationabout importing, see the previous section, “Importing a presentation” on page 11.To choose a presentation1. On the File menu, click Choose Presentation, or click the Choose Presentation buttonon the toolbar. The Choose Presentation window appears.2. In the list of presentations, click the one that you want to use in the console, and then click theLoad button. The presentation slides appear in the Presentation panel.12
User Guide2 C. Selecting and Showing SlidesThere are several ways to select and show slides to participants. You can use the Presentation panel Toolbar Choose Presentation windowIn all cases, it is assumed that you previously imported a presentation.Tip: If you want to show slides from a presentation, but you don’t want to choose (load) thepresentation into the console, use the Choose Presentation window to select slides. This is aconvenient way for several presenters to work together, or for you to use multiple presentations forthe same meeting, without having to load each presentation into the console.To select slides using the Presentation panelAfter choosing a presentation and loading it into the console as described in “Choosing aPresentation” on page 12, click the slide that you want to show, or click the Previous or Next buttonsthat appear in the Presentation panel. The following shows an example of the Presentation panel witha list of slides.To select slides using the toolbar Click the Previous Slide and Next Slide buttons to show different slides.Previous/Next slide buttonsTo select slides using the Choose Presentation window1. On the File menu, click Choose Presentation, or click the Choose Presentation buttonon the toolbar.2. In the presentation area, click the presentation that contains the slides that you want to show. Asnapshot of each slide in the selected presentation appears in the Slides section of the window.3. Scroll through the slides, and then click the slide that you want to show.13
User Guide4. Double click on the slide to show it to the audience. If you select a slide in a presentation currentlybeing shown, then the slide toolbar contains a Show to Audience button.Clicking on the Show to Audience button shows that slide. If there is more than one presentationloaded, then the button is labeled Copy to Loaded Presentation.2 D. Inserting New SlidesIn addition to the slides that you create by using PowerPoint and then importing them to the meeting,you can insert new slides into your presentation, including:White Board slidesWeb slidesText slidesPolling slidesSnapshot slidesSharing slidesTip: The following procedures tell you how to use the Insert menu or toolbar to insert slides.Alternatively, you can click the panel menu button in the Presentation panel, and then click an Insertcommand to insert new slides.Panel menu button14
User Guide2 D 1. Inserting White Board SlidesA White Board slide is a blank image slide upon which you can draw, add text and stamps, andhighlight information, by using the Annotation tools. For example, if you want to quickly create aflow chart to illustrate a point, insert a White Board slide and then use the Annotation tools todraw squares, lines, and so on. The following shows an example of the type of annotations thatyou can add.To insert a White Board slide1. In the Presentation panel, click the slide that you want to insert the new slide after.2. On the Insert menu, click White Board Slide, or click the Insert White Board Slide button onthe toolbar. A blank image slide appears on which you can work. In addition, the Annotation toolsappear on the toolbar.Live Meeting identifies the first White Board slide that you create as White Board A in the list ofslides in the Presentation panel. It identifies the second slide as White Board B, and so on. Youcan rename the slide if you want. For more information about renaming, see “Renaming Slides”on page 29.3. Click the Annotation tool that you wish to use, and then click the area of the slide where you wantto apply it. For more information about using the tools, see “Working with Annotation Tools” onpage 23.2 D 2. Inserting Web SlidesA Web Slide lets you display a Web page to the participants, allowing them to view the latest availableWorld Wide Web information and avoiding the need for you to create slides that duplicate informationalready on your intranet. The links on the Web slide shown to participants are active æ a participantcan click a link and immediately display the associated page. You could show a Web slide with a linkto your e-mail address or links to documents that provide more information. (A link to a document willopen the document in the browser or in a helper application, or it will ask the audience member tosave the document.) You can also use a Web slide to let the audience easily navigate to Web-basedapplications, such as a corporate help desk or phone directory. A Web slide is a good way to showShockwave content and Quicktime movies or large GIF and JPEG images. (The images are notrescaled or modified by PowerPoint.)15
User GuideNote: If you click a link and Live Meeting controls disappear, you have lost contact with the meeting.If you want to show a Web page and its links to participants but deny the audience access to thelinks, create Sharing slides instead.To insert a Web slide1. In the Presentation panel, click the slide that you want to insert the new slide after.2. On the Insert menu, click Web slide, or click the Insert Web slide button on the toolbar.3. Enter the Web Address of the Web page that you want to show.4. Make sure the Bypass Safety Check box is not selected, and then click Verify Web Slide.A check page appears.16
User GuideNote: When you create a Web slide, you have the option of bypassing the safety check. It isrecommended that you do not bypass this check. If you enter a non-existent URL and show theWeb slide during a presentation, you could lose contact with the meeting.5. After the verification completes, click Create Web Slide. The first slide that you create is identifiedas Web A in the list of slides in the Presentation panel. It identifies the second slide as Web B, andso on. You can rename the slide if you want. For more information about renaming, see “RenamingSlides” on page 29.2 D 3. Inserting Text SlidesA Text slide is a blank editable text slide upon which you can type. For example, if you want to typenew information that is available to the audience to copy and paste, such as an action items list, youcan create a Text slide. When you create and work with a text slide, you can use the Edit menucommands to copy, paste, cut, and delete text.17
User GuideTo insert a Text slide1. In the Presentation Panel, click the slide before where you want the new slide to appear.2. On the Insert menu, click Text slide, or click the Insert Text slide button on the toolbar. Ablank area in the slide display area of the console appears for you to type your text. Live Meetingidentifies the first Text slide that you create as Text Slide A in the list of slides in the Presentationpanel. It identifies the second slide as Text Slide B, and so on. You can rename the slide if youwant. For more information about renaming, see “Renaming Slides” on page 29.2 D 4. Inserting Polling SlidesPolling slides are a great way to solicit feedback from participants by allowing them to select fromseveral responses to a question. You can create Polling slides ahead of time or insert them on-the-flyduring your presentation.To insert a Polling slide1. In the Presentation panel, click the slide that you want to insert the new slide after.2. On the Insert menu, click Poll slide, or click the Insert Poll slide buttonon the toolbar.18
User Guide3. In the Question box, enter the question to which you want participants to respond. For example,for a large Sales meeting you might ask “Indicate the region that you represent.”4. In the Choices area, enter one selection for each line. For example, in response to the regionquestion, you might enter North on one line, South on the next line, and so on.5. Click OK. The Polling slide appears in the console and Polling buttons appear in the toolbar.Show PollResultsOpen PollsHide PollResultsEdit SlideClose PollClear PollsDepending on the selections that you make using the Polling buttons on the toolbar, the polls areeither opened or closed and the results either appear or are hidden from the participants. For moreinformation about opening and closing the poll, showing results, and editing a Polling slide, see thenext three sections.The first Polling slide that you create is identified as Polling Slide A in the list of slides in thePresentation panel. The second Polling slide is identified as Polling Slide B, and so on. You canrename the slide if you want. For more information about renaming see “Renaming Slides” onpage 29.Opening and closing the pollsAfter you insert or show a Polling slide, you need to open the polls so that participants can vote.If you want to prevent further voting, close the polls.To open/close the polls1. Select or insert the Polling slide that you want to show.2. To open the polls, click the Open Polls button on
Note: If you show all panels in a meeting, and then exit from the console and enter another meeting, all panels are hidden in the new meeting. If you reset your monitor from 800x600 to 1024x786 after you launch the meeting console, you still need to use the View menu and Panel commands to display all panels. 1 B. Setting Meeting Options

