Transcription
OWNER’S MANUALTO BE USED FOR THOMPSON SEMI-AUTO MODELSMaker of the world famous “TOMMYGUN” andAs the owner of a firearm, you must undertake the full-time responsibility of safe firearmhandling for your own safety and the safety of those around you. Before handling any firearmread and understand the information contained in its owner’s manual.Be certain this owner’s manual is available for reference and is kept with this firearm iftransferred to another party. If the manual is lost or misplaced, write directly to Auto-Ordnancefor a free replacement copy.SAFETY AND SAFE FIREARM HANDLING IS EVERYONE’S RESPONSIBILITY.Auto-Ordnance CorporationFactory: 130 Goddard Memorial Drive, Worcester, MA 01603Consumer Service: 508-795-3919 Fax: 508-795-7046Web Address: www.auto-ordnance.com www.tommygun.comPrices and specifications subject to change without notice.
TABLE OF CONTENTSContentsPageUSER SAFETY WARNINGS & RESPONSIBILITY . . . . . . . . . . . . . . . . . . . . . . . . . . 3-4LOCKING DEVICES. . . . . . . . . . . . . . . . . . . . . . . . . . . . . . . . . . . . . . . . . . . . . . . . . . . . . . 5NOMENCLATURE (T1 & T5). . . . . . . . . . . . . . . . . . . . . . . . . . . . . . . . . . . . . . . . . . . . . . . 6NOMENCLATURE (TM1 & TM1C). . . . . . . . . . . . . . . . . . . . . . . . . . . . . . . . . . . . . . . . . . . 7NOMENCLATURE (T1SB & M1SB). . . . . . . . . . . . . . . . . . . . . . . . . . . . . . . . . . . . . . . . . . 8OPERATION OF SAFETY. . . . . . . . . . . . . . . . . . . . . . . . . . . . . . . . . . . . . . . . . . . . . . . . . 9OPERATION OF THE BOLT LOCK. . . . . . . . . . . . . . . . . . . . . . . . . . . . . . . . . . . . . . . . . 9AMMUNITION . . . . . . . . . . . . . . . . . . . . . . . . . . . . . . . . . . . . . . . . . . . . . . . . . . . . . . . . . . 10MAGAZINES - STICK AND DRUM. . . . . . . . . . . . . . . . . . . . . . . . . . . . . . . . . . . . . . . 11-13LOADING AND FIRING THE THOMPSON. . . . . . . . . . . . . . . . . . . . . . . . . . . . . . . . . . 14DISASSEMBLY OF THE SEMI-AUTO THOMPSON FOR ROUTINE CLEANING. 15-16REASSEMBLY OF THE SEMI-AUTO THOMPSON. . . . . . . . . . . . . . . . . . . . . . . . . . . 17STICK MAGAZINE INSPECTION AND CARE. . . . . . . . . . . . . . . . . . . . . . . . . . . . . . . 18CARE AND CLEANING. . . . . . . . . . . . . . . . . . . . . . . . . . . . . . . . . . . . . . . . . . . . . . . . . . 19SERVICE INSTRUCTIONS - PARTS INFORMATION & ORDERS. . . . . . . . . . . . . . 20SHIPPING FIREARMS FOR SERVICE. . . . . . . . . . . . . . . . . . . . . . . . . . . . . . . . . . . . . . 21THE BASIC RULES OF SAFE FIREARMS HANDLING. . . . . . . . . . . . . . . . . . . . 22-23PARTS LIST & EXPLODED VIEW, MODELS: T1, T5, T1-C and T1SB. . . . . . . . . 24-25PARTS LIST & EXPLODED VIEW, MODELS: TM1, TM1C and M1SB. . . . . . . . . 26-27WARRANTY. . . . . . . . . . . . . . . . . . . . . . . . . . . . . . . . . . . . . . . . . . . . . . . . . . . Back CoverTHOMPSON MODELS AND SPECIFICATIONSincluded in this manualModel: T1Model: T5Model: T1SBModel: TM1 / TM1CModel: M1SBModel: T1-C(Commando)Caliber: . . . . . . . . . . . . . . . . . . .45 ACPBarrel: . . . . 16.5”, Finned & Threaded(with compensator 18”, T1 & T5)10.5”, Finned & Threaded(with compensator 12”, T1SB)Length: . . . . . . . 41” overall (T1 & T5)35” overall (T1SB)Weight: . . . . . . . . . . . . . . . 13 lbs. (T1)9.5 lbs. (T5, Aluminum Receiver)12 lbs. (T1SB)Sight: . . . . . . . . . . . . . . . . Blade front,open rear adjustableStock: . . . . . . . . . Walnut fixed stock,vertical foregripMagazine: . . . . . . . . . . . 30 Shot stickCaliber: . . . . . . . . . . . . . . . . . . .45 ACPBarrel: . . 16.5”, Smooth (TM1 & TM1C)10.5”, Smooth (M1SB)Length: . . . 38” overall (TM1 & TM1C)32” overall (M1SB)Weight: . . . . . . . . . . . . . 11.5 lbs. (TM1)9.0 lbs. (TM1C, Aluminum Receiver)10.5 lbs. (M1SB)Sight: . Blade front, fixed battle rearStock: . . . . . . Walnut fixed stock andhorizontal foregripMagazine: . . . . . . . . . . 30 Shot stick*Caliber: . . . . . . . . . . . . . . . . . . .45 ACPBarrel: . . . . 16.5”, Finned & Threaded(with compensator 18”)Length: . . . . . . . . . . . . . . . 41” overallWeight: . . . . . . . . . . . . . . . . . . . 13 lbs.Sight: . . . . . . . . . . . . . . . . Blade front,open rear adjustableStock: . . . Black finish stock & forendMagazine: . . . . . . . . . . . 30 Shot stick2*Will not accept drum magazines
USER SAFETY WARNINGS & RESPONSIBILITYIMPORTANT “SAFETY WARNINGS” — NOTE THE SYMBOLThese safety warnings are for your protection as well as the safety ofothers. Disregarding information in this manual may result in seriousinjury or death.STOP! Do not attempt to load or use any firearm until you read andunderstand the information contained in its owner’s manual. Beforehandling your firearm, you should learn how it operates and how tomaintain it. This includes knowing its basic parts, how the manualsafety and other safety features operate, how to safely open and close the actionand how to safely load and unload ammunition from the firearm. Improper useand handling is dangerous and could cause severe injury or death to you orthose around you. All users of the firearm must become thoroughly familiar withthe instructions in this manual.Be certain this owner’s manual is available for reference and is kept with thisfirearm if transferred to another party. If the manual is lost or misplaced, writedirectly to Auto-Ordnance for a free replacement copy.As the owner of a firearm, you must undertake the full-timeresponsibility of safe firearm handling for your own safety and thesafety of those around you: Keep all firearms and ammunition out of the reach of children. Store your firearms and ammunition separately. Never store a loaded firearm. Never leave a loaded firearm unattended. Never transport a loaded firearm in a vehicle.REMEMBER: A firearm’s safety lever is a mechanical device which cannever replace safe firearm handling. Safe firearm handling dependson you!Always point the muzzle of your firearm in a safe direction, regardlessof whether the firearm is loaded or unloaded. You should becomethoroughly familiar with the function and operation of this firearm andthe instructions supplied with it.Always treat every firearm as if it were loaded. Give your firearm tosomeone with the action open and safety in the “on” (safe) positionafter you verify the firearm is unloaded. Insist on the same procedurewhen receiving a firearm from someone else. Learn the location of allthe safety features of your firearm and how they operate.You have a responsibility to obtain proper training on how to use and maintainyour firearm. Certified and reputable safety courses and instructions are offeredby The National Rifle Association (NRA) as well as by state and local organizations. You also have a responsibility to know and obey all local, state and federallaws governing the use, possession and transportation of firearms.3
To protect yourself and others from injury, use the correct ammunitionreferenced by the markings on the receiver. Thompson firearms aredesigned, manufactured and proof tested to recommended SportingArms and Ammunition Manufacturers Institute (SAAMI) standards forfactory loaded ammunition. We specifically disclaim responsibility forany damage or injury whatsoever occurring in connection with, or as the resultof, the use in Thompson firearms of cartridges other than those for which thefirearm was originally chambered. Additionally, we disclaim any responsibilityfor damage or injury which results from any modifications or changes that arenot a part of the firearm as delivered from the factory.Learn how to clean your firearm thoroughly and make certain no oil,grease or other materials are blocking the barrel. Obstructions of anykind can cause damage to the firearm resulting in personal injury.Practice proper firearm maintenance and safety. Make sure all exposed metal surfaces are coated with a thin film of oil, especially after being exposed todamp weather. (See proper section of this manual for cleaning instructions).Before using after storage, follow complete instructions stated in this manual forrefamiliarization with the firearm. A thorough inspection should be performedbefore shooting the firearm.Wear eye and ear protection when shooting. Shooting without properear protection can cause hearing damage. The use of eye protectionduring any type of shooting is important to protect your vision.Never climb or jump over an obstacle with a loaded firearm. Never pulla firearm toward you by the muzzle. Never shoot towards a flat, hardsurface or water. Always be sure of your target and what is beyond it.When handling your firearm, never allow fingers or any object to touchthe trigger until you are ready to shoot.The safety should always be in the “on” (safe) position until you areready to shoot. It is a mechanical device and should never be used asan excuse for careless handling or unsafe practices.Make sure you read, understand and follow the firearm safety rulesthat are listed in this manual.The use of a locking device or safety lock is only one aspect ofresponsible firearm storage. Firearms should be stored unloaded andlocked in a location that is both separate from their ammunition andinaccessible to children and other unauthorized persons.4
LOCKING DEVICESThis firearm was originally sold with a key-operated locking device.While it can help provide secure storage for your unloaded firearm,any locking device can fail. All guns are designed to fire if they areloaded and the trigger is pulled. Therefore, never install the lockingdevice inside the trigger guard or in any way that it can possibly pull the trigger!Do not leave the keys in the lock.The ultimate responsibility for secure storage of any firearm must depend uponits owner and his or her individual circumstances. Guns should be securelystored unloaded, in a secure location, separate from their ammunition.Pivot PlateWARRANTY IS VOIDED IF PIVOT PLATE IS REMOVED WITH FRAME ONRECEIVER.It is imperative that you keep this firearm locked in a secureplace and take other steps necessary to limit the possibilityof theft or accident. Failure to take reasonable preventivesteps may result in innocent lives being lost and, in somecircumstances may result in your liability for these deaths.5
CompensatorFront SightModel: T1 (1927A-1)Model: T5 (1927A-1C, Aluminum Receiver)Finned BarrelGrip MountVertical ForegripEjectorBolt HandleBoltStick MagazineReceiverRear SightTriggerMagazine CatchRear GripSafety LeverFrameButt StockSling SwivelNOMENCLATURE6Butt Plate
Front SightModel: TM1 (M1/Military model)Model: TM1C (M1/Lightweight, Aluminum Receiver)Smooth BarrelSling SwivelHorizontal ForegripEjector PortBolt HandleBoltStick MagazineReceiverTriggerRear SightPivot PlateRear GripFrameButt StockSling SwivelButt PlateNOMENCLATURE7
CompensatorFront SightModel: T1SB (1927A-1)Model: M1SB (M1)10.5” Short Barrel Semi-Auto ModelsGrip MountFinned BarrelVertical ForegripEjectorBolt HandleBoltReceiverRear SightStick MagazineFront SightTriggerMagazine CatchRear GripFrameSling SwivelSafety LeverHorizontal ForegripButt StockStick MagazineSling SwivelTriggerMagazine CatchRear SightRear GripButt PlateSafety LeverFrameButt StockSling SwivelNOMENCLATURE8Butt Plate
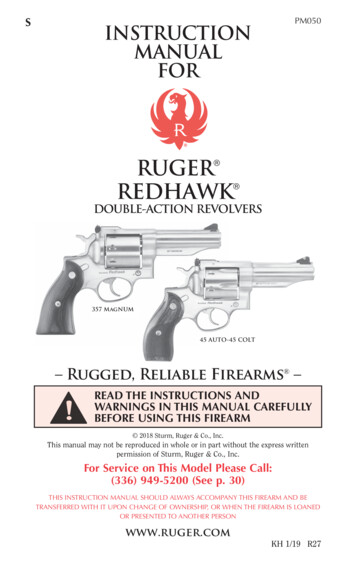
OPERATION OF SAFETYDO NOT PULL BOLT BACK WITH SAFETY ON OR DAMAGE TO THEFIRING PIN MAY RESULT AS WELL AS PERSONAL INJURY.The manual safety lever is located on the frame above the rear grip and must bemoved manually by the shooter. To put the safety in the “SAFE” (on) position, thesafety lever must be rotated fully rearward beneath the word “SAFE” indicatedon the frame. To put the safety in the “FIRE” (off) position, the safety lever mustbe rotated fully forward in the direction of the muzzle beneath the word “FIRE”indicated on the frame.ALWAYS SET FIREARM ON SAFE POSITION WHEN NOT IN USE.REMEMBER, A FIREARM’S MANUAL SAFETY IS A MECHANICALDEVICE WHICH CAN NEVER REPLACE SAFE FIREARM HANDLINGAND STORAGE PRACTICES.SAFETY ONSAFETY OFFOPERATION OF THE BOLT LOCKThe Thompson rifle is designed so that the bolt remains open after the last shothas been fired, provided the rifle is fitted with a stick magazine (the bolt closesafter the last round when equipped with the drum magazine). When the magazineis empty, a protrusion on the rear of the stick magazine follower actuates thebolt lock which is designed to retain the bolt in its rearward position.To actuate the bolt lockwithout a magazine, a triplever in the frame needsto be manually movedby the shooter. The leveris located at the top ofthe guide rails where themagazine is inserted. Withthe safety lever in the“FIRE” position, draw thebolt fully rearward andpush up on the lever, lettingthe bolt slowly go forwarduntil it locks in place.Bolt is backTrip Lever“FIRE” Position9
THE BOLT LOCK IS NOT A SAFETY DEVICE. IT SHOULD NEVER BEUSED TO HOLD THE BOLT BACK WHEN THERE ARE CARTRIDGES INTHE MAGAZINE.The only purpose of the bolt lock is for convenience in the rapid changing ofmagazines and for holding the bolt in its rearward position when the rifle is unloaded for cleaning and inspection.To release the bolt, with the safety lever in the “SAFE” position, simply draw thebolt back and let go; the bolt will go forward.THE BOLT IS UNDER HEAVY SPRING TENSION AND CAN INJUREFINGERS WHEN IT SLAMS SHUT.FOR PROPER FUNCTIONING IN AUTO-ORDNANCETHOMPSON LONG GUNS WE RECOMMEND THE USE OFBRASS CASE 230 GRAIN .45 ACP BA LL AMMUNITION.AMMUNITIONRecommended AmmunitionBrass case 230 grain .45 ACP Ball ammunitionAMMUNITION (CARTRIDGE) NOTICEDeath, serious injury, and damage can result from the use of wrongammunition, bore obstructions, powder overloads, or incorrectcartridge components. Even the strongest firearm can be “blownup” as a result of excess pressure. Always wear shooting glasses andhearing protectors.We specifically disclaim responsibility for any damage or injury whatsoever occurring in connection with, or as the result of, the use in Thompson firearms of cartridges other than those for which the firearm was originally chambered.LEAD EXPOSUREDischarging firearms in poorly ventilated areas, cleaning firearms,or handling ammunition may result in exposure to lead and othersubstances known to the state of California to cause birth defect,reproductive harm, and other serious physical injury. Have adequateventilation at all times. Wash hands thoroughly after exposure.10
MAGAZINES - STICK MAGAZINE AND DRUM MAGAZINESLoading the Stick MagazineUse only factory loaded brass case ammunition of theproper caliber manufactured to US Industry and SAAMIspecifications, referenced by markings on receiver. (SeeNotice and Warnings in other sections of this manual pertaining to Ammunition).To load the stick magazine, align each cartridge with the bullet forward (pointingtoward the larger opening in the front of the magazine body) and push downward until the cartridge snaps into place. Do not attempt to load more than thedesignated number of cartridges for which the magazine has been designed.DAMAGED, NON-STANDARD, OR IMPROPERLY ASSEMBLEDMAGAZINES SHOULD NEVER BE USED. THEY CAN CAUSE AMALFUNCTION, SERIOUS INJURY OR DEATH.Inserting the Stick MagazineThe stick magazine can only be inserted with the bolt in the open position (seeOperation of Bolt Lock on page 9).ALWAYS CONFIRM THE SAFETY LEVER IS IN THE “SAFE” POSITION WHENINSERTING OR REMOVING THE MAGAZINE.While pushing up on the magazine catch, insert the magazine into thebottom of the guide rails in the receiver. (see picture) Push the magazine all the way up the guide rails and then release the magazine catch. A studin the magazine catch should mate with the hole in the magazine tube and lockthe magazine in place. Check to be sure that the magazine is securely latched inplace. It may be necessary to bump the magazine bottom with the heel of yourhand to securely lock magazine.Guide Rails“SAFE”PositionMagazine Catch11
Removing the Stick MagazineTo remove the magazine, simply push up on the magazine latch while graspingthe bottom of the magazine and pull down. To minimize the possibility of damageand malfunctions, do not let the magazine drop to the ground.Loading the 10 round (X-Type) and 50 round (L-Type) Drum MagazinesThe Thompson Drum magazines are designed to fit all Thompson 1928 fullauto models, 1927A-1 Deluxe model both steel and aluminum receivers and the1927A-1 Commando model. The drum magazine will not fit the Thompson M1models because the M1 receivers do not have the required slots to accept thedrum magazines.X-Type Thompson Drumfully loaded (10 rounds)Bullet GuidesRotor ShaftRotorMagazine KeyMagazine BaseMagazine KeySpring10 round drum in parts and loadedMagazine CoverL-Type Thompson Drumfully loaded (50 rounds)Bullet GuidesRotor ShaftRotorMagazine KeyMagazine CoverMagazine BaseMagazine KeySpring50 round drum in parts and loaded1. While lifting the magazine key spring, slide the magazine key off the rotorshaft and magazine cover. Remove cover from magazine base.2. Place 230 grain hardball ammo with the nose of the bullets pointing upstarting at 12 o’clock position in magazine base loading counter-clockwise. Forthe 50 round (L-Type) drum, fill each of the ten sections of the rotor with fiverounds each until fully loaded. For the 10 round (X-Type), fill the one ten roundsection until fully loaded.WARNING: WHERE LOOPED END OF BULLET GUIDE ENDS, DO NOTLOAD IN THIS AREA AS JAMS WILL OCCUR WHEN ROTOR TURNS,RESULTING IN POSSIBLE INJURY OR DEATH.12
3. When the drum is fully loaded, replace the cover and magazine key. Thecuts in the rotor shaft need to be aligned with the magazine key; while exertingdownward pressure on the cover, slide the key fully onto the rotor shaft. For theL-Type 50 round drum, wind the key 9-11 clicks as stated on the magazine cover.For the X-type 10 round drum, wind the key 4-6 clicks.WARNING: TO AVOID PERSONAL INJURY, DO NOT WIND MORETHAN THE STATED AMOUNT OR AFTER ANY ROUND HAS BEENFIRED.4. To unload, hold the drum upside down and press bullets out forward one byone through the mouth of the magazine until empty.WARNING: DO NOT OPEN COVER WHEN LOADED AND ROTOR ISUNDER TENSION AS DAMAGE OR PERSONAL INJURY MAY RESULT.5. To insert or remove the drum magazine from the firearm, the bolt must belocked back. Please refer to page 9 under “Operation of the Bolt Lock.”6. Insert the drum in the slots in the receiver from the left side of the firearm untilthe magazine catch locks in place. The drum may fit tightly the first few times.7. After the last round has been fired from the drum magazine the bolt will close. Inorder to remove the drum magazine from the firearm the bolt must be locked back.To assist in locking the bolt back each drum from Auto-Ordnance includes a “thirdhand” (see picture). This device is inserted into the guide rails for the stick magazine while pulling back on the magazine catch. The stud in the magazine catchshould fit in the opening on the third hand. The third hand can now be pushed fullyupward against the trip lever while pulling all the way back on the bolt handle. Nowrelease the bolt handle at the end of its travel and it will be locked back. Removethe third hand from the guide rails. While pushing up on the magazine catch thedrum magazine can be slid out of the slots from the left side of the firearm.SlotsBolt is backInsert Third HandThird Hand13
LOADING AND FIRING THE THOMPSONPractice this important aspect of firearm handling with an unloaded rifle until youcan perform each of the steps described below. This procedure begins with anempty rifle with the magazine out.1. Be certain the muzzle is pointed in a safe direction.2. Before inserting the loaded magazine lock back the bolt according to theinstructions on page 9. Verify the chamber is empty and move the safety lever tothe “SAFE” position.3. Insert the loaded magazine into the receiver and immediately draw the bolthandle all the way to the rear and release it, allowing the bolt to snap forward underfull spring tension. A cartridge will be stripped from the magazine and chambered.4. The rifle is now cocked and a loaded cartridge is in the chamber. Visually confirmthat the safety lever is in the “SAFE” position.5. When you are ready to fire the rifle move the safety lever to the “FIRE” position.Never touch the trigger until you are ready to fire. Always keep the safety lever inthe “SAFE” position until you are actually firing the firearm.6. The rifle will fire one shot each time the trigger is pulled until the magazine isempty. Each time the bolt is pushed rearward by the energy of the cartridge, aspent case is ejected, the firearm is recocked and a new cartridge is chamberedfrom the magazine into the chamber.7. Immediately following the firing of a shot if another shot is not to be fired at once,put the safety lever in the “SAFE” position while the rifle is still pointing in a safedirection down range. The safety lever should be moved to the “SAFE” position assoon as firing is completed.8. When the last cartridge in the magazine has been fired the bolt lock will remainopen when using stick magazines. The bolt will close on a drum magazine. Beforefollowing the procedures on page 13 to remove the drum magazine manually pullback on the bolt handle just enough to visually inspect the chamber to confirm it isempty. Always confirm that no bullets remain in the opening of the drum magazine.To Unload the Thompson1. Always keep the muzzle pointed in a safe direction at all times and keep thefingers outside the trigger guard.WARNING: THE UNLOADING SEQUENCE MUST BEFOLLOWED EXACTLY AS SPELLED OUT. FAILURE TO DOSO CAN RESULT IN THE RIFLE’S CHAMBER BECOMINGUNINTENTIONALLY LOADED WITH A CARTRIDGE.14
2. Push up on the magazine catch and remove the magazine.WARNING: EVEN THOUGH THE MAGAZINE HAS BEEN REMOVEDA CARTRIDGE REMAINING IN THE CHAMBER CAN STILL BE FIRED.ALWAYS VISUALLY CHECK THE CHAMBER.3. Pull the bolt handle all the way to the rear, extracting and ejecting the cartridgein the chamber.4. Visually confirm the chamber is empty. A safe rifle is one in which the bolt is openand the chamber and magazine are empty and safety is on.DISASSEMBLY OF THE SEMI-AUTO THOMPSON FOR ROUTINE CLEANINGWARNING: MAKE SURE YOUR THOMPSON RIFLE IS UNLOADEDBEFORE STARTING THIS PROCEDURE.Takedown procedures for all Thompson semi-autos are the same.1. With the rifle pointing in a safe direction,safety lever in the “SAFE” position, remove themagazine by pushing up on the magazine catchand pulling the magazine out of the rifle.2. Confirm once again that the rifle is unloadedby visually checking the chamber. Beforedisassembly the bolt should be in the forwardposition, firing pin in the fired position and thesafety lever in the “FIRE” position.Frame Latch ButtonPICTURE #13. With the firearm upside down and using a flat-blade screwdriver with a 1/8” widthblade depress the frame latch button in the rear bottom portion of the receiver.(See PICTURE #1) At the same time pull the frame to the rear (new guns may betight). Once the frame is clear of the button you can remove the screwdriver andcontinue pulling the frame to the rear. About half way back the frame latch buttonwill catch on the frame. Using the same flat-blade screwdriver depress the framelatch button again and remove the frame the rest of the way off the receiver. (SeePICTURE #2) Care should be taken not to misplace the frame latch button shouldit drop out of the receiver.PICTURE #215
Recoil Spring GuideFiring Pin PilotPICTURE #34. While the receiver is still upside down, the internal parts of the receiver can beremoved by pulling up on the recoil spring guide and springs. (See PICTURE #3)It may be helpful to use the flat-blade screwdriver to take pressure off the recoilspring guide before lifting the recoil spring guide out of the receiver. The recoilspring guide is under spring tension so care should be taken when the spring guideclears the receiver. After removing the recoil spring guide and springs the firing pinpilot and spring will come out of the hole in the rear of the receiver.5. Holding the bolt forward with the firearm upside down point the muzzle upwardsso that the hammer slides free of the bolt handle. Remove the bolt handle fromthe hole in the top of the receiver or from the side on the M1. The bolt can now beremoved from the receiver by sliding the bolt all the way to the rear and lifting itclear of the receiver.Oil PointsFramePICTURE #46. Further disassembly of the frame is not normally required for routine cleaning. Alight coat of oil on pivot points and sliding surfaces between the bolt and receiveris recommended. (See PICTURE #4)WARRANTY IS VOIDED IF PIVOT PLATE IS REMOVED WITH FRAMEON RECEIVER.16
REASSEMBLY OF THE SEMI-AUTO THOMPSONWARNING: ONCE AGAIN MAKE SURE YOUR THOMPSON RIFLE ANDMAGAZINE IS UNLOADED BEFORE STARTING THIS PROCEDURE.1. The bolt can be re-inserted into the receiver by placing it in the rear of the receiver and sliding it forward through the hole in the front of the receiver.2. Insert the bolt handle into the top of the receiver (side of the receiver on the M1)by lining up the holes in the bolt and the receiver. While the receiver is upside downthe hammer can be inserted into the hole in the rear of the bolt.3. The firing pin pilot and spring can now be inserted into the hole in the rear of thereceiver and the spring should go partially into rear of the bolt.4. With the bolt fully forward in the receiver the recoil spring guide and springs cannow be installed by first inserting the two springs into the two matching holes inthe top rear of the bolt. Push the recoil spring guide forward under spring tensiontaking care should the spring guide slip and come flying out. Once the recoil springguide clears the back of the receiver insert the spring guide into the receiver beingcareful not to make contact with the firing pin pilot or spring.5. Push and hold the back of the firing pin pilot so that the small diameter portion ofthe pilot lines up with the cut-out on the recoil spring guide. Now push all the waydown on the recoil spring guide so that it slips completely onto the firing pin pilot.At this point the recoil spring guide should be flush with the receiver.Receiver RailsFramePICTURE #56. While the receiver is upside down line up the frame slots onto the rear portion ofthe rails on the receiver and push the frame fully onto the receiver until the framehas cleared the frame latch button and locks in place. (See PICTURE #5)17
STICK MAGAZINE INSPECTION AND CARECheck your stick magazine frequently toinsure it is in proper working condition. Thefollower must move freely and have adequatespring tension so that each cartridge isquickly lifted to the feeding position.To check the spring tension, load onecartridge into the magazine and then firmlypress against the cartridge case. Removeyour finger quickly. The cartridge shouldinstantly and fully move into the feedingposition. If it does not, the magazine shouldbe cleaned. If cleaning does not restoreproper spring tension do not use themagazine.Should cleaning be necessary use a highquality gun cleaning solution that willnot rust the metal. The magazine may bedisassembled by placing a small flat-bladescrewdriver into the slot in the magazinebaseplate and carefully lifting the tab toclear the magazine tube. Next carefully usethe screwdriver blade to start sliding themagazine baseplate off the tube by insertingthe blade between the baseplate and frontof the magazine tube. After the initial gap isopened up between the baseplate and thetube you can use your thumbs to completesliding the baseplate clear of the tube.CAUTION: The magazine spring is undertension and could come out causing injury.FollowerTubeSpringSlotTabMAGAZINEBASE PLATETo reassemble insert the magazine follower and spring. The spring is unidirectional and can be installed either way in the magazine tube. Whilecompressing the spring into the tube slide the magazine baseplate on from therear. Finally insert the screwdriver blade into the tab and bend the tab down soit is flush with the rear of the magazine tube.DAMAGED, NON-STANDARD, OR IMPROPERLY ASSEMBLEDMAGAZINES SHOULD NEVER BE USED. THEY CAN CAUSEA MALFUNCTION, SERIOUS INJURY OR DEATH.18
CARE AND CLEANINGBEFORE CLEANING, BE CERTAIN THE RIFLE AND ITSMAGAZINE CONTAIN NO CARTRIDGES.At regular intervals, or whenever the rifle has been exposed to sand, dust, extremehumidity, condensation, immersion in water, or other adverse conditions, disassemble, clean and oil it. Proper periodic maintenance is essential to the reliablefunctioning of any firearm.To clean the rifle, proceed as follows:1. Disassemble (field-strip) the rifle to the extent described on page 15.2. Using a cleaning rod, run a patch wetted with a high quality gun cleaning solution through the bore several times. Then attach a bristle brush wetted with a highquality gun cleaning solution to the rod and run it back and forth the full lengthof the bore and chamber. Clean bore with dry patches and examine. Bore foulingcan contribute to reduced accuracy, and grease accumulation in the chamber caninterfere with proper feeding of cartridges from the magazine.3. Using a high quality cleaning solvent on a clean patch or bristle brush, removepowder residue from all components of the mechanism. After cleaning, run a drypatch through the bore, then follow with a patch that is very lightly oiled. Wipe allsurfaces clean with cloth, then wipe all surfaces with a patch or cloth that has beenvery lightly oiled.4. NOTE: Only a light application of oil is needed to provide adequate lubrication ofmoving parts and to prevent rust. (See PICTURE #4, oil points, on page 16)
for a free replacement copy. SAFETY AND SAFE FIREARM HANDLING IS EVERYONE'S RESPONSIBILITY. Auto-Ordnance Corporation Factory: 130 Goddard Memorial Drive, Worcester, MA 01603 Consumer Service: 508-795-3919 Fax: 508-795-7046 Web Address: www.auto-ordnance.com www.tommygun.com Prices and specifications subject to change without notice.