Transcription
N750 Wireless Dual Band GigabitRouterModel WNDR4300User ManualSeptember 2014202-11031-07350 East Plumeria DriveSan Jose, CA 95134USA
N750 Wireless Dual Band Gigabit Router WNDR4300SupportThank you for selecting NETGEAR products.After installing your device, locate the serial number on the label of your product and use it to register your product athttps://my.netgear.com. You must register your product before you can use NETGEAR telephone support. NETGEARrecommends registering your product through the NETGEAR website. For product updates and web support, visithttp://support.netgear.com.Phone (US & Canada only): 1-888-NETGEAR.Phone (Other Countries): Check the list of phone numbers at .aspx.ComplianceFor regulatory compliance information, visit http://www.netgear.com/about/regulatory.See the regulatory compliance document before connecting the power supply.TrademarksNETGEAR, the NETGEAR logo, and Connect with Innovation are trademarks and/or registered trademarks of NETGEAR, Inc.and/or its subsidiaries in the United States and/or other countries. Information is subject to change without notice. All rights reserved.2
ContentsChapter 1Hardware SetupUnpack Your Router . . . . . . . . . . . . . . . . . . . . . . . . . . . . . . . . . . . . . . . . . . . . . . . . . . 8Hardware Features . . . . . . . . . . . . . . . . . . . . . . . . . . . . . . . . . . . . . . . . . . . . . . . . . . . 8Front Panel . . . . . . . . . . . . . . . . . . . . . . . . . . . . . . . . . . . . . . . . . . . . . . . . . . . . . . . . 8Back Panel . . . . . . . . . . . . . . . . . . . . . . . . . . . . . . . . . . . . . . . . . . . . . . . . . . . . . . . 10Label . . . . . . . . . . . . . . . . . . . . . . . . . . . . . . . . . . . . . . . . . . . . . . . . . . . . . . . . . . . . 10Attach the Stand . . . . . . . . . . . . . . . . . . . . . . . . . . . . . . . . . . . . . . . . . . . . . . . . . . . . 11Position Your Router . . . . . . . . . . . . . . . . . . . . . . . . . . . . . . . . . . . . . . . . . . . . . . . . . 11Cable Your Router . . . . . . . . . . . . . . . . . . . . . . . . . . . . . . . . . . . . . . . . . . . . . . . . . . . 12Verify the Cabling . . . . . . . . . . . . . . . . . . . . . . . . . . . . . . . . . . . . . . . . . . . . . . . . . . . 14Chapter 2Getting Started with NETGEAR genieRouter Setup Preparation. . . . . . . . . . . . . . . . . . . . . . . . . . . . . . . . . . . . . . . . . . . . .Use Standard TCP/IP Properties for DHCP . . . . . . . . . . . . . . . . . . . . . . . . . . . .Gather ISP Information . . . . . . . . . . . . . . . . . . . . . . . . . . . . . . . . . . . . . . . . . . . .Wireless Devices and Security Settings. . . . . . . . . . . . . . . . . . . . . . . . . . . . . . .Types of Logins and Access . . . . . . . . . . . . . . . . . . . . . . . . . . . . . . . . . . . . . . . . . . .Use NETGEAR genie after Installation . . . . . . . . . . . . . . . . . . . . . . . . . . . . . . . . . .Upgrade the Firmware . . . . . . . . . . . . . . . . . . . . . . . . . . . . . . . . . . . . . . . . . . . . . . .Dashboard (Basic Home Screen). . . . . . . . . . . . . . . . . . . . . . . . . . . . . . . . . . . . . . .Join Your Wireless Network . . . . . . . . . . . . . . . . . . . . . . . . . . . . . . . . . . . . . . . . . . .Manual Method . . . . . . . . . . . . . . . . . . . . . . . . . . . . . . . . . . . . . . . . . . . . . . . . . . .Wi-Fi Protected Setup (WPS) Method . . . . . . . . . . . . . . . . . . . . . . . . . . . . . . .NETGEAR genie App and Mobile genie App. . . . . . . . . . . . . . . . . . . . . . . . . . . . . .Chapter 3161616161617171819191920NETGEAR genie Basic SettingsBasic Home Screen . . . . . . . . . . . . . . . . . . . . . . . . . . . . . . . . . . . . . . . . . . . . . . . . . .Internet Setup . . . . . . . . . . . . . . . . . . . . . . . . . . . . . . . . . . . . . . . . . . . . . . . . . . . . . .Internet Setup Screen Fields . . . . . . . . . . . . . . . . . . . . . . . . . . . . . . . . . . . . . . . .Attached Devices. . . . . . . . . . . . . . . . . . . . . . . . . . . . . . . . . . . . . . . . . . . . . . . . . . . .Parental Controls . . . . . . . . . . . . . . . . . . . . . . . . . . . . . . . . . . . . . . . . . . . . . . . . . . . .ReadySHARE Storage . . . . . . . . . . . . . . . . . . . . . . . . . . . . . . . . . . . . . . . . . . . . . . . .Basic Wireless Settings . . . . . . . . . . . . . . . . . . . . . . . . . . . . . . . . . . . . . . . . . . . . . . .Wireless Settings Screen Fields. . . . . . . . . . . . . . . . . . . . . . . . . . . . . . . . . . . . . .Change WPA Security Option and Password . . . . . . . . . . . . . . . . . . . . . . . . . .Guest Networks. . . . . . . . . . . . . . . . . . . . . . . . . . . . . . . . . . . . . . . . . . . . . . . . . . . . .Guest Network Wireless Security Options . . . . . . . . . . . . . . . . . . . . . . . . . . . .32222232425272829303132
N750 Wireless Dual Band Gigabit Router WNDR4300Chapter 4 NETGEAR genie Advanced HomeNETGEAR genie Advanced Home Screen . . . . . . . . . . . . . . . . . . . . . . . . . . . . . . . .Setup Wizard . . . . . . . . . . . . . . . . . . . . . . . . . . . . . . . . . . . . . . . . . . . . . . . . . . . . . . .WPS Wizard . . . . . . . . . . . . . . . . . . . . . . . . . . . . . . . . . . . . . . . . . . . . . . . . . . . . . . . .Setup Menu . . . . . . . . . . . . . . . . . . . . . . . . . . . . . . . . . . . . . . . . . . . . . . . . . . . . . . . .WAN Setup . . . . . . . . . . . . . . . . . . . . . . . . . . . . . . . . . . . . . . . . . . . . . . . . . . . . . . . . .Default DMZ Server . . . . . . . . . . . . . . . . . . . . . . . . . . . . . . . . . . . . . . . . . . . . . . .Change the MTU Size . . . . . . . . . . . . . . . . . . . . . . . . . . . . . . . . . . . . . . . . . . . . . .LAN Setup. . . . . . . . . . . . . . . . . . . . . . . . . . . . . . . . . . . . . . . . . . . . . . . . . . . . . . . . . .LAN Setup Screen Settings . . . . . . . . . . . . . . . . . . . . . . . . . . . . . . . . . . . . . . . . .Use the Router as a DHCP Server . . . . . . . . . . . . . . . . . . . . . . . . . . . . . . . . . . .Address Reservation. . . . . . . . . . . . . . . . . . . . . . . . . . . . . . . . . . . . . . . . . . . . . . .Quality of Service (QoS) Setup. . . . . . . . . . . . . . . . . . . . . . . . . . . . . . . . . . . . . . . .343435363738394041424243Chapter 5 StorageReadySHARE Access . . . . . . . . . . . . . . . . . . . . . . . . . . . . . . . . . . . . . . . . . . . . . . . . .File-Sharing Scenarios . . . . . . . . . . . . . . . . . . . . . . . . . . . . . . . . . . . . . . . . . . . . . . .Storage Basic Settings . . . . . . . . . . . . . . . . . . . . . . . . . . . . . . . . . . . . . . . . . . . . . . .Add or Edit a Network Folder . . . . . . . . . . . . . . . . . . . . . . . . . . . . . . . . . . . . . . .Storage Advanced Settings . . . . . . . . . . . . . . . . . . . . . . . . . . . . . . . . . . . . . . . . . . .Safely Remove a USB Drive . . . . . . . . . . . . . . . . . . . . . . . . . . . . . . . . . . . . . . . . . . .Media Server . . . . . . . . . . . . . . . . . . . . . . . . . . . . . . . . . . . . . . . . . . . . . . . . . . . . . . .Specify Approved USB Devices. . . . . . . . . . . . . . . . . . . . . . . . . . . . . . . . . . . . . . . .Connect to the USB Drive from a Remote Computer . . . . . . . . . . . . . . . . . . . . .Access the Router USB Drive Remotely Using FTP. . . . . . . . . . . . . . . . . . . . . . . .Time Machine Backup . . . . . . . . . . . . . . . . . . . . . . . . . . . . . . . . . . . . . . . . . . . . . . . .4848505152535354555556Chapter 6 ReadySHARE PrinterReadySHARE Printer . . . . . . . . . . . . . . . . . . . . . . . . . . . . . . . . . . . . . . . . . . . . . . . . .USB Control Center Utility . . . . . . . . . . . . . . . . . . . . . . . . . . . . . . . . . . . . . . . . . . . .Control Center Configuration . . . . . . . . . . . . . . . . . . . . . . . . . . . . . . . . . . . . . . .USB Printer. . . . . . . . . . . . . . . . . . . . . . . . . . . . . . . . . . . . . . . . . . . . . . . . . . . . . . .Scan with a Multifunction Printer. . . . . . . . . . . . . . . . . . . . . . . . . . . . . . . . . . . .6165666667Chapter 7 SecurityKeyword Blocking of HTTP Traffic . . . . . . . . . . . . . . . . . . . . . . . . . . . . . . . . . . . . .Block Services (Port Filtering). . . . . . . . . . . . . . . . . . . . . . . . . . . . . . . . . . . . . . . . .Schedule Blocking . . . . . . . . . . . . . . . . . . . . . . . . . . . . . . . . . . . . . . . . . . . . . . . . . . .Security Event Email Notifications . . . . . . . . . . . . . . . . . . . . . . . . . . . . . . . . . . . . .69707273Chapter 8 AdministrationUpgrade the Firmware . . . . . . . . . . . . . . . . . . . . . . . . . . . . . . . . . . . . . . . . . . . . . . . 75View Router Status . . . . . . . . . . . . . . . . . . . . . . . . . . . . . . . . . . . . . . . . . . . . . . . . . . 76Router Information . . . . . . . . . . . . . . . . . . . . . . . . . . . . . . . . . . . . . . . . . . . . . . . . 764
N750 Wireless Dual Band Gigabit Router WNDR4300Internet Port . . . . . . . . . . . . . . . . . . . . . . . . . . . . . . . . . . . . . . . . . . . . . . . . . . . . . 77Wireless Settings (2.4 GHz and 5 GHz) . . . . . . . . . . . . . . . . . . . . . . . . . . . . . . 79View Logs of Web Access or Attempted Web Access . . . . . . . . . . . . . . . . . . . . . 80Manage the Configuration File . . . . . . . . . . . . . . . . . . . . . . . . . . . . . . . . . . . . . . . . 81Back Up Settings . . . . . . . . . . . . . . . . . . . . . . . . . . . . . . . . . . . . . . . . . . . . . . . . . . 81Restore Configuration Settings. . . . . . . . . . . . . . . . . . . . . . . . . . . . . . . . . . . . . . 81Erase . . . . . . . . . . . . . . . . . . . . . . . . . . . . . . . . . . . . . . . . . . . . . . . . . . . . . . . . . . . . 82Set Password . . . . . . . . . . . . . . . . . . . . . . . . . . . . . . . . . . . . . . . . . . . . . . . . . . . . . . . 82Password Recovery. . . . . . . . . . . . . . . . . . . . . . . . . . . . . . . . . . . . . . . . . . . . . . . . 82Chapter 9Advanced SettingsAdvanced Wireless Settings . . . . . . . . . . . . . . . . . . . . . . . . . . . . . . . . . . . . . . . . . . . 86Restrict Wireless Access by MAC Address . . . . . . . . . . . . . . . . . . . . . . . . . . . . 88Wireless AP . . . . . . . . . . . . . . . . . . . . . . . . . . . . . . . . . . . . . . . . . . . . . . . . . . . . . . . . . 89Wireless Repeating Function (WDS). . . . . . . . . . . . . . . . . . . . . . . . . . . . . . . . . . . . 90Set Up the Base Station . . . . . . . . . . . . . . . . . . . . . . . . . . . . . . . . . . . . . . . . . . . . 92Set Up a Repeater Unit . . . . . . . . . . . . . . . . . . . . . . . . . . . . . . . . . . . . . . . . . . . . . 93Port Forwarding and Triggering. . . . . . . . . . . . . . . . . . . . . . . . . . . . . . . . . . . . . . . . 94Remote Computer Access Basics . . . . . . . . . . . . . . . . . . . . . . . . . . . . . . . . . . . . 94Port Triggering to Open Incoming Ports . . . . . . . . . . . . . . . . . . . . . . . . . . . . . . 95Port Forwarding to Permit External Host Communications . . . . . . . . . . . . . . 97How Port Forwarding Differs from Port Triggering. . . . . . . . . . . . . . . . . . . . . 98Set Up Port Forwarding to Local Servers. . . . . . . . . . . . . . . . . . . . . . . . . . . . . . . . 98Add a Custom Service . . . . . . . . . . . . . . . . . . . . . . . . . . . . . . . . . . . . . . . . . . . . . 99Edit or Delete a Port Forwarding Entry . . . . . . . . . . . . . . . . . . . . . . . . . . . . . . 100Set Up Port Triggering . . . . . . . . . . . . . . . . . . . . . . . . . . . . . . . . . . . . . . . . . . . . . . 100Dynamic DNS . . . . . . . . . . . . . . . . . . . . . . . . . . . . . . . . . . . . . . . . . . . . . . . . . . . . . . 102Static Routes . . . . . . . . . . . . . . . . . . . . . . . . . . . . . . . . . . . . . . . . . . . . . . . . . . . . . . 103Remote Management . . . . . . . . . . . . . . . . . . . . . . . . . . . . . . . . . . . . . . . . . . . . . . . 105USB Settings. . . . . . . . . . . . . . . . . . . . . . . . . . . . . . . . . . . . . . . . . . . . . . . . . . . . . . . 106Universal Plug and Play. . . . . . . . . . . . . . . . . . . . . . . . . . . . . . . . . . . . . . . . . . . . . . 106IPv6 . . . . . . . . . . . . . . . . . . . . . . . . . . . . . . . . . . . . . . . . . . . . . . . . . . . . . . . . . . . . . . 107Auto Detect Fields . . . . . . . . . . . . . . . . . . . . . . . . . . . . . . . . . . . . . . . . . . . . . . . 108Auto Config . . . . . . . . . . . . . . . . . . . . . . . . . . . . . . . . . . . . . . . . . . . . . . . . . . . . . 1096to4 Tunnel . . . . . . . . . . . . . . . . . . . . . . . . . . . . . . . . . . . . . . . . . . . . . . . . . . . . . 110Pass Through . . . . . . . . . . . . . . . . . . . . . . . . . . . . . . . . . . . . . . . . . . . . . . . . . . . . 110Fixed . . . . . . . . . . . . . . . . . . . . . . . . . . . . . . . . . . . . . . . . . . . . . . . . . . . . . . . . . . . 111DHCP . . . . . . . . . . . . . . . . . . . . . . . . . . . . . . . . . . . . . . . . . . . . . . . . . . . . . . . . . . 112PPPoE . . . . . . . . . . . . . . . . . . . . . . . . . . . . . . . . . . . . . . . . . . . . . . . . . . . . . . . . . . 113Traffic Meter . . . . . . . . . . . . . . . . . . . . . . . . . . . . . . . . . . . . . . . . . . . . . . . . . . . . . . 114Chapter 10TroubleshootingQuick Tips . . . . . . . . . . . . . . . . . . . . . . . . . . . . . . . . . . . . . . . . . . . . . . . . . . . . . . . . . 116Sequence to Restart Your Network . . . . . . . . . . . . . . . . . . . . . . . . . . . . . . . . . 116Power LED . . . . . . . . . . . . . . . . . . . . . . . . . . . . . . . . . . . . . . . . . . . . . . . . . . . . . . 116Check Ethernet Cable Connections . . . . . . . . . . . . . . . . . . . . . . . . . . . . . . . . . 116Wireless Settings. . . . . . . . . . . . . . . . . . . . . . . . . . . . . . . . . . . . . . . . . . . . . . . . . 1165
N750 Wireless Dual Band Gigabit Router WNDR4300Network Settings . . . . . . . . . . . . . . . . . . . . . . . . . . . . . . . . . . . . . . . . . . . . . . . . 116Troubleshoot with the LEDs . . . . . . . . . . . . . . . . . . . . . . . . . . . . . . . . . . . . . . . . . . 117Power LED Is Off or Blinking . . . . . . . . . . . . . . . . . . . . . . . . . . . . . . . . . . . . . . . 117LEDs Never Turn Off . . . . . . . . . . . . . . . . . . . . . . . . . . . . . . . . . . . . . . . . . . . . . 117Internet LED Is Off . . . . . . . . . . . . . . . . . . . . . . . . . . . . . . . . . . . . . . . . . . . . . . . 1172.4 GHz and 5 GHz LEDs Are Off. . . . . . . . . . . . . . . . . . . . . . . . . . . . . . . . . . . 118Cannot Log In to the Router . . . . . . . . . . . . . . . . . . . . . . . . . . . . . . . . . . . . . . . . . 118Cannot Access the Internet . . . . . . . . . . . . . . . . . . . . . . . . . . . . . . . . . . . . . . . . . . 119Changes Not Saved . . . . . . . . . . . . . . . . . . . . . . . . . . . . . . . . . . . . . . . . . . . . . . . . . 120Incorrect Date or Time . . . . . . . . . . . . . . . . . . . . . . . . . . . . . . . . . . . . . . . . . . . . . . 120Wireless Connectivity . . . . . . . . . . . . . . . . . . . . . . . . . . . . . . . . . . . . . . . . . . . . . . . 121Wireless Signal Strength . . . . . . . . . . . . . . . . . . . . . . . . . . . . . . . . . . . . . . . . . . 121Appendix A Supplemental InformationFactory Settings . . . . . . . . . . . . . . . . . . . . . . . . . . . . . . . . . . . . . . . . . . . . . . . . . . . 123Technical Specifications . . . . . . . . . . . . . . . . . . . . . . . . . . . . . . . . . . . . . . . . . . . . . 1246
1.Hardware SetupGettin g to know your ro ute r1The N750 Wireless Dual Band Gigabit Router WNDR4300 provides an easy and secure way toset up a wireless home network with fast access to the Internet over a high-speed digitalsubscriber line (DSL). It is compatible with all major DSL Internet service providers, lets youblock unsafe Internet content and applications, and protects the devices (computers, gamingconsoles, and so on) that you connect to your home network.If you have not already set up your new router using the installation guide that comes in the box,this chapter walks you through the hardware setup. Chapter 2, Getting Started with NETGEARgenie, explains how to set up your Internet connection.This chapter contains the following sections: Unpack Your Router Hardware Features Attach the Stand Position Your Router Cable Your Router Verify the CablingFor information about ReadySHARE features in your product, see Chapter 5, Storage, and visitwww.netgear.com/readyshare.For more information about the topics covered in this manual, visit the support website athttp://support.netgear.com.7
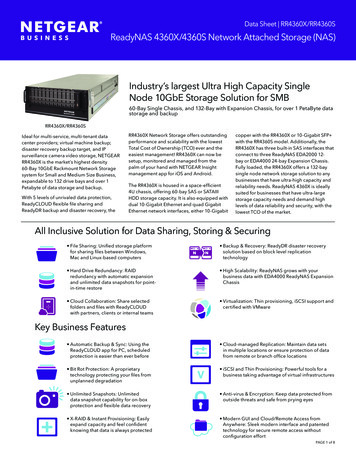
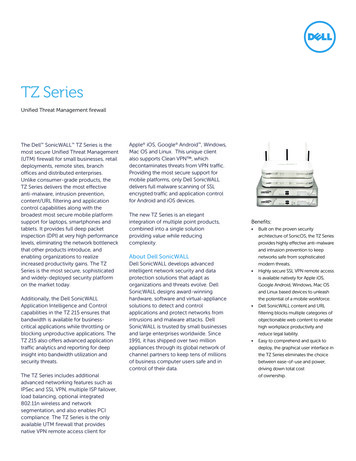
N750 Wireless Dual Band Gigabit Router WNDR4300Unpack Your RouterYour box should contain the following items: N750 Wireless Dual Band Gigabit Router WNDR4300 Router stand AC power adapter (plug varies by region) Category 5E (Cat 5E) Ethernet cable Resource CD Installation guide with cabling and router setup instructionsHardware FeaturesBefore you cable your router, take a moment to become familiar with the label and the frontand back panels. Pay particular attention to the LEDs on the front panel.Front PanelThe router front panel has the status LEDs and icons shown in the figure. The Wireless andWPS icons are buttons.InternetPower2.4 GHz5 GHzLAN ports(1–4)Figure 1. Front panel LEDs and iconsHardware Setup8USBWirelessWPS
N750 Wireless Dual Band Gigabit Router WNDR4300The following table describes the LEDs, icons, and buttons on the front panel from left toright.IconDescriptionPower Solid amber. The unit is starting up after being powered on.Solid green. The router is ready to useOff. Power is not supplied to the router.Blinking green. The firmware is corrupted. Visit http://www.netgear.com/support.Blinking amber. The firmware is upgrading, or the Restore Factory Settings buttonwas pressed.Internet Solid green. An IP address has been received; the router is ready to transmit data.Solid amber. The Ethernet cable connection to the modem has been detected.Off. No Ethernet cable is connected to the modem.2.4 GHz Solid green. The 2.4-GHz wireless radio is operating.Off. The 2.4-GHz wireless radio is off.5 GHz Solid blue. The 5-GHz wireless radio is operating.Off. The 5-GHz wireless radio is off.LAN Solid green. The LAN port has detected a 1 Gbps link with an attached device.Solid amber. The LAN port has detected a 10/100 Mbps link with an attacheddevice.Off. No link is detected on this port. USB WirelessbuttonPressing this button for over one second turns on and off the wireless radios. On. The 2.4-GHz and 5-GHz wireless radios are on. Off. The 2.4-GHz and 5-GHz wireless radios are off, and the 2.4 GHz and 5 GHzLEDs are off.WPS buttonPressing this button allows you to use Wi-Fi Protected Setup (WPS) to add a wirelessdevice or computer to your network (see Wi-Fi Protected Setup (WPS) Method onpage 19). The WPS LED blinks for 2 minutes during this process.Solid green. The router has accepted the USB device.Blinking green. The USB device is in use.Off. No USB device is connected, or the Safely Remove Hardware button has beenclicked and it is now safe to remove the attached USB device.Hardware Setup9
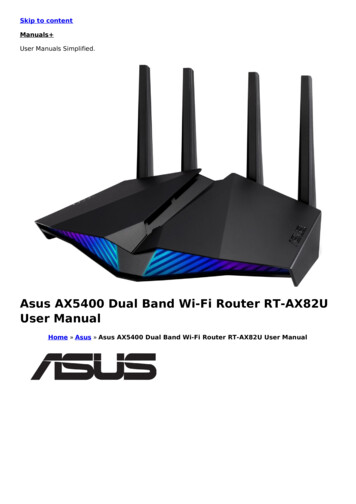
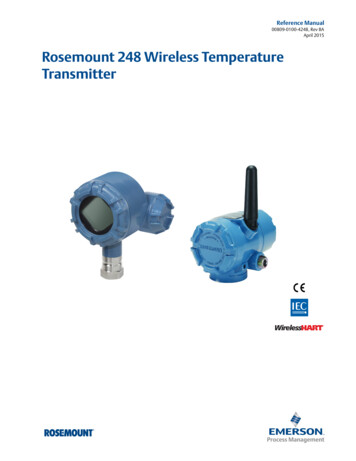
N750 Wireless Dual Band Gigabit Router WNDR4300Back PanelThe back panel has the On/Off button and port connections as shown in the figure.Power inputUSB portFour Ethernet WAN portLAN portsOn/Off buttonFigure 2. Back panelLabelThe label on the bottom of the router shows the Restore Factory Settings button, logininformation, MAC address, and serial number.Login user nameDefault passwordRestore Factory SettingsSerial numberMAC addressFigure 3. Label on router bottomSee Factory Settings on page 123 for information about restoring factory settings.Hardware Setup10
N750 Wireless Dual Band Gigabit Router WNDR4300Attach the StandFor optimal wireless network performance, use the stand (included in the package) toposition your router upright.1. Orient your router vertically.2. Insert the tabs of the stand into the slots on the bottom of your router as shown.Place your router in a suitable area for installation (near an AC power outlet and accessibleto the Ethernet cables for your wired computers).Position Your RouterThe router lets you access your network from virtually anywhere within the operating range ofyour wireless network. However, the operating distance or range of your wireless connectioncan vary significantly depending on the physical placement of your router. For example, thethickness and number of walls the wireless signal passes through can limit the range. Forbest results, place your router: Near the center of the area where your computers and other devices operate, andpreferably within line of sight to your wireless devices. So it is accessible to an AC power outlet and near Ethernet cables for wired computers. In an elevated location such as a high shelf, keeping the number of walls and ceilingsbetween the router and your other devices to a minimum.Hardware Setup11
N750 Wireless Dual Band Gigabit Router WNDR4300 Away from electrical devices that are potential sources of interference, such as ceilingfans, home security systems, microwaves, computers, or the base of a cordless phone or2.4-GHz cordless phone. Away from any large metal surfaces, such as a solid metal door or aluminum studs. Largeexpanses of other materials such as glass, insulated walls, fish tanks, mirrors, brick, andconcrete can also affect your wireless signal. With the antennas in a vertical position to provide the best side-to-side coverage or in ahorizontal position to provide the best up-and-down coverage, as applicable.Cable Your RouterThe installation guide that came in the box has a cabling diagram on the first page. Thissection walks you through cabling with detailed illustrations.1. Connect the router, the computer, and the modem.2. Turn off and unplug the modem. If your modem has a backup battery, remove it as well.1DSL or cableInternetModemHardware Setup12
N750 Wireless Dual Band Gigabit Router WNDR43003. Locate the Ethernet cable (1) that connects your computer to the modem.124. Disconnect the cable from the modem (2). You will connect it to the router later.5. Locate the Ethernet cable that came with the NETGEAR product. Securely insert thatEthernet cable into your modem and into the Internet port of the router (3).36. Locate the cable you removed from the modem in step 2. Securely insert that cable (4) intoa LAN port on the router such as LAN port 1.4Your network cables are connected, and you are ready to start your network. It is importantthat you start your network in the correct sequence (first power on the modem, and after itfinishes starting up, power on the router).Hardware Setup13
N750 Wireless Dual Band Gigabit Router WNDR4300Verify the CablingVerify that your router is cabled correctly by checking the router LEDs. Turn on the router bypressing the On/Off button on the back. The Power LED lights amber when the router is turned on. The LAN port LEDs light green for each computer cabled to the router. The 2.4 GHz N/G-Band LED is lit, and the 5.0 GHz N-Band LED is lit. The Internet LED is lit. If it is not, make sure that the Ethernet cable is securelyattached to the router Internet port and the modem, and that the modem is powered on.Verify that the LANan Ethernet cable.LEDs (1 through 4) are lit for any computers cabled to the router byHardware Setup14
2.Getting Started with NETGEARgenie2Co n n ec t ing t he routerThis chapter explains how to use NETGEAR genie to set up your router after you completecabling as described in the installation guide and in the previous chapter.This chapter contains the following sections: Router Setup Preparation Types of Logins and Access Use NETGEAR genie after Installation Upgrade the Firmware Dashboard (Basic Home Screen) Join Your Wireless Network NETGEAR genie App and Mobile genie App15
N750 Wireless Dual Band Gigabit Router WNDR4300Router Setup PreparationYou can allow NETGEAR genie to automatically set up your router, or you can use the geniemenus and screens to set up your router manually. Before you start the setup process, getyour ISP information and make sure the computers and devices in the network have thesettings described here.Use Standard TCP/IP Properties for DHCPIf you set up your computer to use a static IP address, you need to change the settings sothat it uses Dynamic Host Configuration Protocol (DHCP). Consult the documentation thatcame with your computer or operating system for instructions about how to do this.Gather ISP InformationIf you have DSL broadband service, you might need the following information to set up yourrouter and to check that your Internet configuration is correct. Your Internet service provider(ISP) should have provided you with all of the information needed to connect to the Internet. Ifyou cannot locate this information, ask your ISP to provide it. When your Internet connectionis working, you no longer need to launch the ISP login program on your computer to accessthe Internet. When you start an Internet application, your router automatically logs you in.Make sure that you have the following information: The ISP configuration information for your DSL account ISP login name and password Fixed or static IP address settings (special deployment by ISP; this is rare)Wireless Devices and Security SettingsMake sure that the wireless device or computer that you are using supports WPA or WPA2wireless security, which is the wireless security supported by the router.Types of Logins and AccessDifferent types of logins have different purposes: It is important that you understand thedifference so that you know which login to use when. Router login logs you in to the router interface from NETGEAR genie. See UseNETGEAR genie after Installation on page 17 for details about this login. ISP login logs you in to your Internet service. Your service provider has provided youwith this login information, typically in a letter. If you cannot find this login information,contact your service provider. WiFi password. The preset SSID (WiFi network name) and preset WiFi password foryour router are unique. This information is on the label on the bottom of your router.Getting Started with NETGEAR genie16
N750 Wireless Dual Band Gigabit Router WNDR4300Use NETGEAR genie after InstallationWhen you first set up your router, NETGEAR genie automatically starts when you launch anInternet browser on a computer that is connected to the router. You can use NETGEARgenie again if you want to view or change settings for the router.1. Launch your browser from a computer or wireless device that is connected to the router.2. Enter http://www.routerlogin.net in the web browser address bar.A login window displays.admin********3. Enter admin for the router user name and password for the router password, both inlowercase letters.Note: The router user name and password are different from the user nameand password for logging in to your Internet connection. See Types ofLogins and Access on page 16 for more information.Upgrade the FirmwareWhen you set up your router and are connected to the Internet, the router automaticallychecks for you to see if newer firmware is available. If newer firmware is available, amessage is displayed on the top of the screen.Click the message when it displays, and click Yes to upgrade the router with the latestfirmware. After the upgrade, the router restarts automatically.CAUTION:Do not try to go online, turn off the router, shut down the computer, or doanything else to the router until the router finishes restarting and thehas stopped blinking for several seconds.Power LEDFor more information, see Upgrade the Firmware on page 75.Getting Started with NETGEAR genie17
N750 Wireless Dual Band Gigabit Router WNDR4300Dashboard (Basic Home Screen)The Basic Home screen has a dashboard that lets you see the status of your Internetconnection and network at a glance. You can click any of the six sections of the dashboard toview more detailed information. The left column has the menus, and tabs at the top. You canuse the Advanced tab to access more menus and screens.LanguageMenus(Click theAdvancedtab to viewmore)Dashboard(Click toviewdetails)HelpFigure 4. Basic Home screen with dashboard, language, and online help Home. This dashboard screen displays when you log in to the router. Internet. Set, update, and check the ISP settings of your router. Wireless. View or change the wireless settings for your router. Attached Devices. View the devices connected to your network. Parental Controls. Download and set up parental controls to prevent objectionablecontent from reaching your computers. ReadySHARE. Manage storage on USB devices that you connect to the router USBdrive. Guest Network. Set up a guest network to allow visitors to use your router’s Internetconnection. Advanced tab. Set the router up for unique situations such as when remote access by IPor by domain name from the Internet is needed. See Chapter 4, NETGEAR genieAdvanced Home. You need a solid understanding of networking protocols to use this tab. Help & Support. Visit the NETGEAR support site to get information, help, and productdocumentation. These links work once you have an Internet connection.Getting Started with NETGEAR genie18
N750 Wireless Dual Band Gigabit Router WNDR4300Join Your Wireless NetworkYou can use the manual or the WPS method to join your wireless network.Manual MethodWith the manual method, you choose the network that you want and enter its password toconnect. To connect manually:1. On your computer or wireless device, open t
The LAN port has detected a 1 Gbps link with an attached device. Solid amber. The LAN port has detected a 10/100 Mbps link with an attached device. Off. No link is detected on this port. USB Solid green. The router has accepted the USB device. Blinking green. The USB device is in use.