Transcription
Matlab Toolbox for the iRobot Create 2 (MTIC2)Version 0.9 (8.15.2015)Download ab/Developed by:Joel M. EspositoProfessor Systems EngineeringUS Naval AcademyAnnapolis, MD na.eduAcknowledgements:Joel Esposito thanks iRobot for donating a development version of the Create 2 and acknowledges the previouscontributions of Owen Barton, Josh Koehler and David Lim who assisted in the development of original versionof MTIC, upon which this is built.Citation Information:The toolbox is free. If you publish research or pedagogical papers containing results gathered using thetoolbox, please cite this document as follows.Esposito, Joel M., "Matlab Toolbox for iRobot Create ab/, Copyright 2015Or in BibTex:@MISC{MTIC2,author {Joel M. Esposito },title { Matlab Toolbox for iRobot Create 2},howpublished { },year {2015} }1
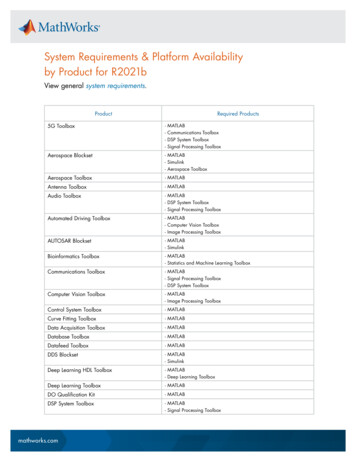
MTIC2 Project Overview4Background . 4What is New for Create 2 and MTIC2? . 4Requirements . 4Robot: . 4PC:. 4Matlab: . 5Connection: . 5GETTING STARTED . 5Downloading and Installation . 5Hardware . 5Software Connection . 6Check Firmware (Optional) . 7Understanding Modes: Safe vs Full . 7Powering Down . 8Example . 8When Things Don't Work Right. 8Unsupported Commands. 8FUNCTION LIST . 10AngleSensorRoomba. 10BatteryChargeReaderRoomba . 10BatteryVoltageRoomba . 10BeepRoomba . 10BumpsWheelDropsSensorsRoomba . 11ButtonsSensorRoomba . 11CliffSignalStrengthRoomba . 11CliffStateRoomba . 11CurrentBatteryRoomba . 11DisplayTextRoomba . 12DistanceSensorRoomba . 12EncoderSensorsRoomba . 12GetFirmwareRoomba . 12MotorCurrentSensor . 13PowerOffRoomba . 13RangeSignalStrengthRoomba . 13RangeStateRoomba . 13RombaInit. 13SeekDockRoomba . 14SetFwdVelAngVelRoomba . 14SetFwdVelRadiusRoomba . 14SetLEDsRoomba . 14SetPWMRoomba . 15SetWheelVelRoomba . 152
StasisSensorRoomba . 15TemperatureRoomba . 153
MTIC2 Project OverviewBackgroundThe iRobot Create 2 is a reprogrammable version of the Roomba 600 robot vacuum cleaner for roboticshobbyists, educators and researchers. Out of the package, users can use their PC to control the robot by sendingand receiving byte code sentences over a wired serial-USB connection. However, the native open interface isgeared to the advanced user, and not well suited to rapidly developing code.This toolbox provides a set of intuitive, high level functions (a.k.a. wrappers) that allows you to easily controlthe Create 2’s sensors and actuators from a PC running MATLAB. Even novice MATLAB users should beable to get the robot running within 10 minutes.What is New for Create 2 and MTIC2?New Create 2 and MTIC 2 features include: communication cable is now USB, eliminating the need for a separate USB to serial converter; communication rate is now faster at 115,200 bits per second; robot has more LEDs and a 7-segment display capable of producing ASCII characters; robot has more buttons; robot has 6 short range IR sensors located on bumper for non-contact obstacle detection; user can control drive wheel motors via raw pulse width modulation (PWM) commands; user can read raw encoder readings; user can sense drive wheel motor current; stasis sensor detects when robot is not making forward progress; and the top plate includes drill template for mounting hardware and CAD files are available to 3-D printaccessoriesThe following features from the original Create and MTIC are no longer supported. Direct access to cargo bay digital I/O pins Top side cargo area Castor wheel drop sensor Demo and local scripting commands GUI for driving the robotRequirementsRobot: You need an iRobot Create 2. The Create 2 is based on the physical platform of the Roomba 650.The toolbox was developed based on the Create Open Interface document dated August 10, 2015. There aresome known issues on robot with firmware lower than 3.3.0. You can check the firmware using theCheckFirmware function included in this toolbox.PC: You need a PC or laptop since all the code you create with this toolbox will be stored on and run on a PC,and the commands will be sent to the robot via a communication cable. The toolbox does not allow you towrite code which is stored on or runs directly on the robot.4
Matlab: The toolbox was developed and tested with MATLAB Release 2015a. Earlier versions were testedon releases dating back through 2008 and will likely work properly. The toolbox has not been tested on Mac orLinux/Unix versions of Matlab or its freeware clones, though it is likely to work.Connection: The USB to Mini-DIN communication cable included with the Create2 is used to create awired data connection to a PC. At the time of this release two products exist for creating a wireless connection:RooTooth and RooWifi. It may also be possible to create a wireless connection using a Bluetooth serial adapteras discussed here.Getting StartedDownloading and Installation1. Download and extract the zip file from matlab/2. Place all the files in a folder called MTIC23. In Matlab add this folder to the path. The path is the list of directories Matlab looks in for functiondefinitions. For example, if you placed the code in a folder called C:\Matlab\MTIC2 , type this at theMatlab command line: addpath 'C:\Matlab\MTIC2';4. You will need to do Step 3 each time you restart Matlab. If you want the change to be permanent type: savepath;Note: If you have previously installed MTIC (for the original Create robot) you should remove that from thepath, as some of the functions have the same name and could cause name collisions. For example: rmpath 'C:\Matlab\MTIC':Hardware1. Charge your robot.2. Connect your robot to your computer using the included communication cable (you need to remove thegreen top plate on the robot to find the port).3. Power the robot on. The LED under the power button should light.5
Software Connection1. Port Number: Even though the communications cable is USB, it is treated by your computer as a serialport. You will need to determine which port number it has been assigned. In Windows try ControlPanel/ System/ Device Manager / Ports (COM & LPT) to see a list of available ports.They are referred to as COM1, COM2, etc. For example on my computer it is listed as “USB SerialPort (COM5)2. Create a serial port object: Matlab manages serial port communications by creating something called"serial port objects". They are variables that contain all the port number and settings you need tocommunicate with the Roomba. For example if you are using COM5, open Matlab and type at thecommand prompt: [serialObject] RoombaInit(5) ;3. Confirm: If the function correctly initialized the robot, you will see the letters ‘go’ on the Create’s 7segment display and hear it play a short song. If it failed, first check the com port number; then trypower cycling the robot.Important Notes: The output is a serial port object that contains all the settings to talk to the robot. This variable mustbe passed to every command in the toolbox, each time they are called. If you type clear allyou may inadvertently delete this variable. You will need to reinitialize with RoombaInit before youcan send more commands to the robot. If you have many Roombas you would like to operate simultaneously, each must be connected to adifferent port number (possible with a USB hub and Bluetooth). You will need a separate serial portobject for each robot/port. Example: [serialObjectRoomba1] [serialObjectRoomba2] RoombaInit(1) ;RoombaInit(2) ;6
Check Firmware (Optional)Note that the toolbox was developed on firmware version 3.2.4, and there are several confirmed bugs in theOpen Interface on versions predating 3.3.0. If you want to check your firmware version you will need a Phillipshead screw driver.1. With the communication cable plugged in, turn over the robot and remove the 4 screws securing thebottom plate.2. Type the following at the Matlab command prompt. Firmware GetFirmwareRoomba(portNumber)3. You will be instructed to remove and replace the battery.4. After your robot plays a short song, press any key.5. The start-up message and firmware version should be displayed.6. Replace the bottom cover and reinitialize the connection to the robot using RoombaInitHow to access battery: Remove 4 screws on (left). Lift out battery (right).Understanding Modes: Safe vs FullTyping the following command:[serialObject] RoombaInit(5)will put the robot in “safe” mode which gives you full control of the sensors and actuators until one of thesesafety conditions occurs:1. detection of a cliff while moving forward (or moving backward with a small turning radius, lessthan one robot radius);2. detection of a wheel drop (on either drive wheel); or3. charger plugged in and powered.Also, note that charging terminates when you enter Safe Mode, and Roomba will not power save. If any one ofthose safety conditions are triggered you will need to use RoombaInit to regain control of the robot.If you would like to initialize your robot in “full” mode, which disables those safety features, use:[serialObject] RoombaInit(5,‘full’)Note that charging and power saving are also disabled in full mode.7
Powering DownYou must power down the Roomba with the command PowerOffRoomba when done. Note that the physicalpower button does not work, and power saving and charging will not occur once the robot is initialized withRoombaInit. There is a real risk of deeply discharging the Roomba's battery causing permanent damage.Always use this command when done!ExampleHere is a Matlab Program that turns on the robot, uses COM5, drives forward in an arc for 1 second, then readsthe encoders.% Initialize communication[serialObject] RoombaInit(5)% Read encoders (provides baseline)[StartLeftCounts, StartRightCounts] .EncoderSensorsRoomba(serialObject)%sets forward velocity 0.5 m/s and turning radius 2 mSetFwdVelRadiusRoomba(serialObject, 0.5, 2);%wait 1 secondpause(1)% stop the robot (turning radius doesn’t matter, inf is straight )SetFwdVelRadiusRoomba(serialObject, 0, inf);[FinishLeftCounts, FinishRightCounts] EncoderSensorsRoomba(serialObject).Distance (0.036*2*pi)*((FinishLeftCounts - StartLeftCounts) .(FinishRightCounts - StartRightCounts) )/( 2 *508.8)% Power down when finished,% note physical power button is disabledPowerOffRoomba(serialObject)When Things Don't Work Righttry-catch statements are used to increase the robustness of the serial communications. That means that if yourequest a sensor to the robot and the robot does not reply appropriately: you will see a warning message but not get an error; and any values the function should have returned (eg. sensor readings) will be NaN (Matlab's data type forNot a Number).The advantage of this is that a single bad sensor reading, for example if the robot drives out of range of thewireless communication device, will not crash your code. On the other hand the onus is on the programmer tocheck for bad sensor responses. The Matlab isnan function is useful to test for this.Unsupported CommandsThere are many commands in the Create 2 Open Interface that were not included in the toolbox: such as usingthe scheduling features, changing the baud rate and controlling the cleaning motors.8
Also, note that the Create has a mode where it streams sensor data over the communication cable continuously.This toolbox does not support that mode. You must send one of the sensor request commands each time youwant to read data.9
Function ListAn alphabetical list of functions along with documentation is included below. Note that the toolbox supportsMatlab’s help and doc commands.AngleSensorRoomba[AngleR] AngleSensorRoomba(serPort)Displays the angle in radians that Create has turned since the angle was last requested. AngleR is in radians. When viewed from above, counter-clockwise angles are positive and clockwiseangles are negative. serPort is a serial port object created by RoombaInit.Note: This command may not work correctly on older versions of the Roomba Open Interface (pre 3.3.0). Line27 contains a correction factor (/0.324956) that may need to be removed in the future. Consider usingEncoderSensorRoomba. AngleR (RightWheelDist-LeftWheelDist)/WheelBase, where WheelBase 0.235.BatteryChargeReaderRoomba[Charge, Capacity, Percent] BatteryChargeReaderRoomba(serPort)Displays the charge remaining in Create's Battery. Charge is the current battery charge in milli-amp hours.Capacity is the Roomba's battery capacity in milli-amp hours.Percent (0 to 100) is Charge / Capacity * 100 .serPort is a serial port object created by RoombaInit.BatteryVoltageRoomba[Voltage] BatteryVoltageRoomba(serPort)Reads the voltage of Create's battery. Voltage is the battery voltage. serPort is a serial port object created by RoombaInit.BeepRoombaBeepRoomba(serPort)Plays a short beep. serPort is a serial port object created by RoombaInit.Note: The tone and duration are hardcoded inside of RoombaInit.10
mpFront, WheDropRight,WheDropLeft] BumpsWheelDropsSensorsRoomba(serPort)Queries the state of the bump and wheel drop sensors. BumpRight,BumpLeft,BumpFront, WheDropRight,WheDropLeft are returned as either triggered (1) ornot triggered (0) . serPort is a serial port object created by RoombaInit.Note: there is no physical front bump sensor, but rather it is considered triggered if both the left and right bumpsensors are triggered, in which case BumpFront 1 and BumpLeft and BumpRight are returned as 0.ButtonsSensorRoomba[Clock, Schedule, Day, Hour, Minute, Dock, Spot, Clean] ButtonsSensorRoomba(serPort)Queries the state of Create's buttons. Clock, Schedule, Day, Hour, Minute, Dock, Spot, Clean are returned as pressed (1) or not pressed (0). serPort is a serial port object created by RoombaInitNote: As of firmware 3.2.0, the Clock and Schedule buttons do not respond (0 always).CliffSignalStrengthRoomba[Signal] CliffSignalRoomba(serPort)Displays the strength cliff sensor signals. Signal is a 1 by 4 array [Left, LeftFront, RightFront, Right] which ranges between 0-4095. Higher values indicatean object is closer (no cliff) and smaller values indicate an object is further (possible cliff). Under normal drivingconditions values are approximately 3000, but vary with surface reflectivity. serPort is a serial port object created with RoombaInit.Note: I have never observed values close to 4095.CliffStateRoomba[State] CliffStateRoomba(serPort)Specifies the state of the Cliff sensor. The state is determined by comparing the cliff sensor’s signal value to someinternal threshold. State is a 1 by 4 vector [Left, LeftFront, RightFront, Right] where 1 indicates the cliff sensor is triggered while 0indicates not triggered. serPort is a serial port object created by RoombaInit.CurrentBatteryRoomba[Current] CurrentTesterRoomba(serPort)Reads the current flowing into or out of Create's battery. Current is in amps. Negative currents indicate that current is flowing out of the battery. Positive currents indicatethat current is flowing into the battery (charging).11
serPort is a serial port object created by RoombaInit.DisplayTextRoombaDisplayText(serPort, FourCharacterString)Displays text on Roomba's display. FourCharacterString is a four character, case sensitive, string. The string can contain any letters (upper andlowercase), numbers and punctuation (i.e. ASCII codes 32 through 126 are supported). Note that all ASCIIcharacters are only an approximation on 7 segment displays. Strings with less than 4 characters will have spacesappended to them. serPort is a serial port object created by RoombaInit.DistanceSensorRoomba[Distance] DistanceSensorRoomba(serPort)Gives the distance traveled since last queried. Distance is in meters, positive values indicate travel in the forward direction and negative values indicate travel inthe reverse direction. If not polled frequently enough, it is capped at its minimum or maximum of /- 32.768meters. serPort is a serial port object created by RoombaInit.Note: Open Interface Document dates Aug 15, 2015 indicates that this reading is incorrect on robots with old firmware(pre 3.3.0). Consider using EncoderSensorsRoomba instead. Distance (RightWheelDist LeftWheelDist)/2 .EncoderSensorsRoomba[LeftCounts, RightCounts] EncoderSensor(serPort)Read Roomba’s wheel encoders. LeftCounts and RightCounts are the drive wheel encoder counts. The wheels have 508.8 counts per revolution(0.7075 deg/count). Counts wrap around to 0 after exceeding /- 32767. serPort is a serial port object created by RoombaInit.Notes: Because the physical encoders do not have quadrature, they are incapable of directly sensing the direction oftravel – rather they infer the direction based on the commanded velocity. Therefore the sign may be incorrectwhen wheel spin direction does not match the commanded velocity. Examples of such situations include: robotbeing pushed or coasting when not powered. The wheel radius is 36 mm, so the distance traveled can be computed using Counts* pi*2*0.036/ 508.8 .GetFirmwareRoombaFirmware GetFirmwareRoomba(portNumber)This function can be used to detect the version of the firmware on the robot.It requires the use of a Phillips head screw driver. Step through instruction are provided within.You will need to use RoombaInit when done. portNumber is an integer specifying the communication port. Firmware is a string specifying the firmware version.12
Note: The toolbox was developed on version 3.2.3. There are some known bugs in the Create Open Interface prior toversion 3.3.0.MotorCurrentSensor[LeftAmp, RightAmp] MotorCurrentSensor(serPort)Get motor currents. LeftAmp and RightAmp are signed left and right drive wheel current draws in amps serPort is a serial port object created by er down robot. serPort is a serial port object created by RoombaInitNote that the physical power button does not work, and power saving and charging will notoccur once the robot is initialized with RoombaInit. There is a real risk of deeply discharging the Roomba's batterycausing permanent damage. Always use this command when done!RangeSignalStrengthRoomba[Signal] RangeSignalStrengthRoomba(serPort)Displays the return strength of the 6 IR range sensors located on the bumper. Signal is a 1 by 6 vector whose entries are Left, FrontLeft, CenterLeft, CenterRight, FrontRight, Right with valuesranging between 0-4095 but I have not observed values above 1500. High values indicate an object is close, lowvalues far away. Note values vary with both range and surface reflectivity. serPort is a serial port object created by RoombaInit.RangeStateRoomba[State] RangeStateRoomba(serPort)Displays the state of the 6 IR range sensors located on the bumper. The state is determined by comparing the range signalstrength to some internal threshold. State is a 1 by 6 vector [Left, FrontLeft, CenterLeft, CenterRight, FrontRight, Right] a value of 0 means no objectin range, 1 indicates an object is in range. serPort is a serial port object created by RoombaInit.RombaInit[serPort] RoombaInit(my COM)[serPort] RoombaInit(my COM, mode)Initializes the serial connection to robot. my COM is the number of the comm port e.g. RoombaInit(1) sets port 'COM1' Uses communication ratedefault of 115200 bits per second. When only one input argument is used, the robot is set to "safe mode" (won't13
run if plugged in, wheel drops or cliff sensor activated). When one of these conditions is triggered the robotswitches to 'passive mode' in which all actuators are disabled. In order to regain control of the robot, it must bereset with RoombaInit.serPort is a serial port object which must be passed to all other Roomba or Create commands.The optional input argument mode is a string indicating the desired mode.o mode 'safe' puts the Create in the default Safe mode described above.o mode 'full' puts the Create in Full mode which disables those safety features.SeekDockRoombaSeekDockRoomba(serPort)Make robot drive to dock and recharge the next time it encounters the docking beams. serPort is a serial port object created with RoombaInit.Note this commands sets robot to 'Passive Mode' which means you can request sensor info but not send actuatorcommands. Return to Full or Safe mode using mba(serPort, FwdVel, AngVel )Sets forward and angular velocity. FwdVel is the forward velocity in meters/ sec [-0.5, 0.5]. Values outside this range are saturated.AngVel is the angular velocity in rad/sec. Negative velocity is backward / clockwise.serPort is a serial port object created by RoombaInit.Note that the individual wheel speeds are capped at 0.5 meters per second, so it is possible to specify robot velocities thatcannot be achieved in which case a warning is ba(serPort, FwdVel, Radius)Moves Roomba by setting forward vel and turn radius FwdVel is forward vel in m/sec [-0.5, 0.5]. Values outside this range are saturated. Radius in meters, when driving forward positive turns left, negative turns right. Range is [-2,2] Special cases:Straight inf. Turn in place clockwise -eps. Turn in place counter-clockwise eps. eps is a built in Matlabconstant. serPort is a serial port object created by kRobotLEDstate,DockLEDstate,SpotLEDstate, DebrisLEDstate, PowerLEDColor, PowerLEDIntensity)Manipulates LEDS. CheckRobotLEDstate,DockLEDstate, SpotLEDstate, and DirtLEDstate can be set as 1 (on) and 0 (off).CheckRobotLED is the red exclamation mark on the top left of robot. DockLED and SpotLEDs are located underthe buttons labeled as such. DirtLED is the blue LED located next to the words DirtDetect.14
The PowerLED's (center button) color and intensity can be controlled with finer resolution. PowerLEDColor is 0(pure green) to 100 (pure red). PowerLEDIntensity is 0 (off) to 100 (brightest). Values outside this range saturate.serPort is a serial port object created by RoombainitSetPWMRoombasetPWM(serPort, LeftPWM, RightPWM)Provides direct control over the wheel actuator's pulse width modulation drivers. LeftPWM and RightPWM are values ranging from 100 (full speed forward) to -100 (full
on releases dating back through 2008 and will likely work properly. The toolbox has not been tested on Mac or Linux/Unix versions of Matlab or its freeware clones, though it is likely to work. Connection: The USB to Mini-DIN communication cable included with the Create2 is used to create a wired data connection to a PC.