Transcription
O W N E R ’ SM A N U A L
Welcome!ENDear iRobot Roomba Owner,Thank you for purchasing an iRobot Roomba vacuumcleaning robot. You’ve joined the millions of people whoclean with robots — the smarter way to get it done.To get the best performance from your Roomba, pleasetake a few moments to read this manual and getacquainted with it. If you have any questions, pleasevisit global.irobot.com for more information.I also encourage you to register your Roomba straightaway at www.irobot.com/roomba800.By registering your robot, you’ll instantly activate yourwarranty and start enjoying these exclusive benefits: Take advantage of iRobot’s award-winningcustomer service: Get support tailored to yourspecific robot, including answers to questions,maintenance tips, video demos, live chat and more. Get product updates and other valuable information:Be among the first to find out about new robots,exclusive discounts and special promotions.When you register, you can also tell us about yourexperience with your Roomba; iRobot listens to ourcustomers and makes enhancements to our robots basedon your valued feedback. We’d love to hear from you!On behalf of the entire team, thank you for choosingiRobot. We appreciate your business, feedback andloyalty. Here’s to robots that make a difference!Yours for less chores and more life,Colin AngleChairman, CEO and Co-FounderiRobot CorporationP.S. Don’t miss out on your exclusive benefits! Registeryour Roomba right now at www.irobot.com/roomba800.Roomba 800 Series Owner’s Manual3
Table of ContentsENImportant Safety Instructions. 7Important Tips.10iRobot Roomba Anatomy.12Setting the Language.16Cleaning Pattern.17Cleaning Modes.18Cleaning System.19Battery Storage and Charging.20Auto Virtual Wall .21Virtual Wall Lighthouse .22Virtual Wall Halo.23Home Base .24Remote Control.25Wireless Command Centre.26Scheduling Roomba .27Regular Maintenance.30Troubleshooting.32Problems While Charging.33Replaceable Modules.34Battery Removal.35Registration.36Declaration of Conformity.37iRobot Customer Care.38Roomba 800 Series Owner’s Manual5
Important Safety InformationENTHIS APPLIANCE CAN BE USED BY CHILDREN AGED FROM8 YEARS AND ABOVE AND PERSONS WITH REDUCEDPHYSICAL, SENSORY OR MENTAL CAPABILITIES OR LACKOF EXPERIENCE AND KNOWLEDGE IF THEY HAVE BEENGIVEN SUPERVISION OR INSTRUCTION CONCERNING USEOF THE APPLIANCE IN A SAFE WAY AND UNDERSTANDTHE HAZARDS INVOLVED. CHILDREN MUST NOT PLAYWITH THE APPLIANCE. CLEANING AND USER MAINTENANCESHALL NOT BE DONE BY CHILDREN WITHOUT SUPERVISION.CAUTION: DO NOT EXPOSE THE ELECTRONICS OF YOURROBOT, ITS BATTERY OR THE INTEGRATED DOCK-CHARGERKNOWN AS HOME BASE. THERE ARE NO USER SERVICEABLE PARTS INSIDE. REFER SERVICING TO QUALIFIEDSERVICE PERSONNEL. PLEASE ENSURE VOLTAGE RATINGFOR ENCLOSED HOME BASE MATCHES STANDARD OUTLETVOLTAGE.Notice: Your robot contains a software interface for the purpose of enabling themanufacturer to provide updates to the internal firmware if any such updates aremade available to users. Any attempt to access, retrieve, copy, modify, distributeor otherwise use any of the robot software is strictly prohibited.Always exercise caution when operating your robot. To reduce the risk of injuryor damage, keep these safety precautions in mind when setting up, using andmaintaining your robot:GENERAL SAFETY INSTRUCTIONS Read all safety and operating instructions before operating your robot. Retain the safety and operating instructions for future reference. Heed all warnings on your robot, battery, Home Base and in the owner’s manual. Follow all operating and use instructions. Refer all non-routine servicing to iRobot.Roomba 800 Series Owner’s Manual7
ENImportant Safety InformationThe symbol on the product or its packaging indicates:Do not dispose of electrical appliances as unsorted municipal waste, useseparate collection facilities. Contact your local authority for information regardingthe collection systems available. If electrical appliances are disposed of in landfillsor dumps, hazardous substances can leak into the groundwater and get into thefood chain, damaging your health and well-being. When replacing old applianceswith new ones, the retailer is legally obliged to take back your old appliance fordisposal at least free of charge.USE RESTRICTIONS Your robot is for indoor use only. Your robot is not a toy. Do not sit or stand on this device. Small children andpets should be supervised when your robot is operating. Store and operate your robot in room temperature environments only. Clean with a cloth dampened with water only. Do not use this device to pick up anything that is burning or smoking. Do not use this device to pick up spills of bleach, paint or other chemicalsor anything wet. Before using this device, pick up objects like clothing, loose papers, pullcords for blinds or curtains, power cords and any fragile objects. If thedevice passes over a power cord and drags it, there is a chance an objectcould be pulled off a table or shelf. If the room to be cleaned contains a balcony, a physical barrier should beused to prevent access to the balcony and ensure safe operation. This appliance is not intended for use by persons (including children) withreduced physical, sensory or mental capabilities or lack of experience andknowledge, unless they have been given supervision or instruction concerninguse of the appliance by a person responsible for their safety. Children should be supervised to ensure they do not play with therobot. Cleaning and maintenance must not be performed by childrenwithout supervision. Do not place anything on top of your robot. Be aware that the robot moves on its own. Take care when walking in thearea that the robot is operating in to avoid stepping on it. Do not operate the robot in areas with exposed electrical outlets in the floor.8Roomba 800 Series Owner’s Manual
Important Safety InformationENBATTERY AND CHARGING Charge using a standard outlet only. Product may not be used with anytype of power converter. Use of other power converters will immediatelyvoid the warranty. Use only the Home Base supplied by the manufacturer to charge this device. Do not use a Home Base with a damaged cord or plug. If the cordor plug is damaged, it must be serviced by the manufacturer or similarlyqualified persons. Use only rechargeable battery packs approved by iRobot. Always charge and remove the battery from your robot and accessoriesbefore long-term storage or transportation. Charge indoors only. Your robot’s Home Base may be protected with a surge protector in theevent of severe electrical storms. Never handle the Home Base with wet hands. Always disconnect your robot from the Home Base before cleaningor maintaining it. Please ensure voltage rating for enclosed Home Base matches standardoutlet voltage. Used battery packs should be placed in a sealed plastic bag and disposedof safely according to local environmental regulations. Before every use, check the battery pack for any sign of damage or leakage.Do not charge damaged or leaking battery packs. If the battery pack is leaking, return it to your local authorised iRobot ServiceCentre for disposal. The battery pack must be removed from the robot before disposal. Only use original battery packs with the correct specification and suppliedby iRobot. Do not crush or dismantle battery packs. Do not heat or place the batterypack near any heat source. Do not incinerate the battery pack. Do not short-circuit the battery pack.Do not immerse the battery pack in any liquid.ROOMBA USE RESTRICTIONS AND SAFETY INFORMATION Use Roomba only in dry environments. Do not spray or pour liquids on Roomba.Roomba 800 Series Owner’s Manual9
ENImportant TipsBefore using Roomba the first time, you must activate it by removing the batterypull tab. Charge Roomba overnight before first-time use.123Turning Roomba on and off To turn Roomba on, press CLEAN once. You will hear a beep, and theCLEAN button will light up. To start a cleaning cycle, press CLEAN again. Roomba will start a cleaning cycle. To pause Roomba, press CLEAN while Roomba is cleaning. To resume the cleaning cycle, press CLEAN again. To turn Roomba off, press and hold CLEAN until Roomba’s lights turn off.For Best Performance Empty Roomba’s bin and clean its filter after every use. Use an Auto Virtual Wall or Virtual Wall Lighthouse (optional accessories) tokeep Roomba cleaning where you want it. Wipe all sensors with a clean, dry, soft cloth every week. Use Roomba frequently.Roomba contains electronic parts. DO NOT submerge Roomba or spray it withwater. Clean with a dry cloth only.10Roomba 800 Series Owner’s Manual
Important TipsENBattery LifeTo extend Roomba’s battery life and keep Roomba cleaning at peak performance: Always keep Roomba charged when not in use. Recharge Roomba as soon as possible following use; waiting several dayscan damage the battery. For storage off of the Home Base, remove the battery from Roomba andstore in a cool, dry place.Floor Conditioning Process for Homes with Heavily Shedding PetsIn homes with heavily shedding pets, Roomba’s bin may fill quickly with hair.In these environments, Roomba must go through a floor conditioning process. Youcan help Roomba along by scheduling it to clean frequently and emptying the binwhen the Full Bin indicator lights – sometimes mid-session. After this conditioningprocess, you’ll enjoy consistent cleaning performance from your Roomba. Forbest performance, be sure to continue emptying Roomba’s bin and cleaningthe filter when the full bin indicator lights.CLEANFull Bin LightRoomba 800 Series Owner’s Manual11
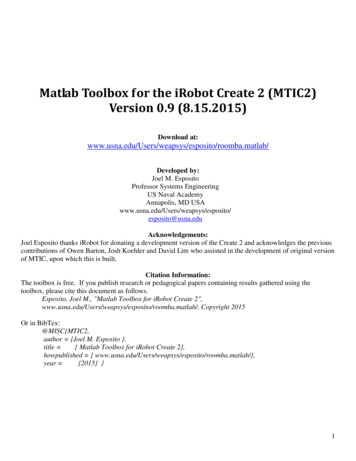
ENiRobot Roomba AnatomyTop ViewFaceplateBin ReleaseButtonHigh-CapacityPowered Bin12Roomba 800 Series Owner’s ManualRCON(RoomConfinementSensor)Carry Handle
iRobot Roomba AnatomyENButtons & LightsBattery LightDirt Detect Anti-Tangle LightCLEANCLEAN/Power ButtonTroubleshooting LightOKSpotDayDockHourClockMinuteScheduleFull Bin LightRoomba 800 Series Owner’s Manual13
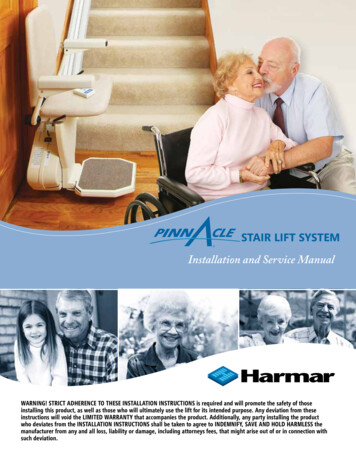
ENiRobot Roomba AnatomyBottom ViewRight Wheel ModuleAeroForce ExtractorsSpinning Side BrushHome Base Contact PointRemovableCaster WheelHome Base Contact PointBattery DoorCliff Sensors14Roomba 800 Series Owner’s ManualLeft Wheel ModuleCliff Sensors
iRobot Roomba AnatomyENCleaning HeadExtractor FrameExtractor Frame Release TabsAeroForce ExtractorsExtractor CapsHigh-Capacity Sealed BinFilter DoorFilter DoorRelease TabFilterSensor PortRoomba 800 Series Owner’s Manual15
ENSetting the LanguageRoomba can provide troubleshooting messages in English, French, German, Spanish,Italian, Dutch, Danish, Swedish, Norwegian, Finnish, Polish, Russian, Portuguese,Japanese, Korean and Chinese.Roomba’s default language is English. To change the default language:123 secx1Take Roomba off the Home Base.Turn on Roomba by pressing CLEAN,the lights will turn on.3English (x1)Press and hold DOCK until Roombabeeps and says the current language.Release DOCK. Roomba is now inLanguage Selection Mode.4Français (x2)Deutsch (x3)3 secEspañol (x4)Italiano (x5)Pусский (x6)x1普通话 (x7) (x16) ress CLEAN repeatedly until you hearPthe language you want.16Roomba 800 Series Owner’s ManualPress and hold CLEAN to turn off Roombaand confirm your language choice.
Cleaning PatternENRoomba cleans floors differently than the way most people do, using its robot intelligenceto efficiently clean the whole floor, under and around furniture and along walls.As it cleans, Roomba calculates the optimal cleaning path and determines when touse its various cleaning behaviours:SpirallingRoomba uses a spiral motion to clean aconcentrated area.Wall FollowingRoomba cleans the full perimetre of theroom and navigates around furniture andobstacles.Room CrossingRoomba criss-crosses the room to ensure full cleaning coverage.Dirt DetectionWhen Roomba senses dirt, the Dirt Detect light illuminates and Roomba cleans moreintensely in that area using a back-and-forth motion, similar to a traditional vacuum.For the most efficient cleaning, clear your floor of clutter and use a Virtual Wall to confine Roomba to one room.Roomba 800 Series Owner’s Manual17
ENCleaning ModesRoomba cleans based on the cleaning mode you select.Roomba has three cleaning modes: 1mClean ModeRoomba automatically calculatesthe room size and adjusts its cleaningtime appropriately.Spot ModeRoomba spirals approximately onemetre in diameter and then spirals backto where it started, intensely cleaning alocalised area.Scheduled Cleaning ModeWhen a future cleaning time is programmed, Roomba enters this mode. At thespecified time, Roomba leaves its Home Base, cleans and then returns to theHome Base to recharge when it’s done.18Roomba 800 Series Owner’s Manual
Cleaning SystemENAeroForce Performance Cleaning SystemThe AeroForce System uses a combination of two breakthrough technologies,tangle-free AeroForce extractors and a high-powered vacuum channel, to delivermore cleaning power and less maintenance hassle.Tangle-Free AeroForce ExtractorsDual counter-rotating extractors incorporate durable rubber treads that grab dirtand debris from any floor type, eliminating the hassle of hair-tangled brushes.High-Powered Vacuum ChannelAccelerated airflow through a sealed channel dramatically increases suction atthe floor to transfer dirt, debris and allergens through the extractors and into theHEPA-filtered, high-capacity bin.Spinning Side BrushCleans along wall edges and corners.Floor SurfacesRoomba works on wood, carpet, tile, vinyl and laminate, and adjusts automaticallyto different floor types. Roomba automatically senses stairs and other cliffs.Anti-Tangle SystemRoomba won’t get stuck on cords, carpet fringe or tassels. When Roomba senses ithas picked up a cord or tassel, it will automatically stop its debris extractors or sidebrush and try to escape. Roomba may make a clicking noise when the anti-tanglesystem is activated.Roomba might stall when confronting rounded edges and might slide overparticularly slippery surfaces. Extremely dark-coloured floors may contributeto Roomba’s cliff sensors working less effectively.Roomba 800 Series Owner’s Manual19
ENBattery Storage and ChargingFor best performance, charge Roomba’s battery overnight before using Roombafor the first time.Roomba is powered by a rechargeable battery. Roomba’s battery can last for hundredsof cleaning cycles if cared for properly.Battery LifeTo extend the battery life, iRobot recommends always keeping Roomba charged. Formore details on how to maintain Roomba’s battery life, visit global.irobot.com.Recharge Roomba as soon as possible following use; waiting several days candamage the battery.For storage off of the Home Base, remove the charged battery from Roombaand store in a cool, dry place.Cleaning TimeYou should fully charge Roomba’s battery before each cleaning cycle. When fully charged, theBattery light will be green and Roomba’s battery will last for at least one full clean cycle.16-Hour Refresh ChargeIf Roomba has been left off the Home Base for an extended period, it will initiate aspecial 16-hour charge cycle. This extensive charge refreshes Roomba’s battery andextends battery life. While charging, Roomba’s CLEAN button pulses quickly. Note: Forbest results, do not interrupt the refresh charge.Charging RoombaTo charge Roomba, connect the line cord to the Home Base and then dock your robot. hen Roomba is on the Home Base, always make sure that the Home BaseWpower light is on.Charging LightsRoomba uses the battery icon light to indicate it is charging. Use this chart to determinethe status of the battery.BATTERY ICONBATTERY STATUSSolid redBattery emptyAmber pulseChargingSolid greenFully chargedQuick amber pulse16-hour refresh charge20Roomba 800 Series Owner’s Manual
Auto Virtual Wall EN(optional accessory compatible with all models)A Virtual Wall creates an invisible barrier that Roombawon’t cross. That makes it easy to confine Roomba toa particular room or area, and prevent it from gettingtoo close to anything delicate or dangerous.You can set a Virtual Wall to block openings of up totwo metres. It creates a cone-shaped barrier, so thebeam gradually gets wider. The Virtual Wall also createsa halo of protection around itself, preventing Roombafrom getting too close.For best performance, place a Virtual Wall on the outside of the doorway youwant to block.Point the arrows on top of the Virtual Wall towards the opening you want to block.Auto Virtual WallWhen a Virtual Wall is set to Auto mode, the powerlight blinks continuously to indicate it is on. Whenbattery levels are low, the Virtual Wall blinks twicerepeatedly to indicate it needs new batteries.When in Auto mode, the batteries should last foraround six months. To save battery power, turnthe Virtual Wall off.Battery Installation12Battery Compartment3Two C Alkaline BatteriesRoomba 800 Series Owner’s Manual21
ENVirtual Wall Lighthouse (optional accessory for some models)A Virtual Wall Lighthouse can act as both a Lighthouse and a Virtual Wall. In Lighthouse mode, it allows Roomba to efficiently clean multiple roomsbefore returning to the Home Base. In Virtual Wall mode, it blocks off areas you don’t want cleaned.Simply use the Mode Selector to make your choice. Either way, the Lighthouse turnson and off automatically as you turn Roomba on and off. When on, the light on top is lit.Each Lighthouse runs on two C alkaline batteries. A flashing power light means thebatteries need replacing soon.How to use the Lighthouse modeSimply place a Lighthouse in the doorway with the logo facing forward. When Roombahas completed the first room, the Lighthouse will help it navigate around your home,allowing it to clean room-to-room. When Roomba has completed cleaning, theLighthouse will direct it back to its Home Base for recharging.You can use Lighthouses and Virtual Walls at the same time. However, please avoidplacing them too close to each other, to the Home Base or to furniture that couldblock the invisible beams. Otherwise, Roomba might not recognise the Lighthousesor be able to return to its Home Base.How to use the Virtual Wall modeIn Virtual Wall mode, the Lighthouse creates an invisible barrier that Roomba won’tcross. It automatically turns off when Roomba is turned off.Simply place the Lighthouse in the centre of the doorframe. Unlike a Virtual Wall, aLighthouse features a range selector that lets you adjust the length of the barrier — up to2.4 metres. Please note: setting a longer range will drain the battery faster.22Roomba 800 Series Owner’s Manual
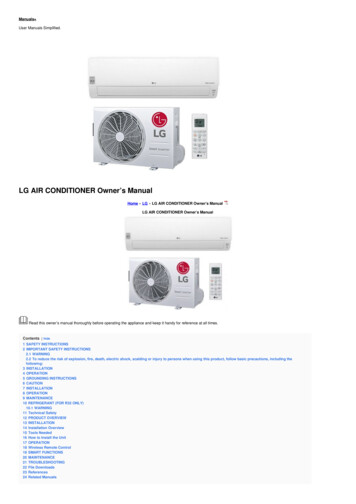
Virtual Wall HaloEN(optional accessory compatible with all models)The Virtual Wall Halo makes Roomba perfect for homes with pets. By setting up aprotective zone around the Virtual WallTM, the Halo prevents Roomba from bumpinginto and disturbing your pet’s food and water bowls.Follow these steps to set up the Virtual Wall Halo:1. Once you have installed batteries in the Virtual Wall, insert it all the way into the Halo.The circular lens of the Virtual Wall should be completely visible at the top.2. Place the Halo on the floor, level with Roomba and close to the bowls(as shown below).3. If you have one bowl, place it beside the Halo, almost touching the wall.If you have two bowls, place one on either side of the Halo.protective zoneprotective zonebowlbowlHaloHalobowlxProtective zone approximately50 centimetres in diameterprotective zonebowlHalobowlbowlThe Virtual Wall Halo works on non-metal bowls less than 25 centimetresin diameter and up to 8.9 centimetres tall.As the Virtual Wall’s battery levels get low, the field may not be strong enoughto protect your bowl(s). If that happens, change the batteries.Roomba 800 Series Owner’s Manual23
ENHome Base At the end of a cleaning cycle or when Roomba’s battery is running low, it returnsto the Home Base to charge. Roomba needs to find the infrared signal of theHome Base in order to return. Always keep the Home Base plugged in. When the Home Base is pluggedin, its power light blinks to indicate the Home Base is connected to thepower source. If Roomba returns to the Home Base and is unable to dock, it will try againuntil it docks successfully. When Roomba makes a connection and docks successfully,the Home Base power light stops blinking and turns solid green. Within a minute of docking, Roomba goes to sleep with just the battery lightilluminated to show charging status.Home Base LocationPosition the Home Base on a hard, level surface against a wall. Make sure it’s at least1.2 metres from any stairs and that Roomba has a clear path to reach it.Do not place the Home Base within 1.2 metres of a staircase.24Roomba 800 Series Owner’s Manual
Remote ControlEN(optional accessory for all models)The Remote Control lets you conveniently control Roomba’s functions. You can useit to turn Roomba on and off and steer it around your room without bending down.It also gives you remote access to these commands:DirectionalButtonsSPOT ButtonCLEAN / Power ButtonDock ButtonBefore using your remote for the first time, install 2 AA batteries.SPOTRoomba spirals approximately 1 metre in diameter andthen spirals back to where it started, intensely cleaning alocal area.CLEANRoomba automatically calculates the room size and adjusts itscleaning time appropriately.DockRoomba attempts to dock on the Home Base , if present.Make sure there is a direct line of sight from the remote control to Roomba andthat the remote is pointed at Roomba.The remote control, Virtual Wall , Lighthouse and Home Base operate usingan invisible infrared beam. If they are all used in the same area, Roomba maysee multiple infrared signals and will not operate. The remote WILL NOT workwhen Roomba is near a Virtual Wall.Roomba 800 Series Owner’s Manual25
ENWireless Command Centre(optional accessory for the 880 model)The Wireless Command Centre lets you control all Roomba functions from up to7.6 metres away. Use the Wireless Command Centre to turn Roomba on and off,schedule up to seven cleaning times a week and steer Roomba around the room.To schedule Roomba to clean, use the buttons on the Wireless Command Centre asif they were on the robot itself. See page 27 for details on setting Roomba’s clockalong with setting, changing and deleting the cleaning schedule.Before using your Wireless Command Centre for the first time, install 4 AA batteries.If you purchase a Wireless Command Centre, visit global.irobot.com for details onsetting up the Wireless Command Centre with Roomba.26Roomba 800 Series Owner’s Manual
Scheduling Roomba ENSetting the TimeYou must set the time before scheduling Roomba to clean. To set the time:1Press CLOCK.2SUN1MON2TUES3WED4THRS5FRI6SAT7Use the DAY, HOUR and MINUTE buttons individually to set the correct time.3Press OK, Roomba will beep to indicatethe time and date has been set.Roomba 800 Series Owner’s Manual27
ENScheduling Roomba Setting a ScheduleYou can schedule Roomba to cleanonce per day, up to seven timesper week.You must set the time before settinga schedule. To set a schedule:12Press SCHEDULE.3 ress OK, Roomba will beep toPindicate the schedule has been set.28Roomba 800 Series Owner’s ManualSUN1MON2TUES3WED4THRS5FRI6SAT7 se the DAY, HOUR and MINUTEUbuttons individually to set the schedule.
ENViewing SchedulesTo view Roomba’s scheduled cleaning times:1. Press SCHEDULE.2. Press DAY to cycle through the scheduled cleaning times.3. Press OK.Deleting a ScheduleTo delete a scheduled cleaning time:1. Press SCHEDULE.2. Press DAY to cycle through the scheduled cleaning times.3. When Roomba displays the scheduled cleaning time you’d like to delete, pressand hold DAY for five seconds. Roomba will beep to indicate the cleaning timehas been deleted.4. Press OK.Changing the ScheduleTo change the cleaning schedule:1. Press SCHEDULE.2. Press DAY to cycle through the scheduled cleaning times.3. When Roomba displays the scheduled cleaning time you’d like to change,press and hold HOUR and MINUTE to make the change.4. Press OK, Roomba will beep to indicate the schedule has been set.Roomba’s clock can be viewed in either the 12-hour (AM/PM) format or the24-hour format. To toggle between the two views, press and hold CLOCK for 5seconds. Toggle between 12-hour and 24-hour format using the CLOCK button.Press OK to save. Roomba beeps and the clock briefly illuminates to indicatethe clock format has been switched.Roomba’s clock will switch back to the default 12-hour (AM/PM) format whenthe battery is disconnected or very low on power.Roomba 800 Series Owner’s Manual29
Regular MaintenanceENTo keep Roomba running at peak performance, you should perform the ter each useNot applicableFilterOnce per week (twice perweek in homes with pets)Every two monthsAeroForce ExtractorsEvery four months (every threemonths in homes with pets)Every twelve monthsSensorsWipe once per weekNot applicableFront WheelOnce per weekAs neededSpinning Side BrushOnce per weekAs neededRoomba Contact PointsOnce per weekNot applicableHome Base Contact PointsOnce per weekNot applicable123 Roomba’s filter by emove and empty Roomba’s CleanRtapping it against your rubbishbin after each use. Pressbutton and pull to remove bin. bin. Remove the filter andshake off debris. Never washthe filter.Clean Roomba’s extractors.Remove hair from Roomba’syellow extractor caps (hair willpull out easily). Never washthe AeroForce extractors orextractor caps.The filter door will NOT close unless a filter is reinserted.If you notice Roomba picking up less debris from your floor, empty thebin, clean the filter and clean the extractors.Do not attempt to run Roomba without the extractor caps. If you misplaceRoomba’s extractor caps, contact iRobot Customer Care for replacement caps.30Roomba 800 Series Owner’s Manual
Regular MaintenanceCliff SensorsRobot contactpointsENCliff SensorsClean Roomba’s sensors.Wipe the following items with a clean,dry cloth every week:1. Four front cliff sensors2. Two rear cliff sensors3. Two Home Base contact points4. Two robot contact points5. Two bin sensors6. Two inner bin sensor ports7. Two outer bin sensor portsBin SensorsClean Roomba’s front wheel.1. Pull firmly on Roomba’s front wheel to remove itWheelfrom the robot.2. Remove debris from inside the front wheel cavity.Axle3. Remove the front wheel from its housing byWear guardpushing it through from underneath. Clearany hair wrapped around the wear guards.4. If the wheel rotation is still restricted, grab thewheel with one hand by placing your fingerHousingover one of the wear guards. Then, use yourother hand to pull on the other wear guard toremove the axle from the wheel.5. Clear away any hair and debris from the axleand wheel assembly.6. Reinstall the wear guards and shaft assemblyto the wheel, and the wheel to the housing.Front wheels clogged with hair and debriscould result in floor damage.Clean spinning side brush.Use a coin or small screwdriver to remove the screw.Then, remove the brush, clean it and reinstall it.When maintaining Roomba, look for the yellow parts. These parts are designedto be removed and cleaned every time you empty Roomba’s bin.Roomba 800 Series Owner’s Manual31
ENTroubleshootingRoomba will tell you something is wrong with a two-tone “uh-oh” sound followed bya narrated voice. The troubleshooting light will also blink. Refer to the chart below toresolve Roomba’s problem. If the problem is not resolved, visit global.irobot.com.Runtime ErrorsTo repeat Roomba’s error message, press CLEAN.Roomba blinksand says Likely causeWhat to doError 1.Move Roomba to anew location, thenpress CLEANto restart.Roomba isstuck w
Roomba 800 Series Owner's Manual 3 EN Dear iRobot Roomba Owner, Thank you for purchasing an iRobot Roomba vacuum cleaning robot. You've joined the millions of people who clean with robots — the smarter way to get it done. To get the best performance from your Roomba, please take a few moments to read this manual and get acquainted with it.