Transcription
Phlebotomy Trainingfor Clinical Research CoordinatorsGuilberto Lawrance – Instructor/Technical RA, CCIChelsea Nickerson – Research Education Program ManagerAdapted from content provided by Cherie Maguire, MS
Agenda Comprehensive Phlebotomy Overview (3:00PM – 3:45PM) Video Demonstration (3:45PM – 4:05PM) Live Demonstration (4:05PM – 4:15PM) Hands-on Practice (4:15PM – 5:00PM) Please note that you must perform additional practice draws and be officiallycertified through your lab/PI
Training Objectives Understand phlebotomy basics Familiarize yourself with how the reference sheets can be useful to you inpractice Understand safety precautions, from both the perspective of the patientand the healthcare worker (you!) Begin to develop comfort with venipuncture procedure
Detailed Outline Comprehensive Phlebotomy Overview What is phlebotomy?SafetySupplies and equipmentPatient identification and preparationSite selection and preparationProper tourniquet applicationVein of choiceVenipuncture (tube holder, syringe, butterfly)Tubes/Order of DrawObservation and bandagingDisposal of contaminated equipmentLabeling/handling requirementsTroubleshooting/complications Video Demonstration Live Demonstration Hands-on Practice
What is Phlebotomy? Word derived from Greek words “phleb-” relates to veins “-otomy” relates to cutting The term phlebotomy refers to the drawing of blood for laboratoryanalysis
Phlebotomy SafetyPatient/Blood Donors Risk 1: Exposure to bloodborne viruses through reuse of needles,syringes and lancets, contaminated work surfaces Sterile single-use devices only Safety-engineered devices Clean work surfaces with disinfectant Risk 2: Infection at blood sampling site Perform hand hygiene Clean patient’s skin with 70% isopropyl alcohol and allow to dry Use sterile needle and syringe removed from the packaging just before use
Phlebotomy SafetyPatient/Blood Donors Risk 3: Pain at blood-sampling site Use needle of smaller gauge than the selected vein Well-trained person should take the blood sample Venipuncture is less painful than heel-pricks in neonates Risk 4: Hematoma or thrombus Use need of smaller gauge than the selected vein Enter vessel at an angle of 30 degrees or less Apply pressure to a straight arm for 3-5 minutes after drawing blood Risk 5: Extensive bleeding Use needle of smaller gauge than the selected vein Take a history to identify patients on anticoagulants and with a history of bleeding
Phlebotomy SafetyPatient/Blood Donors Risk 6: Nerve Damage Avoid finger-pricks for children Use antecubital vessels when possible Avoid probing Risk 7: Vasovagal Reaction – Syncope, Fainting Hydrate patient, take postural blood pressure if dehydratedReduce anxietyHave patient lie down if they express concernProvide audio-visual distraction Risk 8: Allergies Ask about allergies to latex, iodine, and alcohol before starting the procedure
Phlebotomy SafetyHealthcare Worker Risk 1: Needle or sharps injury during or after the procedure, breakageof blood containers, splashes (rare) Use safety devices such as needle covers, tube holders that release needleswith one hand, and safety lancets Avoid two-handed recapping and disassembly Place sharps container in sight and within arm’s reach Dispose of used sharps immediately Risk 2: Exposure to blood Hepatitis B vaccinationWear gloves and PPEUse evacuated tubes and transfer devices when drawing multiple tubesFollow protocol for exposure to body fluids and report incident, even if postexposure prophylaxis is not desired Cover broken skin area with a waterproof dressing
Bloodborne Pathogens HIV Hepatitis B Virus (HBV) Hepatitis C Virus (HCV)
Occupation Risk/Protection HBV poses a greater risk than HIV HBV vaccination is available to all employees throughOccupational Health No vaccination available for HCV or HIV Post-exposure treatment is available through OccupationalHealth
Risks of Needle Sticks According to the Centers for Disease Control andPrevention (CDC), about 385,000 sharps injuries occurannually to hospital employees Potential Hazard: Exposure to blood and otherpotentially infectious materials (OPIM) because of: Unsafe needle devices Improper handling and disposal of needles and othersharps
Risk Factors and Hazards Factors affecting likelihood ofexposure/needle stick: The type and design of device Skill level/training of user How quickly the safety mechanismis activated Proper use of safety device Access to biohazard box Loss of focus/distractions
Risk Factors and Hazards Factors affecting likelihood ofexposure/needle stick: The type and design of device Skill level/training of user How quickly the safety mechanismis activated Proper use of safety device Access to biohazard box Loss of focus/distractions
Needle Safety at BWH Brigham and Women’s Hospitalprovides and requires that safeneedle/sharp practices and/ordevices be used in all proceduresrequiring the use of needles. http://www.bwhpikenotes.org/Employee Resources/Health Safety/NeedleSafety/default.aspx http://www.bwhpikenotes.org/Employee Resources/Health Safety/NeedleSafety/FAQ.aspx http://www.bwhpikenotes.org/Employee Resources/Health Safety/NeedleSafety/Documents/protection.pdf
BWH Standard Precautions Standard Precautions are designed both to preventtransmission of bloodborne pathogens to healthcareworkers (previously covered under universal precautions)and to prevent hospital spread of pathogens betweenpatients via hands of healthcare workers. Standard precautions apply to all patients regardless of theirdiagnosis or presumed infection status. Good hand hygiene (handwashing/hand antisepsis) is thestandard of quality patient care.
Safe Work Practices Observe universal (standard) safety precautions. Observe all applicable isolation procedures. WearPPE at all times. Wash hands in warm, running water with the chlorhexidine gluconate hand washing product(approved by the Infection Control Committee), or, if not visibly contaminated, wash with acommercial foaming hand wash product before and after each patient collection. Gloves are to be worn during all phlebotomies, and changed between patient collections. Palpation of phlebotomy site may be performed without gloves provided the skin is not broken. A lab coat or gown must be worn during blood collection procedures. Needles and hubs are single use and are disposed of in an appropriate ‘sharps’ container as one unit.Needles are never recapped, removed, broken, or bent after phlebotomy procedure. Gloves are to be discarded in the appropriate container immediately after the phlebotomyprocedure. All other items used for the procedure must be disposed of according to properbiohazardous waste disposal policy. Contaminated surfaces must be cleaned with freshly prepared 10% bleach solution. All surfacesare cleaned daily with bleach. In the case of an accidental needle stick, immediately wash the area with an antibacterial soap,express blood from the wound, and contact your supervisor.
BWH Procedure Following Blood/Body Fluid Exposure If you are exposed to blood or visibly bloody fluidsfrom 1) Needle stick or cut from sharp object OR 2)splash to eyes, mouth, nose, or open cut: 1. Wash or flush affected area 2. Page STIK Beeper – 3STIK (37845) 3. Notify your supervisor 4. Obtain evaluation and treatment in Occupational Health It is important to report exposure within 1-2 hours. You mayneed immediate treatment.
Occupational Health Contact Info Address: 10 Vining Street, Suite 104, Neville Building Phone: (617) 732-6034 Business Hours: M-F, 7:00AM to 4:00PM Off Hours: Emergency Department
Supplies and Equipment Needles Safety Needles, 22g or less Butterfly Needles, 21g, or less Syringes Blood Collection Tubes The vacuum tubes are designed to draw a pre-determined volume of blood. Tubes withdifferent additives are used for collecting blood specimens for specific types of tests.The color of the rubber stopper is used to identify these additives. Antiseptic: Individually-packaged 70% isopropyl alcohol wipes Tourniquets: Latex-free tourniquets are available 2x2 Gauze or Cotton Balls Sharps Disposal Container: An OSH acceptable, puncture-proof container marked“Biohazardous” Bandages or Tape
Patient Identification and Preparation Verify patient name and date of birth and/ormedical record number Gain the patient’s confidence and assure them thatalthough they’ll feel a little pinch, it will be of shortduration Depending on the study and tests to be done, askwhether patient is fasting Seated Patient: Ask them to extend their arm toform a straight line shoulder to wrist – do not bendat elbow. Use the arm rest to support their arm. Lying Down Patient: Ask the patient to lie back in acomfortable position. Place a pillow under the armif needed.
Site Selection Extensive scarring or healed burn areas shouldbe avoided Specimens should not be obtained from thearm on the same side as a mastectomy Avoid areas of hematoma If an IV is in place, samples may be obtainedbelow but NEVER above the IV site Do not obtain specimens from an arm having acannula, fistula, or vascular graft Allow 10-15 minutes after a transfusion iscompleted before obtaining a blood sample
Vein Selection Palpate and trace the path of veins severaltimes with the index finger. Unlike veins,arteries pulsate, are more elastic, and havea thick wall Thrombosed veins lack resilience, feel cordlike, and roll easily If veins are not readily available, massagethe arm from wrist to elbow. Tappingsharply at the vein site with your indexfinger a few times will cause the vein todilate. Application of heat to the site mayhave the same result. Lowering the extremity over the bedside orarm rest will allow the veins to fill tocapacity
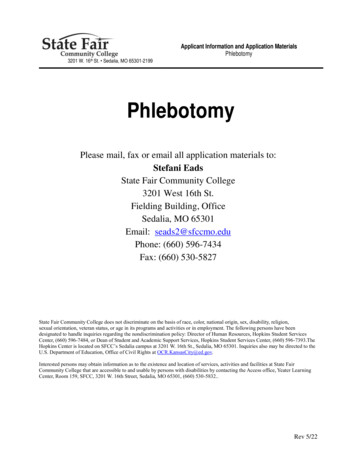
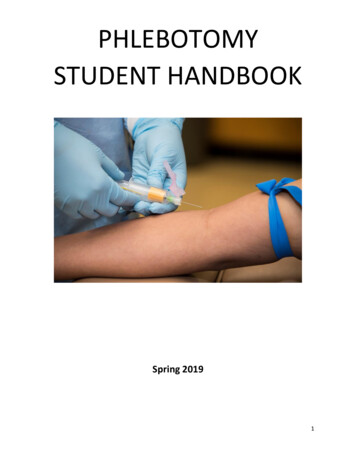
Vein of Choice The larger median cubital, basilic,and cephalic veins are mostfrequently used, but others maybe necessary and will becomemore prominent if the patientcloses their fist tightly. Phlebotomists should NEVERperform venipuncture on anartery Phlebotomists should NEVERdraw blood from the feet
Vein of Choice Which is the best vein forvenipuncture? The median cubital vein lies insidethe cubital fossa anterior to theelbow and is the most commonand easiest site of incision It is not surrounded by largeinnervation – minimizes pain It lies very close to the skin’ssurface – optimizes visibility andreduces complications
Vein of Choice First Choice: Median Cubital Vein Usually large and palpable (though notalways visible) Supported by subcutaneous tissue Least apt to roll Second Choice: Cephalic Vein Runs down the thumb side of the arm Less support and rolls easily Last Resort: Basilic Vein Least desirable: rolls easily Used only as last resort
Tourniquet Application and Timing 3-4 inches (7.5cm to 10.0cm)above the venipuncture site Maximum time tourniquetshould be worn: 1 minute For preliminary vein selection,release and reapply after 2minutes Apply with enough tension tocompress the vein
Practice! (Stage 1) Tourniquet Tying Practice tying tourniqueton your neighbor’s arm Finding Veins Can you find, see, feelyour veins? Your neighbor’s veins?
Site Preparation Cleansing Method for Routine Venipuncture Alcohol prep pad – use a circular motion from thecenter outward Allow the area to dry If the site is touched, the site must be cleansed againbefore the needle is inserted
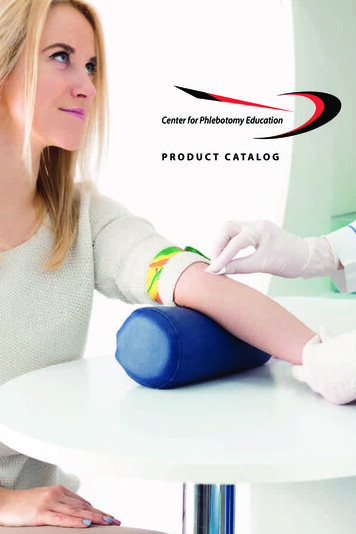
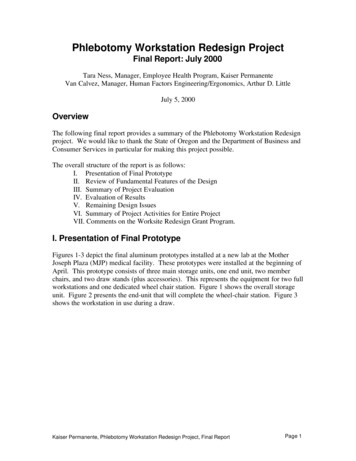
Winged Infusion (Butterfly) BD Vacutainer Push Button Blood Collection Set – ButterflyNeedles Features: Engineered with a retractable needle Push button activation system allows needle to remain in veinwhile depressing button Needle will retract automatically from vein Use: Always used with a barrel Twist needle until tight Winged infusion set – activate safety device by pushing button Warn subjects they will hear a click
The Venipuncture 1) Attach the appropriate needle to the hub by removing the plastic cap over thesmall end of the needle and inserting into the hub, twisting it tight 2) Remove the plastic cap over the needle; hold bevel up 3) Pull the skin tight with your thumb or index finger just below the puncture site 4) Holding the needle in line with the vein, use a quick, small thrust to penetratethe skin and enter the vein in one smooth motion at approx. 30 degree angle 5) Holding the hub securely, insert the first vacutainer tube following proper orderof draw into the large end of the hub penetrating the stopper. Blood should flowinto the evacuated tube. 6) After blood starts to flow, release the tourniquet and ask the patient to opentheir hand. 7) When blood flow stops, remove the tube by holding the hub securely and pullingthe tube of the needle.
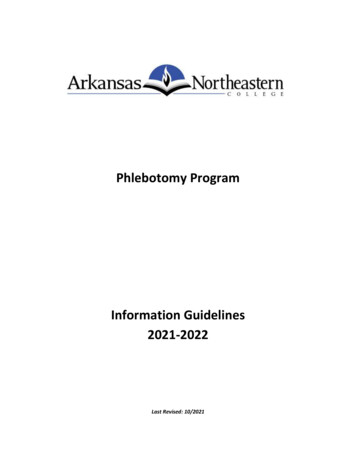
Tubes/Order of Draw Always check your protocol/procedure manual as the order can sometimes differfrom the standard Tubes: Blood culture vials or bottles, sterile tubes Coagulation tube (light blue top) – routine PT/PTT may be performed if blue top is firsttube collected. If using butterfly, collect red top first Serum tube with or without clot activator or silica gel (Red or Gold Top) Heparin tube (Green Top) EDTA (Lavender Top) Glycolytic inhibitor (Gray Top) Summarizing Document: center/order of draw.pdf
Observation and Bandaging Place a gauze pad over the puncturesite and remove the needle. Dispose of the syringe and needle as aunit into an appropriate sharpscontainer Immediately apply slight pressure. Ask the patient to apply pressure for atleast 2 min When bleeding stops, apply a freshbandage, gauze, or tape
Labeling and Handling Requirements Label all tubes immediately after collection withpatient’s name, medical record, location, date,time, and your initials. Samples for crossmatch or type and screen alsoneed the Blood Bank band number Never pre-label tubes. Do the labelingimmediately after taking the specimen. Unlabeled or improperly labeled tubes orspecimens cannot be accepted by the laboratory All specimens must be sealed inside a plasticbiohazard bag before being transported to thelaboratory
Troubleshooting and Complications If a blood sample is not attainable: Reposition the needle Ensure that the collection tube is completely pushed onto the backof the needle in the hub Use another tube as vacuum may have been lost Loosen the tourniquet Probing is not recommended. In most cases, another puncture in asite below the first site is advised A patient should never be stuck more than twice unsuccessfully bya phlebotomist If necessary, bring patient to phlebotomy
Phlebotomy Procedure – Summary Identify subject (Name, DOB, Medical Record #) Ask subject about: Allergies (latex, iodine)Problems with fainting, dizzinessPreferred armFasting, hydration Make subject comfortable/feel relaxed Wash hands Apply gloves Apply tourniquet 3-4 inches above site Vein selection Cleanse with alcohol
Phlebotomy Procedure – Summary (Continued) Use Standard PrecautionsDraw blood using standard procedure: 15-30 degree angle, bevel upRelease tourniquet (1 min, 2 min absolute max)Invert tubes 8 timesRemove needleAsk subject to apply pressureDiscard needles in sharps containerLabel tubesApply tape/bandage over gauzeRemove glovesWash handsProcess, store, shop blood per protocol
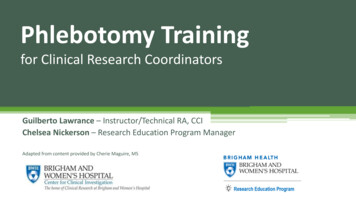
Phlebotomy VideoVideo2D Version of the Oakland University of Health Sciences blood draw training video. This video contains entirely originalwork. Similarity with any other products is coincidental.
Questions?
Practice! (Stage 2) Hands-on demonstration Supervised practice on training models Additional Questions?
CCI Contact Information Phone: (617) 732-8750 Email: cci@partners.org Website: http://www.brighamandwomens.org/research/CCI Subscribe to the CCI Newsletter (Research Connection): scribebwh.html
Phlebotomy Training for Clinical Research Coordinators Guilberto Lawrance -Instructor/Technical RA, CCI Chelsea Nickerson -Research Education Program Manager Adapted from content provided by Cherie Maguire, MS. Agenda Comprehensive Phlebotomy Overview (3:00PM -3:45PM)