Transcription
v1R6USER GUIDEFinal Trim Size: 8.268 x 11.22 in. (210 x 284 mm)3.7 Cu. Ft. Free-StandingGas Range for RVsNS-RNG24SS9NS-RNG24SS9-CBefore using your new product, please read these instructions to prevent any damage.
ContentsIntroduction . . . . . . . . . . . . . . . . . . . . . . . . . . . . . . . . . . . . . . . . . . . . . . . . . . . . . . . . . . . . . . . . . . . . . . . . . . . . . . . . . . . . . . . . . 3IMPORTANT SAFETY INSTRUCTIONS . . . . . . . . . . . . . . . . . . . . . . . . . . . . . . . . . . . . . . . . . . . . . . . . . . . . . . . . . . . . . . . . . . 3GENERAL SAFETY PRECAUTIONS . . . . . . . . . . . . . . . . . . . . . . . . . . . . . . . . . . . . . . . . . . . . . . . . . . . . . . . . . . . . . . . . . . . . . . 4Installation instructions . . . . . . . . . . . . . . . . . . . . . . . . . . . . . . . . . . . . . . . . . . . . . . . . . . . . . . . . . . . . . . . . . . . . . . . . . . . . . . . 5Features . . . . . . . . . . . . . . . . . . . . . . . . . . . . . . . . . . . . . . . . . . . . . . . . . . . . . . . . . . . . . . . . . . . . . . . . . . . . . . . . . . . . . . . . . . . . . 6Package contents . . . . . . . . . . . . . . . . . . . . . . . . . . . . . . . . . . . . . . . . . . . . . . . . . . . . . . . . . . . . . . . . . . . . . . . . . . . . . . . . . . . . . . . . . . . . . . . . 6Main components . . . . . . . . . . . . . . . . . . . . . . . . . . . . . . . . . . . . . . . . . . . . . . . . . . . . . . . . . . . . . . . . . . . . . . . . . . . . . . . . . . . . . . . . . . . . . . . . 6Control panel . . . . . . . . . . . . . . . . . . . . . . . . . . . . . . . . . . . . . . . . . . . . . . . . . . . . . . . . . . . . . . . . . . . . . . . . . . . . . . . . . . . . . . . . . . . . . . . . . . . . 6Range dimensions . . . . . . . . . . . . . . . . . . . . . . . . . . . . . . . . . . . . . . . . . . . . . . . . . . . . . . . . . . . . . . . . . . . . . . . . . . . . . . . . . . . . . . . . . . . . . . . . 7Installing the range . . . . . . . . . . . . . . . . . . . . . . . . . . . . . . . . . . . . . . . . . . . . . . . . . . . . . . . . . . . . . . . . . . . . . . . . . . . . . . . . . . . 8Clearances and dimensions . . . . . . . . . . . . . . . . . . . . . . . . . . . . . . . . . . . . . . . . . . . . . . . . . . . . . . . . . . . . . . . . . . . . . . . . . . . . . . . . . . . . . . . 9Important notes to the installer: . . . . . . . . . . . . . . . . . . . . . . . . . . . . . . . . . . . . . . . . . . . . . . . . . . . . . . . . . . . . . . . . . . . . . . . . . . . . . . . . .10Before installing the range . . . . . . . . . . . . . . . . . . . . . . . . . . . . . . . . . . . . . . . . . . . . . . . . . . . . . . . . . . . . . . . . . . . . . . . . . . . . . . . . . . . . . . .10Adjusting the height and leveling the range . . . . . . . . . . . . . . . . . . . . . . . . . . . . . . . . . . . . . . . . . . . . . . . . . . . . . . . . . . . . . . . . . . . . .10Installing the anti-tip device . . . . . . . . . . . . . . . . . . . . . . . . . . . . . . . . . . . . . . . . . . . . . . . . . . . . . . . . . . . . . . . . . . . . . . . . . . . . . . . . . . . . .11Connecting to gas . . . . . . . . . . . . . . . . . . . . . . . . . . . . . . . . . . . . . . . . . . . . . . . . . . . . . . . . . . . . . . . . . . . . . . . . . . . . . . . . . . . . . . . . . . . . . . .14Installing rubber pads to the oven back . . . . . . . . . . . . . . . . . . . . . . . . . . . . . . . . . . . . . . . . . . . . . . . . . . . . . . . . . . . . . . . . . . . . . . . . . .15Connecting to power . . . . . . . . . . . . . . . . . . . . . . . . . . . . . . . . . . . . . . . . . . . . . . . . . . . . . . . . . . . . . . . . . . . . . . . . . . . . . . . . . . . . . . . . . . . .16Testing for gas leaks . . . . . . . . . . . . . . . . . . . . . . . . . . . . . . . . . . . . . . . . . . . . . . . . . . . . . . . . . . . . . . . . . . . . . . . . . . . . . . . . . . . . . . . . . . . . .16Testing top burners . . . . . . . . . . . . . . . . . . . . . . . . . . . . . . . . . . . . . . . . . . . . . . . . . . . . . . . . . . . . . . . . . . . . . . . . . . . . . . . . . . . . . . . . . . . . .17Testing the oven burner . . . . . . . . . . . . . . . . . . . . . . . . . . . . . . . . . . . . . . . . . . . . . . . . . . . . . . . . . . . . . . . . . . . . . . . . . . . . . . . . . . . . . . . . .17Before you begin using your range . . . . . . . . . . . . . . . . . . . . . . . . . . . . . . . . . . . . . . . . . . . . . . . . . . . . . . . . . . . . . . . . . . .17Tips for saving gas . . . . . . . . . . . . . . . . . . . . . . . . . . . . . . . . . . . . . . . . . . . . . . . . . . . . . . . . . . . . . . . . . . . . . . . . . . . . . . . . . . . . . . . . . . . . . . .17Using the cook top burners . . . . . . . . . . . . . . . . . . . . . . . . . . . . . . . . . . . . . . . . . . . . . . . . . . . . . . . . . . . . . . . . . . . . . . . . . .18Burner control knobs . . . . . . . . . . . . . . . . . . . . . . . . . . . . . . . . . . . . . . . . . . . . . . . . . . . . . . . . . . . . . . . . . . . . . . . . . . . . . . . . . . . . . . . . . . . .18Selecting a burner . . . . . . . . . . . . . . . . . . . . . . . . . . . . . . . . . . . . . . . . . . . . . . . . . . . . . . . . . . . . . . . . . . . . . . . . . . . . . . . . . . . . . . . . . . . . . . .18Turning on a burner . . . . . . . . . . . . . . . . . . . . . . . . . . . . . . . . . . . . . . . . . . . . . . . . . . . . . . . . . . . . . . . . . . . . . . . . . . . . . . . . . . . . . . . . . . . . .19Using the oven . . . . . . . . . . . . . . . . . . . . . . . . . . . . . . . . . . . . . . . . . . . . . . . . . . . . . . . . . . . . . . . . . . . . . . . . . . . . . . . . . . . . . .19Tips for baking . . . . . . . . . . . . . . . . . . . . . . . . . . . . . . . . . . . . . . . . . . . . . . . . . . . . . . . . . . . . . . . . . . . . . . . . . . . . . . . . . . . . . . . . . . . . . . . . . .19Tips for roasting . . . . . . . . . . . . . . . . . . . . . . . . . . . . . . . . . . . . . . . . . . . . . . . . . . . . . . . . . . . . . . . . . . . . . . . . . . . . . . . . . . . . . . . . . . . . . . . . .20Baking times . . . . . . . . . . . . . . . . . . . . . . . . . . . . . . . . . . . . . . . . . . . . . . . . . . . . . . . . . . . . . . . . . . . . . . . . . . . . . . . . . . . . . . . . . . . . . . . . . . . .20Tips for baking cakes . . . . . . . . . . . . . . . . . . . . . . . . . . . . . . . . . . . . . . . . . . . . . . . . . . . . . . . . . . . . . . . . . . . . . . . . . . . . . . . . . . . . . . . . . . . .20Tips for baking pastry . . . . . . . . . . . . . . . . . . . . . . . . . . . . . . . . . . . . . . . . . . . . . . . . . . . . . . . . . . . . . . . . . . . . . . . . . . . . . . . . . . . . . . . . . . .20Tips for cooking vegetables . . . . . . . . . . . . . . . . . . . . . . . . . . . . . . . . . . . . . . . . . . . . . . . . . . . . . . . . . . . . . . . . . . . . . . . . . . . . . . . . . . . . . .20Oven control knob . . . . . . . . . . . . . . . . . . . . . . . . . . . . . . . . . . . . . . . . . . . . . . . . . . . . . . . . . . . . . . . . . . . . . . . . . . . . . . . . . . . . . . . . . . . . . .21Turning on the oven . . . . . . . . . . . . . . . . . . . . . . . . . . . . . . . . . . . . . . . . . . . . . . . . . . . . . . . . . . . . . . . . . . . . . . . . . . . . . . . . . . . . . . . . . . . . .21Adjusting the oven rack . . . . . . . . . . . . . . . . . . . . . . . . . . . . . . . . . . . . . . . . . . . . . . . . . . . . . . . . . . . . . . . . . . . . . . . . . . . . . . . . . . . . . . . . .22Cleaning and maintenance . . . . . . . . . . . . . . . . . . . . . . . . . . . . . . . . . . . . . . . . . . . . . . . . . . . . . . . . . . . . . . . . . . . . . . . . . .23Removing the cook top grate . . . . . . . . . . . . . . . . . . . . . . . . . . . . . . . . . . . . . . . . . . . . . . . . . . . . . . . . . . . . . . . . . . . . . . . . . . . . . . . . . . . .23Cleaning the cook top burners . . . . . . . . . . . . . . . . . . . . . . . . . . . . . . . . . . . . . . . . . . . . . . . . . . . . . . . . . . . . . . . . . . . . . . . . . . . . . . . . . . .23Cleaning the control panel . . . . . . . . . . . . . . . . . . . . . . . . . . . . . . . . . . . . . . . . . . . . . . . . . . . . . . . . . . . . . . . . . . . . . . . . . . . . . . . . . . . . . .23Cleaning the oven . . . . . . . . . . . . . . . . . . . . . . . . . . . . . . . . . . . . . . . . . . . . . . . . . . . . . . . . . . . . . . . . . . . . . . . . . . . . . . . . . . . . . . . . . . . . . . .23Removing the storage drawer . . . . . . . . . . . . . . . . . . . . . . . . . . . . . . . . . . . . . . . . . . . . . . . . . . . . . . . . . . . . . . . . . . . . . . . . . . . . . . . . . . .242www.insigniaproducts.com
NS-RNG24SS9Disassembling range parts . . . . . . . . . . . . . . . . . . . . . . . . . . . . . . . . . . . . . . . . . . . . . . . . . . . . . . . . . . . . . . . . . . . . . . . . . . .26Disassembling the cook top burners . . . . . . . . . . . . . . . . . . . . . . . . . . . . . . . . . . . . . . . . . . . . . . . . . . . . . . . . . . . . . . . . . . . . . . . . . . . . .26Accessing the pilot light and oven burner . . . . . . . . . . . . . . . . . . . . . . . . . . . . . . . . . . . . . . . . . . . . . . . . . . . . . . . . . . . . . . . . . . . . . . . .27Removing and reinstalling the oven door . . . . . . . . . . . . . . . . . . . . . . . . . . . . . . . . . . . . . . . . . . . . . . . . . . . . . . . . . . . . . . . . . . . . . . . .29Troubleshooting . . . . . . . . . . . . . . . . . . . . . . . . . . . . . . . . . . . . . . . . . . . . . . . . . . . . . . . . . . . . . . . . . . . . . . . . . . . . . . . . . . . .30Cook top . . . . . . . . . . . . . . . . . . . . . . . . . . . . . . . . . . . . . . . . . . . . . . . . . . . . . . . . . . . . . . . . . . . . . . . . . . . . . . . . . . . . . . . . . . . . . . . . . . . . . . . .30Oven . . . . . . . . . . . . . . . . . . . . . . . . . . . . . . . . . . . . . . . . . . . . . . . . . . . . . . . . . . . . . . . . . . . . . . . . . . . . . . . . . . . . . . . . . . . . . . . . . . . . . . . . . . .31Specifications . . . . . . . . . . . . . . . . . . . . . . . . . . . . . . . . . . . . . . . . . . . . . . . . . . . . . . . . . . . . . . . . . . . . . . . . . . . . . . . . . . . . . . .32ONE-YEAR LIMITED WARRANTY . . . . . . . . . . . . . . . . . . . . . . . . . . . . . . . . . . . . . . . . . . . . . . . . . . . . . . . . . . . . . . . . . . . . . .33IntroductionCongratulations on your purchase of a high-quality Insignia product. Your NS-RNG24SS9 represents the state of the art inRV range design and is designed for reliable and trouble-free performance.IMPORTANT SAFETY INSTRUCTIONSWARNING: If the information in this manual is not followed exactly, a fire or explosion may result causing propertydamages, personal injury or death.Do not store or use gasoline or other flammable vapors and liquids in the vicinity of this or any other appliance.WHAT TO DO IF YOU SMELL GAS. Extinguish any open flame.Do not try to light any appliance.Do not touch any electrical switch.Do not use any phone in your building.Immediately call your gas supplier from a neighbor's phone. Follow the gas supplier's instructions.If you cannot reach your gas supplier, call the Fire Department.Installation and service must be performed by a qualified installer, service agency or gas supplier.IMPORTANT SAFETY NOTICEGas appliances can cause minor exposure to four of these substances, namely benzene, carbon monoxide, formaldehyde,and soot, caused primarily by the incomplete combustion of LP fuels. Properly adjusted burners, indicated by a bluishrather than a yellow flame, will minimize incomplete combustion. Exposure to these substances can also be minimized byventing with an open window or using a ventilation fan or hood.WARNINGTo reduce the risk of the appliance tipping, it must be secured by a properly installed anti-tip device. To check if this deviceis installed properly, remove the broiler drawer to inspect the anti-tip bracket or grasp the top rear edge of the range andcarefully attempt to tilt it forward to make sure the range is properly anchored. For instructions, see Installing the anti-tipdevice on page 12.WARNING All RANGES CAN TIP INJURY TO PERSONS COULD RESULT INSTALL ANTI-TIP DEVICE PACKED WITH RANGE SEE INSTALLATION INSTRUCTIONSwww.insigniaproducts.com3
3.7 Cu. Ft. Free-Standing Gas Range for RVsWARNINGImproper installation, adjustment, alteration, service or maintenance can cause injury or property damage. Refer to thismanual. For assistance or additional information consult a qualified installer, service agency, manufacturer (dealer) or thegas supplier.WARNINGTo avoid the possibility of electrical shock, disconnect the power supply before servicing this unit.WARNINGNEVER cover any slots, holes or passages in the oven bottom or cover an entire rack with materials such as aluminum foil.Doing so blocks air flow through the oven and may cause carbon monoxide poisoning. Aluminum foil linings may also trapheat, causing a fire hazard.WARNINGNEVER use this appliance as a space heater to heat or warm the room. Doing so may result in carbon monoxide andoverheating of the oven.GENERAL SAFETY PRECAUTIONSWARNINGREAD ALL INSTRUCTIONS BEFORE USING THIS APPLIANCE1 CAREFUL THOUGHT SHOULD BE GIVEN TO THE LOCATION OF THE RANGE.Avoid placement in these areas: in a main “traffic path”; in an isolated area with no counter space nearby; where openrange doors could create a hazard; in a drafty location which could cause the pilot to blow out.2KEEP CHILDREN AND PETS AWAY FROM THE RANGE.Children should not play with the range controls. Range surfaces are hot. The range should not be used as a step stoolto the cabinet above.3 FOR SAFETY REASONS, DO NOT USE THE RANGE AS A KITCHEN HEATER. Ovens and top burners arenot designed for heating use.BE SURE THE RANGE IS PROPERLY INSTALLED AND GROUNDED BY A QUALIFIED TECHNICIAN.BE SURE YOUR RANGE IS CORRECTLY ADJUSTED BY A QUALIFIED SERVICE TECHNICIAN ORINSTALLER FOR THE TYPE OF PROPANE GAS ON WHICH IT IS TO BE USED. SEE INSTALLATIONINSTRUCTIONS.5 NEVER INSTALL RANGE OVER KITCHEN CARPETING.4Some carpet materials are highly flammable and some absorb grease which could be a fire hazard.6REMEMBER FABRIC IS FLAMMABLE.Long flowing sleeves have no place in a kitchen. Don‘t lean on a range. If the range is near a window, use anappropriate window treatment.7IF THE PILOT GOES OUT, YOU SHOULD DETECT A FAINT GAS ODOR AS YOUR SIGNAL TORELIGHT THE PILOT.As a safety measure, open a window or door to ventilate the room before relighting the pilot. If the range connectionsare not perfectly tight, you can have a small leak and therefore a faint gas odor. NEVER use a match or other flame tolocate such a leak. Use a liquid detergent or thick soap and water solution in the areas where you think the leak mightbe. If a bubble develops, it indicates a possible leak. Gas supply should be turned off immediately and you should callyour gas company and/or service company.84NEVER LEAVE A BURNER ON AND UNLIT FOR MORE THAN 5 SECONDS.www.insigniaproducts.com
NS-RNG24SS9A WARNING: SERIOUS HAZARDS ARE ASSOCIATED WITH REACHING INTO STORAGECABINETS ABOVE THE RANGE WHEN THE TOP BURNERS AND/OR OVEN ARE IN OPERATION.9Do not store items that are attractive to children above the range. Do not let clothing come into contact with topburners when range is in operation.POSSIBLE HAZARDS OR INJURIES MAY RESULT FROM THE MISUSE OF APPLIANCE DOORS ORDRAWERS such as stepping, leaning or sitting on the doors or drawers.11 DO NOT USE THE TOP OF THE RANGE OR THE OVEN AS A STORAGE AREA.10Items stored on the range top can become too hot and melt. Do not store flammable materials in the oven.12USE A GOOD POTHOLDER WHEN PULLING OUT OVEN RACKS TO ADD OR REMOVE FOOD.Dish towels or other substitutes can cause bad burns. Use only dry potholders. Damp or moist potholders on hotsurfaces may result in burns from steam. Do not let a potholder touch a flame.13 KEEP ALL PLASTICS AWAY FROM THE RANGE, as plastics are vulnerable to heat.14 AVOID UNSTABLE, EASILY TIPPED PANS. Pan handles should be turned to the back or side of the range—not out into the room or over adjacent burners. Only use utensils that are suitable for range and oven use.15 DO NOT HEAT UNOPENED CONTAINERS OF FOOD ON SURFACE BURNERS OR IN THE OVEN.Buildup of pressure may cause the container to burst and result in serious personal harm and/or damage to the range.16ALUMINUM FOIL WHEN USED IMPROPERLY IS A CAUSE OF MANY RANGE PROBLEMS.See the oven and broiler sections of this book for instructions for proper use17GREASE IS FLAMMABLE AND SHOULD BE HANDLED CAREFULLY. Avoid letting grease deposits collectaround the range or in vent fans. Let quantities of hot fat, a pan of deep fat for example, cool before attempting tomove it. If a grease fire should occur in a pan, put out the flame by placing a lid on the pan. DO NOT throw water on agrease fire. Do not turn on the vent hood. Use a dry chemical or foam type fire extinguisher. If a fire should occur in theoven or broiler, tum off the oven, close the oven door and broiler door and allow the food or grease to burn itself out inthe oven. If smoke or fire persist, call your local fire department.1819AVOID THE USE OF AEROSOL SPRAYS NEAR A RANGE AS MOST ARE FLAMMABLE.NEVER LEAVE SURFACE BURNERS UNATTENDED AT HIGH OR MEDIUM FLAME SETTINGS.Adjust top burner flame size so it does not extend beyond the edge of the cookware. Excessive flame is hazardous20 DO NOT USE A RANGE THAT IS IN NEED OF REPAIR. Repairs should be done by a qualified person. Poorlydone repairs could result in a safety hazard. Do not replace or repair any part of the range yourself unless it isrecommended in this book.21 DO NOT TOUCH THE INTERIOR SURFACES OF THE OVEN DURING OR IMMEDIATELY AFTERUSE. Do not let clothing or other flammable materials contact burners. Although these surfaces may be dark in colorthey can still be hot enough to burn. Other areas of the range can become hot enough to cause burns, such as ventopenings, main top, window, oven door, broiler door and oven racks.2223DO NOT OBSTRUCT THE FLOW OF COMBUSTION OR VENTILATION AIR.BE SURE ALL PACKING MATERIALS ARE REMOVED FROM THE RANGE before operating it to prevent24LEAK TESTING OF THE APPLIANCE SHALL BE CONDUCTED ACCORDING TO THEMANUFACTURER'S INSTRUCTIONS.fire or smoke damage should the packing material ignite.Installation instructions The installation must conform with local codes or, in the absence of local codes, with the national Fuel Gas Code, ANSIZ223.1/NFPA 54 or, in Canada the Propane Gas Installation Code, CSA B149.1. The installation of appliances designed for manufactured (mobile) home installation must conform with theManufactured Home Construction and Safety Standard, Title 24 CFR, Part 3280 (formerly the Federal Standard forMobile Home Construction and Safety, Title 24, HUD (part 280)). The installation of appliances designed for recreational park trailers must conform with state codes, with the standardfor Recreational Park Trailers, ANSI A119.5. When installed, the range must be electrically grounded in accordance with local codes. The range and its individual shut-off valve must be disconnected from the gas supply piping system during anypressure testing of that system at test pressures in excess of 1/2 psi (3.5 k Pa). The range must be isolated from the gas supply piping system by closing its individual manual shut-off valve duringany pressure testing of the gas supply piping system at test pressures equal to or less than 1/2 psi (3.5 k Pa). The maximum gas supply pressure must be in accordance with the manifold 10" WC inlet pressure rating of the gasappliance pressure regulator supplied. The gas supply pressure for checking the regulator setting must be at least 1" WC (249 Pa) above the manufacturer'sspecified manifold pressure. Any opening in the wall behind the range and in the floor under the range must be sealed.SAVE THESE INSTRUCTIONSwww.insigniaproducts.com5
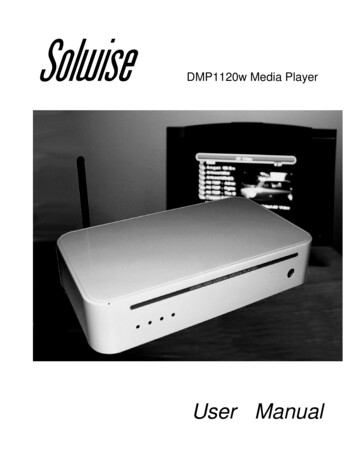
3.7 Cu. Ft. Free-Standing Gas Range for RVsFeaturesNote to reviewers: Please see the question in red in the Troubleshooting section.Package contents 3.7 Cu. Ft. Free-Standing Gas Range for RVAnti-tip deviceRubber pad kitUser GuideMain componentsCook topControl panelOven racksOven doorStorage drawerOven door handleControl panelPanel LightswitchOven LightswitchPanel LightOven LightRear Left6000 BTU6Front Left9000 BTUBake knob12000 BTURear Right3500 BTUwww.insigniaproducts.comFront Right12000 BTU
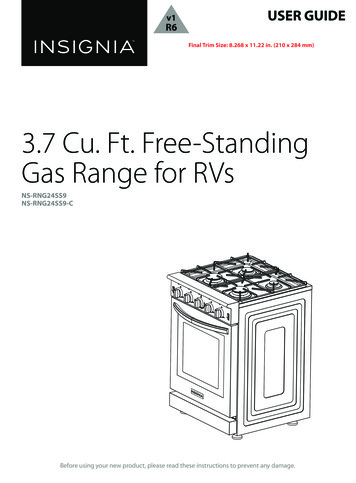
NS-RNG24SS9Range dimensionsFrontwww.insigniaproducts.com35.6" to 36.6" (90.4 cm to 93 cm) Adjustable34.4" (87.4 cm)23.9" (60.7 cm)7
3.7 Cu. Ft. Free-Standing Gas Range for RVsSide26.9" (68.3 cm)24" (60.9 cm)21.7" (55.1 cm).7"(1.8 cm)24.3" (61.7 cm)Installing the rangeIMPORTANT: We recommend that a professional installer install your range.If your range is not installed correctly, incorrect electrical grounding or gas leaks can cause a fire or explosion which can lead to injuryor death.CAUTION Material damage: Do not use the door or handle to lift or move the range. The range must be placed directly on a floor with 1/8" (3 mm) thick commercial grade vinyl composition floorfinishing materials. Do not place the range on to a base or pedestal.8www.insigniaproducts.com
NS-RNG24SS9Clearances and dimensionsUse the dimensions shown below to install the range. The back and sides of the range below the cook top can be flush tocombustible material.A minimum clearance of 5 in. (12.7 cm) horizontally and 18 in. (45.7 cm) vertically is required between the sides of thecooking surface and any combustible construction adjacent to the cooking surface. A minimum clearance of 30 in. (76 cm)is required between the top cooking surface and any combustible material directly above the cooking surface.30" (76.2 cm)18" (45.7 cm)Note: The measurements in the following graphic are minimum requirements.5"(1.3cm))7 cm12.5" ()5 cm61.2" (24www.insigniaproducts.com9
3.7 Cu. Ft. Free-Standing Gas Range for RVsGas and electric location requirements24.8" (63 cm)8.5" (21.6 cm)8.6" (21.8 cm)2" (5.1 cm)(5.1 2"cm)2" (5.1 cm)m).2 c625" (24.Important notes to the installer:1234Read this manual before installing the range.Observe all governing codes and ordinances.Make sure that you leave these instructions with the range.Before installing the range in an area covered with linoleum or any synthetic floor covering, make sure that the floorcovering can withstand temperatures at least 90 F (32 C) above room temperature without shrinking, warping, ordiscoloring.5 Do not install the range over carpeting unless you place an insulating pad or sheet of 1/4-in. (.64 cm) thick plywoodbetween the range and carpeting.Before installing the range Remove the exterior and interior packing. Wipe the surfaces of the range with a damp cloth or sponge, then wipe them dry with a clean, dry cloth.Adjusting the height and leveling the rangeThe range should be the same height as the adjacent countertops or workspaces. The range should also be level. If therange is not level, the door may not close or seal correctly which can cause uneven heating and gas wastage problems. To adjust the height and level the range, turn the feet clockwise (to raise) the range or counter-clockwise (to lower).Note: To make it easier to adjust the feet, have someone push against the top of the range to tilt it slightly.10www.insigniaproducts.com
NS-RNG24SS9Installing the anti-tip deviceWARNING: All ranges can tip and injure people. Install the anti-tip device that came with the range. If you pull the range away from the wall for cleaning, service, or any other reason, make sure that the anti-tip device iscorrectly re-engaged when you push the range back against the wall. In the event of abnormal usage (such as aperson standing, sitting, or leaning on an open door), failure to take this precaution can result in tipping of the range.Personal injury might result from spilled hot liquids or from the range itself.1 Adjust the range feet to the correct height. Make sure that the range is level. See Adjusting the height and leveling therange on page 11.2 Position the rear brackets on the floor with the notches on the brackets facing the front of the range, then screw thebrackets to the floor using four of the provided screws per bracket.18.3" (46.5 cm)2.4" (6 cm)4"(10.1 cm)2.4" (6 cm)20.7" (52.5 cm)www.insigniaproducts.com11
3.7 Cu. Ft. Free-Standing Gas Range for RVs3 Align the rear feet with the notches on the rear brackets, then slide the range into place. Make sure that the rear feet areunder the brackets.4 Open the storage drawer, slide the notches on the front brackets over the front feet, then screw the brackets into thefloor using two of the provided screws for each bracket.12www.insigniaproducts.com
NS-RNG24SS95 Close the drawer.www.insigniaproducts.com13
3.7 Cu. Ft. Free-Standing Gas Range for RVsConnecting to gasWARNING: If your range is not installed correctly, gas leaks can cause a fire or explosion which can lead to death or injury.We recommend that a professional installer connect the gas.CAUTION: Your range can use only LP gas. Do not connect it to any other type gas.You can connect the gas using a flexible connector or a rigid pipe.Flexible connector methodPressureregulatorFlexible applianceconduitFlare union adapter onthe shut-off valveFlare unionadapter on therangeManualshut-off valveONOFF1 Install a male 1/2" flare adapter at the 1/2" NPT internal thread in the range inlet. Use a backup wrench on the elbowfitting to avoid damage.2 Install a male 1/2" or 3/4" flare union adapter in the NPT internal thread on the manual shut-off valve.3 Connect the flexible metal appliance connector.4 Make sure that the circuit breaker is off, then plug the power cord into the electrical outlet. Do not turn the circuitbreaker back on.5 Push the range back into position making sure that the rear legs slide under the anti-tip brackets. The range sits3/4" (19 mm) away from the wall when correctly installed.CAUTION: Be careful not to crimp the flexible connector.6 Carefully tip the range forward to make sure that the front legs are under the anti-tip brackets.Rigid pipe methodThe configuration of the rigid pipe connection varies depending on the location of the gas pipe stub.PressureregulatorPipeManual shut-offvalveONOFF1 Make sure that the circuit breaker is off, then plug the power cord into the electrical outlet. Do not turn the circuitbreaker back on.2 Push the range back into position making sure that the rear legs slide under the anti-tip brackets. The range sits3/4" (19 mm) away from the wall when correctly installed.3 Carefully tip the range forward to make sure that the front legs are under the anti-tip brackets.4 Connect the pipe to the range at the union. Access the connection through the access panel behind the storagedrawer.14www.insigniaproducts.com
NS-RNG24SS9Installing rubber pads to the oven backTo prevent the range from getting too close to the wall behind the range, install the included rubber pads.1 Locate the rubber pad kit. It includes:ScrewsRubber pads2 Align the holes in the rubber pads with the holes on the top, back of the range, then secure the pads to the range withthe provided screws.www.insigniaproducts.com15
3.7 Cu. Ft. Free-Standing Gas Range for RVsConnecting to powerDANGER: Risk of electric shock, short circuit, or fire if the power cord is damaged.The power cord must not be clamped, bent, or trapped or come into contact with hot parts of the range. If the power cord is damaged,it must be replaced by a qualified electrician.IMPORTANT: Electrical installation should comply with national and local codes. The range must be grounded. The range requires a 110/120VAC electrical supply to operate the electronic ignition system. The 5 ft. (1.5 m) power cord providedwith the range is equipped with a 3-prong, grounded plug for protection against shock hazard. The power outlet should have its own 15 amp circuit breaker. In addition, be aware of local codes and ordinances when installing your services. The wiring diagram covering the control circuit is located on the back of the range. The power supply data must correspond to thedata specified on the rating plate of the range. The rating plate sticker is on the power cord.WARNINGS: Avoid fire hazard or electrical shock. Do not use an adapter plug, an extension cord, or remove the grounding prong from the power cord. Failure to follow this warningcan cause serious injury, fire, or death. The range is equipped with a 3-prong grounding plug for your protection against shock hazard and should be plugged directlyinto a correctly grounded receptacle. DO NOT cut or remove the grounding prong from this plug. The power cord must be plugged into a mating 3-prong ground-type outlet, grounded to conform with the National ElectricalCode, ANSI/NFPA 70 latest edition, or Canadian Electrical Code (CSA) and all local codes and ordinances. For personal safety, the range must be correctly grounded. For maximum safety, the power cord must be plugged into an electricaloutlet that is correctly polarized and grounded. If a 2-prong wall receptacle is the only available outlet, have it replaced with a correctly grounded 3-prong wall receptacle installedby a qualified electrician. Do not ground to a gas pipe.3-prong plugOutlet coverTesting for gas leaks1 Make sure that the circuit breaker is turned off.2 Turn on the gas.3 Apply a non-corrosive leak detection fluid to all joints and fittings in the gas connection between the shut-off valve andthe range. Include gas fittings and joints in the range if connections may have been disturbed during installation.4 If bubbles appear around fittings and connections, turn off the supply line gas shut-off va
† The range must be isolated from the gas supply piping system by closing its individual manual shut-off valve during any pressure testing of the gas supply piping system at test pressures equal to or less than 1/2 psi (3.5 k Pa). † The maximum gas supply pressure must be in accordance with the manifold 10" WC inlet pressure rating of the gas

![Tamil Ilakkiya Varalaru In Tamil Pdf Free [PORTABLE] - Jbr Films](/img/63/wenslato.jpg)