Transcription
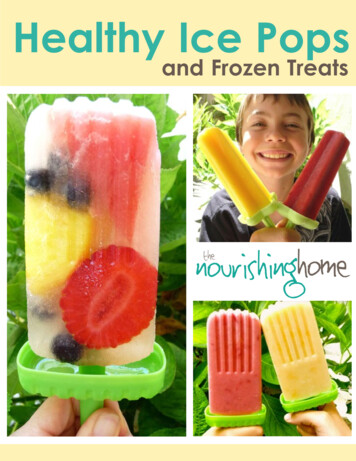
Healthy Ice Popsand Frozen Treatsnourishinghomethe
thank you!My family and I hope you enjoy this fun frozentreats book. Whether you opted to purchase it,or you received it free for being a subscriber, I wantto personally thank you for being a special friend!And if you received this book as part of an eBundleor other book promotion, I’d like to cordially inviteyou to visit me at The Nourishing Home! I lookforward to meeting you soon!May the Lord be with you & bless you!kellyHealthy Ice Pops & Frozen Treat,copyright 2012 The Nourishing HomeThis book, as well as all recipes, photos and contentmay not be reprinted, reproduced or distributedwithout written permission by the author.
contentsIntro: How to Make Healthy Ice Pops .2Banana Split Pop .4Banana Nut Butter Bites.5Cookie Sandwich Pops .5Chocolate Banana Bars .6Chocolate Covered Bananas .7Chocolate Dipped Coconut Cream Bars .8Chunky Cherry Pops .9Fabulous Fruit & Cream Bars.10Fizzy Fun Cultured Pops .11Fruit Juice Push-Up Pops .11Healthier Ice Cream Cake .12Homemade Frozen “Go-Gurts” .13“Italian Ice” Push-Up Pops .14Magic Shell Topping .15No-Bake Mini Cheesecakes .16Red, White & Blueberry Bomb Pops.17Wholesome All-Fruit Pops .18Yummy Fruit Salad Pop .19Resources (where to find pop molds) .19A special thank you to my expert panel oftaste testers who prove daily thatreal kids love real food!
how to make healthy ice popsGrowing up, there were few thingsmore exciting during summer thanhearing that little ditty playing thatmeant only one thing É the Ice CreamMan is coming! Sadly, we now thatknow these tempting treats are chockfull of unhealthy preservatives andharmful additives.So whatÕs a real food lovinÕ momma todo? Why not say goodbye to the icecream man and hello to the ÒIce CreamMOM!ÓThe fact is, there is no need to rely onthe ice cream man (or store-boughtgoodies either) to bring a smile to yourkiddos faces. Making homemade frozenice pops and treats is so easy, delicious and economical! And itÕs a super FUN way toget your kids in the kitchen too!10 Tips for Making Healthy Homemade Frozen Pops1. There are all kinds of delicious ingredients that can be used to make healthyhomemade frozen pops. Some of the best options include: 100% fruit juices, smoothies and yogurt. You can also use other healthy options such as coconut water or milk,kefir, kombucha and herbal or green teas.2. Additionally, frozen pops are a great opportunity to add an extra boost of nutritionÐ especially for those picky eaters. Adding ingredients like yogurt, kombucha, or kefiradds a healthy dose of probiotics. Similarly, you can sneak in a bit of pureed veggiesinto most pop recipes without significantly altering the flavor or texture of the ice pop.3. Since all ingredients expand during the freezing process, be sure to leave at least ahalf-inch to one-inch space at the top of your pop molds when filling them. Also keepin mind that ingredients with more air content (such as smoothies) expand more thansolid ingredients (like yogurt).4. Speaking of pop molds Ð there is no need to purchase fancy ones (unless you wantto). You can make ice pops out of everyday household items, such as dixie cups, icecube trays, candy molds, etc.Ðcontinued on page 32
5. And the best method for ensuring yourpopsicle stick remains securely centered in yourice pop (if youÕre not using pop molds), is tosimply cover the top of dixie cup (or whateveryouÕre using as your mold) with a small piece offoil after pouring in your ingredients. Then, cuta small slit in the center of the foil and carefullyinsert a popsicle stick into the center of themold.6. Delicious additions Ð Adding whole or dicedfruits suspended in your ice pops makes forinteresting textures and flavors, such as in myChocolate Banana Bars on page 6 and YummyFruit Salad Pops on page 19. Similarly,layering ingredients, such as in my Banana SplitPops recipe on page 4, is a great way to combineflavors and create pretty striped pops.7. And speaking of layering ingredients, itÕsimportant to be sure each layer freezes solidbefore adding the next layer. Also, like ingredients stick together better. For example, layering several types of fruit juice basestogether works better than trying to layer juices with ice cream.8. ItÕs also important to keep in mind that different ingredients freeze at differentrates. For example, fruit juice pops freeze faster than yogurt based pops. And ofcourse, freezing time also depends on the size of the ice pop. For best results, popsshould be frozen overnight, or at least for a minimum of 6-8 hours. And as far as storage goes, pops left in molds generally stay fresh for about 1-2 weeks.9. To unmold an ice pop without the pop sticking to the mold, itÕs best to either letthe pop sit out at room temp for a few minutes, or run the mold under water for aminute. Then remove the mold and enjoy!10. Get creative! There are lots of ideas and inspiration to be found via pinterest andgoogle searches for healthy ice pops. And of course, I hope this eBook provides youand your family with lots of inspiration!3
banana split popA favorite of kids of all ages, thiswholesome pop truly tastes like abanana split! It takes a little extra timeto make it Ð but after just one bite,youÕll know why itÕs totallyworth it!Layer One: Strawberry Topping5 fresh ripe organic strawberries2 tbsp 100% pure organic apple juice1 tsp raw honey (or pure maple syrup)Remove stems from strawberries andcut in half. Place the strawberries, apple juice and honey into your blender or VitaMixand blend until thoroughly combined. Pour an even amount of the "strawberrytopping" into six 3-ounce pop molds. Place in freezer until frozen. Then, once frozen,you're ready to make your next layer "banana cream center."Layer Two: Banana Cream Center12 one-inch thick slices of fresh ripe banana1/3 cup, plus 1 tbsp organic plain whole milk yogurt2 tsp pure maple syrup1/4 tsp pure vanilla extractPlace all ingredients into your blender or VitaMix and blend until thoroughlycombined. Then, remove your pop molds from the freezer (making sure that the firstlayer is completely frozen). Pour an even amount of the "banana cream center" intothe pop molds, making sure to leave at least an 2 inches of space from the top of themold for the final layer to be added. Cover each individual pop mold with a small pieceof foil. Use a knife to make a slit in the center of the foil and carefully place a popsiclestick into the mold in the center of the pop. Place in freezer until frozen. Then, oncefrozen, you're ready to make your final layer "pineapple delight base."Layer Three: Pineapple Delight Base1 cup fresh pineapple chunks3 tbsp 100% pure pineapple juice1 tsp raw honey (or pure maple syrup)Place all ingredients into your blender or VitaMix and blend until thoroughlycombined. Then, remove your pop molds from the freezer (making sure that the firsttwo layers are completely frozen). Remove the foil covers from the pop mold and pouran even amount of the "pineapple delight base" layer into the pop molds. No need torecover the pops. Place in freezer until frozen. When ready to serve, run the pop moldunder warm water for a few seconds to loosen before removing the mold.Enjoy! You've worked hard for this healthy treat!4
banana nut butter bitesSimple. Easy. Delicious! This is one ofour favorite bite-sized treats Ð perfectanytime!3 to 4 semi-ripe bananasYour favorite nut butterHomemade magic shell topping(page 15)Line a baking sheet with parchmentpaper. Peel and cut bananas intoslices. Place about two dozen banana slices evenly on the baking sheet. Place a smalldollop of nut butter on the center of each banana slice and then top with anotherbanana slice to form a banana nut butter sandwich. Place in the freezer for about 2-3hours to freeze solid. Make homemade magic shell topping (page 15). Remove frozenbanana sandwiches from freezer and add a toothpick to the center of each one. Thendip each banana sandwich into the Magic Shell topping and allow it to set a bit, thenplace back onto the parchment. Once all banana sandwiches are covered in chocolate.Place back in the freezer for at least one hour before serving. (Toothpicks should beremoved prior to serving to small children.) To store, place in a freezer-safe containerfor up to one week.cookie sandwich popTurn homemade cookies into an extra specialtreat by adding a scoop of homemade icecream. Then, add a popsicle stick in the centerand wrap each ice cream cookie-pop individually and store in the freezer until ready toserve! YUM!Here are a few of our favorite homemadecookie recipes for making cookie pops: Almond Flour Chocolate Chip Cookies(GF) Double Chocolate Chip Cookies(GF) Whole Grain Chocolate Chip Cookies(GF)Looking for some healthier homemade ice cream recipes? Check outmy recomendations here.5
chocolate banana barWe consider this "dessert on a stick," as itÕs sorich with dark chocolately goodness. It tastes likea decadent fudge bar with the bonus of a creamybanana center. Mmm!If you don't have access to raw milk, you cansubstitute the yogurt and raw milk called for inthe recipe with 1 cup of whole milk kefir and1/2 cup filtered water. The pops will be a bittangy-er (is that a word?), but still very delicious!Chocolate-Covered Banana Bar2 medium bananas1/2 cup plain organic whole milk yogurt(or whole milk kefir)1 cup raw whole milk3 1/2 tbsp unsweetened cocoa powder1/4 cup pure maple syrup1/8 tsp pure vanilla extractPeel the two bananas and cut in half so you havefour. Then take three of the four and half themagain Ð this time, cut them in half horizontally (see photo below). You will place thesesix halves of banana into the center of the pop molds (see above photo).With the leftover banana half, cut three thick slices (rounds) about an inch thick, asshown below. YouÕll use the three round slices to make the pop mixture. Save the restof your banana for another recipe. (You can simple slice it and freeze it for later use.)In a blender or VitaMix, add thethree round slices of banana,yogurt, milk, cocoa powder,maple syrup and vanilla. Blend untilthoroughly combined. Pour intobanana-filled pop molds and freezefor at least 6-8 hours.When ready to serve, run the popmold under warm water for a fewseconds to loosen before removingthe mold. Makes six 3-ounce icecream bars.6
chocolate covered bananasItÕs a carnival of fun and flavor thatÕs soeasy to make even a monkey could do it!So why not gather your little monkeystogether in the kitchen for some popmaking fun!4-6 medium *semi-ripe bananas1 batch of homemade Magic Shell (recipeon page 15)Optional: Your favorite crispy nutsCut off just one end of each banana;reserve for another use. Then peel thebananas and place on a parchment-linedbaking sheet. Insert a popsicle stick in the center of the banana at the cut end. Freezethe bananas at least 2-3 hours, or overnight.Make a batch of Magic Shell (recipe on page 15). Pour the chocolate mixture into ameasuring cup. Hold a frozen banana over a bowl vertically (to catch the excesschocolate). The popsicle stick should be pointing up toward the ceiling as youÕre holding it.Carefully pour the Magic Shell mixture over the frozen banana making sure to notexcessively coat. Work quickly as the Magic Shell freezes quickly. If adding choppednuts, sprinkle them on immediately before the chocolate mixture freezes.Once chocolate is set, place the banana on a parchment-lined baking sheet and immediately place in the freezer. Repeat process until all bananas are covered in chocolate.(Tip: Simply transfer the chocolate in the bowl back into your measuring cup as youwork to cover each banana.)Allow bananas to freeze at least 1-2 hours, then wrap individually and enjoy withinone week. Makes four to six chocolate-covered bananas.*Personally, IÕve found that semi-ripe (almost ripe) bananas are best for making chocolate covered treats. Bananas that are too ripe result in a very soft frozen treat thatdoesnÕt hold the chocolate well.7
chocolate dippedcoconut cream barsCreamy coconut flavor enveloped in a rich blanket ofchocolate yes, please!2 cans (13.5-ounce size) pure coconut milk1/3 cup pure honey2 tsp pure vanilla extract1 batch of homemade Magic Shell (see recipe onpage 15)Unsweetened shredded coconutIn a large bowl, whisk together the coconut milk,honey and vanilla, until well combined.Divide the coconut mixture evenly among six 4-ouncepop molds, making sure to leave at least one inch ofspace at top. Secure the pop mold top, or covermolds with foil and insert a popsicle stick in the center.Place in the freezer for at least 8-12 hours untilfrozen solid.To cover the pops in chocolate, prepare a batch ofhomemade Magic Shell (recipe on page 15). Pour thechocolate mixture into a measuring cup.Unmold one pop by gently running the mold under slightly warm water until the moldloosens. Hold the pop over a bowl vertically (to catch the excess chocolate). The pop stickshould be pointing up toward the ceiling as you’re holding it.Carefully pour the Magic Shell mixture over the pop making sure to not excessively coat.Work quickly as the Magic Shell freezes quickly. If adding shredded coconut, sprinkle it onimmediately before the chocolate mixture freezes.Once chocolate is set, place pop on a parchment-lined baking sheet and immediately placein the freezer. Repeat process until all pops are covered in chocolate. (Tip: Simply transferthe chocolate in the bowl back into your measuring cup as you work to cover each pop.)Allow pops to freeze at least 1-2 hours, then wrap individually and enjoy within one week.Makes six pops.8
chunky cherry popWhat better way to celebrate thedelicious, nutritious flavor of cherriesthan to combine them with someprobiotic-rich yogurt and glorious rawmilk for a creamy, dreamy cherrytreat! And for chocolate lovers, simplyadd some dark chocolate bits for ahealthier version of Cherry Garcia.YUM!Why is there a shark in the picture?Apparently, he thought they were"chunky chum-pops!" ha ha!!Chunky Cherry Pop1 cup *raw whole milk3 tbsp pure maple syrup1/4 tsp pure vanilla extract15 pitted, ripe dark cherries, divided (if frozen, thaw first)1/2 cup of plain organic whole milk yogurtOptional: Fair-trade dark chocolate or raw cacao bitsPlace six pitted cherries in a blender or VitaMix container. Add the milk, maple syrupand vanilla extract. Blend until thoroughly combined. Next, add the yogurt and blendon low just a few seconds to combine.Cut the remaining nine cherries into quarters and divide them evenly among the sixmolds. If using dark chocolate or raw cacao bits, add a sprinkling to each pop moldas well.Then, pour the pop mixture into the molds, making sure not to overfill them. Use apopsicle stick to gently stir the liquid mixture and diced cherries together beforesecuring the tops.Freeze for 6-8 hours. When ready to serve, run the pop mold under warm water fora few seconds to loosen before removing the mold. Enjoy!*If you don't have access to raw milk, you can substitute the yogurt and raw milkcalled for in the recipe with 1 cup of whole milk kefir and 1/2 cup filtered water. Thepops will be a bit tangy-er (is that a word?), but still very delicious!9
fabulous fruit & cream bars"I Scream, You Scream, We AllScream for Ice Cream!!" Especiallywhen it's fresh fruit covered indelicious creamy goodness! Mmm!Strawberries & Cream Bar1 pound fresh ripe organicstrawberries1 cup plain organic whole milk yogurt2 1/2 tbsp raw honey1/8 tsp pure vanilla extractRemove stems from strawberries.Finely dice four of the strawberriesand set aside. Then, cut theremaining whole strawberries intohalves and place in your blender orVitaMix. Add the remaining ingredients listed above, except for the four finely dicedstrawberries. Blend until thoroughly combined. Then add the diced strawberries andblend on low just a couple of seconds to mix together. Pour mixture into pop moldsand freeze for at least 6-8 hours. When ready to serve, run the pop mold under warmwater for a few seconds to loosen before removing the mold.Peaches & Cream Bar4 large fresh ripe organic peaches1 cup plain organic whole milk yogurt3 tbsp pure maple syrup1/8 tsp pure vanilla extractRemove skins from the peaches. Cut one peach in half. Finely dice the half peach andset aside. Then, cut the remaining peaches (including the leftover peach half) intoslices. (Be sure to slice them right over your blender or VitaMix container to catch all ofthe juices in the container.) Add the remaining ingredients listed above, except for thefinely diced peach half. Blend until thoroughly combined. Then add the diced peachesand blend on low just a couple of seconds to mix together. Pour mixture into popmolds and freeze for at least 6-8 hours. When ready to serve, run the pop mold underwarm water for a few seconds to loosen before removing the mold.Please note: Ripe fruit is much sweeter and more flavorful. So be sure to only use fullyripened fruit in your ice pops for the best flavor. Also note: When fresh ripe fruit is not2 ice pops. However, it's best to allow theavailable, you can use frozen fruit to makefrozen fruit to thaw first, before blending it. That's because, you may needto add more liquid to get frozen fruit to blend properly and this will change theflavor and texture of your ice pop.10
fizzy fun cultured popsTurn you favorite flavors of kombucha, waterkefir or cultured coconut water into cool andrefreshing pops that not only have a healthycultured zing, but an incredible burst of flavor!And making these pops is so simple É If usinghomemade cultured beverages, simply flavorthem with your kidsÕ favorite fruit or fruit juice.ItÕs best to make sure your homemade culturedbeverages are slightly sweeter than you wouldtypically drink them, since freezing softens theflavor. If you donÕt brew your own bucha or other cultured beverages, you can findmany of these at local whole food type stores, if youÕd like to give these a try.To make these pops, simple pour your cultured beverage of choice into some popmolds and freeze. To create the fun layered effect, fill the molds halfway with one flavor of beverage. Then cover with foil and add a popsicle stick to the center of eachmold. Allow to freeze for at least four hours, or overnight. Then remove the foil andcarefully add a second flavor of your choice to each mold, making sure to leave atleast one inch of space at the top. Place in the freezer for another 4-6 hours untilfrozen solid. Then remove from the pop molds and enjoy!easy fruit juice popsTurn your kiddosÕ favorite juices into pops for a healthyrefreshing treat anytime of year! The flavor combinationsare almost endless É some of our favorites are applegrape, cranberry-grape, orange-mango, and pineapplemango. Just combine juices to achieve your personalfavorite flavors, or use pre-mixed pure juices (with nounhealthy additives), then pour into molds and freeze.And letÕs not forget about veggie juices for an extra boostof nutrition! Carrot juice is an easy one to slip into yourjuice blends, since it has such a mellow sweet flavor.For a slightly creamy fruit juice pop, add two tablespoonsof whole milk yogurt, coconut milk or coconut yogurt toeach cup of juice used. Whisk together, pour into the popmolds, freeze and enjoy! ItÕs that easy.11
healthier ice cream cakeWhatever the happy occasion, this decadent icecream cake is certain to put a big smile on yourfavorite faces! If you're dairy-free, you can easilymodify this recipe as noted below and top withyour favorite dairy-free ice cream.1 batch of decadent fudge brownie batter (oryour favorite brownies)2 quarts of your favorite ice creamRaw cacao nibs (or mini chocolate chips) forsprinkling on topPrepare the brownie cake base:Preheat oven to 350 degrees. Very lightly grease a9x9-inch baking dish with coconut oil. Preparebrownie batter according to the instructions inthe recipe. (If you're dairy-free, simply replace thebutter called for in my brownie recipe with 1/2cup of coconut oil instead.)Bake the brownie cake for approximately 15-18 minutes, until a toothpick inserted inthe center comes out clean. Allow brownie cake to cool completely in the baking dishand then place it in the freezer to freeze solid.Time-Saving Tip: I find it easier to bake the cake a day ahead of time to ensure ampletime for it to cool/freeze. I also like to make my ice cream base a day ahead of time aswell for the reasons described below.Once the brownie cake is frozen, top with ice cream:If using store-bought ice cream (or homemade that's been in the freezer), allow it tosit on the counter for about 10 minutes to soften a bit. Then use an ice cream scoopto scoop the ice cream out and place the scoops side-by-side on top of the frozenbrownie cake. Then, use a cake spreader to even-out the ice cream across the top ofthe cake.If making homemade ice cream, I recommend making the ice cream base a day aheadof time, so it's thoroughly chilled and the flavors have a chance to meld. Then, at leastfour hours before you plan to serve the cake, add the ice cream base to your icecream maker. Once your ice cream is finished churning, spoon it over the frozenbrownie cake and spread it evenly across the top.Sprinkle top of ice cream cake with raw cacao nibs or chocolate chips, if desired.Cover the ice cream cake and place it in the freezer until frozen solid. About 10 minutes before you plan to serve the ice cream cake, place it on the counter to thaw a bitso it's easier to slice. Enjoy!12
homemade frozen go-gurtsWhen my boys asked if we could create ahealthy "go-gurt," I had one goal in mindcreating something yummy and fun thatÕschock-full of healthy real food nutrition!And this pop is a definite win-win! If youdon't want to purchase push-up popmolds, simply use any popsicle molds youalready have on hand, as shown below.Berry Blast Push-Up Pop (Go-Gurt)1 cup frozen organic wild blueberries(or 1 1/4 cup fresh blueberries)1/2 cup fresh or frozen pineapple chunks10 fresh organic strawberries, quartered3 thick-cut slices of banana(about 1Ó thick)1 1/2 to 2 tbsp raw honey2 tbsp ground flax seed meal1 cup whole milk yogurt (or kefir)If using frozen fruit, allow it to thaw first. Add above ingredients, except for yogurt, toyour blender or VitaMix and puree until smooth. Then, add yogurt/kefir and blend onlow speed about 10-15 seconds, just to combine. Place silicone molds in a cup to keepthem upright. Then, add the yogurt mixture to them, leaving at least 1/4" at top toplace cap on. Place in freezer for at least 8 hours. Serve frozen. Makes approximatelysix 4-ounce frozen push-up pops (Go-Gurts).Tropical Treat Push-Up Pop (Go-Gurt)1 cup pineapple chunks1 cup organic mango chunks1/2 cup organic peach chunks3 thick-cut slices of banana (about 1Ó thick)1 to 1 1/2 tbsp raw honey2 tbsp ground flax seed meal1 cup whole milk yogurt (or kefir)If using frozen fruit, allow it to thaw first.Add above ingredients, except for yogurt, to your blender or VitaMix and puree untilsmooth. Then, add yogurt/kefir and blend on low speed about 10-15 seconds, just tocombine. Place silicone molds in a cup to keep them upright. Then, add the yogurtmixture to them, leaving at least 1/4" at top to place cap on. Place in freezer for atleast 8 hours. Serve frozen. Makes approximately six 4-ounce frozen push-up pops(Go-Gurts).13
italian ice popsThis quick and easy recipe allows youto make two different delicious icepops. These pops are one of thefavorites of my Neighborhood KidsTaste-Tester Panel. And if you don'thave push-up pop molds, simply usewhatever popsicle molds you have onhand, as shown below.Lemonade & Strawberry-LemonadeÒItalian IceÓ Push-Up Pops1 cup fresh-squeezed lemon juice(about 3-4 large Meyer lemons)1/2 cup liquid pure clover or sage honey(do not use floral-flavored honey in recipes, its strong flavor overpowers)3 cups of room temperature filtered water (cold water impedes honey from dissolving)3 medium-to-large ripe organic strawberries, quarteredDirections for the Lemonade Italian Ice PopsIn your blender or VitaMix, add the lemon juice and honey. Blend until well combined.Then add the water and blend on low just a few seconds to thoroughly mix. Be sure toset aside two cups of the lemonade to make the strawberry lemonade ice pops, asdirected below. Then use the remaining lemonade to fill six 3-ounce pop molds or foursilicone push-up pop molds. Freeze Lemonade Italian Ice Pops for at least 4-6 hours.When ready to serve, run the pop mold under warm water for a few seconds toloosen before removing the mold.Directions for the Strawberry-Lemonade Italian Ice PopsPlace the quartered strawberries in your blender or VitaMix along with 1/2 cup of thereserved lemonade. Blend until well combined. Then add the remaining 1 1/2 cups ofreserved lemonade and blendon low just a few seconds tothoroughly mix. Pour StrawberryLemonade Italian Ice mixture intosix 3-ounce pop molds or foursilicone push-up pop molds andfreeze at least 4-6 hours. Whenready to serve, run the pop moldunder warm water for a fewseconds to loosen beforeremoving the mold.14
magic shell toppingThree simple real food ingredients is all ittakes to create this classic frozen treattopping! Not only is it the perfect topping forice cream sundaes, but itÕs also an easy anddelicious way to create chocolate coveredpops and bars too!1 1/2 cups dark chocolate chips(65% cacao or higher)1/3 cup coconut oil1/2 tsp pure vanilla extractIn a heat-proof dish or double-boiler, gentlymelt the chocolate and coconut oil overslightly simmering water while continuouslywhisking. Once melted and well combined,carefully remove the dish and whisk in thevanilla.Transfer the chocolate mixture to a glass jarand allow it to cool. Once the chocolate mixture is at room temperature, enjoy drizzling it on your favorite ice cream, or use it tocreate some magnificent pops, such as my favorite Chocolate Dipped Coconut CreamBars on page 8, or my hubbyÕs personal favorite Chocolate Covered Bananas on page7.Store in a sealed jar on counter for 4-5 days, or place in fridge for up to two weeks.To reheat, place jar in a bowl of warm water. (You may need to briskly whisktogether, if separation occurs).15
no bake mini cheesecakesThe warm weather of summer lends itselfto a light, refreshing no-bake dessert . Andthe wonderful thing about this recipe isthereÕs something for everyone since youcan provide a nice little assortment, usinga variety of your favorite fresh fruit toppings. I must warn you though, these areSO good, itÕs really hard to eat just one!Nutty Crust1 cup walnut baking pieces12 whole pitted organic medjjool dates2 tsp coconut oil (or butter, softened)Cheesecake Filling8 oz. organic plain (or cultured) cream cheese, room temp1/3 cup pure raw honey2 tbsp fresh squeezed lemon juice (about 1 lemon)2 tsp fresh grated lemon zest (about 1 lemon)1 cup plain organic whole milk Greek yogurtFresh Berry Topping2 1/2 cups of your favorite assorted fresh organic berriesCombine walnut pieces, pitted and halved dates and coconut oil in a food processorand process until very finely chopped. (The mixture will resemble a graham crackerstyle crust.) Line a 12-cup muffin tin with paper liners. Using your fingers, press thenut mixture into the bottom of each paper muffin liner.Carefully wipe out the food processor container and blade with a clean paper towel(or dish towel). Then add the cream cheese, honey, lemon juice and lemon zest to theclean container and process until well combined. Add the whole milk Greek yogurtand process until smooth and creamy.Divide filling evenly among the 12 muffin cups. Use your finger to even out the top ofeach muffin cup to ensure the filling is evenly distributed within each cup. Place themuffin tin in the freezer for at least two hours until frozen solid.When ready to serve, remove the muffin tin from the freezer. Then remove the minicheesecakes one at a time from the muffin tin and gently peel off the paper liners. (Oryou can place the frozen solid mini-cheesecakes Ð liners left on Ð into an airtight container and just take out what you need and keep the rest frozen for future use.)Place the paperless mini-cheesecakes on a serving platter and allow them to sit on thecounter about 20 minutes before serving. While waiting for them to thaw a bit,arrange your favorite fresh berries in a pleasing pattern across the top of each minicheesecake. Then serve and enjoy! These are SO delicious!16
red white & blueberry bomb popThis healthy version of an old classicis simply honey-sweetened, freshsqueezed lemonade flavored withcolorful fresh fruit Ð a blast ofwholesome goodness in every bite!It takes a little extra time to make thispop, but itÕs worth it for the smiles!Makes a fun patriotic treat on July 4th!Prepare the Lemonade1/2 cup fresh-squeezed lemon juice1/4 cup liquid raw clover or sage honey2 cups of room-temp filtered waterFresh organic strawberries & blueberriesIn a blender or VitaMix, add lemon juice, honey and 1/2 cup of water. Blend thoroughly until well combined. Then add the remaining 1 1/2 cups of water and blend on low,just to combine. Place the lemonade in your frig until you're ready to ma
Pops recipe on page 4, is a great way to combine flavors and create pretty striped pops. 7. And speaking of layering ingredients,it's important to be sure each layer freezes solid before adding the next layer. Also, like ingredi-ents stick together better. For example, layering several types of fruit juice bases