Transcription
Photoshop Basics: The ToolboxThe tool palette is probably one of the most frequently used parts of Adobe Photoshop. Ifyou want to make the most of Photoshop, you need to understand how to use the toolseffectively.You can pickup a tool in the toolbox simply by clicking on it. If you let your cursor sitover the tool without clicking on it, the name of that tool will appear on screen. It willlook something like this:The letter inside the brackets is the keyboard shortcut for that tool. You will find acomplete list of these shortcuts at the end of this tutorial.Tools with little black arrows in the corner have hidden tools underneath. Whenever youselect any tool from the toolbox, a series of options will appear at the top of the screenin the Options Bar. Here is an example of what part of the option bar looks like whenyou click on one of the selection tools:www.ibrett.com Brett Lamb 2004
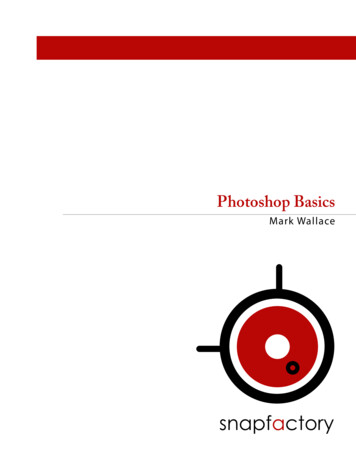
The Toolbox: A Visual GuideThere is a whole range of ‘hidden’ tools in the Adobe Photoshop toolbox.Here’s a nifty little guide to help familiarise yourself with where they’re located.www.ibrett.com Brett Lamb 2004
Photoshop basics: The ToolboxA brief description of the tools in Photoshop and what they do.The most frequently used tools are underlined.TOOLICONSHORTCUTDESCRIPTIONRectangular Marquee ToolMAllows you to make rectangular selections of theimage.Elliptical Marquee ToolMAllows you to make elliptical selections of the image.Allows you to select a single row of pixels stretchingfrom one side of the image to the other.Single Row Marquee ToolAllows you to select a single column of pixels stretchingfrom the top of the image to the bottom.Single Column Marquee ToolVAllow you to move selections and layers around thecanvas.Magic WandWThe Magic Wand allows you to select parts of theimage that are similar in colour. Adjusting theTolerance in the Options Bar when you click on thistool allows you to adjust how much the Magic Wandselects. If the tolerance is low, it will select only verysimilar colours. If the tolerance is high, it will selectcolours from a wider spectrum. Very useful forremoving backgrounds from an image.Lasso ToolLThe Lasso Tool allows you to make irregular, freehandselections of the image.Polygonal Lasso ToolLThe Polygonal Lasso Tool allows you to makepolygonal selections of the canvas – such as trianglesand other irregular, straight edged shapes.LThe Magnetic Lasso Tool is similar to the regular LassoTool although it automatic clings the edges of animage. You can adjust the settings of this tool in theOptions Bar.Move ToolMagnetic Lasso ToolCrop Toolwww.ibrett.com Brett Lamb 2004CClick on this tool, select the area of your document thatyou wish to crop and hit ‘Enter’ on your keyboard toconfirm the crop (if you’re unhappy with the area you’veselected, press the ESC key and try again).
Slice ToolKThe Slice Tool allows you to divide the image intosegments which can be exported to form a HTML table.This is useful for web design because parts of theimage can be individually optimised or used ashyperlinks. Dividing such an image into smaller partsalso makes it appear to load faster in browsers.Slice Select ToolKThis tool allows you to move and resize slices.JThe Healing Brush allows you to fix blemishes,scratches and other imperfections in images. Holddown the option key to select an area of the imagewhich is similar to the one you want to repair. Use thehealing brush to paint over the imperfection.JThis is another image retouching tool which allows youto patch areas of the image. There are three ways to dothis. First, click on the Patch Tool and select an area ofthe screen that is to be patched up. Click on Source inthe Options Bar. Drag the selected area to the region ofthe image you want to use as the patch. Clicking onDestination in the Option Bar enables you to do thereverse: select the patch, then drag it to the area youwish to patch up. Using the Options Bar, you may alsopatch up the selected area with a pattern.BThe Brush Tool is much like a conventional paint brush.When you click on the Brush Tool, you are able toselect a range of different brushes from the Option Bar.You can also set the Opacity and Flow of the brush.Select the colour of the brush by clicking on ‘SetForeground Color’ selector.Pencil ToolBThe Pencil Tool is much like a conventional pencil,except you can choose a whole range of shapes andsizes for the nib using the Options Bar. You can alsoset the opacity of the pencil.Clone Stamp ToolCThe Clone Stamp Tool allows you to clone parts of animage. A common usePattern Stamp ToolCThe Pattern Stamp Tool allows you paint a pattern onthe canvas. You can specify the sort of pattern youwould like using the Options Bar.YThe History Brush is very similar to the Clone StampTool with one important differnce: instead of allowingyou to clone part of the image, it allows you to clonepart of the image as it appears in the previous stage ofthe History. This means you can change an image andthen regain portions of it using the History Brush.Healing BrushPatch ToolBrush ToolHistory Brushwww.ibrett.com Brett Lamb 2004
Art History BrushYThe Art History Brush allows you to transformconventional images into works of art. Experiment bychoosing different styles and brush types. It’s best towork on a new layer above the original image, this willpreserve the original if you make major mistakes.EraserEAllows you to erase parts of the image. Erased areasare replaced with the Background Color.Background EraserEThis makes the erased area transparent.Magic EraserEMuch like the Magic Wand Tool, effective for removingareas of similar colour. Check ‘Contagious’ in theOptions Bar to ensure the area you remove is smooth.Gradient ToolGClick on this tool, draw a line in the canvas to create agradient from the foreground colour to the backgroundcolour. Options to create more complex gradients canbe found in the Options Bar.Paint BucketGFills an area of the screen with the foreground colour.The tolerance of this tool can be adjusted in theOptions Bar.Blur ToolRUsing this tool, you can blur part of the image, strengthof the blurring can be adjusted in the Options Bar.Sharpen ToolRUse this tool to sharped the image.Smudge ToolRUse this tool to smudge the image.Dodge ToolOUse the Dodge Tool to lighten parts of the image, youcan choose to lighten shadows, highlights or midtonesusing the Options Bar. You can also set the exposureof the Dodge Tool.Burn ToolOThe Burn Tool darkens parts of the image. Like theDodge Tool , you can choose to darken shadows,highlights or midtones using the Options Bar. You canalso set the exposure of the Burn Tool.Sponge ToolOThe Sponge Tool can be used to saturate or desaturatethe image, that is, make the colours more or less vivid.Path Selection ToolAThis line allows you to select vector graphics (the sortsof lines and shapes you can draw with the Pen Tools inPhotoshop).Direct Selection ToolAThis allows you to manipulate vector graphics such aslines, shapes and text.www.ibrett.com Brett Lamb 2004
Horizontal Type ToolTCreates horizontal type, you can adjust the size andfont in the Options Bar.Vertical Type ToolTCreates vertical type, you can adjust the size and fontin the Options Bar.Horizontal Type Mask ToolTThis creates a horizontal text shaped selection whichcan be manipulated in various ways.Vertical Type Mask ToolTThis creates a horizontal text shaped selection whichcan be manipulated in various ways.Pen ToolPThe pen tool is used to create paths, which can bemade into selections or objects that can have a strokearound the outside or be filled with colour (liketriangles, rectangles and other shapes).Freeform Pen ToolPThe Freeform Pen Tool allows you to create freehandpaths.Add Anchor Point ToolThe Freeform Pen Tool allows you to create additionalanchor points on a path, essentially giving you theability to manipulate it in very flexible ways.Delete Anchor Point ToolAllows you to change paths by deleting anchor points.Convert Point ToolAnother tool for manipulating anchor points of a path.Rectangle ToolUDraws rectangular paths.Round Rectangle ToolUDraws rounded rectangular paths.Ellipse ToolUDraws ellipses.Polygon ToolUDraws polygons.Line ToolUDraws lines.Custom Shape ToolUDraws custom shapes.Note ToolNCreates post-it notes which can be positionedthroughout the document. Useful if you’re working withother people.Audio Annotation ToolNCreates audio annotations which can be positioned onthe canvas. Useful if you’re working with other people.www.ibrett.com Brett Lamb 2004
Eye DropperIThe Eye Dropper Tool is used to select colours fromthe canvas. The selected colour becomes theForeground Color.Color Sampler ToolISelects colour information from a specified point in yourimage. You can store up to four different colours.These can be cleared using the Options Bar.Measure ToolIUsed to measure areas on the screen. Values appearin the Options Bar.Hand ToolHUsed to scroll around your document.Zoom ToolZSelect a particular area of the screen to zoom into.Holding down the Option/Alt button enables you totoggle between zoom in and zoom out.Foreground/Background Colorwww.ibrett.com Brett Lamb 2004If you click on the foreground or background colour,you will be presented with a dialogue box allowing youto select the colour you desire.
Photoshop basics: Starting a new documentWhen you launch Adobe Photoshop, you can start a document by selecting File New.You will be presented with a dialogue box asking you to specify the size and variousother parameters.Selecting the Preset Sizes submenu allows you to choose from a range of presetdocument sizes, such as A4, 640x480, Standard PAL. There is an exhaustive list ofoptions. If you’re working in video or print, two mediums which require very specificpage and screen sizes, this drop down menu quickly becomes a necessity.You can also manually input the desired size of your image. If you click the drop downmenu to the right of the height and width fields, you’ll find different forms ofmeasurement – pixels, inches, centimetres, millimetres, points, picas and columns.The resolution of your document depends on what the image is intended for. If it’s forthe web, set the resolution to 72 pixels/inch. If you’re creating a print layout, theminimum resolution should be 300 pixels/inch. The higher the resolution, the sloweryour computer will perform.You can select a range of colour modes, including Bitmap (black and white), Greyscale(shades of grey), RGB Color (colours are created using a combination of red, green andblue – best for onscreen work such as images intended for webpages), CYMK (coloursare created using a combination of Cyan, Yellow, Magenta and black – this is best forwork that is going to be printed, such as posters and magazines) and Lab Color.When you launch Photoshop with an image in the clipboard, Photoshop will automaticallyset the width and height of the new image to the dimensions of that picture (so, if yourimage is 50 pixels wide and 70 pixels high, Photoshop automatically puts these figuresinto the width and height fields.www.ibrett.com Brett Lamb 2004
Photoshop basics: Working with layersOne of the most useful aspects of Photoshop is its ability to work with multiple layers.That is, you can have multiple images stacked on top of each other. Here’s an exampleof what your document might look like if you’re working with three different layers.In this example, there are three layers. A thumbnail image of each layer is shown in theLayers Palette. Simply by dragging layers, you can rearrange their order.You can also adjust the Opacity of each layer.Here, the opacity of the top layer has been reduced to 50%. Experimenting with layersand their opacity can produce complex and sophisticated images.www.ibrett.com Brett Lamb 2004
Photoshop basics: The Layers PaletteWhen working with layers, you will need to use the Layers Palette. This palette allowsyou to reorder layers, change their opacity, create new layers, hide layers, link layersand delete layers.The opacity of a layer canbe adjusted here.Change blendingmodeClick here to lock allor parts of a layer.Click here to create a newlayer – dragging layers ontothis icon will crate a duplicateof the selected layer.Click in this space tolink a layer to thecurrently selected layerClicking on this iconwill hide/show a layer.Click here to delete alayer – or simply dragthe layer to the trash.When you’re working with multiple layers, you can manipulate the way a layer is blendedwith the layer beneath it. Here are examples of the layer blending modes available inPhotoshop.BLENDING MODENormalDissolvewww.ibrett.com Brett Lamb 2004EXAMPLE
DarkenMultiplyColor BurnLinear BurnLightenwww.ibrett.com Brett Lamb 2004
ScreenColor DodgeLinear DodgeOverlaySoft Lightwww.ibrett.com Brett Lamb 2004
Hard LightVivid LightLinear LightPin LightDifferencewww.ibrett.com Brett Lamb 2004
m Brett Lamb 2004
Photoshop basics: SelectionIf you’re going to do sophisticated work in Adobe Photoshop, you need to understandselection. Your ability to produce sophisticated imagery hinges on your ability to use theselection tools. If you wish to select parts of the image, you can use the following toolsin the toolbox.Rectangular Marquee ToolMagic WandElliptical Marquee ToolLasso ToolSingle Row Marquee ToolPolygonal Lasso ToolSingle Column Marquee ToolMagnetic Lasso ToolBecause selection is so important when you start creating sophisticated images, AdobePhotoshop has an entire menu dedicated to the ways in which you can select parts of theimage. Here’s a quick summary of the feature you’ll find in this menu:www.ibrett.com Brett Lamb 2004
MENU ITEMDESCRIPTIONAllThis allows you to select the entire image.DeselectDeselects currently selected area.ReselectReselects previously selected area.InverseSelects the inverse of your current selection.Colour Range Allows you to select a particular colour. When you selectthis item, you will be presented with a dialogue box. Youcan toggle between a black and white picture of theSelection and the Image itself. When you click on the‘Image’ button, you can choose the colour that you wantto select using the eye dropper. The selected colour rangewill be displayed in the dialogue box.Feather www.ibrett.com Brett Lamb 2004This menu item allows you to feather the area selected. Inthe following example, a rectangular area around thepicture has been selected and feathered by 10 points.Notice what happens when the selected are, which hasbeen feathered, is deleted.
(notice the slightly rounded cornerson the rectangular selection)When the feathered area is filled, the imageslowly fades into the fill colour.www.ibrett.com Brett Lamb 2004
Modify Border This constrains the image by creating a border around it.In the following example, the entire area has beenselected. A border of 15 pixels has been created using thebackground colour.Modify Border (15 pixels)Pressing delete Fills the border with the background colourwww.ibrett.com Brett Lamb 2004
Modify Smooth This smooths the selected area. In the example, anirregular selection has been made with the PolygonalSelection Tool and it has been smoothed by 10 pixels.Modify Smooth (10 pixels)Modify Expand www.ibrett.com Brett Lamb 2004Expand allows you to increase the selected area by aspecified number of pixels. In the example, a selection hasbeen made with the Lasso Tool. It has been expanded by10 pixels.
Notice that the selected area has increasedby ten pixels around the perimeter.Modify Contract Contract allows you to decrease the selected area by aspecified number of pixels. In the example, a selection hasbeen made with the Lasso Tool. It has been contracted by10 pixels.If you look closely, you will notice that the selected areahas decreased by 10 pixels all the way around theperimeter.www.ibrett.com Brett Lamb 2004
Grow www.ibrett.com Brett Lamb 2004Using Grow will increase the selected area to encompassnearby areas of similar colour. Here, an area has beenselected with the Lasso Tool and the Grow functionhas been performed. Notice how the selected areaincreases each time to incorporate areas of similar colour
Similar Transform SelectionLoad SelectionSave Selectionwww.ibrett.com Brett Lamb 2004Similar allows you to select areas of a similar colour ortone to the area currently selected. In this example, asmall area of the picture has been selected with the LassoTool. Choosing similar has selected areas of the picturethat are similar in colour.Transform Selection enables you to manually resize theselection.Allows you to load saved selections.If you find yourself frequently selecting the same area or asimilar shape, you area able to save these selections forlater use. Saved selections can be reused by going toSelection Load Selection.
Photoshop basics: The Edit menuThe Edit menu contains a range of powerful ways to manipulate the image you’reworking with. You’ll find yourself using the features under this menu quite frequently nomatter what sort of image you’re creating. Here’s a brief summary of the features you’llfind in this menu.MENU ITEMUndoDESCRIPTIONAllows you to undo the previous action.Step ForwardAllows you to move forward in the history.Step BackwardsAllows you to move backwards in the history.FadeFade allows you to fade brush strokes after drawingthem. You can also apply various blending modes tothe brush. In this example, a squiggle has beendrawn on a layer above the background using theBrush Tool. It has been faded to 70% of its originalopacity.www.ibrett.com Brett Lamb 2004
CutAllows you to cut out the selected area to pastesomewhere else.CopyCopies the selected area.Copy MergedCopies all of the visible layers into one image.PastePastes the copied selection, creating a new layer.ClearClears the selected area.Check spelling Basic spell checker.Find and ReplaceText Allows you to find and replace text, much like thetype of feature you find in a word processor.Fill Fills the selected area. You can choose from theforeground colour, background colour, pattern, 50%grey, black and white.www.ibrett.com Brett Lamb 2004
Stroke www.ibrett.com Brett Lamb 2004Creates a stroke around the selected area. In theexample, a five pixel stroke has been added to theselected area.
Free Transform Free Transform allows you to manually rotate andresize the selected area by dragging handles aroundthe selection area.Transform Under this menu you’ll find an array of vitallyimportant ways to manipulate your image, including:Scale, Rotate, Skew, Distort, Perspective, Rotate180º, Rotate 90º Clockwise, Rotate 90º CounterClockwise, Flip Horizontal and Flip Vertical. Some ofthese functions are self-explanatory. The lessobvious ones have been described here.Skewwww.ibrett.com Brett Lamb 2004
DistortPerspectiveFlip Horizontalwww.ibrett.com Brett Lamb 2004Distort allows you to move the corners of the imagehorizontally and vertically, it provides more freedomthan skew.
Flip VerticalDefine Brush Makes the selected area into a brush that can beused when using the Brush Tool, Eraser and othertools that rely on different shaped brushes.Define Pattern Turns the selected area into a pattern.PurgeAllows you to clear undo, the history and clipboard.Preset ManagerAllow you to manage the objects that appear bydefault in the Brushes, Swatches, Gradients, Styles,Patterns, Contours, Custom Shapes and Tools.www.ibrett.com Brett Lamb 2004
Photoshop basics: The image menuThe Image menu is where you can adjust the colour and size of your image. There are anumber of fundamental, frequently used image manipulation functions under this menu.MENU ITEMMode DESCRIPTIONThis menu item allows you to set the colour mode of yourdocument. The most frequently used modes includeBitmap, Grayscale, RGB Color and CYMK Color. If you’reimage is entirely black and white, chances are you’veaccidentally set the mode to Greyscale or Bitmap whencreating the document. Changing the colour mode willoften flatten the image into one layer.Adjustments This menu essentially contains a range of important colourmanipulation functions. Under this submenu, you will find:Levels, Auto Levels, Auto Color, Curves, Color Balance,Brightness/Contrast, Hue/Saturation, Desaturate, ReplaceColor, Selective Color, Chanel Mixer, Gradient Map, Invert,Equalize, Threshold, Posterize, Variations.DuplicateThis allows you to create a copy of the document in a newwindow.Image Size Allows you to chance the size of the image.Canvas Size Allows you to change the size of the canvas, the image willnot change, only the size of your workspace (unless, ofcourse, you make your workspace smaller than thepicture, in which case the original image will be cropped).www.ibrett.com Brett Lamb 2004
Rotate Canvas This allows you to rotate your entire document 180º, 90ºCW, 90º CCW, as well as by other values. It also enablesyou to flip the entire document vertically and horizontally.CropCrops the image to the selected area.www.ibrett.com Brett Lamb 2004
Photoshop basics: The Filter menuThe Filter Menu contains a range of powerful ways to manipulate your images. Examplesof some of these filters have been shown below. When creating advanced imagery inPhotoshop, you will need to have a good understanding of these filters. The best way toget to know them is simply to experiment.MENU ITEMNORMALEXAMPLEThis is the unprocessed version of the image thathas been used for these examples.Artistic ColoredPencilwww.ibrett.com Brett Lamb 2004
Artistic CutoutArtistic Dry Brush Artistic Film Grainwww.ibrett.com Brett Lamb 2004
Artistic FrescoArtistic Neon GlowArtistic Paint Daubswww.ibrett.com Brett Lamb 2004
Artistic Palette KnifeArtistic Plastic WrapArtistic Poster Edgeswww.ibrett.com Brett Lamb 2004
Artistic Rough PastelsArtistic Smudge StickArtistic Spongewww.ibrett.com Brett Lamb 2004
Artistic UnderpaintingArtistic WatercolorBlur Gaussian Blurwww.ibrett.com Brett Lamb 2004
Blur Motion BlurBlur Radial BlurBlur Smart Blurwww.ibrett.com Brett Lamb 2004
Brush Strokes Accented EdgesBrush Strokes Angled StrokesBrush Strokes CrossHatchwww.ibrett.com Brett Lamb 2004
Brush Strokes DarkStrokesBrush Strokes Ink OutlinesBrush Strokes Spatterwww.ibrett.com Brett Lamb 2004
Brush Strokes Sprayed StrokesBrush Strokes Sumi-eDistort Diffuse Glowwww.ibrett.com Brett Lamb 2004
Distort GlassDistort Ocean RippleDistort Pinchwww.ibrett.com Brett Lamb 2004
Distort Polar CoordinatesDistort RippleDistort Shearwww.ibrett.com Brett Lamb 2004
Distort SphereizeDistort TwirlDistort Wavewww.ibrett.com Brett Lamb 2004
Distort Zig ZagNoise Add NoiseNoise Dust and Scratcheswww.ibrett.com Brett Lamb 2004
Noise MedianPixelate Color HalftonePixelate Crystallizewww.ibrett.com Brett Lamb 2004
Pixelate FragmentPixelate MezzotintPixelate Mosaicwww.ibrett.com Brett Lamb 2004
Pixelate PointillizeRender CloudsCreates a random cloud in the selection based onthe background and foreground colour.Render Difference Cloudwww.ibrett.com Brett Lamb 2004
Render Lens FlareSharpen Sharpen MoreSketch Bas Reliefwww.ibrett.com Brett Lamb 2004
Sketch Chalk andCharcoalSketch CharcoalSketch Chromewww.ibrett.com Brett Lamb 2004
Sketch Conte CrayonSketch Graphic PenSketch Halftone Patternwww.ibrett.com Brett Lamb 2004
Sketch NotepaperSketch PhotocopySketch Plasterwww.ibrett.com Brett Lamb 2004
Sketch ReticulationSketch StampSketch Torn Edgeswww.ibrett.com Brett Lamb 2004
Sketch Water PaperStulize DiffuseStylize Embosswww.ibrett.com Brett Lamb 2004
Sylize ExtrudeStylize Find EdgesStylize Glowing Edgeswww.ibrett.com Brett Lamb 2004
Stylize SolarizeStylize TilesStylize Trace Contourwww.ibrett.com Brett Lamb 2004
Stylize WindTexture CraquelureTexture Grainwww.ibrett.com Brett Lamb 2004
Texture Mosaic TilesTexture PatchworkTexture Stained Classwww.ibrett.com Brett Lamb 2004
Texture Texturizerwww.ibrett.com Brett Lamb 2004
Photoshop basics: The view and windows menusThe View Menu is essential for zooming in and out and showing/hiding guides. If youdon’t see a particular palette on the screen, you can show them using the WindowsMenu.www.ibrett.com Brett Lamb 2004
Photoshop: The Basics www.ibrett.com Brett Lamb 2004 2 The Toolbox: A Visual Guide There is a whole range of 'hidden' tools in the Adobe Photoshop toolbox.


![Adobe Photoshop 2021 (Version 22.1.1) [32 64bit] [2022] - GWBC](/img/64/adobe-photoshop-2021-version-2211.jpg)