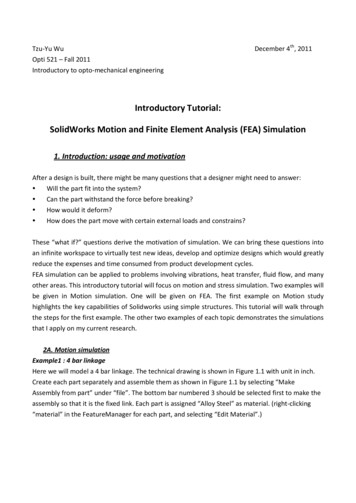
Transcription
GarageBandEssential Tutorial& WorkflowThis tutorial covers the basics behind GarageBand’s functionality andDigital Audio. It shows you how to get things up and running whilelearning some fundamentals of the digital recording process.Topics include:1.2.3.4.5.6.7.Creating a New ProjectCreating a New TrackWorking with LoopsCreating a Song with pre-recorded loopsCreating Custom drumbeatsHow to Record Software InstrumentsEditing Software Tracks
GarageBandEssential Tutorial& Workflow1. Creating a New ProjectTo create a new project, make sure the New Project tab is selected on the left menucolumn.That gives you 7 options to choose from:These are just some templates for particular types of music to get you started or youcould select Empty Project and start from scratch.Choosing a template doesn't lock you in to a particular style or project type. You're alwaysfree to add or delete any tracks you want regardless of which template you pick. Thesetemplates are just meant to be convenient starting points.Empty Project creates a blank project.Before starting you can specify your project settings by clicking the Details arrow onthe bottom left. This changes the Time Signature, Key (minor or mayor), and Tempo
(you can use Tap Tempo by clicking the button to the beat of the song you want tocreate).You can also select your Audio Input and Output.Once you've specified your project's settings, just click Choose to create the project.When you select it, you're asked to choose the type of track you're going to record.In this case we’ll work with Software Instrument (sounds from Mac), the principlesfor any kind of project are similar.
This is what your interface should look like.You notice this creates our first track, Classic Electric Piano. (You can change yourinstrument by selecting a different one from the Library that appears on the left.
And in this case it opens up the Musical Typing window because I currently don'thave a real music keyboard connected to my Mac. By typing the keys shown here, Ican play the corresponding notes through the default instrument, which again is thisClassic Electric Piano right now.Any time you want to add an instrument or sound to your recording, you have to firstcreate a new track to hold the sound you're recording or bringing in.
2. Creating a New TrackYou can create a new track by choosing new track.Or pressing Option Command N on your keyboard.Or by clicking the new track button up here. Either one of those options opens upthis new track dialog box.In here you have to decide whether it's going to be a Softer instrument track One of two types of audio or real instrument tracks A drummer track
Software instrument tracks are for recording sounds from a MIDI source. We'll begetting into this much more later, but MIDI stands for musical instrument digitalinterface.Essentially, a software track is a track where you'll either be recording your performance on aMIDI piano keyboard, or some other MIDI instrument like drums.MIDI performance is not actually a recording of sounds. It's a recording of data that tellsGarageBand things like what notes were played, how long they were held, how hard theywere hit, and so on.With this data recorded, you can play back your performance with any ofGarageBand's built-in software instruments.i.e. if you originally recorded a flute sound with just a few clicks you can change it to asaxophone, a guitar, or a piano.Another advantage of software instruments is you can easily fix wrong notes or addmissing ones. But the main takeaway right now is that software instruments arevirtual instruments.
An audio track on the other hand, is used when you want to record a realinstrument. You create a real instrument track when you intend to sing or play into amicrophone, or plug your instrument, an electric guitar for example into your Mac, orusing your iPad and the GarageBand app as an analog keyboard.The recording on a real instrument track is not data, but actual audio, so it's not as easy tofix wrong or missing notes. GarageBand does have some features that'll let you fix thingslike timing and intonation, but you don't get nearly the control you do with softwareinstruments.The real advantage of recording real instruments is that you get real instrument sounds.Now, some of the software instruments sound amazingly realistic, and they should becausethey were created with real instrument samples. But recording a real instrument track letsyou capture the sound of your own personal instrument or voice.The third type of track is a drummer track.Drummer is a tool for adding realistic drum parts to your projects which you canhighly customize to fit your song. Drummer parts change dynamically. So, it's muchmore advanced than dragging in pre-recorded drum loops, which can change toconform to the key and tempo of your song.
With a drummer track, you get fine grain control over the types of parts that are being played,down to which drums are being hit, which style of drummer is playing, and much more.Note that you can only have one drummer track per project.So, most of the time, you are going to be creating either software or audio tracks in yourprojects.QUICK REVIEWIf we select Software Instrument and click Create, that creates a second softwareinstrument track.Create another New Track, this time select an audio track.With that selected, as long as the details tab is toggled open, you can choose theinput the microphone or audio input device is connected to.You can also check the box on the right if you want to be able to monitor your playback.And below that clicking either of these arrows opens up the audio input output preferences.(You can always change settings later).
3. Working with LoopsGarageBand has nearly 2,000 loops included with it. So finding what you need canbe daunting unless you know how to efficiently browse through your selections.Clicking the letter O on yourkeyboard, or pressing theLoop button (selected inimage) on the top right sideof the interface to open theloop menu.Choose the categories forthe instrument/style youwant to narrow down yourloop search.Click on the loops to playthem and find the ones youlike best.You can also view them aslist form in differentcategories by clicking theoption below the searchbox.TIP: You can favorite loops by checking the favorite check box on the right side of the loopmenu next to the loop nameBLUE TRACKS: Audio tracksGREEN TRACKS: Software InstrumentsWhen you find the loop that you want to use, just drag it from the loop browserright onto your timeline.Notice that we have this area that says Drag Apple Loops here. You can just slide itup to the point in the project where you want it to start, and release your mouse.This way, the proper type of track is automatically created. You are now making sureyou're getting the exact sound of the instrument loop, instead of adding a loop to adifferent instrument (which you can eventually change – Explained later).
QUICK REVIEWSoftware Instrument tracks (GREEN) are mini tracks that contain not audio files, but datafiles that tell GarageBand what notes to play, how loud to play them, and so on. (RecordedData)Because they consist of data, software instrument tracks can be easily edited note bynote, and you can completely change the type of instrument playing those notes.Audio tracks (BLUE), on the other hand, are for recording real instruments like electricguitars, wind instruments, vocals, and so on. (Recorded sound shown in wavelength)
4. CREATING A SONG with pre-recorded loops.I.II.III.Create a New Empty ProjectOpen the loop menu and start by selecting the Drums. Once you found one youliked, drag and drop it on your timeline window.If you want to loop your loop, place your cursor in the upper right portion of theloop region. With this cursor you can drag out the loop as long as you want it tobe.If I needed it to be longer or shorter you could just drag it out again, in either direction.Make sure that you have Edit Snap to Gridselected here if you want it to line up exactly to thebeats.You’ve got your drums lined up now. Let’s move to the bass.IV.V.Do the same thing as the drum selection, choose your loop and drag it to yourtimeline. Loop selection as much as you want. Now you’ve got a Drum track and aBass track.Now, you can sample other instruments while you play the loop automatically sothat you don't have to constantly rewind and hit play. To do this click on the CycleRegion arrows and place the yellow bar over the region that plays both thedrums and bass, then click play and select different loops/instruments on yourloop menu. You’ll start sampling other loops with the rhythm you have justcreated.
You can change your loop settings.Click the Library button on the top left. This will openyour settings/instruments options. You can selectdifferent effect patches for your loops.With real instruments you run the existing recordingthrough effects. With software loops you canchange the instrument being played altogether.One of the greatest advantages of working with loops isthat you can change the tempo, the key and even the timesignature of your song even after you've laid down several tracks.You can change the tempo where it says bpm. (Faster or Slower)You can also change the key (Tone).You don’t want to stray very far to your original tempo or keytone so your song won’t soundartificial or weird.QUICK OVERVIEW OF TRACK OPTIONS
TRACKMute button: Mutes single track.Solo button: Plays only that track.Volume Slider: Change track’s volumeLeft and Right: Balances track sound on either side.
5. Creating custom drumbeatsYou can customize your drum set for a particular style of song that you’re trying to create.Open a New Empty Project at the Drummer option.This is what your interface will look like now.On the timeline you notice two different tracks: that is to start with two different beats.If you want to copy and paste one, just hold the Command key and drag itelsewhere on the same track. You can also loop the drum beats.On the bottom we’ve got different drummer profiles. Kyle is the default drummer, you canchange beat styles, but you need to buy the GarageBand package.Here you can use the different settings presented to change the sound of your beat.
You can move the Yellow dot around the square to change the sound from Soft toLoud, or Simple to Complex. On your left you change presets (usually a jumping off point),and on your right you can select the different parts of the drums that are being played,change its fills and swing, which essentially changes the beat.Playing with this tool is the best way to understanding its functionality.You can also select different drum kits on the Library that’s on your left. You could evenchange the drums to sound like a different instrument if you wanted to.Again, it really depends on what you want and playing with the tools given will get you moreexperience and understanding of the different drum parts.
6. How to Record Software InstrumentsYou can use the musical typing keyboard that appears when you select to open a NewSoftware Instrument track, or connect your own MIDI keyboard via USB which should beautomatically recognized by the software.BEFORE YOUR STARTTo help you keep time, GarageBand has a built-inmetronome to click off beats for you. Whenever youcreate a New Project, the metronome is on by defaultas it is here. The metronome provides a click that fallson each beat to help you keep time.You can also select this Count In option, which isalso on by default. With Count In selected,GarageBand will count in a full measure before goinginto record mode. This gives you some time to get thefeel of a song before you actually start playing.When both of these options are on (Default) yourinterface should look like this.I.Select an instrument from your Instrument Library on the left (Rememberyou can always change it later).II.To start Recording, Click the redRecord button, or R on thekeyboard.You’ll hear the metronome at the beat you’veselected, and you can now start playing with your On-screen keyboard or MIDI connectedkeyboard.
You can see here that I’ve Recorded various tracks Changed their respective volumes Loop my recordings Placed them where I wanted them to start playing.REMEMBER My tracks are all green tracks because they are all Software Instrumenttracks.
7. Editing Software TracksGarageBand lets you: Delete bad notes Move them around Stretch them out Fix their timing Insert new notes around themThe point of fixing stuff in GarageBand is so that you can quickly correct mistakes, so youspend less time trying to nail a part down, and more time crafting the entire song.TIP You don't want to go overboard with perfecting your song. Being slightly out of time or alittle off-key gives your song a definite human quality.I.To start editing your tracks, select the one you want to work on first and open yourEditing tool, which is located on the left top side of your interface (Scissors).This window will open on the bottom of your screen interface.You have your time bar on top, and notes the go up and down and a keyboard that describeseat note is displayed on the left side.In the effects section you can change the region or a couple notes. Strength TimeYou can basically move your notes to leave them exactly where you want them to, andsound at the right time, or you can delete extra notes, or create new ones.
Just Select your track and then you can start working on them individually.
GarageBand Essential Tutorial & Workflow 1. Creating a New Project To create a new project, make sure the New Project tab is selected on the left menu column. That gives you 7 options to choose from: These are just some templates for particular types of music to get you started or you could select Empty Project and start fro

