Transcription
The Basics of Music ProductionThe Complete Guide
About This Night School SeriesJust like learning an instrument and writing songs, the art of recording,arranging, and mixing takes time to learn. In this music production nightschool series we’ll introduce you to the basics, but you’ll need to continueto learn, practice, and develop a good ear in order to create great finalmixes. Today we’ll begin with setting up your home studio. In the followingweeks, we’ll show you how to record vocals and live instruments, addvirtual instruments, and create a final mix.
Lesson 1Setting Up a Home StudioIn our first lesson, we’ll take a look at the equipment you'll need to set upa home studio. You don't have to get it all, but rather pick and choosewhat you'll need to record the kind of music you want to make in yourhome.
What You’ll NeedBefore we can get to work and start learning about recording, you’ll need afew things. Recording equipment will cost you some cash, but you don’thave to spend a lot to get a lot. Here’s what we recommend:Audio InterfaceAlthough your computer likely comes with a microphone input port andyou can buy low-grade microphones to plug directly into your sound card,you won’t achieve anywhere near a high level of quality. Additionally, builtin sound cards provide little to no control over the signal. Among otheradvantages, an audio interface provides you with the ability to use highquality microphones and studio monitors (speakers). When operating on abudget, expect to spend at least 150 for a decent unit. The FocusriteScarlett 2i2, Presonus AudioBox 22VSL, and Native Instruments KompleteAudio 6 all provide two microphone inputs and good recording quality
without a high cost. If you need four inputs but can’t spend much, look atthe Presonus AudioBox 44VSL or the MOTU 4pre. Those with more roomin their budget should consider theMOTU Track16 and MOTU 896mk3, aswell as the Apogee Duet and Quartet when working on a Mac. Anyinterface on this list will work well so long it is compatible with yourcomputer. Check the system requirements before buying.Microphone(s)If you plan to record vocals or live instruments, you’ll need at least onemicrophone. Most microphones record certain instruments and soundtypes better than others. For example, theShure SM-57 is a popular choicefor recording snare drums (although it has other uses, too) and the AKG535 EB produces great vocals. You can get very specific about your micchoices, but since we’re just starting we want to find an inexpensive yetversatile option. Most anycondenser mic with a cardioid pickup pattern(we’ll discuss what this means in later lessons) in the 100-200 range will
work. On the extremely cheap side, the Behringer C-1 and SamsonC01(which we use for our podcast) produce quality recordings for under 100. For more money, the Shure SM-27-SC and Rode NT3 will offer acleaner, better sound under more circumstances. (In most cases you’llbenefit more from recording in a quiet, echo-free room than you will fromspending hundreds on microphones, but we’ll talk about that more later.)Studio MonitorsNot to be confused with computer monitor that displays a picture, studiomonitors are speakers that do their best to represent recorded sound ascleanly and accurately as possible. If you’ve never heard music through apair of even decent studio monitors, you might be blown away by thedetail they provide. Even better, you can get a good pair for a reasonableprice—much less than you’d pay for high quality entertainment speakersthat, most of the time, don’t sound as good. The Samson Resolv A6 cost 250 for a pair and work great. For a little more money, look at the Yamaha
HS50M for 150 each (you need to buy two). For a step up, considertheYamaha HS80M for 250 each (you also need to buy two of them).Regardless of what you get, you should also invest in a pair of monitorisolation pads so the sound quality of your monitors aren’t negativelyaffected by the surface you place them on.MIDI Keyboard/ControllerIf you plan to use virtual instruments in your arrangements, you’ll need aMIDI keyboard to play them. These come cheap, and you don’t needanything fancy in most cases. For under 100, you can pick up the MAudio KeyStation 49 for a compact keyboard that connects over USB. Fora few more keys, get the M-Audio KeyStation 61. These keyboards onlyprovide basic controls, however, so if you plan to manipulate yourinstruments (a common need in electronic music) you’ll want somethinglike the M-Audio Oxygen 49 instead. For those who intend to include arealistic piano, you’ll need to cough up quite a bit more money for a good
digital one. Most digital keyboards have semi-weighted keys that respondto how hard you push them, but actual pianos are a bit more complex. Asemi-weighted keyboard will not feel natural to a pianist so those whowant a realistic feel and representation of a piano need to purchase a full88-key keyboard that incorporates a graded hammer effect. For a longtime, the Yamaha P series has been one of the best values. If you plan touse a virtual piano in your work, get theYamaha P105B.MIDI Interface (Optional)Every keyboard mentioned in the previous section offers USB MIDI outputso you don’t need a MIDI interface to connect them to your computer.Some keyboards, however, only provide traditional MIDI ports. Some ofthe audio interfaces mentioned earlier (such as the Focusrite Scarlett 2i2)double as a MIDI interface and provide MIDI inputs, but if you need aseparate device the E-Mu Xmidi 1X1 is about as cheap and simple as itgets.
CablesYou’ll need a few cables to connect all your hardware. Generally anythingUSB-based comes with a USB-A to USB-B cable, so you probably won’tneed to buy any of those. Microphones, on the other hand, use an XLRinterface so you will need to purchase an XLR cable for each microphoneyou buy. Your studio monitors will also need cables to connect. Most workwith XLR just fine, but your audio interface may only allow you to use 1/4"TRS cables. Check the output options on your audio interface and theinput options on your studio monitors to ensure you get a pair that’ll work.
Digital Audio Workstation (DAW) SoftwareYou can buy all the hardware in the world, but if you don’t have recordingsoftware you can’t do much with it. When it comes to picking a DAW, youhave many options. In this series, we’ve chosen Cubase because it’spowerful, runs on both Windows and OS X, you can get a free trial, andyou can buy the entry level version (which offers plenty of power andfeatures) for under 100. You don’t have to use Cubase to follow alongwith these lessons. We’ll stick to broad concepts as much as possible andmost DAWs work in a similar fashion. If you want to look at other options,check out Reaper (only 60), Pro Tools, Digital Performer, FL Studio(Windows only), Cakewalk SONAR (Windows only). Mac users may alsowant to look at Logic Pro 9, but we’d recommend against it as Appleseems to consider Logic a very low priority and nearly all the competitionoffers a comparable feature set for less money.
Virtual InstrumentsMost DAWs come with a few low-quality virtual instruments but you’llprobably want to upgrade to something better if you intend to use themregularly in your recordings. You can find some good, free options on DSKMusic and VST Planet—or just by searching the web for the specificinstrument you need. If you want to recreate the sound of a piano or anyother real instrument, however, you’ll need to pay—sometimes a lot—forthe best. You can build out a large library of sounds quickly by purchasinga software sampler. We like Kontakt. It runs a hefty 400, but comes withseveral pianos, a decent orchestra, plenty of acoustic and electric guitars,a choir, electronic instruments, and a ton more. For even more sounds youcan purchase Goliath for 495, but East West (its creator) has frequentsales and offers it for much less. (At the time of this writing, you can getGoliath at 50% off.) East West offers plenty of great other virtualinstruments, so check them out and come back for our virtual instrumentlesson to learn about additional options.
That’s a long shopping list, but nevertheless the minimum you’ll need todo some pretty standard stuff. Of course, you won’t need everything soonly buy what you intend to use. If you want additional recommendations,read our inexpensive home recording studio buyer’s guide.Set Up Your StudioFor the most part, setting up a home recording studio just requires a lot ofplug-and-play. Nevertheless, you’ll need to know a few things to getstarted.Pick a Quiet RoomIdeally you’d record in a room that lets in little to no outside noise andyou’d acoustically treat that room to remove any reverberation.
Realistically, however, you’re going to record where you can because youdon’t have the thousands of dollars necessary to set up a professionalrecording environment. Carpeted rooms work best, and the fewerwindows you have the better. If your walls produce too muchreverberation, you can hang dense blankets on them to reduce the effect.Closing the shades on your windows also helps. You won’t be able to fixall your sound problems, but choose a carpeted room and reduce as muchreverberation as you can before you start recording.Set Up Your Studio MonitorsPlace one on each side of your computer display, on top of their monitorisolation pads. The angle at which you place your monitors greatly affectshow you hear the sound they produce, so don’t just position them straightforward and call it a day. Instead, follow these steps:1. Start by placing each at a 45 degree angle facing inward. (If yourmonitors are a good five feet away, however, a 35 degree angle willmake a better starting point.)2. Sit at your workstation and imagine a line coming out of eachmonitor in the direction their facing. The lines from both monitorsshould pass through each ear (left and right, respectively) andintersect around the back of your neck. If this isn’t the case, adjusteach monitor until it is.3. Play a monaural audio track (like this or most podcasts) and listencarefully. If the audio appears to coming from straight in front of you,you’re good to go. If it feels too far to one side, adjust your monitors
slightly until it does. Because you won’t always sit in the exact sameposition, the balance of sound might feel a tiny bit off if you havegood ears. That said, a little bit of variance shouldn’t make a bigdifference. Just do the best you can to center the sound.You may want to calibrate your monitors as well. That’s a complex topicwe don’t have time for in this lesson, but read this tutorial if you want topursue calibration.Enable Phantom Power for Your MicrophonesIn order to record you’ll need to enable phantom power for yourmicrophones on your audio interface. Nearly all condenser microphoneswith a cardioid pickup pattern—the kind we recommended you buy—require a power source (specifically, 48V). Your audio interface can provideit, but you often need to press a button or flip a switch. Consult yourinterface’s manual if you can’t find a button or switch labeled 48V on thefront panel next to each mic input.Plug Everything In and Install Your SoftwareOnce you’ve handled the previous steps, you just need to plug everythingin and install drivers and software. Depending on the hardware andsoftware you chose, the setup process will vary. In many cases, afterinstallation you won’t have to do anything else (aside from authorizing yoursoftware, perhaps). If not, consult your manuals to find out what additionalsteps you need to take to get up and running and perform a test recordingin your DAW software to ensure everything is good to go.
Lesson 2Recording AudioAfter setting up your home studio, you need to know how to use it! Thislesson will start you off on the basics of recording and getting used to yourDAW software.
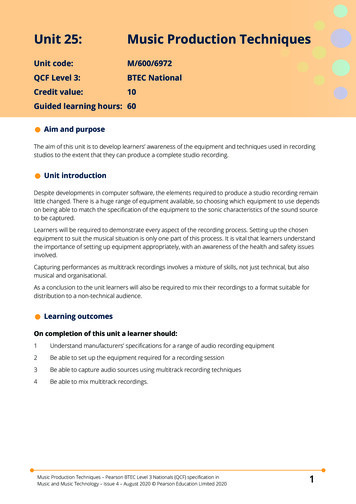
What You'll Need in This LessonIf you’ve finished the first lesson, you should have all the equipmentyou need to get started. This is the equipment (and other stuff) you’llneed to have to participate in this lesson:1Your computer with the DAW software of your choice installed(we'll be using Cubase)2A digital audio interface (with 48v phantom power) hooked up toyour computer3A microphone connected to your digital audio interface, mostlikely via XLR cable4An instrument (e.g. a guitar, your voice, etc.)5About 20-30 minutes of your timeOnce you've got everything ready, boot up your DAW software andlet's get started!Get to Know Your DAW's InterfaceInterface elements vary between different DAWs, but they embodythe same ideas. We'll use Cubase to demonstrate here, but if you'reusing something else you should find things are pretty similar. Let'stake a look at the common parts you'll need to know about.
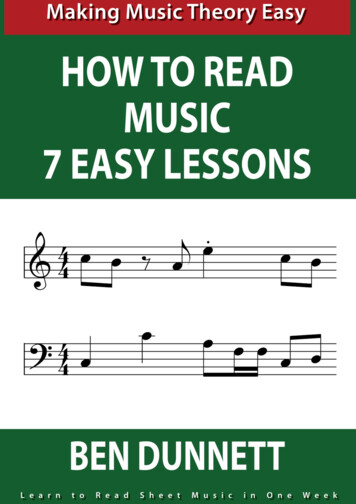
The main project window is where you'll do a lot of your work. Thiswindow lets you interact with your instruments and sounds as well asbring up individual channel settings as needed. You can do a lotmore, too, but those are the basics.
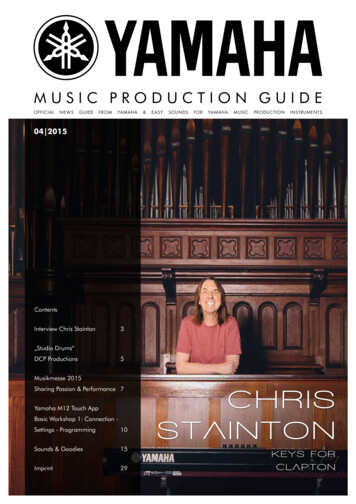
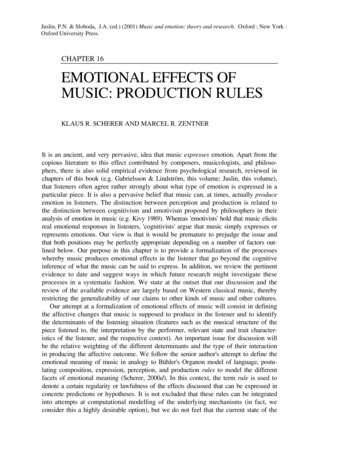
The mixer (in Cubase, this is the first of three mixers) looks like ahardware mixing board in a lot of ways. You can adjust the levels ofindividual tracks, open their channel settings, monitor the masteroutput, and keep a general eye on what's going on with your mix as itplays.The transporter does what you probably expect: it transports youaround your project. This is where you press record, stop, and play,but also where you can toggle the metronome, set time signatures,loop your project, and get information about where you currently arein your project.
The VST instruments panel isn't something you really need to knowabout until the next lesson, but it's simply where you add virtualinstruments to your project.
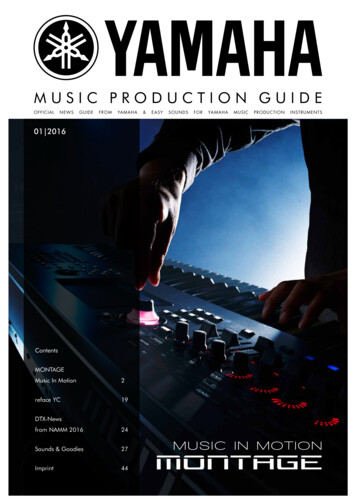
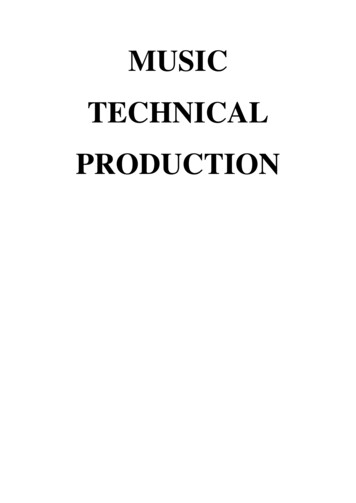
When you click the little "e" button next to an audio track you get itschannel settings. You can add input (track-specific) and send (multitrack) effects here, use the built-in EQ, and adju
The Basics of Music Production The Complete Guide. About This Night School Series Just like learning an instrument and writing songs, the art of recording, arranging, and mixing takes time to learn. In this music production night school series we’ll introduce you to the basics, but you’ll need to continue to learn, practice, and develop a good ear in order to create great final mixes .