Transcription
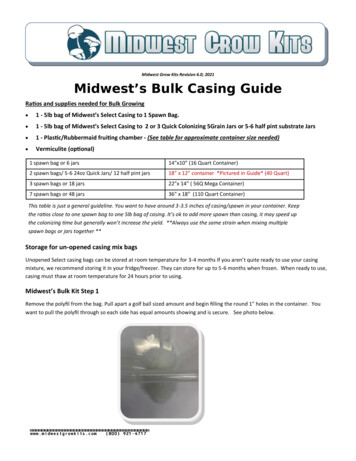
Midwest Grow Kits Revision 6.0; 2021Midwest’s Bulk Casing GuideRatios and supplies needed for Bulk Growing 1 - 5lb bag of Midwest’s Select Casing to 1 Spawn Bag. 1 - 5lb bag of Midwest’s Select Casing to 2 or 3 Quick Colonizing 5Grain Jars or 5-6 half pint substrate Jars 1 - Plastic/Rubbermaid fruiting chamber - (See table for approximate container size needed) Vermiculite (optional)1 spawn bag or 6 jars14”x10” (16 Quart Container)2 spawn bags/ 5-6 24oz Quick Jars/ 12 half pint jars18” x 12” container *Pictured in Guide* (40 Quart)3 spawn bags or 18 jars22”x 14” ( 56Q Mega Container)7 spawn bags or 48 jars36” x 18” (110 Quart Container)This table is just a general guideline. You want to have around 3-3.5 inches of casing/spawn in your container. Keepthe ratios close to one spawn bag to one 5lb bag of casing. It’s ok to add more spawn than casing, it may speed upthe colonizing time but generally won’t increase the yield. **Always use the same strain when mixing multiplespawn bags or jars together **Storage for un-opened casing mix bagsUnopened Select casing bags can be stored at room temperature for 3-4 months If you aren’t quite ready to use your casingmixture, we recommend storing it in your fridge/freezer. They can store for up to 5-6 months when frozen. When ready to use,casing must thaw at room temperature for 24 hours prior to using.Midwest’s Bulk Kit Step 1Remove the polyfil from the bag. Pull apart a golf ball sized amount and begin filling the round 1” holes in the container. Youwant to pull the polyfil through so each side has equal amounts showing and is secure. See photo below.www.midwestgrowkits.com(800) 921-4717
Preparing your ContainerWith the black plastic provided, start by cutting an ovalshape around 21” x16” in size. You can use two layers ifdesired. This will keep light from entering through thebottom of the container.Place the plastic on the bottom and trim any parts asneeded. When you add your casing and spawn it shouldgenerally be around the same height as the spawn/casing mix. (3-3.5”)
Step 2Place 2/3 to 3/4 of the casing mix on the bottom of the fruiting container and don’t forget to leave enough for top layer.Step 3Break up fully colonized spawn bag or jars into small pieces. Its best to break them up first into a separate container or bag andthen dump it into the fruiting container and mix well. Try and get the spawn mixed evenly throughout the casing mixture. If youare using jars, you may need to use a food processor or coffee grinder to break up the cake better. Jars can be very difficult tobreak up.Step 4Take the remaining casing and put a top, thin cover layer (1/2 inch to 3/4 inch) over the entire surface of the spawn/casing mixture, so that there are no exposed grains. Pat it down lightly to create a smooth surface.Mist the inside walls of the chamber with fresh clean water. Put the lid on tight. Continue to mist the walls of the chamber ona daily basis to help ensure the humidity stays elevated. Most people recommend leaving the container in the dark during thisstage but light will not hurt the mycelium development.
Step 5After 7-10 days, you need to check on the tub. If it’s 100% colonized you will see bits of white mycelium poking through the surface. Now it is time to introduce light to the fruiting chamber. Introduce light by exposing the top of the chamber to daylight or5000k light from a light source. (See our lighting kit) If you are using a blue container, you can cut a hole in the lid and tape apiece of plastic wrap over the hole to create an area for light to enter. They need light 10-12 hours per day.After 10 DaysAfter 14 DaysSoon you will start to see pins forming and mushrooms will start growing. This can take anywhere from 2 weeks up to 4 weeksdepending on the size of the container and the amount of spawn used.Pins FormingKeep misting the sides of the container each day. Bulk grows will usually flush 2-3 times with each flush producing less mushrooms each time.Note: If storing bags for extended periods without freezing check the moisture level of the casing. Grab a handful of it andsqueeze lightly. If you see a few drops of water come out its perfect. If no water drips out, add 1 cup of clean water and re-mix.Repeat until this consistency is achieved. This is known as “Field Capacity”, the perfect water ratio for growing mushrooms.
(Optional) Top Vermiculite Moisture LayerThis last step is optional, many people like to add a top layer of vermiculite. It is not needed in most cases. If you feel yourfully colonized casing is starting to become dry this is a great way to re-hydrate the casing.1.Once everything is re-colonized and pins are forming, sprinkle a 1 centimeter layer of vermiculite on the top, spreadingit out nice and even. (You will only use a portion of the 1 gallon bag provided)2.Brush it off any small pins or growing mushrooms.3.Fill the spray bottle with filtered water (bottled spring water is best), mist the entire surface until it is damp. Do not over-saturate. Repeat this process every 24-48 hours as needed. Add more vermiculite as needed after picking.Dunking?This question is asked a lot and is debated by many. Typically you will not need to dunk your bulk grow. There is enoughmoisture in the casing mix to provide 3 flushes worth of mushrooms. In all our testing, dunking or floating the cake betweenflushes does not produce notable benefits in growth and its very easy to damage the cake.Bulk grow pictures in all different sizes submitted by our customers.
Midwest Grow Kits Revision 6.; Midwest's Bulk Casing Guide Ratios and supplies needed for ulk Growing 1 -5lb bag of Midwest's Select asing to 1 Spawn ag. 1 -5lb bag of Midwest's Select asing to 2 or 3 Quick olonizing 5Grain Jars or 5-6 half pint substrate Jars 1 -Plastic/Rubbermaid fruiting chamber - See table for approximate container size needed