Transcription
Pulsar SmasherUser Manualwww.pulsar.audioPulsar Smasher - User Manual - page 1 / 18
Table of contentsTable of contents.2Introduction.3Welcome.4Our experience.4Sound and science.4Our user interfaces.4The search for the right equipment.4A final word.4The « British Mode ».5Quick start.6Installation.6Activation.6First Steps.8The user interface.9Use of parameter controls.10Parameter locking.10Using the GUI resize control.10The Toolbar.11Undo / Redo.11Preset Selection.11Save / Save As.12A / B.12Menu Button.12Oversampling settings.12Disable Static Noise option.13Other options.13The control panel.14Bypass.14Input.14Output.15Mix.15Minimum Configuration.16License agreement.17License.17Updates.17License transfer.17Activation.17Trial.17Third Party Software.17Disclaimer.18Pulsar Smasher - User Manual - page 2 / 18
IntroductionThis manual describes the features and operation of the Pulsar Smasher effect processor. To besure you understand how to use your plug-in and understand all the subtleties, please read it inits entirety.The information contained in this manual is believed to be correct at the time of publication.However, if an error has unfortunately crept into its contents, please let us know.IMPORTANT: The prolonged use of amplified instruments, speakers or headphones may causepermanent hearing loss. Ensure you monitor your exposure level, and take regular breaks. Incase of tinnitus or suspected hearing loss, please consult an ENT specialist.Pulsar Smasher - User Manual - page 3 / 18
WelcomeOur experienceThank you for choosing Pulsar Audio quality!With more than 15 years’ experience in plug-in development for the biggest names in theindustry, we decided to create Pulsar Audio to push the quality requirements of our productseven further.For each product, our quest for excellence requires us never to rest on our technicalachievements, and to expand our knowledge ever further.Sound and scienceWith solid expertise in audio signal processing, but also in electronics, sound techniques andmusic practice, we take great care in modeling all the small details and imperfections ofanalogue equipment that make the difference between a « mathematical » sound result and rich,living and musical processing, and we produce this famous « 3rd dimension » sound that is insuch demand.In addition, our close collaboration with music production professionals requires us to be rigorousin order to produce professional quality tools.Our user interfacesThe user interface of a plug-in is the link between the creative drive and the technicalimplementation; it must therefore be clear, intuitive, and as pleasant as possible to use. We takegreat care to create the most beautiful and fluid interfaces possible, with an emphasis onintuitiveness.The search for the right equipmentRarely do you find two analog machines that sound exactly the same. It is therefore important,when developing an emulation, to carefully choose the hardware units to be used as models.We only use units in perfect condition and measure them with the best recording equipment.A final wordWe hope you will enjoy this plug-in as much as we enjoyed creating it. Be sure to visit ourwebsite www.pulsar.audio and find out about updates, new products, tips and other resources.There you will also be able to contact us to ask for help or simply to tell us about yourexperience!The Pulsar TeamPulsar Smasher - User Manual - page 4 / 18
The « British Mode »The 1176 is a vintage FET (field effect transistor) compressor. Based on an internal feedbackconfiguration, these designs are known to be fast and colorful, capable from soft limiting toheavily saturated tones.The original 1176 compressor has 4 selectable ratios. But it just so happens that all 4 buttonscan be pressed at the same time, this is called “all buttons mode” or “British Mode”. Althoughprobably an unanticipated feature, this mode has become very popular because of its distorted,explosive and highly compressed sound.While prototyping FET compressor algorithms, we found a digital modification that could bemade to the algorithm that models the British Mode, that adds definition to the low-frequencytransients and makes the sound more aggressive.Based on this idea, we developed the Pulsar Smasher, a very easy to use plug-in, consisting ofan extreme and aggressive compressor, ideal for raising the level of ambiences in a drum bus,but also for adding presence to vocals, or warming up guitars or basses.Pulsar Smasher - User Manual - page 5 / 18
Quick startInstallationPulsar Smasher is available as a plug-in in VST2, VST3, AU and AAX formats for use with allmajor DAW software such as Live, Cubase, Logic, Pro Tools, etc.Installation from the supplied installer is automatic. The installer takes care of copying thedifferent plug-ins as well as presets, manual, etc. into the appropriate locations.Note: If you are using the VST2 format in Windows, you will be asked by the installer to specifythe installation folders for the 32-bit and 64-bit VST2 plug-ins respectively. The paths that seemmost appropriate for your computer will be recommended by default, but we advise you to checkthem before completing the installation. If the plug-in is not installed in the same folder as yourother possible plug-ins, your DAW software may not detect it.ActivationAll our plug-ins are protected by PACE's iLok system. For correct operation, we recommend youensure that you have the latest version of the « iLok License Manager » software, available forfree download at www.ilok.com .You can choose between three activation methods:Activation on a hardware USB dongle such as iLok 2 or iLok 3, which will enable you touse your plugin on several machines (you can order a dongle online at www.ilok.com orbuy it from your music retailer)iLok Cloud activation which will enable you to use your plugin on several machines butrequires a permanent internet connectionMachine activation, which does not require a dongle or a permanent internet connection,but only activates your plugin on one machineImportant: If you choose the iLok Cloud system, it is necessary first to open a Cloud session onyour computer by going to the « File Open Cloud Session » menu of your iLok LicenseManager. If you choose an iLok 2 or 3 dongle, it is necessary to connect it to your computerbefore any operation.When you purchase your software, you will receive:A license deposited directly onto your iLok account. Just go to the « Available » tab anddrag it to the destination of your choice (here CLOUD for a cloud license, or iLok Pulsarfor an iLok 2 or 3 dongle)An activation code. Simply paste it into the « Licenses Redeem Activation Code » menuto receive the license on your account, and drop it off at the destination of your choice(CLOUD or iLok 2 or 3 dongle)Pulsar Smasher - User Manual - page 6 / 18
iLok License Manager’s "available" license tabPulsar Smasher - User Manual - page 7 / 18
First StepsLoad the Pulsar Smasher on a track of your choice in your DAW. A good starting point is to loada basic preset corresponding to the type of the track (voice, guitar, bass, drums.). From there:Start playback and observe the gain reduction being applied, looking at the VU metersAdjust the input gain to get the level of gain reduction suggested in the preset name. Holddown the Shift key on your keyboard while adjusting the Input Gain, and the Output Gainwill automatically compensateAdjust the output gain so that the volume at the output of the compressor is the same as atthe input. This can be done by ear, using the “Bypass” switch to temporarily disable theeffect of the compressorIf necessary, adjust the amount of compressed and uncompressed sound using the “Mix”knobThis way you can quickly review many of the available factory presets for inspiration withoutgetting into technical considerations.Pulsar Smasher - User Manual - page 8 / 18
The user interfaceThe user interfaceThe user interface consists of 2 separate panels:The toolbar, common to all Pulsar Audio plug-ins (top)The control panel, specific to the Pulsar Smasher plug-in.Note that in all Pulsar Audio plug-ins, you will find a resizing control in the bottom right corner ofthe plugin interface.Pulsar Smasher - User Manual - page 9 / 18
Use of parameter controlsThe parameter control knobs have several modes of use:The normal editing mode (use a classic mouse drag, or the mouse wheel)The fine editing mode (hold the Ctrl or Cmd key while dragging or while using the mousewheel, or drag with the right mouse button)The « reset to default » action (double-click, or click while holding the Alt key)The « menu » action (right-click, or click while holding the Ctrl key)Only for some controls, the alternate edition mode (hold Shift while dragging), which canhave various functions, for example to temporarily link two parametersParameter lockingIt is possible to lock certain parameters, so that they are not changed when loading a preset. Forexample, one possible use of this feature is to set the compressor input and output gains toachieve the desired effect on a certain sound, then lock these parameters, and finally browse thelist of factory presets to find the most suitable sound.Locking the Dual Input knobTo lock a control, right-click it with the mouse, or click while holding down the Ctrl key on thekeyboard. If the control can be locked, a menu will appear offering to lock it. When a parameteris locked, a small padlock icon appears next to the control.Using the GUI resize controlLocated at the bottom right of the interface of all Pulsar Audio plugins, this control enables you toresize the plugin's interface to your liking. It comes in the form of three lines, like a classicresizing handle:Resizing handleNote that in some DAWs, this resizing can be problematic, depending on how the DAWdeveloper has designed its windowing.It is also possible, by clicking in the corner, to open a small popup window with buttons offering achoice of fixed size resizing (100% - 150%):Resizing windowPulsar Smasher - User Manual - page 10 / 18
The ToolbarLocated at the top of the plug-in interface, it contains all the functions relating to parameters,presets, communication with Pulsar Audio, etc.The toolbarUndo / RedoThe 2 arrow buttons on the left of the toolbar have the function Undo and Redo, i.e. respectivelythe cancellation and restoration of the last action. All parameter changes and more generally thestate of the plug-in are stored in a history. You can click on « Undo » at any time to return to theprevious state (or to the nth previous state) and on « Redo » to return to the current state.Note: a right-click on one of these buttons gives access to the list of stored operations.Undo / redo buttonsPreset SelectionThe preset selection area, located in the center of the bar, enables you to:Read the name of the current preset. If an asterisk appears after the preset name, itmeans that the state of the plug-in no longer corresponds to the saved presetSelect a preset from the list of available presets, arranged in sub-banksDelete the current preset (« Delete Preset » option)Rename or move a preset to another sub-bank (« Move / Rename Preset » option)Set the current preset as the one that will be loaded by default when creating a newinstance of the plugin (« Set This Preset As Default » option)Open the presets directory. This can be handy for making backups of your preset files andrestoring them. Note that renaming and reorganizing presets must be done from the pluginmenu and not by acting directly on the filesRestore factory presets. This will also overwrite any changes you have made to yourfactory presetsQuickly navigate between the presets to find inspiration, using the left and right arrowsThe preset selection areaPulsar Smasher - User Manual - page 11 / 18
Save / Save AsThe Save button saves the current preset.The Save As button saves the current state of the plug-in under a new preset name.Save and Save As buttonsA/BThis section allows you to compare 2 different states of the plug-in, or 2 different presets. Slots Aand B, accessible through these 2 buttons, represent 2 completely independent states.For example, when state A is active, you can load a preset and/or make settings from theinterface, then click on button B; then load another preset and/or make other settings; buttons Aand B now allow you to quickly switch between the two states and easily compare the 2 presetsor sets of settings.It is also possible to copy the state A to B or vice versa using the or buttons located betweenA and B.A, B and Copy buttonsMenu ButtonThe button located on the far right of the bar encompasses various options.The Menu buttonOversampling settingsThe first menu item is used to set the oversampling. Oversampling allows sound to beprocessed at a higher sampling rate within the plug-in, in return for higher latency and CPUconsumption. Oversampling is disabled by default, as all Pulsar Audio products use advancedtechnologies that allow in most cases to do without oversampling, with no compromise onquality. This makes oversampling useful mainly when you saturate a lot.Please note that Pulsar Audio products use very high-quality linear phase upsampling anddownsampling filters. This means that the x2 oversampling will generally be of higher qualitythan the x2 setting in a competitor's product, but will also be more CPU intensive.Pulsar Smasher - User Manual - page 12 / 18
Oversampling optionsThe "Offline oversampling" option enables you to choose an oversampling setting for finalrendering (and other non-real-time processing) independent of the setting applied in real time.This enables to reduce the CPU consumption during the use of the plugin, while having the bestquality during the final rendering.Disable Static Noise optionAll analog equipment introduces a hiss, mainly caused by thermal noise in the electroniccomponents, the amplitude of which differs from one model to another.In some Pulsar plug-ins, we thought it appropriate to model this noise, although at a lower levelthan in real life (often around -90 dBFS), because it contributes slightly to the character of theoriginal device.In some cases (if the output of the plug-in is strongly amplified), this noise can become audibleand undesirable, so it is possible to deactivate it using the "Disable Static Noise" option.Other optionsOther functions accessible through this menu are:Enabling / disabling the help balloonsAccess to the websiteAccess to social mediaAccess to communication with technical supportLink to this user manualPulsar Smasher - User Manual - page 13 / 18
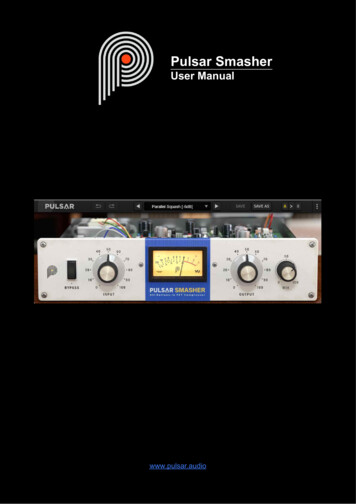
The control panelThe Smasher's control panelThe Smasher's control panel is inspired by the « blue stripe » version of a famous hardwaremachine, but with a reduced number of controls.BypassThe Bypass switch toggles between the sound processed by the plug-in (Active mode) and theunprocessed input sound (Bypass mode).Bypass switchInputThe Input knob adjusts the gain that is applied to the input signal from -24 dB to 24 dB. Thisparameter must be chosen according to the sound level of the track you are processing, andaccording to the desired effect. The higher this gain, the greater the effects of compression andsaturation (or even distortion) will be.Note: If the Shift key is pressed when adjusting this knob, the output gain knob will be adjusted inthe opposite direction.Input Gain knobPulsar Smasher - User Manual - page 14 / 18
OutputThe Output knob adjusts the gain applied after the compression stage. This is not a digital gainapplied at the output of the plug-in, but a model of the compressor output stage: above a certainlevel, increasing this potentiometer will induce saturation.Note: If the Shift key is pressed when adjusting this knob, the input gain knob will be adjusted inthe opposite direction.Output Gain knobMixThe Mix knob is used to dose the amount of compressed signal (100%) and unprocessedoriginal signal (0%). It will be very useful given the aggressive nature of the Smasher: indeed, onmany sources where using 100% would be too extreme, it is still possible to use the Smasherusing a small percentage of Mix.Mix knobPulsar Smasher - User Manual - page 15 / 18
Minimum ConfigurationThis plug-in is compatible with all major sequencers on the market (Cubase, Nuendo, Pro Tools,Logic Pro, FL Studio, Ableton Live, Bitwig, Digital Performer, Studio One, Reaper, AdobeAudition.)Available formats:VST 2.4 (Windows: 32/64-bit, Mac: 64-bit only)VST 3 (Windows: 32/64-bit, Mac: 64-bit only)AAX (Windows: 32/64-bit, Mac: 64-bit only)Audio Unit (64-bit).WindowsCPU: Intel Core i3 / i5 / i7 / XeonMemory: 4 GB RAM / 1 GB free disk spaceOperating system: Windows 7 and higherGPU: OpenGL 2.0 compatible GPU with up-to-date driversScreen resolution: minimum 1024 768 / recommended 1280 1024 or 1600 1024MacOSCPU: Intel Core i3 / i5 / i7 / Xeon / Apple Silicon(M1)Memory: 4 GB RAM / 1 GB free disk spaceOperating system: 10.9 and higherGPU: OpenGL 2.0 compatible GPU with up-to-date driversScreen resolution: minimum 1024 768 / recommended 1280 1024 or 1600 1024Pulsar Smasher - User Manual - page 16 / 18
License agreementThis license agreement concerns and describes your rights and the conditions under which youmay use your Pulsar Audio software. We recommend that you read the entire agreement. Byaccepting the present agreement or by using Pulsar Audio software, you accept all theseconditions.This license agreement applies to all Pulsar Audio software, plug-ins and programs that you mayuse during the evaluation period and/or thereafter subject to the acquisition of a license, for anyversion, update, or supplement.LicenseThe software is not sold to you: you are granted a license to use it. You are allowed to install anduse the software on as many machines as you wish. You may not rent, lend, or license thissoftware. You may not alter, decompile, disassemble, or reverse engineer this software.UpdatesThis license gives you the right to all minor updates (e. g. 1.1 to 1.2), but excludes majorversions (e. g. 1.x to 2.x).License transferYou may transfer all your rights to use the Software to another person provided that you transferthis Agreement and the Software to that other person; and that the recipient accepts the termsand conditions of this Agreement and any other provisions pursuant to which you have acquireda valid license to use this Software.ActivationPulsar Audio will not be held responsible for any failure to activate PACE's iLok protectionsystem / license.TrialPulsar Audio offers a 14-day trial license, starting at the time of transfer of the license to an iLokkey. After expiration, the plug-in can no longer be used, and in the event that no permanentlicense is acquired, it must be deleted.Third Party SoftwareVST is a registered trademark of Steinberg Media Technologies GmbH. AAX is a registeredtrademark of Avid Technology, Inc. Audio Units is a registered trademark of Apple Computer,Inc.Pulsar Smasher - User Manual - page 17 / 18
DisclaimerNeither Pulsar Audio nor anyone else who has been involved in the creation, production, ordelivery of this product shall be liable for any direct, indirect, consequential, or incidentaldamages arising out of the use or inability to use this product (including, without limitation,damages for loss of business profits, business interruption, loss of business information and thelike) even if Pulsar Audio has previously been advised of the possibility of such damages. Somejurisdictions do not allow limitations on the duration of an implied warranty or limitation ofincidental or consequential damages, in which case the above limitations or exclusions may notapply to you. This warranty gives you specific legal rights, and you may also have other rightsthat vary from jurisdiction to jurisdiction.Pulsar Smasher - User Manual - page 18 / 18
with all major DAW software such as Live, Cubase, Logic, Pro Tools, etc. Installation from the supplied installer is automatic. The installer takes care of copying the different plug-ins as well as presets, manual, etc. into the appropriate locations. Note: If you are using the VST2 format in Windows, you will be asked by the installer to