Transcription
ATOM SQHybrid MIDI Keyboard / Pad Performanceand Production ControllerOwner’s Manual www.presonus.comEnglish
Table of Contents3.2Screen Controls — 183.2.1Instrument Mode — 191Overview — 13.2.2Song Mode — 231.1Introduction — 13.2.3Editor Modes — 251.2Product Registration — 13.2.4User Mode — 291.3What’s in the box — 21.4What’s in your MyPreSonus account — 21.5Companion PreSonus Products — 31.6Firmware Updates — 32Standard Controller Mode — 42.12.24Advanced Ableton LiveIntegration — 324.1Pads — 324.1.1RGB Colors — 324.1.2Triggering Notes or Clips — 324.1.3Plus and Minus Pads — 32Setup Mode — 44.1.4Touch Strip — 32Pads — 64.1.5A-H Buttons — 332.2.1RGB Colors — 64.1.6Knobs 1-8 — 332.2.2Triggering Notes — 64.1.7Navigation Buttons — 342.2.3Plus and Minus Pads — 64.1.8Transport Buttons — 342.3Touch Strip — 72.4A-H Buttons — 72.5Knobs 1-8 — 72.6Navigation Buttons — 72.7Transport Buttons — 82.8Screen Controls — 84.2Screen Controls — 344.2.1Instrument Mode — 354.2.2Song Mode — 374.2.3Editor Mode — 384.2.4User Mode — 385Studio One Artist Quick Start — 395.1Installation and Authorization — 395.2Setting Up Studio One — 402.8.1Instrument Mode — 82.8.2Song Mode — 112.8.3Editor Modes — 125.2.1Configuring Audio Devices — 412.8.4User Mode — 135.2.2Configuring MIDI Devices — 413Advanced Studio OneIntegration — 143.1Controls — 145.3Creating a New Song — 455.3.1Configuring Your Audio I/O — 455.3.2Creating Audio andInstrument Tracks — 473.1.1Pad Controllers — 145.3.3Recording an Audio Track — 483.1.2Touch Strip — 155.3.43.1.3A-H Buttons — 15Adding Virtual Instrumentsand Effects — 483.1.4Encoders — 153.1.5Navigation Buttons — 163.1.6Transport Buttons — 163.1.7Global Controls — 16
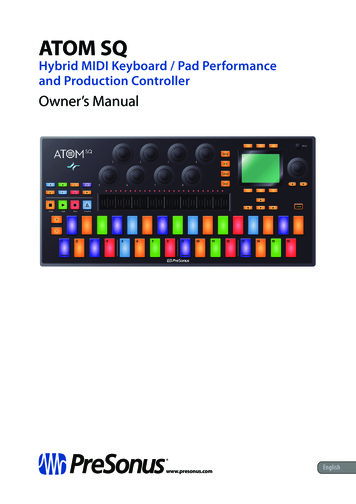
11.1ATOM SQOwner’s Thank you for purchasing the PreSonus ATOM SQ hybrid MIDI keyboard / padproduction and performance controller. ATOM SQ was designed as a versatileand expressive MIDI pad controller for contemporary music production. Itsunique design is optimized for both classic TR-style 16-step beat sequencing anddrum pattern editing in Studio One or playing instruments and launching clipsin Ableton Live—yet its staggered and RGB-lit 32-pad configuration is instantlyfamiliar to anyone who’s played a controller keyboard. Advanced features letyou change the keyboard scale, and a built-in arpeggiator and user-configurabletouch strip make the ATOM SQ the most expressive controller you’ll ever use.PreSonus Audio Electronics is committed to constant product improvement,and we highly value your suggestions. We believe the best way to achieve ourgoal of constant product improvement is by listening to the real experts: ourvalued customers. We appreciate the support you have shown us through thepurchase of this product and are confident that you will enjoy your ATOM SQ!About this manual: We suggest that you use this manual to familiarize yourself withthe features, applications, and workflows for your ATOM SQ before trying to connectit to your computer. This will help you to get better performances and faster results.Throughout this manual, you will find Power User Tips that can quickly makeyou an ATOM SQ expert and help you get the most out of your investment.1.2Product RegistrationPreSonus is committed to delivering the best experience for ourcustomers. My PreSonus is a one-stop portal for all our registeredcustomers’ needs. From your My PreSonus account, you can view allyour PreSonus hardware and software registrations; download drivers,installers, and content; contact support; track orders and more.To register your ATOM SQ:Go to My.PreSonus.com and follow the onscreen instructions.1
11.3ATOM SQOwner’s ManualOverviewWhat’s in the boxOrDownload the MyPreSonus app from the Apple App Store or Google Play.1.3What’s in the boxYour ATOM SQ package contains the following:ATOM SQ hybrid MIDI keyboard / pad production and performance controllerPreSonus ATOM SQ Quick Start Guide5’ (1.5m) USB cable1.4What’s in your MyPreSonus accountOnce you register your ATOM SQ, you will be able to download the following:Studio One Artist recording software and contentUniversal Control (necessary for firmware updates)Ableton Live LiteEDM Elite Vol. 1 LibraryDirty Electro House Library2
11.51.5OverviewCompanion PreSonus ProductsATOM SQOwner’s ManualCompanion PreSonus ProductsThanks for choosing PreSonus! As a solutions company, we believe the best way totake care of our customers (that’s you) is to ensure that you have the best possibleexperience from the beginning of your signal chain to the end. To achieve this goal,we’ve prioritized seamless integration throughout every design phase of theseproducts from day one. The result is systems that communicate with each otheras intended—straight out of the box—without excessive configuration hassles.We’re here for you. Find out more at www.presonus.com.1.6Firmware UpdatesPreSonus is committed to constant product improvement. As part of thiscommitment, we offer periodic firmware updates that add features, improvefunctionality, and resolve issues that are discovered in the field. Becauseof this, it is highly recommended that you download Universal Controlfrom your My PreSonus account after registering your ATOM SQ.Note: At the time of this manual’s publication, a firmware update is required for fullfunctionality of your ATOM SQ. You must download and install Universal Control and runthe firmware update on your unit.During installation, you will be given the option to install various PreSonusaudio drivers. No driver installation is required to use the ATOM SQ.Once installed, connect your ATOM SQ to your computer. YourATOM SQ is entirely bus-powered. If you are using a USB hub, makesure you are connecting your ATOM SQ to a powered port.Universal Control will alert you if there is new firmware available for yourATOM SQ. Clicking on the Update Firmware button will begin the update process.When the firmware update is complete, your ATOM SQ will reboot automatically.3
22.1ATOM SQOwner’s ManualStandard Controller ModeSetup Mode2Standard Controller ModeWhile ATOM SQ is seamlessly integrated with Studio One and AbletonLive, it is also a versatile controller that can be used with just aboutany production software. In Studio One and Ableton Live, ATOMSQ will automatically configure itself and be ready for use.To use ATOM SQ with other applications, you can choose fromthe following modes (See Section 2.1 for details): MIDI Mode. Standard pad or keyboard controller with the flexibility tomanually setup the controller to meet your production needs. Whilein MIDI mode, you will see two MIDI ports in the MIDI Preferencesor Options for your software: ATM SQ and ATM SQ Control. Only theATM SQ port needs to be configured to Send or Receive MIDI. Mackie MCU Mode. A hybrid control mode allowingflexibility and basic control surface support. Mackie HUI Mode. A hybrid control mode allowing flexibility and basiccontrol surface support. This is the recommended mode for Pro Tools.To use MCU or HUI modes, most software applications will require the ATOM SQ tobe set up as a control surface. Consult your application’s reference manual for setup instructions. Ensure that a Mackie MCU or Mackie HUI device has been createdand the MIDI ports are set to “ATM SQ Control” for both sending and receiving.2.1Setup ModePress the round Setup button to open Setup mode on the ATOM SQ display.Setup Mode: Page MedPressureThresholdVelocity4561. Screen. When selected, the Screen Encoder adjuststhe overall brightness of the screen2. LEDs. When selected, the Screen Encoder adjusts theoverall brightness of all pads and buttons.3. Default Settings. Resets ALL settings back to default.4
22.1ATOM SQOwner’s ManualStandard Controller ModeSetup Mode4. Pressure. When selected, the Screen Encoder changes the typeof pressure message being sent after an initial strike: Mono. Monophonic aftertouch. Poly. Polyphonic aftertouch. CC. Sends a MIDI message that can easily be MIDIlearned by software (monophonic). Off. No pressure message will be sent.Note: Monophonic aftertouch, Polyphonic aftertouch, and MIDI learn is notsupported by all applications.5. Threshold. When selected, the Screen Encoder changes howmuch pressure is needed before a pressure message is sent: Low. Not much pressure is needed to send a pressure message. Med. More pressure is needed to send a pressure message. High. The most amount of pressure needed to send a pressure message.6. Velocity. When selected, the Screen Encoder changes how ATOMSQ will interpret strikes on the pads (velocity curve): Soft. For players that prefer to strike pads lightly. Med. Suitable for most players. Hard. For players that prefer to strike pads with force.Setup Mode: Page 2123A-HClockMardi GrasBank/Oct120 BPMOffSetupMCUHUIMIDIModeModeMode4561. A-H buttons. When selected, the Screen Encoderflips the primary and secondary modes. Bank/Oct. Pessing the A-H buttons will change banks oroctaves. Pressing and holding the Shift button while using theA-H buttons will send a MIDI learnable MIDI message. CC. Pressing the A-H buttons will send a MIDI learnableMIDI message. Pressing and holding the Shift button whileusing the A-H buttons will change banks or octaves.2. Clock. When selected while in Internal clock mode, turning theScreen Encoder will change the clock’s BPM. When an ExternalClock is being sent from a host, External Clock will be displayedand BPM will not be adjustable from your ATOM SQ.3. Mardi Gras. When pressed, all buttons, pads, and LEDs will cycle on/off or change colors. Press the Mardi Gras button again to disable.5
22.2ATOM SQOwner’s ManualStandard Controller ModePads4. MCU Mode. When selected, the Transport buttons, navigationbuttons, and the display buttons for the first page of Songmode will send common Mackie MCU commands.5. HUI Mode. When selected, the Transport buttons, navigationbuttons, and the display buttons for the first page of Songmode will send common Mackie HUI commands.6. MIDI Mode. This is default mode for ATOM SQ that allows for user customization.Note: HUI and MCU mode functions will vary depending on the software applicationbeing used. Mardi Gras, MCU, HUI, and MIDI modes are not available while usingStudio One.Setup Mode: Page 3Version 1.10SetupThe last page of Setup Mode displays the firmwareversion installed on your ATOM SQ.2.2Pads2.2.1RGB ColorsPads change color depending on which pad layout mode isselected. Pad color can also be changed in certain modes.2.2.2Triggering NotesAll 32 pads are velocity sensitive. Strikes with less force result in a quiet sound,and strikes with more force result in a louder sound (unless Full Velocity or16-vel is enabled). All pads are also sensitive to pressure. After striking andpressing down on a pad, more or less pressure can be applied to control multipleexpressive parameters such as Aftertouch are available in your software.2.2.3Plus and Minus PadsThe and - pads are pressure sensitive buttons. They can be assigned to either PitchBend or Octave Up/Down commands.6
22.32.3Standard Controller ModeTouch StripATOM SQOwner’s ManualTouch StripThe touch strip adds expressive control to ATOM SQ. The touchstrip can be assigned to musical functions like Pitch Bend,Modulation Wheel, etc. See Section 2.8.4 for details.2.4A-H ButtonsThe A-H buttons can change the current drum bank or change the current Octavein Keyboard layout. In Keyboard layout, the A button is used as a momentary buttonfor Sustain (press and hold to Sustain). Alternatively, if Shift is held, the A-H buttonssend commands that can be assigned using MIDI Learn in supported software.2.5Knobs 1-8The 8 main knobs can be used to control parameters in your software.Power User Tip: These knobs have a velocity multiplier built in. Thefaster they are turned, the more quickly they reach min or max.2.6Navigation ButtonsThe Up, Down, Left, and Right navigation buttons to the left of the Shift buttonwill change their functions depending on which mode ATOM SQ is in. In MCUor HUI modes, they can go to the next or previous track or control some Zoomfunctions. In MIDI mode, these buttons can be freely assigned in your software.7
22.7ATOM SQOwner’s ManualStandard Controller ModeTransport Buttons2.7Transport ButtonsWhile in MCU and HUI modes, these are dedicated transport buttons.Some buttons have a primary and secondary command when Shift is heldat the same time. In MIDI Mode, these buttons are freely assignable.MCU/HUI mode2.8 Stop. Stops the transport from playing. Shift Stop. Undo the last command or action.This is not available in all software. Play. Starts the transport from the point of the playhead. Shift Play. Enables or disables Loop. Record. Begins recording from the point of theplayhead. This is not available in all software. Shift Record. Saves the current song. This is not available in all software. Metronome. Enables or disables the Metronome.This is not available in all software.Screen ControlsATOM SQ’s screen functions use a paging system to accommodate many differentcommands and controls. The Page Left and Page Right buttons below theScreen Encoder will page through multiple screen commands, if available.Power User Tip: To quickly jump back to the first page, press the mode button asecond time.Press a screen button to select a function or enable/disable it. Use theScreen Encoder to change the selected screen parameter value.2.8.1Instrument ModeInstrument mode will change the screen to display functions used to control a virtualinstrument and to access the Arpeggiator Mode built into the ATOM SQ firmware.2.8.1.1 Pad Configuration123PadsRangeOctaveKey0 3Pad ConfigurationChromCAllScaleRootVelocity4561. Pads. When selected, the Screen Encoder will changehow the layout of the pads appear:8
22.8ATOM SQOwner’s ManualStandard Controller ModeScreen Controls Keys. Follows the layout of a piano. White keys on the bottom laneand black keys on the top lane. If a Scale type other than Chromatic isselected, the bright pads will guide you to play the correct notes in thescale. The dim pads are considered “wrong notes” but are still playable. Blocks. Assigns one drum bank to the left side and onedrum bank to the right side. The first bank begins onPad 1 and the second bank begins on Pad 9. Continuous. Assigns all pitches from left to right starting from the bottomlane (pads 1-16), then continuing in the upper lane (pads 17-32).2. Range/Transpose. When selected, turning the Screen Encoder willeither change the viewable range of the keyboard in Key mode, ortranspose the pads in either Blocks or Continuous modes.3. Octave. When selected, the Screen Encoder will transpose thepads note assignments up or down in musical octaves (7 possibleoctaves). Octave can also be changed using the B-H buttons.4. Scale. When selected, the Screen Encoder will change the pads noteassignments and constrain them to the selected musical Scale. Chromatic, all possible notes are available Major Melodic Minor Harmonic Minor Natural Minor Major Pentatonic Minor Pentatonic Blues Dorian Minor Mixolydian Phrygian5. Root. When selected, the Screen Encoder will change the Root note of a scale (C,C#, D, D#, E, F, F#, G, G#, A, A#, B). The Root note is indicated by the green pads.6. Velocity. When selected, the Screen Encoder willtoggle between three velocity modes. All. The pads can trigger all possible velocities from 1-127 Full. The pads will send a fixed velocity of 127 16-vel. Only available when in Blocks or Continuous modes, 16-veltakes a selected MIDI note from the top lane, and maps the selectednote across 16 possible fixed velocities in the bottom lane. Pad 1 isfixed at a velocity of 7, and pad 16 is fixed at a velocity of 127.9
22.8ATOM SQOwner’s ManualStandard Controller ModeScreen Controls2.8.1.2 ArpeggiatorPress the right arrow button below the Screen Encoder tonavigate to the Arpeggiator Page. Please note: Arpeggiator Modewill only remain engaged while on the arpeggiator 161ArpRateOctaves4561. Mode. When selected, the Screen Encoder changesthe Play Mode for the Arpeggitator. Up. The arpeggio starts at the lowest held note and travels upward throughthe held notes, then returns to the lowest note as the arpeggio begins again. Down. The arpeggio starts at the highest held note andtravels downward through the held notes, then returnsto the highest note as the arpeggio begins again. Up/Down. The arpeggio starts at the lowest held note,travels upward to the highest, then travels back down tothe lowest note, and the arpeggio begins again. Down/Up. The arpeggio starts at the highest held note,travels downward to the lowest, then travels back up tothe highest note, and the arpeggio begins again. Random. The arpeggio plays the currently held notes in a random pattern. Chord. The currently held chord (or single note)is repeated as long as it is held. Input. The arpeggio pattern is derived from theorder in which notes are played and held.2. Swing. When selected, the Screen Encoder will adjust theamount of Swing that is applied to the sequence.3. Clear Sequence. Stops a held sequence.10
22.8ATOM SQOwner’s ManualStandard Controller ModeScreen Controls4. Arp. Toggles between the Arpeggiator’s Off, On, and Hold modes.5. Rate. When selected, the Screen Encoder will adjust how fast orslow the arpeggiator steps through each note in the sequence.6. Octave. When selected, the Screen Encoder will change how manyoctaves the sequence will step through before restarting.2.8.2Song ModeWhen in MCU or HUI modes, Song mode’s first page will display commonlyused functions and commands for your project. In Song mode’s second page,the screen buttons are freely MIDI assignable and are labeled as buttons1-6. In MIDI mode, only the assignable buttons appear on page 1.MCU/HUI Page 1123SoloMuteArmSongZoomCursor451. Solo. Solos the currently selected track.2. Mute. Mutes the currently selected track.3. Arm. Record arms the currently selected track.4. Zoom. When latched, the Screen Encoder as well as the NavigationLeft or Right arrows will control horizontal zooming.5. Cursor. When latched, the Screen Encoder willmove the playhead across the timeline.11
22.8ATOM SQOwner’s ManualStandard Controller ModeScreen Controls2.8.3Editor ModesPress the Editor button to access the Control Editor. This Control Editor lets youcustomize the messages sent from the different controllers on your ATOM SQ. Movea knob, press a button, touch the Touch Strip, or press a pad to edit the controller.To change the assignment of the Touch Strip from the Control Editor, you must firstput it in CC mode. This can be done from the User menu. See Section 2.1 for details.Knob 1-8, A-H buttons, or Touch Strip Editor, page 1Store toPresetResetCurrent1ControlControl Editor251CCChannelNote: Channel is not available when the touch strip is selected.Knob 1-8, or Touch Strip Editor, page 2Store toPresetResetCurrent1ControlControl Editor1127MinMaxNote: Min and Max are not available when one of the A-H buttons is selected.Pad EditorStore toPresetResetCurrent1ControlControl Editor1Channel12
22.8ATOM SQOwner’s ManualStandard Controller ModeScreen Controls2.8.4User Mode12Touch /-CCPitchPage 1Page 1KnobButton341. Touch Strip. When selected, the Screen Encoder willchange how the touch strip behaves: Range. Touching and sliding will change the viewable range in Keymode or change transposition in Blocks or Continuous modes. Mod. Touching and sliding will control Mod Wheel messagesfrom from minimum (left) to maximum (right). Pitch. Touching and sliding will control Pitch Bend messages.While active, pitch always resets to center. CC. Touching and sliding will control the CC message sentvia the strip from minimum (left) to maximum (right). Arp, the touch strip will use the 8 divisions (tall white lines) tochange the arpeggiator’s rate. From left to right: 1/4, 1/8, 1/16,1/32, 1/4T, 1/8T, 1/16T, 1/32T. In this mode, all red LEDs willremain off indicating that the Touch Strip is controlling rate.2. /-. When selected, the Screen Encoder will changehow the and - buttons behave: Pitch. The plus and minus buttons control pitch bend usingpressure. The Plus button sends pitch up and the Minus buttonsends pitch down. Releasing a button will reset back to center. Octave. The plus and minus buttons will cycle up(plus) or down (minus) through octaves.3. Knobs. When selected, the Screen Encoder will change theMIDI assignments for Knobs 1-8 (4 pages/banks total).4. A-H MIDI. When selected, the Screen Encoder will change the assignmentsfor the A-H buttons MIDI messages (2 pages/banks total).13
33.1Advanced Studio One IntegrationControls3ATOM SQOwner’s ManualAdvanced Studio One IntegrationWhen ATOM SQ is connected to Studio One, the Studio One logo light on theATOM SQ will turn blue. No setup is required. Studio One will automaticallydetect and enable your ATOM SQ for advanced integrated control.To confirm External Device settings, click on the External Devices link onthe Studio One Start page and select the ATOM SQ device. From here, youcan confirm that both the Send and Receive ports are set to “ATOM SQ.”Please note that the ATOM SQ pads, buttons, and touch strip LEDs will remain dark andthe screen will not have any functions until a New Song is created or an existing Song isopened.Once a New Song is created, all pads will turn white, the screen will default toInst (Instrument) mode and bank buttons A-H will be active, however, until anInstrument is loaded into Studio One, the pads and bank buttons have no function.3.1Controls3.1.1Pad ControllersAll 32 pads on your ATOM SQ are velocity-sensitive. Strikes with less force resultin a quiet sound, while strikes with more force result in a louder sound (unlessFull Velocity is enabled). All pads are also sensitive to pressure. After strikingand pressing down on a pad, more or less pressure can be applied to controlmultiple expressive parameters in Studio One when available (i.e. Aftertouch).The and - pads are pressure-sensitive pads only. They can beassigned to either Pitch Bend or Breath/Mod Wheel commandsThe pads on your ATOM SQ will change colors dynamically, dependingon what they are currently controlling in Studio One as follows: Impact XT. While controlling an instance of Impact XT, the pads on your ATOMSQ will match the corresponding color of each pad in Impact XT. These colorscan be changed from within Impact XT. Impact XT as 8 banks of 16 pads.Because ATOM SQ features two 16-pad banks, it will display two Impact XTbanks simultaneously for quick access to multiple banks: A/B, C/D, E/F, and G/H.Banks can be changed using the A-H bank buttons. When triggering a sound inImpact XT, the pad on your ATOM SQ will change to white while being pressed. Native Studio One or third-party virtual instruments. When controllingvirtual instruments, the pads on your ATOM SQ will reflect the current LayoutMode you have selected. For most virtual instruments, Keyboard Mode will bethe best choice. When active, Keyboard mode changing the function of theATOM SQ pads to behave in a traditional piano layout. Continuous or Scale Onlywill lay out notes from left to right starting with Pad 1. When triggering a sound,each pad on your ATOM SQ will change to Light Blue while being pressed.Note: The root of a scale will change color depending on your current track color. Pattern Editors. While the Pattern Editor in Studio One is active, the top laneof pads on your ATOM SQ can be used to select the sample or note you wouldlike to program. The bottom lane of pads control 16 steps of the Studio Onestep sequencer, allowing the programming of 16 steps in banks of 16. Thisis true for both Drum and Melodic Pattern Modes. While in a pattern mode,octaves or banks can be changed using the A-H bank buttons. A step that isOn will be at full pad brightness while a step that is Off will be very dim. As thesequence plays, the pad brightness of the current step will be slightly dim.14
33.1Advanced Studio One IntegrationControls3.1.2ATOM SQOwner’s ManualTouch StripThe touch strip adds expressive control to ATOM SQ. The touchstrip can be assigned to musical functions like Pitch Bend,Modulation Wheel, etc. See Section 3.2.1.3 for details.3.1.3A-H ButtonsUse the A-H buttons to switch the current drum bank in Impact XT or changethe current Octave in Keyboard, Continuous, or Scale Only layout Modes.In Keyboard, Continuous, and Scale Only layouts, the A button will always be orange.This button is used as a momentary button for Sustain (press and hold for Sustain).3.1.4EncodersThe 8 large encoders on your ATOM SQ can back used to control plugin parameters when a plug-in is in focus, whether the plug-in is aVirtual Instrument, Effect, or Note FX. Depending on which plug-inis in focus, the parameter mapped to each encoder will vary.All Studio One Native plug-ins have a default mapping, however, thesecontrols can be reassigned using the Control Link window. Some thirdparty plug-ins may not have a default mapping, in this case, you mustuse Control Link to assign the desired parameter to each encoder. Allcustom assignments will work in any Studio One Song, so you only haveto make the assignment once to use it anytime you open the plug-in.Power User Tip: Your ATOM SQ encoders have a built-in velocity multiplier, so the fasteryou turn them, the more quickly they will reach the minimum or maximum or theparameter range.15
33.1Advanced Studio One IntegrationControls3.1.5ATOM SQOwner’s ManualNavigation ButtonsThe Up, Down, Left, and Right navigation buttons to the left of the Shift buttonwill change their functions depending on what is in focus in Studio One. They cango to the next or previous track, navigate the Browser, or select events, notes, andArranger sections. Pressing and holding the ATOM SQ’s Shift button while pressinga navigation button will have different behaviors depending on what is in focus atthe moment. For example, pressing and holding Shift while an Event is selected,then pressing Navigation Left will add the Event on the left to the selection.3.1.6Transport ButtonsThese are dedicated Transport buttons on ATOM SQ. Each buttonhas a primary and secondary command. To access the secondarycommand, press and hold Shift while pressing a Transport button.3.1.7 Stop. Stops the transport. Shift Stop. Undo the last command or action in Studio One. Play. Starts playback from the current position. Press Play to stop playback. Shift Play. Enables or disables Loop. While enabled,the Play button will illuminate blue. Record. Starts recording from current playback position. When thePattern Editor is active, press to enable Record / Step Record. Shift Record. Saves the current Song. Metronome. Enables or disables the Metronome. Shift Metronome. Enables or disables the Precount.Global ControlsATOM SQ keeps certain commonly used controls and commands availableat all times to minimize jumping back and forth through different menus.These are accessed by pressing and holding down the Shift button whilepressing any of the A-H buttons or while turning any of the encoders.A-H buttonsWhile accessing their global functions, the A-H buttons will illuminate orange.To change these buttons to their global control functions, hold the Shift buttonwhile pressing the desired button. These are functions that are fixed. Commandsare shown on ATOM SQ’s screen while pressing and holding the Shift button.16
33.1ATOM SQOwner’s ManualAdvanced Studio One IntegrationControls123456781. Windows Show/Hide2. Select All on Track3. Copy4. Duplicate5. Redo6. Deselect All7. Paste8. DeleteEncoders 1-8Holding down the ATOM SQ’s Shift button will change the knob assignmentsto their global control functions. These are controls that are fixed.Power User Tip: Because these knobs have a velocity multiplier built-in, the faster theyare turned, the more quickly they reach the minimum or maximum value. Slow turns arebest for precise movements.152637481. Move Loop2. Vertical Zoom3. Loop Start4. Grid5. Playhead6. Horizontal Zoom7. Loop End8. Nudge17
33.2Advanced Studio One IntegrationScreen ControlsATOM SQOwner’s ManualScreen EncoderThe Screen Encoder also features a global function to change presets. If anInstrument, Effect, or Note FX Editor is in focus, pressing and holding the Shiftbutton while turning the Screen Encoder will change to the next or previouspreset. The name of the preset will also briefly show on ATOM SQ’s display.Power User Tip: Be sure to save a custom preset before changing the preset or your workwill be lost!Touch StripThe Touch Strip will control Track Volume when used with the Shift Button. WhenShift is held, touching the strip and sliding to the left will decrease the selectedtrack’s volume and sliding to the right will increase the selected track’s volume.Power User Tip: You can also change the touch strip’s primary assignment to Volumefrom the “Performance Config” menu in Inst mode.3.2Screen ControlsATOM SQ’s flexible screen puts many different commands andcontrols at your fingertips. The Page Left and Page Right buttonswill page through additional screen commands, if available.Power User Tip: To quickly jump back to the first page, press the mode button a secondtime.Use the button above or below a function to send a command, enable/disable functions, or show/hide Studio One windows. Use the Screen Encoderto change a selected screen parameter value like Octave, Rate, etc.ATOM SQ will dynamically follow what function is currently in focusin Studio One. Focus is indicated in two different ways: Arrangement, Browser, Editor, and Console. When one of these windowsis in focus on ATOM SQ, you will see a thin blue rectangle around it. Instrument, Effect, Note FX editors. When one of these editors infocus on ATOM SQ, you see a bright yellow button labeled ATOMSQ. It the
3.1.7 Global Controls — 16 3.2 Screen Controls — 18 3.2.1 Instrument Mode — 19 3.2.2 Song Mode — 23 3.2.3 Editor Modes — 25 3.2.4 User Mode — 29 4 Advanced Ableton Live Integration — 32 4.1 Pads — 32 4.1.1 RGB Colors — 32 4.1.2 Triggering Notes or Clips — 32 4.1.3 Plus and Minus Pads — 32 4.1.4 Touch Strip — 32 4.1.5 A-H .