Transcription
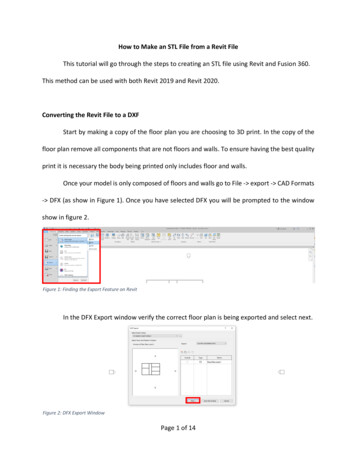
How to Make an STL File from a Revit FileThis tutorial will go through the steps to creating an STL file using Revit and Fusion 360.This method can be used with both Revit 2019 and Revit 2020.Converting the Revit File to a DXFStart by making a copy of the floor plan you are choosing to 3D print. In the copy of thefloor plan remove all components that are not floors and walls. To ensure having the best qualityprint it is necessary the body being printed only includes floor and walls.Once your model is only composed of floors and walls go to File - export - CAD Formats- DFX (as show in Figure 1). Once you have selected DFX you will be prompted to the windowshow in figure 2.Figure 1: Finding the Export Feature on RevitIn the DFX Export window verify the correct floor plan is being exported and select next.Figure 2: DFX Export WindowPage 1 of 14
You will be directed to save the file as shown in figure 3. Once ok is selected the floor planwill be exported into a DFX format.Figure 3: Saving the DFX FileExporting a DXF File into FusionFirst open a blank Fusion File. Then proceed to Open - Open from my Computer - Selectthe correct file - Open. Back on the Fusion Design Space, the floor layout should load. Pleasenote that it is only two dimensional. All these steps are illustrated in figures 4-6.Figure 4: Starting a New Fusion FilePage 2 of 14
Figure 5: Choosing Where to Open the File FromFigure 6: Floor Layout in FusionPage 3 of 14
Figure 7: Selecting the DXF FilePage 4 of 14
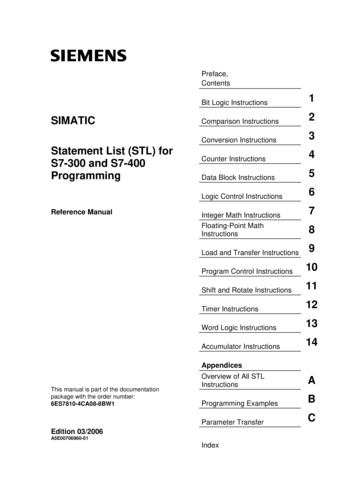
Scaling the ModelIn order to ensure that the walls and floors are extruded correctly, the model needs to befirst scaled down. The model will be scaled so the length and width of the building does notexceed 7 inches (177.8 mm). To scale the model the sketch for the floorplan has to be edited. Inthe browser tab, under sketches, find the sketch for the walls, right click and select edit sketch.In order to use the scale feature on Fusion you will need to select a point that is not partof the components being scaled. As shown in figure 8 click on the dropdown menu on the Createtab and select point, this will allow you to create a sketch point.Figure 8: Finding the Point FeatureOnce you have selected the point feature on Fusion click anywhere on the sketch to setthe point. Please ensure the point you place is outside of the floorplan as shown in figure 9.Page 5 of 14
Figure 9: Creating a PointOnce the point has been placed the next step would be to use the sketch scale feature.Click on the dropdown menu in the modify tab and select sketch scale (shown in figure 10).Figure 10: Inserting a point into the workspaceFigure 11: Finding the Sketch Scale ToolTo use the sketch scale tool, first select the entities that are to be selected. Make surethat everything that is part of the floor plan is selected, that includes everything in the sketch butthe point that was created. In the sketch scale pop up box (shown in figure 12) select point andselect the point that was drawn.Page 6 of 14
Figure 12: Sketch Scale Pop-UpOnce the entities and point have been selected, the scale factor can be designated ineither of the pop-up boxes shown in figure 13. The floorplan should be scaled down so neitherthe width or length exceeds 7 inches (1778.8 mm), this is to ensure that the floor plan fits on theUltimaker build plate. It may take multiple attempts of scaling to achieve the desired dimensions.Figure 13: Designating the Scale FactorPage 7 of 14
To check if the length and width do not exceed 7 inches, the measure feature on Fusioncan be used. Click on the dropdown menu under the Inspect tab and select Measure as shown infigure 14. To use the measure tool simply select two points, the distance between those twopoints will be displayed.Figure 15: Finding the Measure Tool on FusionFigure 14: Using the Measure ToolPage 8 of 14
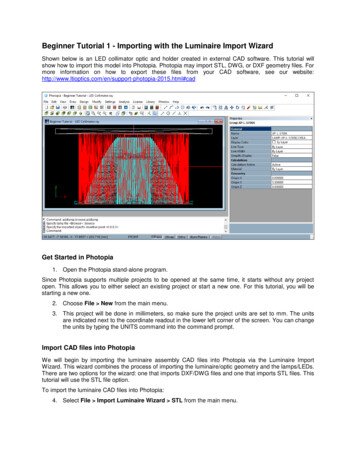
Extruding the WallsClick on the drop-down menu under the Create Tab and select Extrude (as shown in figure16).Figure 16: Finding the Extrude Tool on FusionUsing the setting shown in the Extrude pop-up in figure 16, select the floor plan andextrude it 12.5 mm.Figure 17: Using the Extrude ToolPage 9 of 14
Figure 18 shows the how the model should look like once the floors have been extruded.Figure 18: Extruded FloorsCreating the FloorIn order to create a floor a new sketch needs to be made. Under the Create Tab selectCreate Sketch.Figure 19: Finding the Create Sketch ToolPage 10 of 14
When selecting a plane to create the sketch select the outer face of the floor plan asshown in figure 20.Plane to be selected for new sketchFigure 20: Selecting the Plane for the New SketchOnce in sketch mode draw a rectangle around the perimeter of the floor plan. To draw arectangle, go the Create Tab and select Two-Point Rectangle. Draw the rectangle by selecting twopoints on the floor plan as seen in figure 21.Page 11 of 14
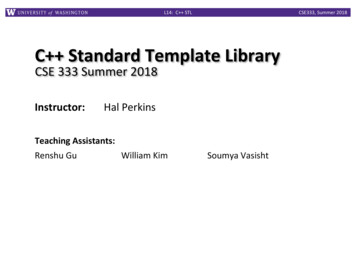
Select these pointsFigure 21: Drawing a Rectangle Around the PerimeterExit sketch mode once the rectangle has been created.Extruding the FloorUsing the same procedure described earlier extrude the floor by 2.5 mm. When selectingthe profile that needs to be extruded, it may be needed to select multiple profiles.The finished model should like the one in figure 22.Page 12 of 14
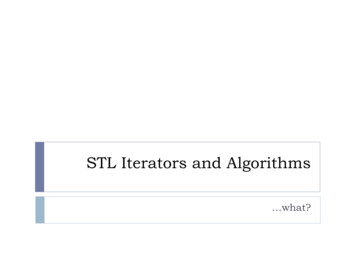
Figure 22: Finished ModelExporting as STL FileTo export as a STL file, go to the Browser Tab. Expand the bodies section and right clickon the body that corresponds to the floor plan. From the menu that appears select Save As STL(shown in figure 23).In the Save As STL pop-up do not change any of the options just hit ok and save the fileon the computer.Page 13 of 14
Figure 24: Finding the Save As STL OptionFigure 23: The Save as STL Pop-UpPage 14 of 14
Exporting as STL File To export as a STL file, go to the Browser Tab. Expand the bodies section and right click on the body that corresponds to the floor plan. From the menu that appears select Save As STL (shown in figure 23). In the Save As STL pop-up do not change any of the options just hit ok and save the file on the computer.