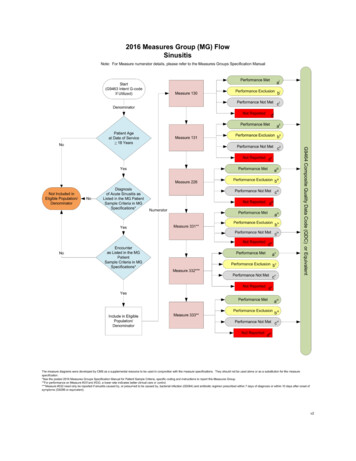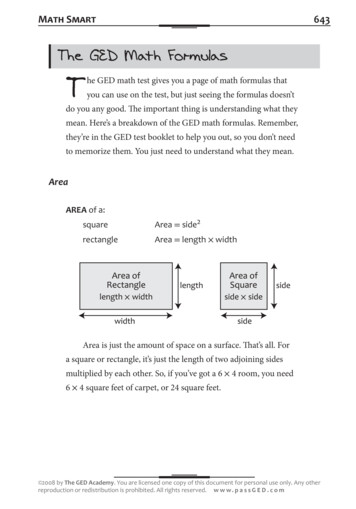
Transcription
Perfect Pantograph PatternsThe No Math, No Measure Way 2007 Cindy RothLongarm University , Inc.I have been a longarm quilter since 1995. When I started, most of the longarmmachine quilting was done with pantographs. But there were no instructions on HOWto stitch pantograph patterns. Even today, many years later, there are very fewinstructions on how to easily and efficiently stitch these patterns. Until now!With quilting in general and in machine quilting in particular, there are several ways todo anything and achieve the same result. I know that there are many different waysto stitch a pantograph pattern. The following instructions will show you how I stitchpantograph (sometimes called “edge-to-edge”) patterns. I developed this method bytrial and error over the course of several years. If you have a different (or better) wayto stitch pantographs, that’s all right with me. As long as a well stitched, well spacedpattern is created, it really doesn't make any difference HOW it is done.The No Math, No Measure method gives the look of even, all over texture on thequilt. This means that there is no “break” between the rows of the pattern on thequilt. When you look at the finished quilt, it is very hard to see where one row of thepattern ends and the next row begins. Many quilters use a technique to place thepattern which will give the look of rows or “stripes” to the quilting. While this methodmay be technically correct (meaning they do a lot of math and spend a lot of timeplacing the pattern) many people don’t like the look of quilting in rows. (I’m sure youhave seen this, there is a row of quilting, a large “empty” or un-quilted space and thenanother row of quilting. This is repeated all over the quilt top.) Many piecers don’t (orwon’t) have their quilts machine quilted because they think all machine quilting lookslike that!Materials needed:Pantograph Pattern—I am using the pattern Woodcut Camellia from the Kim DarwinCollection available at www.LongarmUniversity.comPermanent markerVis-à-vis or other water soluble marker for transparenciesPantograph Placement Guides from Longarm University ORWrite On Transparency plastic (available at most office supply stores)Weights, rulers, blue painter’s tape, etc., to hold pattern in position
Stitching a Pantograph PatternPage 2Steps to Quilting Pantograph Patterns Prepare the PatternPrepare the QuiltPrepare the LaserPlace the PatternPositioning the PattenSpace the RowsStitch First Row of the PatternStitch the Second Row of the PatternStitch the Remaining RowsStitch the Bottom of the QuiltPreparing the Pantograph PatternBefore we even begin to think about quilting, the pattern must be prepared. Place yourpattern on a flat surface (the table of the quilting machine works well). Line up a longruler or other straight edge across the top of the pattern with the ruler just touchingthe “highest point” of the pattern. Draw a straight line across the length of the patternconnecting the high points of the pattern.Repeat this process and draw a line connecting the “lowest points” of the pattern.Please note: For these instructions we will be using a pattern that has no “main motif”and that has an equal amount of “pattern” on it. Later on we will discuss placement ofpattern motifs and other issues.Measure between the lines, divide this number in half and draw a line across the lengthof the pattern, dividing it in half lengthwise. (OK, this is math, but this is the only mathyou will have to do!)Note: Some patterns may already have these linesmarked on them.Find a spot on the pattern, preferably the “highpoint” of the pattern, and draw a vertical line. Thisline should be about 10 inches or so away from theright edge of the pattern. (This is important lateron.) See the photo at the ��———————————————— 2007 Longarm University, Inc.
Stitching a Pantograph PatternPage 3Preparing the QuiltI prefer to “float” my quilt top when I put it on the quilting machine. Please refer to“Putting a Quilt on the Quilting Machine” for directions on how to do this.After I baste across the quilt top (see “Putting aQuilt on the Quilting Machine”) I like to put a row“squiggle” stitching above the basting. It willhold the fabric in place and avoid “fold over”when we are stitching the pattern. If there isenough backing fabric, I’ll stitch a straight lineusing my channel lock about 1—3 inches ABOVEthe basting line.ofChannel lock lineSquiggle stitching line & Basting linePrepare the LaserMany quilting machines have ways of adjustingthe laser light to a very fine beam. Most of the time that fine beam is not fine enough.I like to take a piece of masking tape and completely cover the tip of the laser light.Then I take the point of a safety pin and pierce the making tape in the center. This willmake an extremely fine pin-point hole in the tape for the laser light to shine though. Ihave found that the finer the beam of the laser light, the more accurate my quilting is.Place the PatternStanding at the back of the machine lay the pantograph pattern on the table, havingthe edges of the pattern extend past the raw edges of the quilt top. DO NOT PUT THEPATTERN UNDER THE PLASTIC. DO NOT LINE UP THE PATTERN TO ANY LINES ON THETABLE. Don’t worry yet about “exact” placement of the pattern. We will work on thisnext. To keep the pattern flat, place a weighted object like a translucent ruler,template, etc., on the “short” edges of the pattern.Number 1 Rule of PantographsAs far as I am concerned there are not many “rules” in longarm quilting except one.The one rule you MUST remember, especially when working with pantographs or fromthe back of the machine with the laser is:WHERE THE NEEDLE IS—THE LASER IS. WHERE THE LASER IS—THE NEEDLE IS.THEY BOTH MUST TO BE IN THE SAME PLACE TO HAVE THE PATTERN ——— 2007 Longarm University, Inc.
Stitching a Pantograph PatternPage 4Positioning the PatternStanding at the back of the machine, move themachine head and put the needle down on thestitched channel lock line, near the right edge ofthe quilt top. See the photo at the right.ck linehannel LoStitched CLeave the needle in the fabric and look at the pattern on the table. Notice where thelight from the laser is located. The laser light should be on the lower horizontalregistration line of the pattern. If the laser light is NOT on this line, carefully move thelaser until it is on the line. See photos below.Laser is NOT on the lower horizontallineLaser is now positioned correctly onthe lower horizontal ———————————————— 2007 Longarm University, Inc.
Stitching a Pantograph PatternPage 5Once the laser has been positioned DO NOT MOVE THE LASER!!! From this point onyou will be moving the PATTERN ONLY to position it prior to quilting.Lift up your needle and move the machine head to the middle of the quilt top. Put yourneedle down on the stitched channel lock line and look at where the laser is located onthe pattern. The laser should be ON the lower horizontal registration line. If it is not,MOVE THE PATTERN ONLY until the laser is correctly placed.Lift up your needle and move the machine head to the left edge of the quilt top. Putyour needle down on the stitched channel lock line and look at where the laser islocated on the pattern. The laser should be ON the lower horizontal registration line. Ifit is not, MOVE THE PATTERN ONLY until the laser is correctly placed. If desired,place small pieces of masking tape or “painter’s” tape on the long edges of the patternto keep it from moving.Left raw edge of thequilt.Right raw edge of thequiltUsing a translucent ruler or template, place it where the laser indicates the left rawedge of the quilt. This will let you know when you get to the edge of the quilt when youare stitching. See the photos below.Note: I do not to place my pattern under the plastic that is on the top of the table.I find it is hard to position the pattern under the plastic and the reflection of the laserlight off the plastic hurts my eyes when I am �� 2007 Longarm University, Inc.
Stitching a Pantograph PatternPage 6Spacing Between the Rows of the PatternAfter each row of the pattern is quilted, the quilted section is moved “up” onto the takeup roller and a new (un-quilted) work area is exposed. How the pattern is “spaced”gives your finished quilt the look of allover texture or “stripes” of quilting. Many quiltersstress over having the rows of the pattern spaced “properly”. What I do is to begin mypattern at the top of the quilt, work my way down the quilt and “whatever happens atthe bottom, happens!” Because I like the look of allover texture in my pantographquilting, I don’t worry that a “whole” row of pattern is not at the bottom. If there is apartial row of the pattern at the bottom of the quilt, that’s all right.Even though this is a “no stress” way of quilting, it does require some planning beforestarting the quilting.The photos below show the next step using the Longarm University PantographPlacement Guides available on the Longarm University websitewww.LongarmUniversity.com. You can also use “write on” Transparency plastic whichis available at most office supply stores.Place the horizontal and vertical placement lines of the Pantograph Placement Guide onthe upper horizontal line and the vertical line of the pattern. (The etched lines of theguide are against the pattern). Using a Vis-à-vis or other water soluble marker, drawthe pattern onto the plastic. See photos ��———————————————— 2007 Longarm University, Inc.
Stitching a Pantograph PatternPage 7Move the Pantograph Placement Guide to the lower edge of the pattern. Insert theVertical plastic extension into the slot to form an upside down “T”. Place the horizontaland vertical placement lines of the Guide on the lower horizontal line and the verticalline of the pattern. Look at the photo below left—the drawn pattern line at the bottomof the paper pattern is too close. If the pattern were stitched this way, the patternwould look “smooshed” together.To change the spacing, move the Pantograph Placement Guide down (away) from thelower horizontal line on the (paper) pattern until the spacing of both the drawn patternand the paper pattern looks good to you. (The horizontal etched lines on the Guide arein 1/4 inch intervals.) For this pattern I like to have about 1/4 inch between the tworows. See the photos below.XOne more thing to decide—What is going to be your “Positioning Point” on the pattern.I like to choose a “high point” or a very distinctive point of the pattern. This is whereyou will be lining up the laser when “moving” from row to row on the workspace. (Thisgets explained later on). On this pattern, my “Positioning Point” is at the X in the photoabove right.Now your pattern is ready to begin stitching.From this point forward, the only thing you will move to position your pattern onto thequilt top is your laser! DO NOT MOVE the paper pattern or the Pantograph PlacementGuide until you are finished quilting your ��———————————————— 2007 Longarm University, Inc.
Stitching a Pantograph PatternPage 8Beginning to Stitch the PatternMove the machine head back to the right edge of the quilt. Place the laser on thepattern where you want to begin stitching—usually, but not always, near the lowerhorizontal registration line. Pull up your bobbin thread and WHILE LOOKING AT THEPATTERN begin stitching your pattern.Depending on your pattern you may haveto stop your stitching line at the ruler ortemplate marking the right raw edge ofthe quilt. If this happens, stop stitching,lift your needle and gently move themachine to where the pattern begins againand begin stitching. Continue to move themachine as many times as necessary tocomplete the right edge of the pattern.See the photo at the right. Eventually youwill be working on the “main” part of thepattern. Continue to follow the lines ofthe pattern.At this point you are working on blind faith. Youhave positioned your pattern correctly andeverything will work out well. Resist the urge tolook up at your stitching line. If you must look atyour stitching line, stop your stitching, put yourneedle down (to keep the machine from moving)then look at your stitching. It is looking prettygood but you still have the rest of the row tofinish. See the photo at the right. Notice thatthe pattern is being stitched onto the �� 2007 Longarm University, Inc.
Stitching a Pantograph PatternPage 9Begin stitching again and work until the laser is up to the translucent ruler or templateyou have placed on the pattern to indicate the left raw edge of the quilt. Depending onyour pattern you may have to stop your stitching line at the ruler or template markingthe left raw edge of the quilt. If this happens,stop stitching, lift your needle and gently movethe machine to where the pattern begins againand begin stitching. Continue to move themachine and begin stitching again as manytimes as necessary to complete the stitching atthe left edge of the pattern. The first row ofyour pantograph is now completed. See thephoto at the right. (Photo is taken from thefront, or needle side of the machine.)Notice that the first row of stitching went “off”the quilt at the top edge and there is stitching inthe batting. That is what I wanted to happen! The extra stitching will be trimmedaway later on.Move the machine back to the right edge of the quilting machine and roll the quilt up onthe take up roller to expose the next area to be quilted.Preparing to Quilt the Second Row of the PatternStand at the front (needle) side of the machine. Find on the quilted pattern the“Positioning Point” of your pattern. The Positioning Point is shown in the circle in thephoto at the lower left. Put your needle down at this point. See the photo below ��———————————————— 2007 Longarm University, Inc.
Stitching a Pantograph PatternPage 10Walk around to the back of the machine and look at where the laser light beam is onthe (paper) pattern.Do you remember Rule #1 of Pantograph quilting? WHERE THE NEEDLE IS—THE LASERIS. WHERE THE LASER IS—THE NEEDLE IS. THEY BOTH NEED TO BE IN THE SAMEPLACE TO HAVE THE PATTERN STITCH CORRECTLY.Look at the photos below. Are the laser and the needle in the SAME place? No, they arenot. To get them in the same place, carefully move the laser until it is on the“Positioning Point” of the pattern.Notice in the photo at the upper right that thelaser is NOT on the Positioning Point of thepattern.In the photo in the lower right the laser IS onthe Positioning Point. Once the laser is in thecorrect place, you can begin stitching thesecond row.Before I begin stitching, I double check the pattern placement as follows—Move the machine (not the laser) until the laser light is on the “low point” of the(paper) pattern. Now look at the where the needle is on the quilt top. Does it look likethere is the same amount of “space” between the stitching and the needle as there ison the pattern? If so, move to the next low point of the pattern and check again.When you are satisfied with the pattern placement begin stitching the second row asthe first ———————————————— 2007 Longarm University, Inc.
Stitching a Pantograph PatternPage 11The photo at the left shows two rows of thepattern stitched on the quilt. Because therows of the pattern have been “spaced” fairlyclose together you can’t really see where onerow of stitching ends and another row begins.That is what I want to see!Continue rolling up the quilt onto the take up roller, placing the needle down on the“Positioning Point” of the pattern from the front, adjusting the laser so that is correctlyplaced on the paper pattern, checking the placement of the pattern, then quiltingacross the quilt top, for each row until you reach the lower edge of the quilt.What If? What if your spacing gets “messed up” and you wind up with a larger spacebetween the stitched rows of pattern as shown in the photo below left? Not a problem!After the row of pattern is stitched and before I roll up the quilt onto the take up roller,from the front (needle) side of the machine, I will add some free hand stitching to fill inthe “open” space. See the photo at the lower right. Keep the free hand design similarto the pattern and no one will ever know that you “messed ��———————————————— 2007 Longarm University, Inc.
Stitching a Pantograph PatternPage 12The Bottom Edge of the QuiltWhen the bottom edge of the quilt top is in your workspace, baste across the lowerraw edge of the quilt top to secure the quilt top and the batting to the backing fabric.(Refer to “Putting a Quilt on the Quilting Machine” instructions).Place your needle down on the basting line and mark this point on the (paper) pattern.I like to use a “slat” from a mini blind or youcan use a yardstick or anything else to make a“physical” break on the (paper) pattern. Seethe photo at the right.When you are stitching the pattern, stitch up tothe slat (or whatever you are using). Lift yourneedle up and gently move the machine to thenext area to be quilted. Continue this wayacross the row.The photo at the right shows the bottomedge of the quilt. Notice how the threadhas been “dragged” across to the nextarea to be — 2007 Longarm University, Inc.
Stitching a Pantograph PatternPage 13Here are some problems you may encounter when you are stitching pantographpatterns.Problem #1: you may not be able to begin your pattern placement or stitching “off” thequilt into the top of the batting as shown on Page 8. The main reason for this would beif your backing is “just long enough” and you were not able to float the quilt top. Oryou are not able to float the quilt top with enough space to stitch the pattern into thebatting.Problem #2: the pattern you are using has “empty” spaces (spaces that have noquilting) in the pattern. This would make the top of the quilt have un-quilted areas andthe un-quilted areas won’t match the density of the quilting in the rest of the quilt.Solution to Problem #1 and #2: Remember when we divided the pattern in halflengthwise on Page 2? Use this line on the pattern to line up the top raw edge of thequilt. If necessary, use a “slat” from a mini blind or a yardstick or anything else tomake a “physical” break on the (paper) pattern.When you begin stitching the to half of thepattern, stitch up to the slat (or whatever youare using). Lift your needle up and gently movethe machine to the next area to be quilted.Continue this way across the row.The photo at the right shows the pattern AroundCorners with a mini blind slat positioned slightlybelow the line at the middle of the pattern. Thedashed line above the slat is lined up to the topraw edge of the quilt.Solution: Place the Pantograph Placement Guide so thatthe left edge of the guide is at the raw edge of the quilt.Using a Vis-à-vis marker, redraw elements of the patternto make it “work” for the quilt and for ease in quilting. Inthe photo at the right, the areas that I re-drew are inwhite. You can see how this would make the quilting mucheasier and make the edge of the quilt look neater.Raw edge of the quiltProblem #3: The pattern ends abruptly at the raw edge ofthe quilt or will look “jagged” if it is quilted exactly as it ison the pattern.I have shown this done at the left raw edge of the quilt,but it can be done on the right raw edge �———————————————— 2007 Longarm University, Inc.
The No Math, No Measure method gives the look of even, all over texture on the quilt. This means that there is no "break" between the rows of the pattern on the quilt. When you look at the finished quilt, it is very hard to see where one row of the pattern ends and the next row begins. Many quilters use a technique to place the