Transcription
VERITAS Volume Manager 4.1Troubleshooting GuideSolarisN13114FMarch 2005
DisclaimerThe information contained in this publication is subject to change without notice. VERITAS SoftwareCorporation makes no warranty of any kind with regard to this manual, including, but not limited to,the implied warranties of merchantability and fitness for a particular purpose. VERITAS SoftwareCorporation shall not be liable for errors contained herein or for incidental or consequential damagesin connection with the furnishing, performance, or use of this manual.VERITAS Legal NoticeCopyright 2005 VERITAS Software Corporation. All rights reserved. VERITAS and theVERITAS Logo are trademarks or registered trademarks of VERITAS Software Corporation or itsaffiliates in the U.S. and other countries. Other names may be trademarks of their respective owners.VERITAS Software Corporation350 Ellis StreetMountain View, CA 94043USAPhone 650–527–8000 Fax 650–527–2908www.veritas.comThird-Party Legal NoticesData Encryption Standard (DES) CopyrightCopyright 1990 Dennis Ferguson. All rights reserved.Commercial use is permitted only if products that are derived from or include this software are made available for purchase and/or use inCanada. Otherwise, redistribution and use in source and binary forms are permitted.Copyright 1985, 1986, 1987, 1988, 1990 by the Massachusetts Institute of Technology. All rights reserved.Export of this software from the United States of America may require a specific license from the United States Government. It is the responsibilityof any person or organization contemplating export to obtain such a license before exporting.WITHIN THAT CONSTRAINT, permission to use, copy, modify, and distribute this software and its documentation for any purpose and withoutfee is hereby granted, provided that the above copyright notice appear in all copies and that both that copyright notice and this permission noticeappear in supporting documentation, and that the name of M.I.T. not be used in advertising or publicity pertaining to distribution of the softwarewithout specific, written prior permission. M.I.T. makes no representations about the suitability of this software for any purpose. It is provided asis without express or implied warranty.Sun Microsystems TrademarksSun, Solaris, SunOS, Java, Sun Java System Cluster, Sun StorEdge, Solstice DiskSuite, Sun Fire, Sun Enterprise, Online: Backup, and Netra aretrademarks or registered trademarks of Sun Microsystems, Inc. in the United States and other countries.All SPARC trademarks are used under license and are trademarks or registered trademarks of SPARC International, SPARC trademarks are basedupon an architecture developed by Sun Microsystems, Inc.iiVERITAS Volume Manager Troubleshooting Guide
ContentsPreface . . . . . . . . . . . . . . . . . . . . . . . . . . . . . . . . . . . . . . . . . . . . . . . . . . . . . . . . . . . . . . viiHow This Guide Is Organized . . . . . . . . . . . . . . . . . . . . . . . . . . . . . . . . . . . . . . . . . . . . . . .viiConventions . . . . . . . . . . . . . . . . . . . . . . . . . . . . . . . . . . . . . . . . . . . . . . . . . . . . . . . . . . . . . viiiGetting Help . . . . . . . . . . . . . . . . . . . . . . . . . . . . . . . . . . . . . . . . . . . . . . . . . . . . . . . . . . . . . . ixDocumentation Feedback . . . . . . . . . . . . . . . . . . . . . . . . . . . . . . . . . . . . . . . . . . . . . . . . . . . ixChapter 1. Recovery from Hardware Failure . . . . . . . . . . . . . . . . . . . . . . . . . . . . . . . . . 1Listing Unstartable Volumes . . . . . . . . . . . . . . . . . . . . . . . . . . . . . . . . . . . . . . . . . . . . . . . . . 2Displaying Volume and Plex States . . . . . . . . . . . . . . . . . . . . . . . . . . . . . . . . . . . . . . . . . . . 2Understanding the Plex State Cycle . . . . . . . . . . . . . . . . . . . . . . . . . . . . . . . . . . . . . . . . . . . 3Recovering an Unstartable Mirrored Volume . . . . . . . . . . . . . . . . . . . . . . . . . . . . . . . . . . . 5Recovering an Unstartable Volume with a Disabled Plex in the RECOVER State . . . . 6Forcibly Restarting a Disabled Volume . . . . . . . . . . . . . . . . . . . . . . . . . . . . . . . . . . . . . . . . 7Clearing the Failing Flag for a Disk . . . . . . . . . . . . . . . . . . . . . . . . . . . . . . . . . . . . . . . . . . . . 7Reattaching Failed Disks . . . . . . . . . . . . . . . . . . . . . . . . . . . . . . . . . . . . . . . . . . . . . . . . . . . . . 8Failures on RAID-5 Volumes . . . . . . . . . . . . . . . . . . . . . . . . . . . . . . . . . . . . . . . . . . . . . . . . . 9System Failures . . . . . . . . . . . . . . . . . . . . . . . . . . . . . . . . . . . . . . . . . . . . . . . . . . . . . . . . . . 9Disk Failures . . . . . . . . . . . . . . . . . . . . . . . . . . . . . . . . . . . . . . . . . . . . . . . . . . . . . . . . . . . 10Default Startup Recovery Process for RAID-5 . . . . . . . . . . . . . . . . . . . . . . . . . . . . . . 11Recovering a RAID-5 Volume . . . . . . . . . . . . . . . . . . . . . . . . . . . . . . . . . . . . . . . . . . . . 12Recovery After Moving RAID-5 Subdisks . . . . . . . . . . . . . . . . . . . . . . . . . . . . . . . . . . 15Starting RAID-5 Volumes . . . . . . . . . . . . . . . . . . . . . . . . . . . . . . . . . . . . . . . . . . . . . . . . 15Recovering from Incomplete Disk Group Moves . . . . . . . . . . . . . . . . . . . . . . . . . . . . . . . 18Recovery from Failure of a DCO Volume . . . . . . . . . . . . . . . . . . . . . . . . . . . . . . . . . . . . . 19iii
Recovering a Version 0 DCO . . . . . . . . . . . . . . . . . . . . . . . . . . . . . . . . . . . . . . . . . . . . . 21Recovering a Version 20 DCO . . . . . . . . . . . . . . . . . . . . . . . . . . . . . . . . . . . . . . . . . . . . 22Chapter 2. Recovery from Failure of Instant Snapshot Operations . . . . . . . . . . . . 25Failure of vxsnap prepare . . . . . . . . . . . . . . . . . . . . . . . . . . . . . . . . . . . . . . . . . . . . . . . . . . 25Failure of vxsnap make for Full-Sized Instant Snapshots . . . . . . . . . . . . . . . . . . . . . . . . 26Failure of vxsnap make for Break-Off Instant Snapshots . . . . . . . . . . . . . . . . . . . . . . . . 26Failure of vxsnap make for Space-Optimized Instant Snapshots . . . . . . . . . . . . . . . . . 27Failure of vxsnap restore . . . . . . . . . . . . . . . . . . . . . . . . . . . . . . . . . . . . . . . . . . . . . . . . . . . 27Failure of vxsnap reattach or refresh . . . . . . . . . . . . . . . . . . . . . . . . . . . . . . . . . . . . . . . . . 27Copy-on-write Failure . . . . . . . . . . . . . . . . . . . . . . . . . . . . . . . . . . . . . . . . . . . . . . . . . . . . . 28I/O Errors During Resynchronization . . . . . . . . . . . . . . . . . . . . . . . . . . . . . . . . . . . . . . . . 29I/O Failure on a DCO Volume . . . . . . . . . . . . . . . . . . . . . . . . . . . . . . . . . . . . . . . . . . . . . . 29Chapter 3. Recovery from Boot Disk Failure . . . . . . . . . . . . . . . . . . . . . . . . . . . . . . . 31Possible root, swap, and usr Configurations . . . . . . . . . . . . . . . . . . . . . . . . . . . . . . . . . . 31Booting from Alternate Boot Disks . . . . . . . . . . . . . . . . . . . . . . . . . . . . . . . . . . . . . . . . . . . 32The Boot Process on SPARC Systems . . . . . . . . . . . . . . . . . . . . . . . . . . . . . . . . . . . . . . . . . 33Hot-Relocation and Boot Disk Failure . . . . . . . . . . . . . . . . . . . . . . . . . . . . . . . . . . . . . . . . 34Unrelocating Subdisks to a Replacement Boot Disk . . . . . . . . . . . . . . . . . . . . . . . . . 34Recovery from Boot Failure . . . . . . . . . . . . . . . . . . . . . . . . . . . . . . . . . . . . . . . . . . . . . . . . . 35Boot Device Cannot be Opened . . . . . . . . . . . . . . . . . . . . . . . . . . . . . . . . . . . . . . . . . . 35Cannot Boot From Unusable or Stale Plexes . . . . . . . . . . . . . . . . . . . . . . . . . . . . . . . . 36Invalid UNIX Partition . . . . . . . . . . . . . . . . . . . . . . . . . . . . . . . . . . . . . . . . . . . . . . . . . . 37Incorrect Entries in /etc/vfstab . . . . . . . . . . . . . . . . . . . . . . . . . . . . . . . . . . . . . . . . . . 38Missing or Damaged Configuration Files . . . . . . . . . . . . . . . . . . . . . . . . . . . . . . . . . . 39Repairing Root or /usr File Systems on Mirrored Volumes . . . . . . . . . . . . . . . . . . . . . . 41Recovering a Root Disk and Root Mirror from Backup Tape . . . . . . . . . . . . . . . . . . 41Re-Adding and Replacing Boot Disks . . . . . . . . . . . . . . . . . . . . . . . . . . . . . . . . . . . . . . . . 45Re-Adding a Failed Boot Disk . . . . . . . . . . . . . . . . . . . . . . . . . . . . . . . . . . . . . . . . . . . 45Replacing a Failed Boot Disk . . . . . . . . . . . . . . . . . . . . . . . . . . . . . . . . . . . . . . . . . . . . . 47ivVERITAS Volume Manager Troubleshooting Guide
Recovery by Reinstallation . . . . . . . . . . . . . . . . . . . . . . . . . . . . . . . . . . . . . . . . . . . . . . . . . . 48General Reinstallation Information . . . . . . . . . . . . . . . . . . . . . . . . . . . . . . . . . . . . . . . . 48Reinstalling the System and Recovering VxVM . . . . . . . . . . . . . . . . . . . . . . . . . . . . . 49Chapter 4. Logging Commands and Transactions . . . . . . . . . . . . . . . . . . . . . . . . . . 59Logging Commands . . . . . . . . . . . . . . . . . . . . . . . . . . . . . . . . . . . . . . . . . . . . . . . . . . . . . . . 59Logging Transactions . . . . . . . . . . . . . . . . . . . . . . . . . . . . . . . . . . . . . . . . . . . . . . . . . . . . . . 61Associating Command and Transaction Logs . . . . . . . . . . . . . . . . . . . . . . . . . . . . . . . . . . 63Chapter 5. Backing Up and Restoring Disk GroupConfigurations . . . . . . . . . . . . . . . . . . . . . . . . . . . . . . . . . . . . . . . . . . . . . . . . . . . . . . . . 65Backing Up a Disk Group Configuration . . . . . . . . . . . . . . . . . . . . . . . . . . . . . . . . . . . . . . 66Restoring a Disk Group Configuration . . . . . . . . . . . . . . . . . . . . . . . . . . . . . . . . . . . . . . . . 67Resolving Conflicting Backups for a Disk Group . . . . . . . . . . . . . . . . . . . . . . . . . . . . 68Chapter 6. Error Messages . . . . . . . . . . . . . . . . . . . . . . . . . . . . . . . . . . . . . . . . . . . . . . 71Logging Error Messages . . . . . . . . . . . . . . . . . . . . . . . . . . . . . . . . . . . . . . . . . . . . . . . . . . . . 71Configuring Logging in the Startup Script . . . . . . . . . . . . . . . . . . . . . . . . . . . . . . . . . . . . 72Understanding Messages . . . . . . . . . . . . . . . . . . . . . . . . . . . . . . . . . . . . . . . . . . . . . . . . . . . 73Messages . . . . . . . . . . . . . . . . . . . . . . . . . . . . . . . . . . . . . . . . . . . . . . . . . . . . . . . . . . . . . . 75Index . . . . . . . . . . . . . . . . . . . . . . . . . . . . . . . . . . . . . . . . . . . . . . . . . . . . . . . . . . . . . . .123Contentsv
viVERITAS Volume Manager Troubleshooting Guide
PrefaceThe VERITAS Volume Manager Troubleshooting Guide provides information about how torecover from hardware failure, and how to understand and deal with VERITAS VolumeManager (VxVM) error messages during normal operation. It includes guidelines forrecovering from the failure of disks and other hardware upon which virtual softwareobjects such as subdisks, plexes and volumes are constructed in VxVM. Information isalso included on how to configure command and transaction logging, and to back up andrestore disk group configurations.This guide assumes that you have a: Basic knowledge of the SolarisTM operating system (OS). Basic understanding of Solaris system administration. Basic understanding of storage management in VxVM.Note Most VERITAS Volume Manager commands require superuser or other appropriateprivileges.How This Guide Is OrganizedThis guide is organized as follows: Recovery from Hardware Failure Recovery from Failure of Instant Snapshot Operations Recovery from Boot Disk Failure Logging Commands and Transactions Backing Up and Restoring Disk Group Configurations Error MessagesRefer to the Release Notes for information about the other documentation that is providedwith this product.vii
aceUsed for path names,commands, output, directoryand file names, functions, andparameters.Read tunables from the/etc/vx/tunefstab file.monospace(bold)Indicates user input.# ls pubsitalicIdentifies book titles, newterms, emphasized text, andvariables replaced with aname or value.See the User’s Guide for details.Depicts GUI objects, such asfields, list boxes, menuselections, etc. Also depictsGUI commands.Enter your password in the Passwordfield.blue textIndicates hypertext links.See “Getting Help” on page ix.#Unix superuser prompt (allshells).# cp /pubs/4.0/user book/release mgnt/4.0/archiveC:\ Windows user prompt.boldSee the ls(1) manual page for moreinformation.C:\ dir pubsThe variable system name indicates thesystem on which to enter the command.Press Return.C:\ copy \pubs\4.0\user bookc:\release mgnt\4.0\archiveviiiVERITAS Volume Manager Troubleshooting Guide
Getting HelpGetting HelpFor technical assistance, visit http://support.veritas.com and select phone or emailsupport. This site also provides access to resources such as TechNotes, product alerts,software downloads, hardware compatibility lists, and the VERITAS customer emailnotification service. Use the Knowledge Base Search feature to access additional productinformation, including current and past releases of product documentation.Diagnostic tools are also available to assist in troubleshooting problems associated withthe product. These tools are available on disc or can be downloaded from the VERITASFTP site. See the README.VRTSspt file in the /support directory for details.For license information, software updates and sales contacts, eritas.jsp. For information onpurchasing product documentation, visit http://webstore.veritas.com.Documentation FeedbackYour feedback on product documentation is important to us. Send suggestions forimprovements and reports on errors or omissions to foundation docs@veritas.com.Include the title and part number of the document (located in the lower left corner of thetitle page), and chapter and section titles of the text on which you are reporting. Our goalis to ensure customer satisfaction by providing effective, quality documentation. Forassistance with topics other than documentation, visit http://support.veritas.com.Prefaceix
Documentation FeedbackxVERITAS Volume Manager Troubleshooting Guide
1Recovery from Hardware FailureVERITAS Volume Manager (VxVM) protects systems from disk and other hardwarefailures and helps you to recover from such events. This chapter describes recoveryprocedures and information to help you prevent loss of data or system access due to diskand other hardware failures.If a volume has a disk I/O failure (for example, because the disk has an uncorrectableerror), VxVM can detach the plex involved in the failure. I/O stops on that plex butcontinues on the remaining plexes of the volume.If a disk fails completely, VxVM can detach the disk from its disk group. All plexes on thedisk are disabled. If there are any unmirrored volumes on a disk when it is detached,those volumes are also disabled.Note Apparent disk failure may not be due to a fault in the physical disk media or thedisk controller, but may instead be caused by a fault in an intermediate or ancillarycomponent such as a cable, host bus adapter, or power supply.The hot-relocation feature in VxVM automatically detects disk failures, and notifies thesystem administrator and other nominated users of the failures by electronic mail.Hot-relocation also attempts to use spare disks and free disk space to restore redundancyand to preserve access to mirrored and RAID-5 volumes. For more information, see the“Administering Hot-Relocation” chapter in the VERITAS Volume Manager Administrator’sGuide.Recovery from failures of the boot (root) disk requires the use of the special proceduresdescribed in “Recovery from Boot Disk Failure” on page 31. The chapter also includesprocedures for repairing the root (/) and usr file systems.1
Listing Unstartable VolumesListing Unstartable VolumesAn unstartable volume can be incorrectly configured or have other errors or conditionsthat prevent it from being started. To display unstartable volumes, use the vxinfocommand. This displays information about the accessibility and usability of volumes:# vxinfo [-g diskgroup] [volume .]The following example output shows one volume, mkting, as being sgenrootswapS tartedU nstartableS tartedStartedStartedDisplaying Volume and Plex StatesTo display detailed information about the configuration of a volume including its stateand the states of its plexes, use the following form of the vxprint command:# vxprint [-g diskgroup] -hvt [volume .]The following example shows a disabled volume, vol, which has two clean plexes,vol-01 and vol-02, each with a single subdisk:# vxprint -g mydg -hvt volDisk group: HEPARENTVOL LOGVOLSNAPVOLDCOvplsdplsdvolvol-01volmydg11-01 vol-01vol-02volmydg12-01 LENGTHREADPOL PREFPLEXUTYPELAYOUTNCOL/WIDMODE[COL/]OFF DEVICE MODE[COL/]OFF AM/NMMODE[COL/]OFF DEVICE ee the “Creating and Administering Plexes” and “Administering Volumes” chapters inthe VERITAS Volume Manager Administrator’s Guide for a description of the possible plexand volume states.2VERITAS Volume Manager Troubleshooting Guide
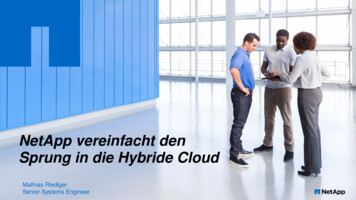
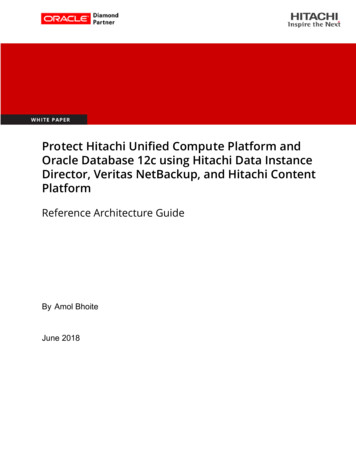
Understanding the Plex State CycleUnderstanding the Plex State CycleChanging plex states are part of normal operations, and do not necessarily indicateabnormalities that must be corrected. A clear understanding of the various plex states andtheir interrelationship is necessary if you want to be able to perform the recoveryprocedures described in this chapter.The figure, “Main Plex State Cycle,” shows the main transitions that take place betweenplex states in VxVM. (For more information about plex states, see the chapter “Creatingand Administering Plexes” in the VERITAS Volume Manager Administrator’s Guide.)Main Plex State CycleStart up(vxvol start)PS: CLEANPS: ACTIVEPKS: DISABLEDPKS: ENABLEDShut down(vxvol stop)PS Plex StatePKS Plex Kernel StateAt system startup, volumes are started automatically and the vxvol start task makes allCLEAN plexes ACTIVE. At shutdown, the vxvol stop task marks all ACTIVE plexesCLEAN. If all plexes are initially CLEAN at startup, this indicates that a controlledshutdown occurred and optimizes the time taken to start up the volumes.The figure, “Additional Plex State Transitions” on page 4, shows additional transitionsthat are possible between plex states as a result of hardware problems, abnormal systemshutdown, and intervention by the system administrator.When first created, a plex has state EMPTY until the volume to which it is attached isinitialized. Its state is then set to CLEAN. Its plex kernel state remains set to DISABLEDand is not set to ENABLED until the volume is started.Chapter 1, Recovery from Hardware Failure3
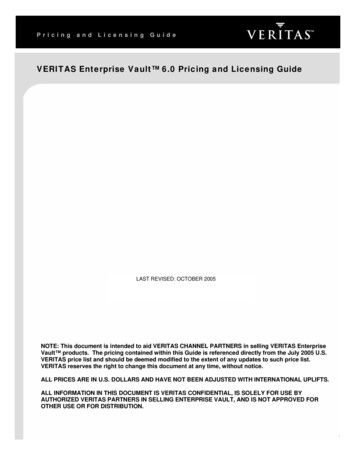
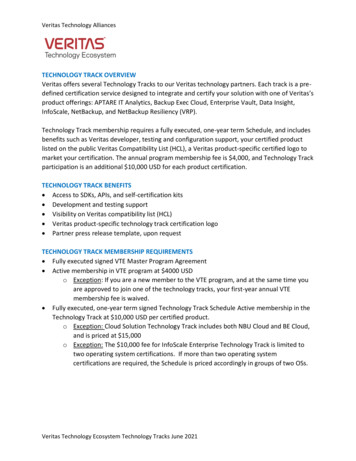
Understanding the Plex State CycleAdditional Plex State TransitionsCreate plexPS: EMPTYPKS: DISABLEDPS: ACTIVEPKS: DISABLEDAfter crashand reboot(vxvol start)Initialize plex(vxvol init clean)Start up(vxvol start)PS: CLEANPKS: DISABLEDShut down(vxvol stop)Recover data(vxvol resync)Take plex offline(vxmend off)PS: ACTIVEPKS: ENABLEDPS: OFFLINEPKS: DISABLEDResync data(vxplex att)Put plex online(vxmend on)UncorrectableI/O failurePS Plex StateResyncPS: IOFAILfailsPKS: DETACHEDPS: STALEPKS: DETACHEDPKS Plex Kernel StateAfter a system crash and reboot, all plexes of a volume are ACTIVE but marked with plexkernel state DISABLED until their data is recovered by the vxvol resync task.A plex may be taken offline with the vxmend off command, made available again usingvxmend on, and its data resynchronized with the other plexes when it is reattached usingvxplex att. A failed resynchronization or uncorrectable I/O failure places the plex inthe IOFAIL state.“Recovering an Unstartable Mirrored Volume” on page 5, and subsequent sectionsdescribe the actions that you can take if a system crash or I/O error leaves no plexes of amirrored volume in a CLEAN or ACTIVE state.For information on the recovery of RAID-5 volumes, see “Failures on RAID-5 Volumes”on page 9 and subsequent sections.4VERITAS Volume Manager Troubleshooting Guide
Recovering an Unstartable Mirrored VolumeRecovering an Unstartable Mirrored VolumeA system crash or an I/O error can corrupt one or more plexes of a mirrored volume andleave no plex CLEAN or ACTIVE. You can mark one of the plexes CLEAN and instruct thesystem to use that plex as the source for reviving the others as follows:1. Place the desired plex in the CLEAN state using the following command:# vxmend [-g diskgroup] fix clean plexFor example, to place the plex vol01-02 in the CLEAN state:# vxmend -g mydg fix clean vol01-022. To recover the other plexes in a volume from the CLEAN plex, the volume must bedisabled, and the other plexes must be STALE. If necessary, make any other CLEAN orACTIVE plexes STALE by running the following command on each of these plexes inturn:# vxmend [-g diskgroup] fix stale plex3. To enable the CLEAN plex and to recover the STALE plexes from it, use the followingcommand:# vxvol [-g diskgroup] start volumeFor example, to recover volume vol01:# vxvol -g mydg start vol01For more information about the vxmend and vxvol command, see the vxmend(1M) andvxvol(1M) manual pages.Note Following severe hardware failure of several disks or other related subsystemsunderlying all the mirrored plexes of a volume, it may be impossible to recover thevolume using vxmend. In this case, remove the volume, recreate it on hardware thatis functioning correctly, and restore the contents of the volume from a backup orfrom a snapshot image.Chapter 1, Recovery from Hardware Failure5
Recovering an Unstartable Volume with a Disabled Plex in the RECOVER StateRecovering an Unstartable Volume with a Disabled Plex inthe RECOVER StateA plex is shown in the RECOVER state if its contents are out-of-date with respect to thevolume. This can happen if a disk containing one or more of the plex’s subdisks has beenreplaced or reattached. If a plex is shown as being in this state, it can be recovered asfollows:1. Use the following command to force the plex into the OFFLINE state:# vxmend [-g diskgroup] -o force off plex2. Place the plex into the STALE state using this command:# vxmend [-g diskgroup] on plex3. If there are other ACTIVE or CLEAN plexes in the volume, use the followingcommand to reattach the plex to the volume:# vxplex [-g diskgroup] att plex volumeIf the volume is already enabled, resynchronization of the plex is started immediately.If there are no other clean plexes in the volume, use this command to make the plexDISABLED and CLEAN:# vxmend [-g diskgroup] fix clean plex4. If the volume is not already enabled, use the following command to start it, andpreform any resynchronization of the plexes in the background:# vxvol [-g diskgroup] -o bg start volumeNote If the data in the plex was corrupted, and the volume has no ACTIVE orCLEAN redundant plexes from which its contents can be resynchronized, itmust be restored from a backup or from a snapshot image.6VERITAS Volume Manager Troubleshooting Guide
Forcibly Restarting a Disabled VolumeForcibly Restarting a Disabled VolumeIf a disk failure caused a volume to be disabled, and the volume does not contain anyvalid redundant plexes, you must restore the volume from a backup after replacing thefailed disk. Any volumes that are listed as Unstartable must be restarted using thevxvol command before restoring their contents from a backup:# vxvol [-g diskgroup] -o bg -f start volumeThe -f option forcibly restarts the volume, and the -o bg option resynchronizes its plexesas a background task. For example, to restart the volume myvol so that it can be restoredfrom backup, use the following command:# vxvol -g mydg -o bg -f start myvolClearing the Failing Flag for a DiskIf I/O errors are intermittent rather than persistent, VERITAS Volume Manager sets thefailing flag on a disk, rather than detaching the disk. Such errors can occur due to thetemporary removal of a cable, controller faults, a partially faulty LUN in a disk array, or adisk with a few bad sectors or tracks.If the hardware fault is not with the disk itself (for example, it is caused by problems withthe controller or the cable path to the disk), you can use the vxedit command to unsetthe failing flag after correcting the source of the I/O error.Caution Do not unset the failing flag if the reason for the I/O errors is unknown. Ifthe disk hardware truly is failing, and the flag is cleared, there is a risk of dataloss.To clear the failing flag on a disk:1. Use the vxdisk list command to find out which disks are failing:# vxdisk edc1t3d0s2auto:sliced. . neonline failingonline2. Use the vxedit set command to clear the flag for each disk that is marked asfailing (in this example, mydg02):# vxedit set failing off mydg02Chapter 1, Recovery from Hardware Failure7
Reattaching Failed Disks3. Use the vxdisk list command to verify that the failing flag has been cleared:# vxdisk edc1t3d0s2auto:sliced. . neonlineonlineReattaching Failed DisksYou can perform a reattach operation if a disk could not be found at system startup, or ifVxVM is started with some disk drivers unloaded and unloadable (causing disks to enterthe failed state). If the underlying problem has been fixed (such as a cable or controllerfault), use the vxreattach command to reattach the disks without plexes being flaggedas STALE. However, the reattach must occur before any volumes on the disk are started.The vxreattach command is called as part of disk recovery from the vxdiskadmmenus and during the boot process. If possible, vxreattach reattaches the failed diskmedia record to the disk with the same device name. Reattachment places a disk in thesame disk group that it was located in before and retains its original disk media name.To reattach a failed disk:1. Use the vxdisk list command to see which disks have failed, as shown in thefollowing example:# vxdisk dgSTATUSonlineonlinefailed was: c1t3d0s2failed was: c1t4d0s22. Once the fault has been corrected, the disks can be reattached by using the followingcommand to rescan the device list:# /usr/sbin/vxdctl enable3. Use the vxreattach command with no options to reattach the disks:# /etc/vx/bin/vxreattachAfter reattachment takes place, recovery may not be necessary unless a disk was faultyand had to be replaced. Reattachment can fail if the original (or another) cause for the diskfailure still exists.8VERITAS Volume Manager Troubleshooting Guide
Failures on RAID-5 VolumesYou can use the command vxreattach -c to check whether reattachment is possible,without performing the operation. Instead, it displays the disk group and disk medianame where the disk can be reattached.See the vxreattach(1M) manual page for more information on the vxreattachcommand.Failures on RAID-5 VolumesFailures are seen in two varieties: system failures and disk failures. A system failure meansthat the system has abruptly ceased to operate due to an operating system panic or powerfailure. Disk failures imply that the data on some number of disks has become unavailabledue to a system failure (such as a head crash, electronics failure on disk, or disk controllerfailure).System FailuresRAID-5 volumes are designed to remain available with a minimum of disk spaceoverhead, if there are disk failures. However, many forms of RAID-5 can have data lossafter a system failure. Data loss occurs because a system failure causes the data and parityin the RAID-5 volume to become unsynchronized. Loss of synchronization occurs becausethe status of writes that were outstanding at the time of the failure cannot be determined.If a loss of sync occurs while a RAID-5 volume is being accessed, the volume is describedas having stale parity. The parity must then be reconstructed by reading all the non-paritycolumns within each stripe, recalculating the parity, and writing out the parity stripe unitin the stripe. This must be done for every stripe in the volume, so it can take a long time tocomplete.Caution While the resynchronization of a RAID-5 volume without log plexes is beingperformed, any failure of a disk within the volume causes its data to be lost.Besides the vulnerability to failure, the resynchronization process can tax the systemresources and slow down system operation.RAID-5 logs reduce the damage that can be caused by system failures, because theymaintain a copy of the data being written at the time of the failure. The process ofresynchronization consists of reading that data and parity from the logs and writing it tothe appropriate areas of the RAID-5 volume. This greatly reduces the amount of timeneeded for a resynchronization of data and parity. It also means that the volume neverbecomes truly stale. The data and parity for all stripes in the volume are known at alltimes, so the fa
Sun, Solaris, SunOS, Java, Sun Java System Cluster, Sun StorEdge, Solstice DiskSuite, Sun Fire, Sun Enterprise, Online: Backup, and Netra are . Recovery from Hardware Failure 1 VERITAS Volume Man