Transcription
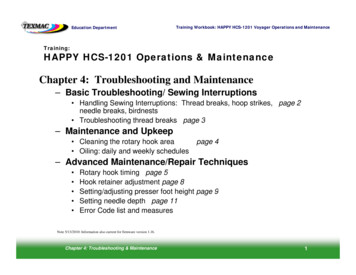
Education DepartmentTraining Workbook: HAPPY HCS-1201 Voyager Operations and MaintenanceTraining:gHAPPY HCS-1201 Operations & MaintenanceChapter 4: Troubleshooting and Maintenance– Basic Troubleshooting/ Sewing Interruptions Handling Sewing Interruptions: Thread breaks, hoop strikes, page 2needle breaks, birdnests Troubleshooting thread breaks page 3– Maintenance and Upkeep Cleaning the rotary hook areag dailyy and weeklyy schedules Oiling:page 4– Advanced Maintenance/Repair Techniques Rotary hook timing page 5Hook retainer adjustment page 8S tti / dj ti presser footSetting/adjustingf t heighth i ht page 9Setting needle depth page 11Error Code list and measuresNote 5/13/2010: Information also current for firmware version 1.16.Chapter 4: Troubleshooting & Maintenance1
Education DepartmentTraining Workbook: HAPPY HCS-1201 Voyager Operations and MaintenanceRecoveringg From Sewingg InterruptionspYour machine remembers the last-sewn stitch and position after most sewing interruptions, including threadbreaks, hoop strikes, or shut-down. As long as the garment remains hooped, there is a good chance you canresume sewing once you’ve fixed the problem. Note: Sudden power loss or emergency shut-down may resultin slight mis-alignment.General Steps for Recovering from Sewing Interruptions1. Fix the problem. Repair thread break/ replace needle, clear any blockage of thread or broken needle. Check that the bobbin andneedle are re-threaded properly.2. Verify sewing position. If the current needle does not appear to be over the correct position to resume sewing, press FUNC, thenarrow down to POSITION, and press SET. If the sewing arm has been moved off the current sewing position, the carriage shouldreturn to this position now; otherwise it will not movemove. The stitch counter should also now reflect the current sewing positionposition.3. Back up if necessary. To overlap slightly to prevent gaps, press the STOP key until the satisfied.4. Press START to resume sewing.If the Garment Has Become Mis-AlignedgIf you find the machine is slightly off-alignment when resuming sewing, follow this procedure:1. Make note of the current sewing position (stitch#). At this point, also make a mental note (best-guess) of how far off the sewingposition is, and in what direction.2. Return to the design Origin position. Do this by pressing the FUNC key, selecting ORIGIN, and pressing SET.3. Adjust the position of the hoop using the arrow keys based on your guess in step 1.4. Return to the stitch # of the last-sewn position by pressing MENU, choosing POSITION, and pressing SET. Arrow down to thethird option (stitch #), enter the stitch # from step 1 using the arrow keys and press SET. The sewing arm will now move to the lastsewn position. Press ESC to return to the main (drive) screen.5 Test-sew5.Test sew or trace to verify before resuming sewing.sewing If youyou’rere still slightly offoff, repeat steps 11-44 aboveabove.Chapter 4: Troubleshooting & Maintenance2
Education DepartmentTraining Workbook: HAPPY HCS-1201 Voyager Operations and MaintenanceBasic Troubleshooting:g Thread BreaksWe’ve listed the most common causes for thread breaks are listed in a flowchartbelow, in order of frequency. Learn this checklist to keep your machine sewingtrouble-free.Thread Breaks: Other CausesSometimes less-obvious causes maycontribute These regular maintenancecontribute.steps will further reduce causes forthread break:Thread BreakIs the threadactually broken?NOCCheckif:(1) bobbin out & reloador(2) if sensor is working/properly threadedYESKeep Hook Area CleanOver time, lint, bits of thread and other debris oilcombinebi iin ththe rotarythhookk area tto coatt iimportantt tsewing surfaces and interfere with sewing. Cleanthis area from time to time (more if you run yourmachine hard) with compressed air and/or a spraycleaner such as Hook Wash.If the thread is actually broken, then:Check Thread Feed/Path:- thread path: is it correct at all points?- feed: is it smooth? Is it catching on anything?- Correct Needle orientation? Scarf should be at back.If path/feed is not the cause, then:Check condition/quality of thread:Old or mis-handled thread will break more frequently,especially when running in significant volume/speed.Use quality 40-wt polyester or rayon embroidery thread.If the bad thread is not the cause, then:Maybe a design problem if breaks in the same place(s).1. Turn on the Stitch Sweeper, and reload the design, or2. Have the digitizer fix the bad section or run a designcleanup to remove short stitches.If the design is not the cause, then:Check for damage/scarred surfaces from hoop strikeor needle break. Broken bits of needle/other metal mayscar/bur surfaces that contact thread i.e. needle, presserfoot, needle plate, point area of rotary hook. Replaceneedle, use fine abrasive cord/cloth to “polish” thesesurfaces smooth again.Chapter 4: Troubleshooting & MaintenanceRe-threadand sewagain.Improper Thread TensionOOver-tightti ht AND over-looselttensioni eitherith att ththebobbin or the upper thread contribute indirectly tothread breaks.Rotary Hook TimingIf you’ve eliminated the most common causes,check to see if the rotary hook may have slippedslightly out of time. Read more on rotary hooktiming, its significance, how to check and adjustlater on in this chapter.3
Education DepartmentTraining Workbook: HAPPY HCS-1201 Voyager Operations and MaintenanceGeneral Maintenance and Upkeeppp Oiling: Use only white sewing machine oilThere are 2 oiling schedules based on how frequently themachine is used:- Every 8 hours (or more if used heavily) – 1 drop of oil onthe “race” of the hook as shown.- Every 40 hours (as shown in diagram below, right)(a) needle bars: 1 drop on each(for b, c, and d, move head to Needle 1)(b) “cup” cut-out marked in yellow on machine( ) reciprocator(c)it andd presser footf t shafts,h ftupper portiona(d) reciprocator and presser foot shafts,lower portion“race” of the hookbc CleaningdClean the rotary hook area on a regular basis(especially with regular use) using solvent andcompressed air. Helps prevent buildup of debris/oily filmfrom lint/dust and oil spray. Reduces thread breaks &other sewing problems. Remove theneedle plate first to getbetter accessfor cleaning.Removing the needle plate exposesmore of the rotary hook area formore-thorough cleaning.Chapter 4: Troubleshooting & Maintenance4
Education DepartmentTraining Workbook: HAPPY HCS-1201 Voyager Operations and MaintenanceAdvanced Maintenance/Repair:pHook TiminggRotary Hook TimingThe rotary hook is responsible for catching the top thread and creating a loop around thebobbin thread in order to form a stitch. To catch the top thread, the point of the rotary hookmust arrive at a precise moment and distance to the needle (timing and clearance). Whenthe timing and clearance are out of adjustment, the machine will generally experiencemissed stitches, looping, thread breaks and needle breaks.Checking Rotary Hook Timing and ClearanceIf you suspect that your rotary hook timing is off, you or your customer can check this easilyyourself following these steps:1. Power the machine on and allow it to continue to the main drive screen.2. Select needle six (6). Do this using thekeys on the control panel3. Remove the needle plate and bobbin case . Do this by loosening each of the two (2) flatheadscrews with an offset screwdriver (provided in the machine’s toolkit)Timing for HCS-1201is at 25 degrees.degrees3. Remove the bobbin case.4. Engage the needle. Do this by pressing the P.FOOT key, which lowers thepresser foot. Then, grab the needle bar over the presser foot, and pull it downuntil it locks into place.5. Turn shaft to 25 degrees. Do this with a 3mm Allen wrench. Turn the main shaftfrom the rear of the machine clockwise to L 25 (25 degrees). The needle shouldbe down and in the basket area of the rotary hook at this point.Chapter 4: Troubleshooting & MaintenanceWith the needleengaged,d it shouldh ld fallf llinto this basket in frontof the rotary hook andjust behind the retainingfinger.5
Education DepartmentTraining Workbook: HAPPY HCS-1201 Voyager Operations and MaintenanceAdvanced Maintenance/Repair:pHook TiminggChecking Rotary Hook Timing and Clearance (continued)TIMING (left-right) at 25 degrees:Viewing the hook assembly from the front of themachine, the point of the rotary hook shouldbe hidden behind the needle.HOOK-NEEDLE CLEARANCE (front-back) at 25 degrees:From the side of the machine, the point of the rotary hookppy 0.1-0.15mm from the back of theshould be approximatelyneedle (about the thickness of a business card). If the pointis either touching or too far from the needle, the machine isnot set correctly and will require adjustment.Note that the hook pointpasses behind the needleacross the lower portionof the scarf.This clearanceshould be aboutthe width of abusiness card.Chapter 4: Troubleshooting & Maintenance6
Education DepartmentTraining Workbook: HAPPY HCS-1201 Voyager Operations and MaintenanceAdvanced Maintenance/Repair:pHook TiminggAdjusting Rotary Hook Timing1. Loosen the Rotary Hook. Do this by loosening each of the three (3) set screwsthat attach the rotary hook to the rotary hook shaft. Start with the larger screw on themilled flat spot of the hook’shook s neck (lower right).right) Loosen screws just enough tobreak the hook loose on the shaft. Turn the wheel as necessary to access eachscrew from either side.(3/4 view) 3 set screws are locatedalong the rear “collar” of the rotaryhook.3. Reset the dial to 25 degrees. Check that the needle is lowered into the rotary hookbasket once more and that the main shaft dial is set 25 degrees. Adjust the mainshaft as necessary by hand at rear of the machinemachine.4. Move hook and tighten screws. Adjust the timing and clearance simultaneouslyaccording to the diagrams on the previous page. Tighten screws carefully. If necessary,have an assistant hold the main shaft exactly at 25 degrees while positioning andtightening.Helpful Hints- Have a helper hold the timing wheel at 25 degrees with the T-handle wrench asyou make your adjustments and tighten the screws.(side view) Turn the hook as necessaryfor easy access with a screwadriver.- Tighten each screw just enough to snug the hook back on the shaft, then re-checkre checkthe timing, then tighten each screw further. Tighten all screws as firmly as you canmanage. When practicing, re-check constantly as each screw is tightened.- Use a quality flat-tip screwdriver with a wide grip to help you apply enough torqueto secure the rotary hook tightly on the shaft.Loosenoose thiss scscrewewfirst before theother 2.Chapter 4: Troubleshooting & Maintenance7
Education DepartmentTraining Workbook: HAPPY HCS-1201 Voyager Operations and MaintenanceMechanical Procedures: Hook Retainer AdjustmentjStub of hookretainerAbout the Hook Retainer (also called retaining finger)The hook retainer is located at the front of the rotary hook, near thetop of the bobbin case. It is responsible for keeping the inner basketand bobbin case from spinning freelyfreely, while still allowing thread topass across the front of the rotary hook.Adjusting the Hook RetainerFollow this short procedure to adjust the hook retainer:Hook retainer orretaining finger1 Remove the needle plate.1.plate Do this by loosening each ofthe two (2) flathead screws with an offset screwdriver.2. Loosen the black screw. But do not remove. This will bethe small button head hex screw toward the right corner,facing downward.3. Move the retainer. Looking downward, set the stublocated at the center of the retainer to approximately0.8mm from the back edge of the rotary hook basket; orabout halfway into the basket. The photo on the lower rightshows a retaining finger close-upclose up with proper clearanceclearance.Location ofblack set screwPhoto of clearanceof retaining fingerstub from thenotch in the hook.4. Tighten Screw. And check that the inner basket of therotary hook does not rotate freely.Location ofblack set screwSide view, retaining fingerChapter 4: Troubleshooting & Maintenance8
Education DepartmentTraining Workbook: HAPPY HCS-1201 Voyager Operations and MaintenanceAdvanced Maintenance/Repair:pPresser FootInspecting Presser Foot HeightFollow this procedure to check proper presser foot height:1. Engage the needle. Do this by pressing the P.FOOT key, which lowers the presser foot. Then, grab theneedle bar over the presser footfoot, and pull it down until it locks into placeplace.2. Turn the shaft to 0 degrees. Do this with using a 3mm hex wrench to turn the timing wheel at the rear ofthe machine.3 Ch3.Checkk ththe clearance.lTh diThedistancetbbetweentththe platel t andd pressure ffoott shouldh ld bbe approximatelyi t l1.2mm; or slightly less than the width of a dime.Chapter 4: Troubleshooting & Maintenance9
Education DepartmentTraining Workbook: HAPPY HCS-1201 Voyager Operations and MaintenanceAdvanced Maintenance/Repair:pPresser FootTurn knob to index the headpast needle , exposing the setscrew for the presser foot shaft.Adjusting Presser Foot Height1 T1.Takek notet off ththe adjustmentdj tt neededd d byb completingl tisteps 1-3 on previous page.2. Return the needle to the home position by pressingthe T.CUT button or manually turning the shaft to 270ddeg.as iindicateddi t d bby ththe titimingi wheelh l att ththe bback.k ThiThisMUST be done before performing step 4 below.3. Remove retaining clip shown with a 1.5 mm hexwrench, from the end of the metal guide rail on thecontrol panel side of the moving headhead.4. Index the head past the needle 1 position to needle“0”. Do this by turning the manual needle select knobclockwise.Remove this retaining clip with a 1.5 mmhex wrench.wrenchExposed 2mm Hex set screw5. Loosen the set screw and adjust the presser foot height. This is a phillips-type screw that fastensthe pressure foot to the needle bar. Do not remove the screw. Adjust until the clearance measuresapprox. 1.2 mm or slightly less than the width of a dime.6. Tighten the set screw.Chapter 4: Troubleshooting & Maintenance10
Training Workbook: HAPPY HCS-1201 Voyager Operations and MaintenanceEducation DepartmentAdvanced Maintenance: Needle DepthpInspecting Needle Depth1. Power the machine on and allow it to continue to the main drive screen.2. Select needle six (6). Do this using thekeys on the control panel3. Remove the needle plate and bobbin case . Do this by loosening each of the two (2) flatheadscrews with an offset screwdriver (provided in the machine’s toolkit)4. Remove the bobbin case.5. Engage the needle. Do this by pressing the P.FOOT key,whichhich lolowersers the presser footfoot. ThenThen, grab the needle barover the presser foot, and pull it down until it locks into place.Note that the hook pointpasses behind the needleacross the lower portionof the scarf.6. Turn shaft to 25 degrees. Do this with a 3mm hex wrench.Turn the main shaft from the rear of the machine clockwise to25 degrees. The needle should be down and in the basket areaof the rotary hook at this point.7. Check needle height relative to the hook point. If needledepth is correct, the hook point will be passing behind thelower portion of the scarf.The optional Needle Depth Gauge makes needle depth easier to check:1 F1.Followllstepst1-41 4 above,bb dbutdo not remove theh needledl platel– not necessary.2. Turn shaft to 5 degrees. This is bottom dead center for needle bar position in thesewing cycle.3. Insert the needle depth gauge as shown. If depth is correct, needle pointshould scrape the top of the gauge. If too low, gauge insertion will notbe possible. If too high, the gauge will not be able to contact the needleat all.N dl ddepthNeedleth gaugeChapter 4: Troubleshooting & Maintenance11
Training Workbook: HAPPY HCS-1201 Voyager Operations and MaintenanceEducation DepartmentError Code List and MeasuresCodeErrorDescriptionpagepg 1Resolution/Remarks001Circuit BoardAbnormality detected in control circuitboardPower down machine and, after 10 seconds, power on again.002Power SourcePower failure or abnormal voltagevoltage.Power down machine andand, after 10 secondsseconds, power on againagain.004System MemorySystem memory faultPower down machine and, after 10 seconds, power on again.015Inverter TripCaused most frequently by uneven orinadequate AC power to the machine.Also may be main shaft motor overload,short,h t troublet bl w/main/ i shafth ft drived i unitit orother main shaft motor relatedabnormality.Cut power and turn main shaft by hand. If turns normally, power onagain. Check inverter for Error. Should be set at 0.0. Also checkpower coming into machine. In our experience, this is triggered byi dinadequatet or iirregularl voltagelt(I(I.e. ffewer ththan 110v)110 ) comingi ffromthe AC outlet.016X-assemblyalarmX-motor-related trouble, i.e. x-motoroverload, short circuit, problem with motordrive unitPower off machine, test pantograph movement manually. Check forany abnormality throughout full range of motion. If none found,power on and test. May need to check PMD (pulse motor driver)017Y-assemblyalarmY-motor-related trouble, i.e. Y-motoroverload, short circuit, problem with motordrive unitPower off machine, test pantograph movement manually. Check forany abnormality throughout full range of motion. If none found,power on and test. May need to check PMD (pulse motor driver)018Main shaft errorMain shaft will not turn.Currently, check for “birdnesting” at the rotary hook or any otherblockage preventing main shaft from turning through its full rotation.Also check for needle bar boss jam as described on page 26 of thisguide – another possible cause.020Needle detectMachine not detecting current needle #correctly, or needle bar selection unit is offits stop position. Trouble with positiondetecting circuit board.Turn needle bar selector knob to until head is properly positioned atcurrent needle position (check red alignment mark on knob with thaton machine body).Chapter 4: Troubleshooting & Maintenance12
Training Workbook: HAPPY HCS-1201 Voyager Operations and MaintenanceEducation DepartmentError Code List and MeasuresCodeErrorDescriptionpagepg 2Resolution/Remarks021Needle moveMotor for needle bar selection unit hasstopped partway through its path.Follow same procedure listed for error 020022Needle moveHead unable to move due to malfunctionof thread take-up lever or trouble ofposition-detecting circuit boardFollow same procedure listed for error 020024Needle CenterNeedle bar stop position is off-center;needle bar stop position is out of place.Follow same procedure listed for error 020025Needle overg of actual needlesNeedle # out of rangeon given machine.Follow same pprocedure listed for error 020026Needle differMismatch between actual selected needleposition and needle number showing inthe control panel.Boot machine into maintenance mode and follow the procedure inthis guide for re-setting “Needle Memory” .030pSlow-speedmismatchImproperp p speedpadjustmentjat lowspeed. Speed does not decrease below100rpm at low speed.Perform automatic speedpre-set: ((1)) Choose “OTHER” from themain menu, then select “SPEED”. After warning, machine will turnmain shaft slowly from stop to max speed (needle does not engage).050C point sensorMain shaft is stopped in a position otherthan "C" point (270 degrees)Press SET and choose the AUTO option to allow machine toattempt to clear this error on its own. Barring that, choose“MANUAL” and turn the shaft back to 270 degrees.051L SensorTiming detection board fault, or marredphoto-sensor. Malfunction of "Lowestneedle position" sensor on detectioncircuit board.Check to see if photo sensor is clean or if the slit plate contactssensor. Also check rotary hook area for bird-nesting and clearthread/blockage as necessary.052C SensorTiming board detection fault, or marredphoto-sensor. Malfunction of "Colorchange position" sensor on timingdetection circuit board.Check to see if photo sensor is clean or if the slit plate contactsg and clearsensor. Also check rotaryy hook area for bird-nestingthread/blockage as necessary.Chapter 4: Troubleshooting & Maintenance13
Training Workbook: HAPPY HCS-1201 Voyager Operations and MaintenanceEducation DepartmentError Code List and MeasuresCodeErrorpagepg 3DescriptionResolution/Remarks055Safety CoverSwitch not closed on left side of head dueto safety cover being openClose safety cover or close switch.060X LimitCurrent design exceeds allowed widthand/or or design position is positioned toofar to left or right of center.Check to make sure current pattern is digitized center-centercenter center. ReRecheck design position and size against currently-selected hoop andre-adjust as necessary.061Y LimitCurrent design exceeds allowed heightand/or or design position is positioned toofar to above or below center.Check to make sure current pattern is digitized center-center. Recheck design position and size against currently-selected hoop andre-adjust as necessary.090Miss receptionNot implementedNot implemented091Failure to sendNot implementedNot implemented093Data formatNot implementedNot implemented104Miss functionCorruption/mis-read of design dataRe-transfer design again into machine and try again.105Dual functionCorruption/mis-read of design dataRe-load design again into memory108Improper readNot implementedNot implemented110Memory fullfDuring design transfer,f memory has filledfto capacityDelete unnecessary patterns fromfmachine memory and try again.111Change OverColor change mis-matchDesign exceeds maximum # of 99 color changes or color changedata is corrupt. Simplify or re-load design.112Data errorData error in designRe-load design114Id over# of patterns in control panel memory hasexceeded the maximum of 99Delete unnecessary patterns from machine memory and try again.Chapter 4: Troubleshooting & Maintenance14
Training Workbook: HAPPY HCS-1201 Voyager Operations and MaintenanceEducation DepartmentError Code List and MeasuresDescriptionpagepg 4CodeError118Trace data overError in design trace data creationRe-load design and try again.120Memory errorFault in retaining contents of patternmemoryIf this occurs frequently, it is likely that CPU is faulty. Entermaintenance mode and run memory clear function to test memoryand clear all data. Re-set machine system and speed, then try reloading design again. Update to firmware 1.11 or greater (for colorLCD version of Voyager) which is more resilient against this sort oferror.130Card errorIncapable of disposing of memory cardcontinuouslytilRe-seat memory card and try again. Ensure that you are using acompatibletibl memory cardd (C(Compactt FlFlashh up tto 1 Gb iin size)i )FFailingilithe above, power off machine, power on again and re-try. Usingsame card, then different memory card.131Card not readyCard not setSame procedure as error code 130133Bad cardNot implementedSame procedure as error code 130141Not found nameDesignated pattern not foundRe-connect memory card into PC and re-save design again.190Cut bladeThread cut knife is not at stop positionLook for bird’s nest or other obstruction to moving knife. Clean outthroat /needle plate and rotary hook area. Perform thread cut toattempt to clear. Failing that, press manual engagement lever andmanually turn main shaft to check that knife opens and closesproperly continuing until knife reproperly,re-seatsseats properlyproperly. In doing so,so checkmoving knife timing, verifying that knife opens at approx. 116degrees. If needed, reset knife according to page 22 of this guide.193CatcherThread catch hook is off its properlyretracted position. Limit switch to detectposition is not "OFF".Check if not trimming properly. If thread is cut, ensure that catcherhas returned to position, selecting either auto or manual. If so, cutand return thread catch hook to retracted position. If problem recurs,t bl h t positiontroubleshootiti off threadth d hholder,ld whichhi h may mis-guideiid catchert hand cause it to miss the thread.Chapter 4: Troubleshooting & MaintenanceResolution/Remarks15
Education Department Training Workbook: HAPPY HCS-1201 Voyager Operations and Maintenance General Maintenance and Upppkeep Oiling: Use only white sewing machine oil There are 2 oiling schedules based on how frequently the machine is used:-Every 8 hours (or mo


