Transcription
deepcarpet cleanerUSER MANUALModel Number: 93140 seriesMotorized brush for use on:
Founded by a professional carpet cleaner in 1972,the first machines were designed and built forprofessional use. A brand was born and soon after, RugDoctor launched the first rental program that madeprofessional-grade carpet cleaning machines availableto the public. More than 40 years later, Rug Doctor hasgrown to become a household name and continues asthe leader in carpet care rental systems with powerfulmachines and innovative products.345611Safety InstructionsQuick StartParts, ComponentsHow To Clean / FeaturesTroubleshooting &Retain for your records: To savetime if calling Customer Service forinformation about your Rug Doctor machine, it is recommended that yourecord your machine informationbelow.Serial #:Model #:Date of Purchase:Replacement Parts132Warranty Informationrugdoctor.com1-800-784-3628Rug Doctor, LLC4701 Old Shepard PlacePlano, Texas 75093consumer. support@rugdoctor. comwww.rugdoctor. com
IMPORTANT SAFETY INSTRUCTIONSWARNINGPlease read all instructions before using.When using an electrical appliance,TO REDUCE THE RISK OF FIRE, ELECTRIC basic precautions should always beSHOCK, INJURY OR PROPERTY DAMAGE: followed, including the following:SAVE THESE INSTRUCTIONS To avoid scalding or burns, use caution when handling hot tap water to fill tanks. Do notboil or microwave water to be used in machine. Do not leave appliance unattended when plugged in or while it is on. Unplug from outletwhen not in use and before servicing. To reduce the risk of fire and electric shock due to internal componentdamage, use only Rug Doctor cleaning products intended for use with this appliance.See the Cleaning Product section of this manual. Do not allow to be used as a toy. Not intended for use by children age 12 and under.Close attention and adult supervision is necessary when used near children. Do not allowchildren to place their body parts in or near openings and moving parts. Use only as described in this manual. Use only manufacturer’srecommended products. Do not use with damaged cord or plug. If appliance is not working as it should, hasbeen dropped, damaged, left outdoors, or dropped into water, stop using andreturn it to a service center. Do not pull or carry by cord, use cord as a handle, close a door on cord, or pull cordaround sharp edges or corners. Do not run appliance over cord. Keep cord away fromheated surfaces. Do not unplug by pulling on cord. To unplug, grasp the plug, not the cord. Do not handle plug or appliance with wet hands. Do not put any object into openings. Do not use if any opening is blocked;keep free of dust, lint, hair, and anything that may reduce air flow. Keep hair, loose clothing, fingers, and all parts of body away from openings andmoving parts. Turn off all controls before unplugging. Product contains chemicals known to the State of California to cause cancer andbirth defects. Use extra care when cleaning on stairs. Do not use to pick up flammable or combustible liquids or materials such as gasoline,certain paints or use in areas where they may be present. Do not use to pick up anything that is burning or smoking, such as cigarettes,matches, or hot ashes. Do not place in or pick up caustic or toxic materials (Such as, bleach, ammonia, toiletbowl cleaner and drain cleaners) with machine. Connect to a properly grounded outlet only. See “Grounding Instructions.” Use only on surfaces moistened by cleaning process or small spills. Do not place orsubmerge machine in standing water or try to clear flooded areas. Do not clean over floor electrical outlets. The use of an extension cord is not recommended. Failure to follow the foregoinginstructions may expose the user to the possibility of electric shock, personal injuryand/or death. When clean water tank runs out stop using and follow instructions to refill. Do not operate without tanks or in any manner inconsistent with above warnings orthe operating instructions set fourth in this manual.WARNINGImproper connection of equipment-groundingconductor can result in a risk of electric shock.Check with a qualified electrician or serviceperson if you are in doubt as to whether theoutlet is properly grounded. Do not modifythe plug provided with the appliance—If it willnot fit the outlet, have a proper outlet installedby a qualified electrician. This appliance isfor use on a nominal 120-volt circuit andhas a grounded plug that looks like the plugillustrated in Figure A. Make sure that theappliance is connected to an outlet having thesame configuration as the plug. No adaptershould be used with this appliance.Grounding InstructionsThis appliance must be grounded. Ifit should malfunction or breakdown,grounding provides a path of leastresistance for electric current to reducethe risk ofGrounded Outlet Boxelectric shock.Grounded OutletThis appliance isequipped witha cord havingan equipmentgroundingGrounding Pinconductor andgrounding plug. The plug must be insertedinto an appropriate outlet that is properlyinstalled and grounded in accordance withall local codes and ordinances.rugdoctor.com1-800-784-36283
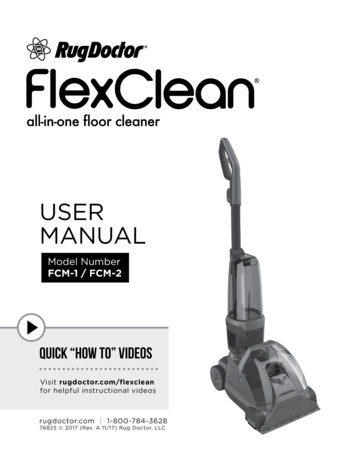
CLEANING TIPS1. Before you begin, review the safety warnings found in the front ofthis manual.2. Always test color fastness before using on carpets and upholstery.a. Wet an inconspicuous area with a small amount of cleanerb. After 1-2 minutes, blot with a paper towel and check forcolor transfer.3. Using a normal dry vacuum cleaner, vacuum the area you want todeep clean to remove loose dirt before using the Rug Doctor DeepCarpet Cleaner machine.4. Pre-treat any special problem areas with appropriate Rug Doctorcleaning solutions (reference cleaning products on manual Page 5and www.rugdoctor.com).QUICK START1. Raise the HANDLE by pulling the handle upward. Lift the handle intothe upright position. (Fig. 1)2. Remove the CLEAN WATER TANK by grasping the TANK HANDLEand lifting straight up. (Fig. 2). Loosen the TANK LID by turningcounter clockwise and remove from the machine, setaside. Fill the tank with hot tap water to the “CLEANWATER FILL LINE”. DO NOT USE BOILED OR MICROWAVEDWATER IN TANK.3. The TANK LID is also the “Soap” measure. (Fig. 3) Fill the lidwith Rug Doctor cleaning solution to the desired level (measuredin ounces). Follow instructions on the cleaning solution bottle forbest results. Pour the cleaning solution into the CLEAN WATER TANKand replace the lid. Turn clockwise to tighten. Place the CLEANWATER TANK back in the machine, making sure it is secure.4. Check the POWER SWITCH to make sure it is in the “off” position.5. Unwrap the POWER CORD and plug in to an outlet. Note: Rotate thetop CORD WRAP HOOK to release the cord for easy unwrapping.6. To clean RUG/CARPET position the machine and turn the POWERSWITCH toward the “RUG” setting.7. Depress the “SOAP & SCRUB” button on the top of the handle whilepulling the machine slowly and steadily backward in a straight line.(Fig. 4)8. Use the SUPER BOOST SPRAY knob to select your desired level ofdeep cleaning. (Fig. 5). For moderately/heavy soiled or high-trafficcarpets set the SUPER BOOST SPRAY to “ON”. (See SUPER BOOSTCLEANING instructions found on Page 7 for more information).9. Release the “SOAP & SCRUB” button 6 to 12 inches before endingeach pass to stop cleaning solution. Tilt the machine back and push itforward to start a new backward cleaning pass.10. When the “CLEAN WATER TANK” is empty, re-fill using the TANKREFILLING instructions found on Page 8.11. To clean upholstery, stairs, spots and stains see the UPHOLSTERYTOOL instructions found on Page 9.12. Wrap the UPHOLSTERY TOOL around the TOOL CADDY. The TOOLCADDY is removable and can be stored on-board or hung on a hook.See Page 5 for UPHOLSTERY TOOL CADDY wrapping instructions.4rugdoctor.com1-800-784-3628(Fig. 1)(Fig. 2)(Fig. 3)(Fig. 4)(Fig. 5)
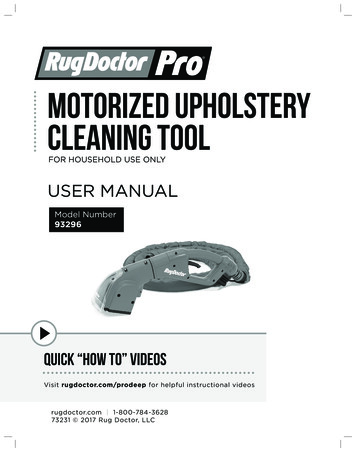
PRODUCT PARTS, COMPONENTSComfortGripHandleUpholsteryBrush Tool forstains, stairsand versatilecleaning“Rotating” Cord Wrapfor fast unwrappingFlexible hosewith compactstorageCarry HandleUpholsteryTool WastePort“Simple Lift”CLEAN WaterTank HandleLarge, carpet friendlywheels for extramaneuverabilityRemovableclearwater tankRotationGroomingBrushVibrating DeepCleaning BrushComplete Tool CaddyWrap SystemTOOL CADDY WRAP SYSTEMSTEP 1 Insert large connector with hose up, secure in place.STEP 2 Wrap the tool hose clockwise around the caddy 3 times.STEP 3 Insert the Upholstery Hand Tool into place with the brushfacing out. Secure the tool with the clips locking it in place.STEP 4 Insert the small connector into the opening directly abovethe Upholstery Hand Tool final placement.CLEANING SOLUTION-RUG DOCTOR PROFESSIONAL OXY-STEAM 64 or 40oz products will thoroughlydeep clean and brighten carpets while effectively removing dirt, soils and stainsthrough oxygen-activated cleaning boosters.-RUG DOCTOR PROFESSIONAL PET 64 or 40oz products will permanently removepet stains and odors while deterring pets from remarking areas through its powerful,pro-enzymatic carpet cleaning formula.rugdoctor.com 1-800-784-3628 5
SETTING UP/ GET READY TO CLEANYour RUG DOCTOR DEEP CARPET CLEANER is ready to start cleaning right out of thebox. No assembly required! Follow these simple instructions to start cleaning.1. Raise the COLLAPSIBLE HANDLE into the upright position:a. Raise the handle by pulling upward into the upright position. (Fig. 6)b. For best results, lower the HANDLE to it’s lowest position by pullingthe HANDLE RELEASE lever upward. This will help keep the frontnozzle in contact with the carpet at all times when pulling backwards.2. Fill the CLEAN WATER TANK:a. Remove the CLEAN WATER TANK by grasping the tank HANDLEand lifting straight up. (Fig. 7)b. Loosen the TANK LID by turning counter clockwise and remove fromthe machine, set aside.c. Fill the tank with hot tap water to the “CLEAN WATER FILL LINE”.DO NOT USE BOILED OR MICROWAVED WATER IN TANK.d. The TANK LID is also the “Soap” measure. Fill the lid with RugDoctor cleaning solution to the desired level (measured in ounces).Follow instructions on the cleaning solution bottle for best results.(Fig. 8)e. Pour the cleaning solution into the CLEAN WATER TANK and replacethe lid. Turn clockwise to tighten.f. Place the CLEAN WATER TANK back in the machine, making sureit is secure.g. Check the POWER SWITCH to make sure it is in the “off” position.h. The POWER CORD will come wrapped and tied. Release the POWERCORD and plug in to a grounded outlet.i. NOTE: The machine was designed with convenient Rotating CORDWRAP HOOKS to store and CORD on-bard. The CORD WRAPHOOKS on the handle rotate to easily release the power cord.DO NOT USE BOILED OR MICROWAVED WATER IN TANK. Doingso could result in scalding or burns. Not recommended for use onwool, jute, sisal carpets and rugs. Doing so could damage materialand void warranty on machine. Do not walk on wet carpet.HOW TO CLEAN / FEATURESYou’re now ready to deep clean your carpets and rugs. Your RUG DOCTORDEEP CARPET CLEANER has innovative features: DUAL CROSS ACTIONBRUSHES to clean deep down in carpet and SUPER BOOST SPRAY empowersyou to customize your clean for high-traffic and heavily soiled areas.DUAL CROSS ACTION BRUSHESYour Rug Doctor Deep Carpet Cleaner uses DUAL CROSS ACTIONBRUSHES. Two brushes under the machine deep clean all sides of thecarpet fibers. This innovative technology deep cleans each carpet fiber,then grooms and polishes the carpet – all in one cleaning pass.1. With the machine POWER CORD plugged in to a grounded outlet turnthe machine on by pressing the POWER SWITCH down toward the“RUG” setting.6rugdoctor.com1-800-784-3628(Fig. 6)(Fig. 7)(Fig. 8)
HOW TO CLEAN / FEATURES (CONT)DUAL CROSS ACTION BRUSHES (CONT2. The DUAL CROSS ACTION BRUSHES are activated by the “SOAP &SCRUB” button on the top of the handle. (Fig. 9)a. The Vibrating-Oscillating Brush scrubs all sides of the carpet, deepcleaning each fiber from the base of the carpet.b. The Roller Brush grooms and polishes the carpet, leaving it lookingclean and finished. Note: Your Rug Doctor Deep Carpet Cleaner alsofeatures Side Brushes for edge cleaning along carpets.(Fig. 9)SUPER BOOST CLEANINGNot every carpet needs the same level of deep clean, some need aSUPER BOOST. Use the “SUPER BOOST SPRAY” setting on the machinefor an extra “boost” in cleaning heavily soiled and high-traffic areas.1. Use the SUPER BOOST SPRAY knob to select your desired level of deepcleaning. (Fig. 10)a. SUPER BOOST “OFF”: For lightly soiled carpets set the SUPERBOOST SPRAY on the machine to “OFF”. The machine will spraycleaning solution onto the carpet under the machine. As you pullthe machine backward, you’ll see the solution dirt from the carpetbeing suctioned into the machine.b. SUPER BOOST “ON”: For moderately/heavy soiled or high-trafficcarpets set the SUPER BOOST SPRAY on the machine to “ON”. Themachine will spray additional cleaning solution from the “SUPERBOOST SPRAY” nozzle.2. Position the machine on carpet and push the POWER SWITCH downtoward the “RUG” setting.3. Press the “SOAP & SCRUB” button on the top of the handle whilepulling the machine slowly and steadily backward in a straight line.(Fig. 9)4. Release the “SOAP & SCRUB” button 6 to 12 inches before endingeach pass to stop cleaning solution. Tilt the machine back and push itforward to start a new backward cleaning pass.(Fig. 10)(Fig. 11 )(Fig. 12)EMPTYING THE WASTE WATER TANK1. Empty the WASTE WATER TANK before the dirty water reaches the“Full Line” (Fig. 11).2. Turn off the machine using the POWER SWITCH.3. Remove the WASTE WATER TANK from the machine by grasping thetank HANDLE and lifting straight up. (Fig. 12)4. Unscrew the WIDE OPENING LID and pour out the dirty water. (Fig. 13).Dirty water should be poured into a toilet or outside, do not pour intosink or tub.5. Rinse the inside of the WASTE WATER TANK and replace the WIDEOPENING LID, firmly tighten the lid.6. Place the tank back on the machine by setting is straight down on thebase until it is secure. (Fig. 14)(Fig. 13)(Fig. 14)REFILLING THE CLEAN WATER TANK1. When the unit no longer sprays water, check the CLEAN WATER TANKto see if it’s empty.2. If the CLEAN WATER TANK is empty, turn off the machine using thePOWER SWITCH.rugdoctor.com1-800-784-36287
HOW TO CLEAN / FEATURES (CONT)REFILLING THE CLEAN WATER TANK (CONT)3. Remove the CLEAN WATER TANK by grasping the TANK HANDLE andlifting straight up. (Fig. 15)4. Loosen the TANK LID by turning counter clockwise and remove from themachine, set aside. Fill the tank with hot tap water to the “CLEANWATER FILL LINE”. (Fig. 16). DO NOT BOIL OR MICROWAVE WATER.5. The TANK LID is also the “Soap” measure. (Fig. 17). Fill the lid with RugDoctor cleaning solution to the desired level (measured in ounces).Follow instructions on the cleaning solution bottle for best results.6. Pour the cleaning solution into the CLEAN WATER TANK and replacethe lid. Turn clockwise to tighten.7. Place the CLEAN WATER TANK back in the machine, making sure itis secure.CLEANING UP/STORAGE AFTER USEAfter you’ve used your RUG DOCTOR DEEP CARPET CLEANER follow theseeasy steps for quick clean-up and storage for your machine.1. Turn the machine off by pressing the POWER SWITCH down toward the“OFF” setting.2. Unplug the POWER CORD from the outlet and wrap it around theROTATING CORD HOOKS.3. Empty the CLEAN WATER TANK (if necessary), rinse and replace onthe machine.4. Empty the WASTE WATER TANK then rinse, clean and dry beforeplacing back on the machine base.a. WIDE OPENING LID opening is designed to fit your hand inside tothoroughly clean, rinse and dry to store a fresh and clean tank. (Fig. 7)5. Move the machine to a closet or storage place. Use the HANDLERELEASE lever to collapse the HANDLE for convenient and compactstorage. (Fig. 18). Tip: Let the machine brushes dry before putting themachine away.(Fig. 15)(Fig. 16)(Fig. 17)(Fig. 17)CLEANING UPHOLSTERY, STAIRS ANDSTAINS, USING THE UPHOLSTERY TOOL(Fig. 18)SETTING UP/GETTING READY TO CLEANYour RUG DOCTOR DEEP CARPET CLEANER is ready to start cleaning rightout of the box. No assembly required! Follow these simple instructions tostart cleaning.1. Wrap the UPHOLSTERY TOOL around the TOOL CADDY. The TOOLCADDY is removable and can be stored on-board or hung on a hooka. UPHOLSTERY TOOL CADDY wrapping instructions. (Fig. 19).See Page 5 for UPHOLSTERY TOOL CADDY wrapping instructions.2. Raise the COLLAPSIBLE HANDLE into the upright position3. Fill the CLEAN WATER TANK:a. Remove the CLEAN WATER TANK by grasping the tank HANDLEand lifting straight up. (Fig. 15)b. Loosen the TANK LID by turning counter clockwise and remove fromthe machine, set aside.8rugdoctor.com1-800-784-3628(Fig. 19)
CLEANING UPHOLSTERY, STAIRS ANDSTAINS, USING THE UPHOLSTERY TOOLSETTING UP/GETTING READY TO CLEAN (CONT)Your RUG DOCTOR DEEP CARPET CLEANER is ready to start cleaning rightout of the box. No assembly required! Follow these simple instructions tostart cleaning.3. Fill the CLEAN WATER TANK:c. Fill the tank with hot tap water to the “CLEAN WATER FILL LINE”.DO NOT USE BOILED OR MICROWAVED WATER IN TANK.d. The TANK LID is also the “Soap” measure. Fill the lid with RugDoctor cleaning solution to the desired level (measured in ounces).Follow instructions on the cleaning solution bottle for best results.(Fig. 20)e. Pour the cleaning solution into the CLEAN WATER TANK and replacethe lid. Turn clockwise to tighten.f. Place the CLEAN WATER TANK back in the machine, making sureit is secure.4. Rotate the CORD WRAP HOOK on the handle to release the power cord.Unwrap the POWER CORD and plug in to a grounded outlet. Making surethe POWER SWITCH is in the “OFF” (middle) position. (Fig. 21)DO NOT USE BOILED OR MICROWAVED WATER IN TANK. Doingso could result in scalding or burns. Not recommended for use onwool, jute, sisal carpets and rugs. Doing so could damage materialand void warranty on machine. Do not walk on wet carpet.(Fig. 20)(Fig. 21)(Fig. 22)HOW TO CLEAN / FEATURES(Fig. 23)CLEANING WITH THE UPHOLSTERY TOOLYou’re now ready to deep clean your upholstery, stairs and carpet spots andstains. Your RUG DOCTOR DEEP CARPET CLEANER has an UPHOLSTERYTOOL and innovative TOOL CADDY. Designed to easily snap on and off back ofthe machine handle, the UPHOLSTERY TOOL CADDY hangs on a hook or pegwhen not in use. Simply snap the TOOL CADDY on-board to store the wholemachine in one convenient and compact package.(Fig. 24)1. Unwrap the UPHOLSTERY TOOL from the CADDY. (Fig. 22)2. Open the WASTE WATER PORT by pulling on the blackrubber plug out. (Fig. 23)3. Insert the UPHOLSTERY TOOL connection into the WASTE WATER PORTon the front of the WASTE WATER TANK by lining up the “O” icons on thetank and the TOOL. (Fig. 24)4. Lock the TOOL into place by rotating to the right, theicon will bestraight up. (Fig. 25)5. Connect the SOLUTION HOSE to the “TOOL CLEAN PORT” located on thetop of the machine. (Fig. 26)rugdoctor.com1-800-784-36289(Fig. 25)(Fig. 26)
HOW TO CLEAN / FEATURES (CONT)CLEANING WITH THE UPHOLSTERY TOOL (CONT)6. Turn the machine on by pressing the POWER SWITCH down toward the“TOOL” setting. (Fig. 27)7. Position the UPHOLSTERY TOOL in front of the area or stain you want todeep clean.8. Squeeze the “SOAP” trigger on the handle to begin cleaning. (Fig. 28)9. While squeezing the trigger, move the tool back and forth over the areayou want to clean, making sure to press the suction nozzle down intothe surface. (Fig. 29)10. Release the “SOAP” trigger when complete, excess water can be removedby making additional passes with the tool without squeezing the “SOAP”trigger. This may permit faster drying.11. Leave the machine on for 15 seconds after cleaning to allow for all of thedirty solution to be collected into the WASTE WATER TANK.(Fig. 27)EMPTYING THE WASTE WATER TANK(Fig. 28)See instruction on Page 7REFILLING THE CLEAN WATER TANKSee instruction on Page 6STORING THE UPHOLSTERY TOOL ON THE TOOL CADDY1. The Tool Caddy is labeled so you can wrap the upholstery tool hose securelyfor storage. Also see instruction on Page 5. (Fig. 30)2. The TOOL CADDY can be easily removed and replaced on the unit. Simplylift up to remove. To replace back on the unit, align the connection hooks onthe back with the connection inlets on the back of the HANDLE. (Fig. 31)(Fig. 29)CLEANING UP/STORAGE AFTER USEAfter you’ve used your RUG DOCTOR DEEP CARPET CLEANER UpholsteryTool follow these easy steps for quick clean-up and storage for your machine.1. Turn the machine off by pressing the POWER SWITCH down toward the“OFF” setting.2. Unplug the POWER CORD from the outlet and wrap it around theROTATING CORD HOOKS.3. Empty the CLEAN WATER TANK (if necessary), rinse and replace onthe machine.4. Empty the WASTE WATER TANK then rinse, clean and dry before placingback on the machine base.a. WIDE OPENING LID opening is designed to fit your hand inside tothoroughly clean, rinse and dry to store a fresh and clean tank. (Fig. 32)5. Move the machine to a closet or storage place. Use the HANDLERELEASE lever to collapse the HANDLE for convenient and compactstorage. (Fig. 33)(Fig. 30)(Fig. 31)(Fig. 32)10rugdoctor.com1-800-784-3628(Fig. 33)
TROUBLE SHOOTINGProblemNo PowerNo / Low SprayNo / Low SuctionRotating Brush Doesn’tRotateVibrating Oscillating Brushdoesn’t vibrate or oscillateNo/Low Spray from theUpholstery ToolNo/Low Suction from theUpholstery ToolPossible ReasonHow to FixPower cord not plugged inPlug power cord into walloutletPower button not pressedPress unit powerbutton onNot pressing spray triggerPress spray triggerClean Water / solutiontank is empty or lowFill Clean Water tank withwater and solutionsClean Water tank isnot seated or installedcorrectlyLift Up Clean Watertank, and place back intopositionSpray is cloggedClean spray tipDirty Water / collectiontank Is fullEmpty Dirty Water /collection tankDirty Water / collectiontank is not seated /installed correctlyLift Up Dirty Water /collection tank and placeback into positionNot Pressing Soap andScrub ButtonPress Soap and ScrubButton on HandleIf something gets lodgedin the brush roll, Brush willstop rotatingTurn Unit off and back onto reset the brush rollNot Pressing Soap andScrub ButtonPress Soap and ScrubButton on HandleIf something gets lodgedin the brush roll, Brush willstop rotatingTurn Unit off and back onto reset the brush rollNot Pressing Spray TriggerPress Spray TriggerUpholstery Solution Plugnot installed correctly onTool Clean PortMake sure symbols arealigned when installingClean Water/Solution TankEmpty/LowFill Clean Water Tank withWater and SolutionClean Water Tank Is NotSeated/Installed CorrectlyLift Up Clean Watertank and place back intopositionDirty Water/CollectionTank Is FullEmpty Dirty Water/Collection TankDirty Water/CollectionTank is Not Seated/Installed CorrectlyLift Up Dirty Water/Collection tank and placeback into positionUpholstery Vacuum Plug innot installed correctly onthe Tool Waste PortMake sure symbols arealigned when installingCALL 1-800-RUGDOCT (1-800-784-3628) if problem is not resolvedPlease do not return this product to the store.rugdoctor.com1-800-784-362811
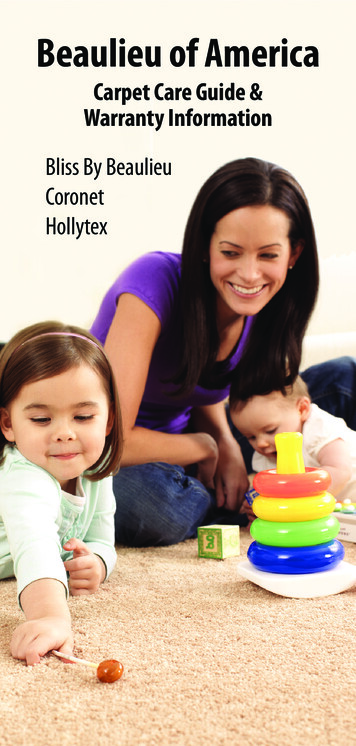
REPLACEMENT PARTSAccessories and replacement parts are available for your RUG DOCTOR DEEP CARPETCLEANER by calling “Rug Doctor Customer Service 1-800-RUGDOCT (1-800-784-3628) orvisiting www.rugdoctor.com.Replacement Parts12ImagePart #Waste Water Tank Assembly93276Clean Water Tank Assembly93277Upholstery Tool93270Basic Tool Caddy93271rugdoctor.com1-800-784-3628
WARRANTY INFORMATIONTwo (2) Year Limited Consumer WarrantyRug Doctor gives the original purchaser, who retains proof of purchase, from Rug Doctor or anauthorized Rug Doctor dealer, this limited warranty (“warranty”) for your Deep Carpet Cleanermachine acquired for normal household use (commercial or rental use is excluded). You areresponsible to notify Rug Doctor within thirty (30) days of original purchase if any parts orcomponents are missing on your Deep Cleaning machine.What Does This Warranty Cover / How Long Does The Warranty LastRug Doctor will, for the original purchaser, repair or replace including labor, any part that is defectivein material or workmanship within two (2) years of purchase. This warranty applies to machines usedfor normal household purposes only.What The Warranty DOES NOT CoverThe following exclusions apply to machine and part(s) failures due to: 1) normal wear and tear; 2)machine alterations and 3) abuse or misuse of the machine, including use not in accordance withthis “Instruction Guide.” This warranty does not provide for a refund of the purchase price. For bestoperating efficiency and cleaning, use of Rug Doctor products is recommended. Use of the machinefor rental voids the warranty and is not permitted under Federal Law (see “UNAUTHORIZED USE”statement below). Commercial use is excluded under this warranty except as set forth in the“ONE YEAR LIMITED COMMERCIAL WARRANTY” below. RUG DOCTOR IS NOT LIABLE FOR ANYCONSEQUENTIAL OR INCIDENTAL DAMAGES OF ANY NATURE INVOLVING THE PURCHASE/USEOF YOUR CARPET CLEANING MACHINE. IN NO EVENT SHALL RUG DOCTOR’S LIABILITY EXCEEDTHE PURCHASE PRICE OF THE MACHINE. SOME STATES DO NOT ALLOW THE EXCLUSION ORLIMITATION OF INCIDENTAL OR CONSEQUENTIAL DAMAGES, SO THE ABOVE LIMITATIONS OREXCLUSIONS MAY NOT APPLY TO YOU. THIS IS RUG DOCTOR’S EXCLUSIVE WARRANTY FOR THISPRODUCT. ALL OTHER WARRANTIES, WHETHER ORAL OR WRITTEN ARE EXPRESSLY DISCLAIMED.THE IMPLIED WARRANTIES OF A MERCHANTS’ ABILITY AND FITNESS FOR A PARTICULARPURPOSE, WHICH MAY ARISE BY OPERATION OF LAW, ARE LIMITED TO 2 YEARS FROM THE DATEOF PURCHASE UNLESS APPLICABLE STATE LAW PROVIDES OTHERWISE.ExpensesIf a machine is returned to a warranty center for repair within thirty (30) days of original purchase,Rug Doctor will pay the freight charges both to a warranty center and back to you. Thereafter, youmay be directed to take the machine to a local repair center or required to ship the machine to a RugDoctor warranty center should additional repairs be required during the warranty period. You will beresponsible to pay any freight charges for shipment to the warranty center for repairs occurring afterthe initial thirty (30) days. Rug Doctor will pay the freight charges back to you.How State Laws ApplyThis warranty gives you specific legal rights. You may also have other rights which varyfrom state to state.How Do I Get Service Under This Warranty?TO OBTAIN WARRANTY ASSISTANCE, please call 1-800 RUG DOCTOR (1-800-784-3628)(8 am to 5 pm Mon - Fri CST) or e-mail consumer. support@rugdoctor.com. Rug Doctor will needthe following information in order to assist you: your name, address and telephone number, productmodel and serial number, proof of purchase showing date and place of purchase. Please explainthe nature of the problem. Rug Doctor will review all the facts involved and advise you as torecommended procedure. We recommend you keep the original carton and packing materials.Rug Doctor, LLC4701 Old Shepard PlacePlano, Texas 75093E-mail: consumer. support@rugdoctor. comWeb Site: www.rugdoctor. comUnauthorized UseUse of this carpet cleaning machine with Rug Doctor trademarks for rental purposes isUNAUTHORIZED and is in violation of U.S.C. Section 1114(I) and 15 U.S.C. Section 1125(a).rugdoctor.com1-800-784-362813
INSTRUCCIONES DE SEGURIDAD IMPORTANTESADVERTENCIAPARA REDUCIR EL RIESGO DE INCENDIO,DESCARGA ELÉCTRICA, LESIONES ODAÑOS A LA PROPIEDAD:Lea todas las instrucciones antes deusar. Al usar aparatos eléctricos, siempredeben tomarse precauciones básicas,entre las que se incluyen las siguientes:GUARDE ESTAS INSTRUCCIONES Para evitar escaldaduras o quemaduras, tenga cuidado cuando utilice agua caliente del grifo para llenar lostanques. No hierva ni caliente en el microondas el agua que se utilizará en la máquina. No deje el aparato sin supervisión mientras esté enchufado o mientras esté encendido. Desenchúfelo deltomacorriente cuando no lo utilice y antes de realizar el servicio técnico. Para reducir el riesgo de incendio y descarga eléctrica debido a daños de un componente interno, utilice sololos productos de limpieza Rug Doctor destinados para ser utilizados con este aparato. Consulte la sección deProductos de limpieza de este manual. No permita que sea utilizado como juguete. No está destinado para ser utilizado por niños de 12 años omenores. Es necesaria la supervisión de un adulto con suma atención cuando el aparato se utiliza cerca de losniños. No permita que los niños coloquen partes de su cuerpo en las aberturas y piezas móviles o cerca deellas. Utilícelo únicamente según las instrucciones de este manual. Utilice solo los productos recomendados por elfabricante. No utilice el aparato con cables ni enchufes dañados. Si el aparato no está funcionando como debería, si se hacaído, dañado, se ha dejado a la intemperie o caído al agua, deje de utilizarlo y devuélvalo al centro de serviciotécnico. No lo remolque ni lo transporte utilizando el cable, no utilice el cable a modo de manija, no cierre puertasencima del cable ni tire del cable cuando esté cerca de bordes o esquinas filosos. No desplace el aparato sobreel cable. Mantenga el cable lejos de superficies calientes. No lo desenchufe tirando del cable. Para desenchufarlo, tome el enchufe en lugar del cable. No manipule el enchufe ni el aparato con las manos mojadas. No coloque ningún objeto en las aberturas. No lo utilice si alguna de la aberturas está bloqueada; manténgalolibre de polvo, pelusas, pelos y todo aquello que pueda reducir el flujo de aire. Mantenga el pelo, la ropa suelta, los dedos y todas las partes del cuerpo lejos de las aberturas y piezas móviles. Apague todos los controles antes de desenchufarlo. El producto contiene químicos que son conocidos en el Estado de California como causantes de cáncer ydefectos congénitos. Tenga aún más cuidado al limpiar en las escaleras. No utilice el aparato para aspirar líquidos o materiales inflamables o combustible
Place the CLEAN and r ATER TANK back in the machine, making sure it is secure.W 4. Check the POWER SWITCH to make sure it is in the “off” position. 5.wrap the POWER CORD and plug in to an outlet. Note: Rotate the Un op CORD WRAP HOOK to release the cord for easy unwrapping.t 6.o clean