Transcription
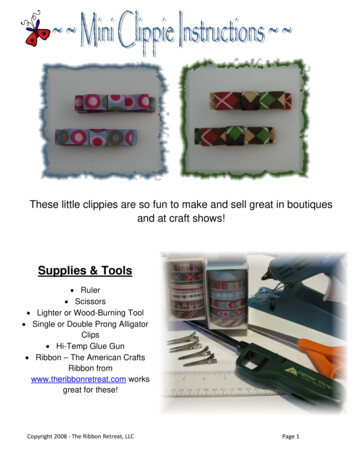
These little clippies are so fun to make and sell great in boutiquesand at craft shows!Supplies & Tools Ruler Scissors Lighter or Wood-Burning Tool Single or Double Prong AlligatorClips Hi-Temp Glue Gun Ribbon – The American CraftsRibbon fromwww.theribbonretreat.com worksgreat for these!Copyright 2008 ‐ The Ribbon Retreat, LLCPage 1
1231. Cut three pieces of ribbon. Cut the first piece of ribbon at 4 ½”. Cut the secondpiece of ribbon at 3 ½”. Lastly, cut the third piece of ribbon at 1 ½”. Seal all of theribbon ends.2. Take the first piece of ribbon (the one that is 4 ½”). Measure up 1 ¼” from oneend and hold in your hand. You will be using this piece of ribbon to line youralligator clip.3. Place a bead of glue on the end of ribbon you’re holding (up 1 ¼”). The bead ofglue will be on the wrong side of the ribbon if you’re using a print.4564. Slide the ribbon inside of the alligator clip – pressing it up against the top prong ofthe clip.5. This is what the barrette will look like when you’re holding the pinch part of the clipat your left, with the barrette open.6. Now turn the barrette back over and place a bead of glue on the TOP part of theclip.Copyright 2008 ‐ The Ribbon Retreat, LLCPage 2
7897. Take the long piece of ribbon and fold it over the hot glue, pressing down acrossthe clip to adhere it securely.8. This is what the clip will look like when it is opened.9. Now turn the barrette over so that the lined portion is on the bottom.1010.11.12.1112Place glue inside of the pinch part of the clip where indicated.With your finger, press the ribbon inside of the pinch part of the clip and pressfirmly to adhere.Now place a bead of glue on the remaining piece of ribbon.Continued on Next Page .Copyright 2008 ‐ The Ribbon Retreat, LLCPage 3
1313.14.15.14Press the ribbon onto the back part of the barrette.You now have the lined barrette, the 3 ½” piece of ribbon, and the 1 ½” piece ofribbon.Take the 3 ½” piece of ribbon. We’ll be using this piece for the actual bow.1616.17.18.151718Place a bead of glue at the very tip of one end of the ribbon.Bring the opposite end of ribbon around to form a circle and glue together.Now hold the ribbon so that the glued piece is at the bottom.Continued on Next Page Copyright 2008 ‐ The Ribbon Retreat, LLCPage 4
1919.20.21.20Place a bead of glue where the two pieces of ribbon are glued together.Now take the top of the loop and press down onto the bead of glue – in thecenter.Press firmly to adhere.2222.23.24.212324Now turn the bow over so that the seam is facing you.Place a bead of glue in the center.Now turn the bow back over and press onto the lined alligator clip. Try tocenter it as best as you can.Continued on Next Page .Copyright 2008 ‐ The Ribbon Retreat, LLCPage 5
2525.26.27.30.27Now take the clip and using one hand, open it up.While continuing to hold the clip open, place a bead of glue in the center.Take the remaining piece of ribbon and glue on the inside of the barrette asshown.2828.29.262930Now place a bead of glue in the center again.Take the other end of the ribbon around the center of the barrette and adhereto the glue.Turn it over and you now have a finished mini clippie. Great job!Copyright 2008 ‐ The Ribbon Retreat, LLCPage 6
Ribbon – The American Crafts Ribbon from . www.theribbonretreat.com works great for these! 1 . 2 . 3 . 1. Cut three pieces of ribbon. Cut the first piece of ribbon at 4 ½”. Cut the second piece of ribbon at 3 ½”. Lastly, cut the third