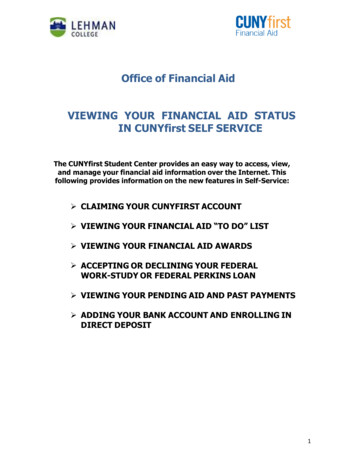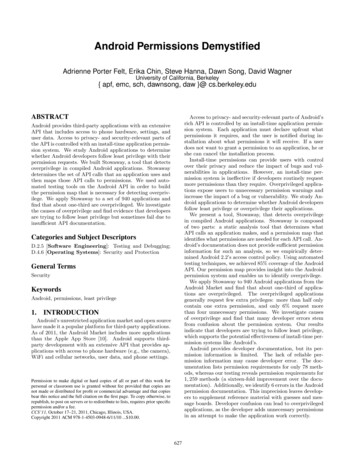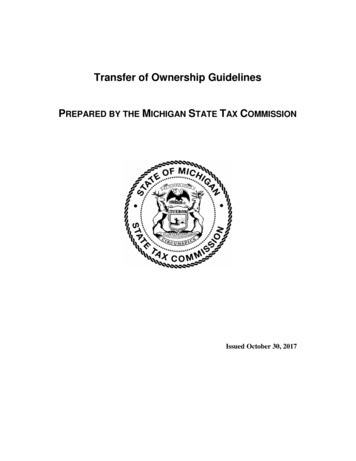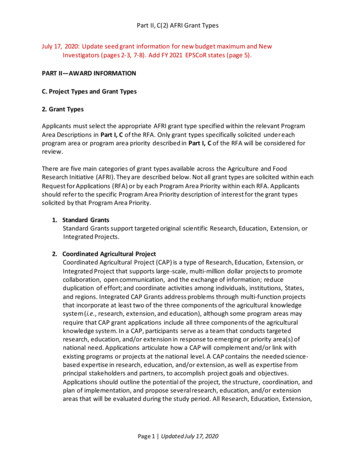
Transcription
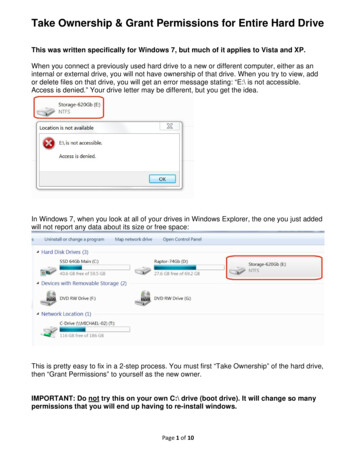
Take Ownership & Grant Permissions for Entire Hard DriveThis was written specifically for Windows 7, but much of it applies to Vista and XP.When you connect a previously used hard drive to a new or different computer, either as aninternal or external drive, you will not have ownership of that drive. When you try to view, addor delete files on that drive, you will get an error message stating: “E:\ is not accessible.Access is denied.” Your drive letter may be different, but you get the idea.In Windows 7, when you look at all of your drives in Windows Explorer, the one you just addedwill not report any data about its size or free space:This is pretty easy to fix in a 2-step process. You must first “Take Ownership” of the hard drive,then “Grant Permissions” to yourself as the new owner.IMPORTANT: Do not try this on your own C:\ drive (boot drive). It will change so manypermissions that you will end up having to re-install windows.Page 1 of 10
Continued: Take Ownership & Grant PermissionsPART 1 – Take OwnershipIn Windows Explorer, right-click on the drive you want to take ownership of, then select“Properties” from drop-down menu:Click on the “Security” tab:Page 2 of 10
Continued: Take Ownership & Grant PermissionsClick on the “Advanced” button:Click on the “Owner” tab in Advanced Security Settings:Page 3 of 10
Continued: Take Ownership & Grant PermissionsClick on the “Edit” Button:Click on the “Other users or groups” button:Page 4 of 10
Continued: Take Ownership & Grant PermissionsUnder “Object Types”, uncheck everything except “Users”, then click on OK.Click on the “Advanced” button:Click on the “Find Now” button:Page 5 of 10
Continued: Take Ownership & Grant PermissionsUnder “Search Results”, click the “user name” that you log into windows with, then click OK:Verify the correct user name in the object window, then press OK:Page 6 of 10
Continued: Take Ownership & Grant PermissionsPlace a check mark in front of “Replace owner on subcontainters and objects”:You will see a warning message stating that “All permissions will be replaced ”. This isnormal. Click on “Yes”:Page 7 of 10
Continued: Take Ownership & Grant PermissionsA status window will show file permissions being rapidly replaced:If you see an error message saying “Access is denied”, it’s not a problem. That message onlyrefers to a specific system file that’s currently in use. You don’t need access to it anyway. Justclick the “Continue” button:Click OK on the final Windows Security message:Thus concludes Part 1. You have successfully taken ownership of the hard drive. Proceed toPart 2 and “Grant Permissions” to yourself.Page 8 of 10
Continued: Take Ownership & Grant PermissionsPART 2 - Grant PermissionsIn Windows Explorer, right-click on the drive you just took ownership of, then select“Properties” from the drop-down menu.Under “Properties”, click the “Security” tab. You should see your user name in the “Group oruser names” window. Click on the user name to highlight it, then click on the “Edit” button:Page 9 of 10
Continued: Take Ownership & Grant PermissionsUnder the “Allow” column, place a check mark in the box for “Full control”, then click on the“OK” button:The hard drive should now show up in Windows Explorer with data about its size and freespace. You should be able to click on it, then click on any directory, then add, delete or modifyfiles as needed.THE END!Page 10 of 10
Take Ownership & Grant Permissions for Entire Hard Drive Page 1 of 10 This was written specifically for Windows 7, but much of it applies to Vista and XP. When you connect a previously used hard drive to a new or different computer, either as an internal or external drive, you will no