Transcription
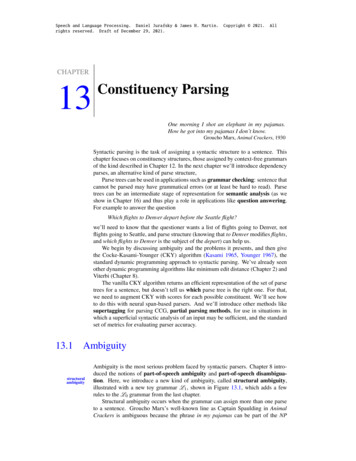
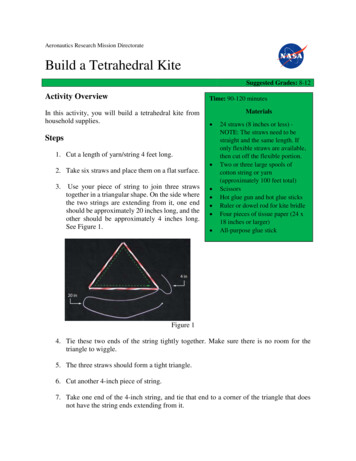
Aeronautics Research Mission DirectorateBuild a Tetrahedral KiteSuggested Grades: 8-12Activity OverviewTime: 90-120 minutesIn this activity, you will build a tetrahedral kite fromhousehold supplies.Materials Steps1. Cut a length of yarn/string 4 feet long.2. Take six straws and place them on a flat surface.3.Use your piece of string to join three strawstogether in a triangular shape. On the side wherethe two strings are extending from it, one endshould be approximately 20 inches long, and theother should be approximately 4 inches long.See Figure 1. 24 straws (8 inches or less) NOTE: The straws need to bestraight and the same length. Ifonly flexible straws are available,then cut off the flexible portion.Two or three large spools ofcotton string or yarn(approximately 100 feet total)ScissorsHot glue gun and hot glue sticksRuler or dowel rod for kite bridleFour pieces of tissue paper (24 x18 inches or larger)All-purpose glue stickFigure 14. Tie these two ends of the string tightly together. Make sure there is no room for thetriangle to wiggle.5. The three straws should form a tight triangle.6. Cut another 4-inch piece of string.7. Take one end of the 4-inch string, and tie that end to a corner of the triangle that doesnot have the string ends extending from it.
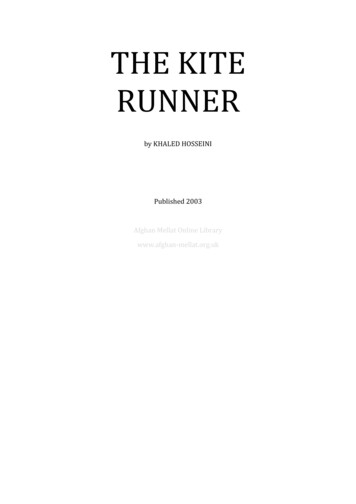
Figure 2.8. Add two more straws onto the longest piece of string.9. Next, take the string that holds the two additional straws and tie it to the end of one ofthe 4-inch strings to make another tight triangle. You should have two pieces of stringsticking out from one end of the two triangles and one piece of string at the oppositeside. See Figure 3.Figure 3.10. Cut another 4-inch piece of string.11. Take that 4-inch piece of string and tie one of its ends to one of the empty corners. SeeFigure 4.12. Cut a piece of string that is double the length of one straw (or side of a pyramid).13. Tie one end of that double-length string to the remaining empty corner. See Figure 4.
Figure 4.14. Add the last straw onto the double-length string.15. Tie together the two opposite ends (the end of the 4-inch string and the end of the doublelength string closest to the straws) to form a tight 3D pyramid. See Figure 5.Figure 5.16. Follow Steps 1-15 to create three more pyramids. You will need four pyramids tocomplete the kite.17. Lace two pyramids side by side in the middle of the 24 inch x 18 inch tissue. (It mighthelp to place a piece of tape in the middle of the pyramids lightly to hold them in placefor marking purposes.)18. At each corner of the two joined shapes, measure 1 inch beyond each of the four cornersand mark with a dot. See Figure 6.
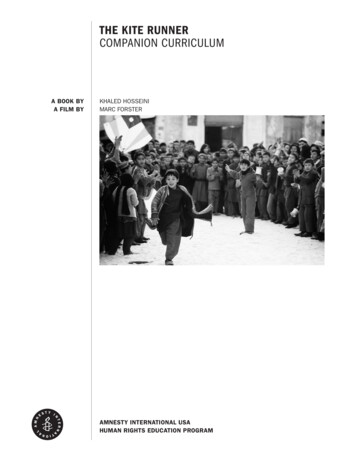
Figure 6.19. Remove the pyramids and connect the dots with a ruler to create a diamond shape. SeeFigure 7.Figure 7.20. Measure 2 inches directly across from the vertex of one of the obtuse angles (an obtuseangle is 90 degrees or more) on the template, and make a mark. See Figure 8.21. Place any corner of a pyramid on the 2-inch mark so that the straws of the pyramid crossover the sides of the template and are equidistant from the vertex. See Figure 8.Figure 8.22. Trace the inside of the side straws from the mark to the sides of the template to create asmall diamond shape. See Figure 10 for an example.23. Follow Steps 20-22, and do the same to the other obtuse angle of the template.
24. Measure 1½ inches directly across from the vertex of the acute angle, which is less than90 degrees, on the template, and make a mark.25. Place any side of the pyramid on the 1½ inch mark so that the straws of the pyramidcross over the sides of the template and are equidistant from the vertex. Trace along theside of the straw through the mark to each of the template sides to make triangles. SeeFigure 9.Figure 9.26. Follow Steps 24-25, and do the same to the other side of the template.27. Your completed tissue paper template should look like Figure 10.Figure 10.28. Cut out the entire template, and then cut out the corners of the template so it looks likeFigure 11.Figure 11.
29. Trace this template onto three other sheets of tissue paper in preparation for coveringfour pyramids in total.30. Lay the one cut tissue paper template on your table.31. Place one side of the pyramid in the middle of the template so there is enough tissuepaper to wrap around the other two sides. See Figure 12.Figure 12.32. Using a glue stick, spread glue along the flaps, and fold the flaps over the straws. Seeyellow circle in Figure 12. Make sure the tissue is wrapped tightly around the straws.33. Flip the pyramid onto the other side of the tissue template.34. Using a glue stick, spread glue onto the flaps, and fold these flaps over the straws for atight fit. See Figure 13.Figure 13.
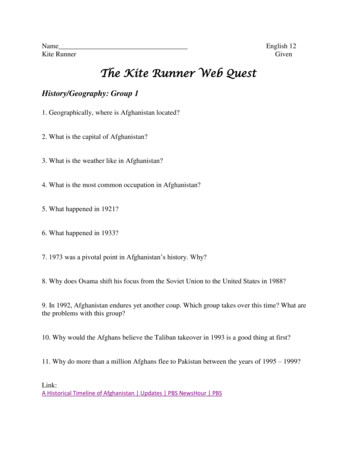
35. Now that you have successfully created and covered one pyramid, you will need to repeatthe process to make three additional pyramids (four in total).36. Once you have created all four pyramids and attached the tissue paper, lay threepyramids on a flat surface or table to form one large triangle. All sides with the tissuepaper should be facing away from you. See Figure 14.Figure 14.37. Each pyramid will have strings that are free. Use those free strings to tie one pyramid toanother. This will tie the adjacent base vertices together.38. On a flat surface, place the fourth pyramid on the top of the three, securing each end tomake a larger pyramid shape. See Figure 15.Figure 15.39. Be sure to fasten all ends tightly and securely so there is very little wiggle room amongthe pyramids.40. Now that you have made your kite, you will need to create and attach your bridle in orderto fly it.
41. Cut a piece of string approximately 15 feet long, and tie it to the ruler or dowel rod so itcan serve as your bridle.42. Use the hot glue gun to make sure your string stays on the ruler. Apply a drop glue(approximately the size of the quarter) to the ruler or rod in order to fasten the string tothe bridle. NOTE: Use caution when using the hot glue gun. An adult should supervisethis task.43. Place your kite on the table with the base touching the table.44. Cut a 24-inch piece of string, and tie it firmly to the very top of the kite.45. Tie the same piece of string again to the middle joint of the kite. This will be betweenthe top section of the kite and the bottom toward the front. There should not be any slackin the string.46. Tie a loop in the middle of your string. The loop should be about the size of a quarter.47. Attach the string of your kite to your bridle string.Figure 16.48. Your kite is finished and ready to fly. If you want, you can always build more of thesetetrahedral kites and join them together in larger pyramid shapes. How large can youbuild your kite?
32. Using a glue stick, spread glue along the flaps, and fold the flaps over the straws. See yellow circle in Figure 12. Make sure the tissue is wrapped tightly around the straws. 33. Flip the pyramid onto the other side of the tissue template. 34. Using a glue stick, spread glue onto the fla