Transcription
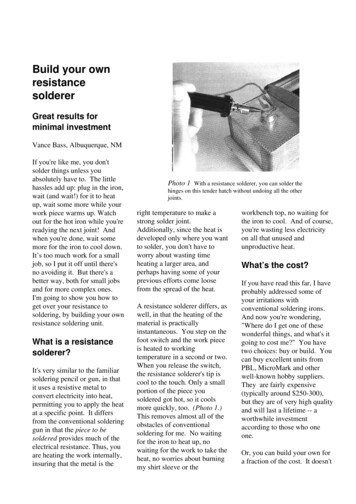
Build your ownresistancesoldererGreat results forminimal investmentVance Bass, Albuquerque, NMIf you're like me, you don'tsolder things unless youabsolutely have to. The littlehassles add up: plug in the iron,wait (and wait!) for it to heatup, wait some more while yourwork piece warms up. Watchout for the hot iron while you'rereadying the next joint! Andwhen you're done, wait somemore for the iron to cool down.It’s too much work for a smalljob, so I put it off until there'sno avoiding it. But there's abetter way, both for small jobsand for more complex ones.I'm going to show you how toget over your resistance tosoldering, by building your ownresistance soldering unit.What is a resistancesolderer?It's very similar to the familiarsoldering pencil or gun, in thatit uses a resistive metal toconvert electricity into heat,permitting you to apply the heatat a specific point. It differsfrom the conventional solderinggun in that the piece to besoldered provides much of theelectrical resistance. Thus, youare heating the work internally,insuring that the metal is thePhoto 1 With a resistance solderer, you can solder thehinges on this tender hatch without undoing all the otherjoints.right temperature to make astrong solder joint.Additionally, since the heat isdeveloped only where you wantto solder, you don't have toworry about wasting timeheating a larger area, andperhaps having some of yourprevious efforts come loosefrom the spread of the heat.A resistance solderer differs, aswell, in that the heating of thematerial is practicallyinstantaneous. You step on thefoot switch and the work pieceis heated to workingtemperature in a second or two.When you release the switch,the resistance solderer's tip iscool to the touch. Only a smallportion of the piece yousoldered got hot, so it coolsmore quickly, too. (Photo 1.)This removes almost all of theobstacles of conventionalsoldering for me. No waitingfor the iron to heat up, nowaiting for the work to take theheat, no worries about burningmy shirt sleeve or theworkbench top, no waiting forthe iron to cool. And of course,you're wasting less electricityon all that unused andunproductive heat.What’s the cost?If you have read this far, I haveprobably addressed some ofyour irritations withconventional soldering irons.And now you're wondering,"Where do I get one of thesewonderful things, and what's itgoing to cost me?" You havetwo choices: buy or build. Youcan buy excellent units fromPBL, MicroMark and otherwell-known hobby suppliers.They are fairly expensive(typically around 250-300),but they are of very high qualityand will last a lifetime -- aworthwhile investmentaccording to those who oneone.Or, you can build your own fora fraction of the cost. It doesn't
showing a unitThe power source for yourconstructed from asolderer will be an automobilepowerbattery charger. Most chargerstransformer, aproduce 12 volts of directwooden dowelcurrent (12VDC) and between 2and a cheap D-celland 20 amps (2-20A). Mostbattery. It was notpeople who have built onea constructionrecommend 5A as a minimum.project for theIf you want to compare thisfaint-hearted,with your conventionalhowever. Cleversoldering iron, you canminds came upcalculate the wattage bywith a safe andmultiplying the voltage timesPhoto 2. The solderer is made from commerciallysimple alternative,the amperage: a 12VDC, 5Aavailable tools, modified to work together.though, and theunit consumes 60W. That isresistance solderernot to say that it produces thelook as polished, perhaps, and itis now an item every workshopsame heat as a 60W solderinghasn't gone through a nationalcan (and should) have.iron, however. Since the heat iselectrical safety inspector, but itgenerated right at the spot youwill do the same job. (YourTo simplify the construction,want to solder, you will betrackwork uses the samewe're going to usevoltages and amperages, by thecommercially availableway, so don't worry too muchproducts, and modifyabout the safety inspection.them somewhat so theyUse the common electricalcan be combined toprecautions and you should beform a resistancefine.) With this simple homesolderer. The bill ofmade solderer, you can soldermaterials lists the itemswiring joints or attach brassyou will need to build adetail parts in seconds. A unitPhoto 3. The footswitch controls the currentbasic unit. (Seelike this will not be suitable forflow from the transformer to the electrode.sidebar.) You cansoldering really large piecessubstitute equivalentradiating less of it into the airlike 1:20 scale brass locomotiveparts wherever you wish. (Thatand thus you will be using lesscabs or boilers, however. Forold Lionel ZW transformer inwattage to do the same job. Onthat, you'll still need to use ayour attic would make a goodsmall parts, you have to be fasttorch. But it will replace yourpower source, for example.)with the on/off switch, even atsoldering iron for most jobs,Construction should take only a2A, or you’ll heat your part redand will let you do many thingscouple of hours once you havehot!impossible to do with an iron.the materials.Construction madesimple.Hobbyists have circulated plansfor building resistance solderersfor years, and Narrow Gaugeand Short Line Gazettepublished an article in 1981The resistance solderer I’lldescribe consists of three mainpieces: the power source, thefootswitch , and the electrode.(Photo 2.) You may also add avoltage controller if you wish,made from a household lightdimmer switch.A foot switch permits you tocontrol the flow of electricityfrom the power source to theelectrode. The box housing thefootswitch has 1/4 inch jacks,into which the cords from thepower source and the electrodeare plugged. These are standard
musical cord jacks and plugs.(Photo 3.)The electrode consists of abakelite handle holding acarbon rod. (This could also bemade of wood or anotherinsulating material.) A heavycord connects the electrode tothe footswitch. One wire of thecord is attached to the carbonrod, while the other wire hangsloose, with an alligator clipattached to the end. You don’treally need a box of 50 cuttingtorch rods (I still have 49 in thebox). Try to find some friendsto share a box, or ask thewelding supply to sell you oneor two. If you have to buy theentire box, though, rememberthat you’re still saving a lot bybuilding it yourself.(Photo 4.)Cut the plug off the cord.Separate the wires on one endof the cord for about 6 inches,then strip both wires about 1/4inch. Strip the wires on theother end and solder them intothe other guitar plug. With apower hand drill, drill a 1/8inch hole about 1/2 inch fromthe bottom end of the handle,then gently move the drill uptowards the top end of thehandle, giving the hole an angleof about 45 degrees. This willsimplify moving the groundwire through it later. With ametal saw (hobby or hacksaw),cut the metal mounting barrel toleave about 1 inch above thebase. Drill a 1/8 inch holethrough the side of the barrel,and thread it for a 6-32 screw.(This is a set screw, not aPutting it alltogether.First, modify thebattery charger bycutting off theterminal clips from thebattery cable. StripPhoto 4. The electrode is made from anthe wires and solderinexpensive soldering pencil handle. It canboth of them into one also be made from a wooden dowel or otherof the guitar plugs.insulating material.(This may be a tight fit-- be sure you checkcritical measurement -- useall the clearances in the plug'swhatever you have that willshell before you solder thehold the carbon rod in place.)wires.) That completes theThe rod can be sharpened to apower source!fine tip in an ordinary pencilsharpener. Carbon, after all, isNext, make the electrodethe same stuff a pencil is madehandle. Take apart theof, minus the hardener and thesoldering pencil, and disconnectwood. The fine point willthe cord from the heating tip.permit you to focus the heatright where you need it.Now, connect all the pieces ofthe electrode: thead the cordinto the bottom end of thehandle. Push one of the wiresthrough the angled hole, andmove the other all the waythrough the handle and out theother end. Solder the lowerwire onto the alligator clip andtie a knot in it to keep if fromfalling out the bottom of thehandle. Connect the wire onthe upper end to the carbon rod.If you’re using carbon cuttingrod, it will be coated in copperand the wires can simply besoldered on to the copper coat.Otherwise, you’ll have todevise something that willtransmit the electricity to therod and still permit changing itshould it break. Onehomemade rig uses telescopingbrass tubing to adapt the rod tothe handle. Winding ten ortwelve turns of thin copperwire around the rod would givea good place to connect thepower wire; this can beclamped down firmly by the setscrew for positive contact at alltimes.Finally, you’ll need a footswitch to give you control overthe power and leave both handsfree to work. Use heavy-dutycomponents in this part, oryou’ll find yourself rebuilding itafter the switch or the wiresmelt from the high amperage.Take a 2x2x4 inch aluminumproject box (a two-part box forelectronics projects) and cut thesides of the half with the
screwhole flanges at a 45degree angle with your hacksawor hobby saw. Flatten out onebend in the other half, cut offthe excess metal, bend a newedge and drill new holes for thescrews. (Photo 3.) This willgive you a box with an anglewhich will allow you to reachthe switch easily with your foot.Drill three holes in the box: onein the top and two on the front.Square up the front holes to fitthe power jacks you are using.Measure the depth of the switchyou’re using and place the tophole to make sure that theswitch will clear the bottom ofthe box when mounted. Mountthe two jacks in the two holeson the front side. Using aheavy-gauge wire, such ashousehold extension cord wire,connect the plugs and switchesso one connector on each plugis directly wired to the other.Solder the two connectors onthe switch to each of theremaining connectors on thetwo jacks. (Figure 3.) Screwthe box together and it’sfinished!Using the resistancesolderer.To ready the solderer, connectthe three components byplugging the power plugs intothe jacks on the front panel ofthe foot switch. It doesn’tmatter which plug goes intowhich jack, so arrange thecharger and footswitch wherethey are convenient in yourwork space and put the plugsinto the nearest jacks. Be sureto connect the electrode andcharger before plugging thecharger into the house power,or your get a lot of sparks fromthe jacks.To use the solderer, you firstprepare the pieces your aresoldering in the usual way:clean them mechanically ifnecessary with a file, steelwool, sandpaper, etc. Make aphysically sound joint ifpossible, one that would holdthe pieces together withoutsolder. Then apply the flux ofyour choice to the joint tofurther clean the joint and tospread the heat evenly over thesurface of the metal.If your charger has differentamperage or voltaage settings,start out on the lowestamperage. This should besufficient for most small andmedium jobs. I have found thatusing higher amperages alsotends to trip the charger’scircuit breaker, which wasdesigned to shut down power incase of a short circuit. Acontrolled short circuit is whatyou are trying to create withyour solderer, so don’t temptthe breaker. (You may wish todisable it if you feelcomfortable you can do so, anduse the resulting rig, safely.)Now, the fun part. Clip thealligator clip on your electrodehandle someplace on the workpiece, the closer to the solderjoint the better (it wastes lessheat this way). Place the tip ofthe electrode at the point youwant the heat, then press thefoot switch. The flux shouldstart to bubble almostimmediately, so have the solderready in your other hand andapply it quickly. Release thefoot switch when the solder hasflowed, then remove theelectrode from the work piece.You may lose a few pieces ofwork at first, as you getaccustomed to this sequence ofevents. Welding supply housessell these electrodes for cutting,not for joining metal, and youwill find out why if you take theelectrode off the metal beforeyou turn off the current. Whatyou will see is the same arc ofelectricity your car batterymakes if you connect the cablesincorrectly. It’s big, and it’sloud, but most importantly it’svery energetic. The arc willpunch a hole in a small piece ofmetal, and that expensive detailcasting or that smooth surfaceyou were working on will nowhave a big black pit. Moral:always turn the power on andoff while the electrode is on themetal.Advanced topics.You can easily add a voltagecontroller, if your charger hasonly one setting, or if the lowestsetting is still too powerful forwhat you are working on. Ahousehold light dimmer willperform the same function foryour solderer, and reduce theelectrical voltage getting to thetransformer, in turn reducingthe voltage that comes out.
This may be useful if you soldera lot of small parts likehandrails, and find that they areheating too rapidly for you towork on easily. Mount thedimmer in a double junctionbox, with an outlet, so thedimmer controls the voltage atthe plug. Plug your chargerinto this.You could skip the chargeraltogether, do it the cowboyway and just get a 10A or 15Atransformer with a 6V or 12Vsecondary. The usual caveatsapply: put a fuse and switch onthe primary side, and don’t tryit if you don’t know whatyou’re doing.Resistance is notfutile.1Well, there you are. Younow have a resistancesolderer, and yourmodeling life will never bethe same. You can nowgrind out those jobs inseconds that once were thethorn in your paw -- eitherpainful or impossible to dowith your iron and torch.And you saved yourselfabout 200 in the process,enough to buy the brassstock for that Big Boyyou’ve been thinking aboutscratchbuilding. Go for it!Bill of MaterialsAutomobile battery charger.12VDC, switchable amperage isdesirable (typically 2, 5, 10A). Cost:around 50.Soldering pencil. A 20- or 30W ironfrom an radio or hobby shop. Cost:around 5.1/4-inch carbon rod. The easiestplace to find these would be at awelding supply. (Make sure you getthe hard kind.) You can also find themin the core of certain carbon cells, butthe chemicals that surround the rodsare noxious and require care indisposal. Cost: 20/box of 50.Aluminum project box.5A pushbutton switch.Electrical extension cord.Computer power supply plugs/jacks(2 ea.)Available at radio shops. Cost: around 15.You can also experiment withdifferent types of electrodes.Using the plugs in thefootswitch box permits you tounplug one electrode and plugin another. The commerciallyavailable units usually have anadd-on accessory such as a“tweezer” electrode. This putsthe two electrical contacts onthe fingers of a tweezer-likehandle, permitting you to runthe electricity and heat directlythrough the metal from onesurface to the other. Somecommercial rigs come with thetweezer as the standardelectrode and charge extra forthe kind you just built. Bothare useful.Wire stripper, solder, flux, solderingiron. Well, you have to start withsomething! You should already havethese in your toolbox, though. Cost:around 15.1Those guys on StarTrek didn't know aboutresistance soldering.
AfterthoughtsAfter using my solderer a while,I discovered two items in thepreceding which must bechanged to withstand the heatgenerated by the system: thefoot switch and the connectors.You must have a 20Apushbutton switch if the switchis between the transformer andthe electrode. These are a bitharder to find, but anelectronics supply will havethem. Ask around until youfind one. Or, ask around at thelocal hardware stores and find aheavy-duty AC footswitchintended for power tools likedrill presses. This permitsconnecting the electrodedirectly to the output side of thetransformer.The other issue is theconnectors. Don’t use guitarplugs (as originally shown inthe photos-- they willeventually fail due to the heatgenerated. Instead, use nylonpower supply connectors fromthe radio or computer shop.(Photo 5) They are inexpensiveand will stand up to the heat.This will require making arectangular hole in yourfootswitch box, but is worth theextra effort.After writing the article, I madeanother very useful tool: atweezer or pincer styleelectrode. Mine was madefrom bamboo kitchen tongs;any non-conductive, heatresistant material will do, butpay attention to durability here,too. (Photo 5)I attached a couple of brassblocks to the ends of the tongs,drilled lengthwise to acceptPBL tweezer tips, andcrosswise for a set screw. Thetips are about 3.50 a pair atCaboose Hobbies, and areprobably available directlyfrom PBL as well. I ran thewiring down the length of thetongs, then secured them withcloth tape used on bicyclehandles (electrical tape willwork fine, too). I used thesame plug on the end of thewire as on the carbon electrode.Rather than soldering thecarbon rod to the wire in theelectrode handle, it’s better touse a mechanical connection -like a set screw. That way, youcan change rods easier, and youdon’t have to worry about thesolder joint coming undone.Finally, the issue of heatconcentration. The smaller thetip, the more heat isconcentrated on a smaller area.You can sharpen the carbonelectrodes in a pencil sharpener.Or, you can use the PBL metalelectrodes, which are about1/16” diameter. This is how thePBL and American Beautypencil are configured. It may ormay not be easier to find themthan the carbon electrodes. It’syour choice; either will work.Photo 5. The tweezer electrode,made from wood pasta tongs. Notethe computer power supply plug onthe end of the cord.
Build your own resistance solderer Great results for minimal investment Vance Bass, Albuquerque, NM If you're like me, you don't solder things unless you absolutely have to. The little hassles add up: plug in the iron, wait (and wait!) for it to heat up, wait some more while your work pi