Transcription
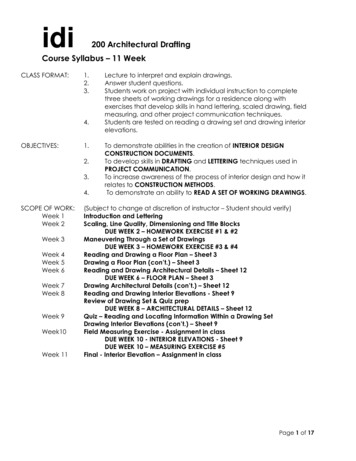
idi200 Architectural DraftingCourse Syllabus – 11 WeekCLASS FORMAT:1.2.3.4.OBJECTIVES:1.2.3.4.SCOPE OF WORK:Week 1Week 2Week 3Week 4Week 5Week 6Week 7Week 8Week 9Week10Week 11Lecture to interpret and explain drawings.Answer student questions.Students work on project with individual instruction to completethree sheets of working drawings for a residence along withexercises that develop skills in hand lettering, scaled drawing, fieldmeasuring, and other project communication techniques.Students are tested on reading a drawing set and drawing interiorelevations.To demonstrate abilities in the creation of INTERIOR DESIGNCONSTRUCTION DOCUMENTS.To develop skills in DRAFTING and LETTERING techniques used inPROJECT COMMUNICATION.To increase awareness of the process of interior design and how itrelates to CONSTRUCTION METHODS.To demonstrate an ability to READ A SET OF WORKING DRAWINGS.(Subject to change at discretion of instructor – Student should verify)Introduction and LetteringScaling, Line Quality, Dimensioning and Title BlocksDUE WEEK 2 – HOMEWORK EXERCISE #1 & #2Maneuvering Through a Set of DrawingsDUE WEEK 3 – HOMEWORK EXERCISE #3 & #4Reading and Drawing a Floor Plan – Sheet 3Drawing a Floor Plan (con’t.) – Sheet 3Reading and Drawing Architectural Details – Sheet 12DUE WEEK 6 – FLOOR PLAN – Sheet 3Drawing Architectural Details (con’t.) – Sheet 12Reading and Drawing Interior Elevations - Sheet 9Review of Drawing Set & Quiz prepDUE WEEK 8 – ARCHITECTURAL DETAILS – Sheet 12Quiz – Reading and Locating Information Within a Drawing SetDrawing Interior Elevations (con’t.) – Sheet 9Field Measuring Exercise - Assignment in classDUE WEEK 10 - INTERIOR ELEVATIONS - Sheet 9DUE WEEK 10 – MEASURING EXERCISE #5Final - Interior Elevation – Assignment in classPage 1 of 17
idi200 Architectural DraftingCourse Supply ListAll of these supplies should be purchased at the beginning of the Architectural Draftingcourse. YOU ARE EXPECTED TO BRING ALL OF THE SUPPLIES TO EVERY CLASS.Supplies that were provided to you in your Certificate class including the following Review these supplies and supplement if needed:Flimsy (12” or 18” roll is okay)Drafting tape or dotsLeads 2H, H, HB, and F with lead holders for each (3 leads to a tube is best)Architectural scaleLead pointerSoft eraserTemplate with small hexagons, squares, circles and trianglesBath fixture template (1/4” scale)Drafting brushErasing shieldSupplies that can be purchased at Art Supply Warehouse, Huntington Beach(artsupplywarehouse.com) or similar type store:24" x 18" sheets of vellum (3 or 4 sheets will be needed)1000H erasable grid (called Fade Out)8 squares to an inchNo borders on the vellum8 1/2" x 11" pad of vellum (erasable grid or plain)Prismacolor pen, French Grey 70%Other supplies:Downloads from IDI website:200 Drafting Syllabus200 Drafting 11x17 Reduced Partial Plans (for reference only)NOTE: PLEASE KEEP ALL SUPPLIES, CLASS NOTES AND MATERIALSFROM THIS CLASS, AS THEY WILL BE USED IN OTHER CLASSESPage 2 of 17
idi200 Architectural DraftingCourse PoliciesSCHOOL POLICY:ATTENDANCE IS MANDATORYStudents are expected to remain in class for the ENTIRE PERIOD – Leaving earlier than 15minutes prior to class end will be marked as tardy.15 min. Breaks are allotted every hour.Desks and parallel bars must be CLEANED at the end of every class period.All homework, sheet assignments and the final are due at the specified times and therewill be no personal extensions of due dates. If your homework or your sheet assignmentis not finished on time, turn it in the next week and your grade will be reduced by 3points. If you turn it in 2 weeks late, 6 points will be taken off. After 3 weeks late, 10 pointswill be deducted. You must eventually complete and turn in ALL sheets (includinghomework) to pass the class.MY POLICY:Class starts on time and if you are tardy you are responsible for getting the classinformation from another studentCELL PHONES ARE TO BE TURNED OFF DURING CLASS. No phone calls or texting in class orduring lab time.Every student is required to draft in class and are expected to bring all of their supplies towork during the lab time. STUDENTS ARE NOT ALLOWED TO WORK ON OTHER CLASSES INTHIS CLASS TIME. Students who leave prior to 15 minutes before the end of class will bemarked as tardy. Twice tardy counts as an absence. I reserve the right to fail anystudent who has more than two absences.If anyone is caught cheating, (tracing another student’s work) both students will fail theclass.Printing must be done at a facility that will reproduce your work with a digital scanner.Consolidated Reprographics (CR), C2 Reprographics, Coastal Blue and Orange CountyBlueprint (OCB) have Ose machines that will do this. Ask for a PPC (plain paper copy) onbond. Do not go to printers that use a large size Xerox machine such as Kinkos.No large vellum sheet originals will be accepted as homework – you must have thosereproduced. The 8-1/2” x 11” exercises may be turned in on vellum, however, a copy ispreferred.Page 3 of 17
idi200 Architectural DraftingCourse PoliciesSTUDENT EVALUATION:Criterion-based method of grading which means the grade isindependent of other student scores.POINT DISTRIBUTION:10 pointsAttendance and attitude (2 points deducted for each absenceand 1 point for each tardy and leaving class early)20 points Homework Exercise #1 & 220 points Homework Exercise #3 & 425 points Floor Plan - Sheet 325 points Architectural Details - Sheet 1225 points Quiz #125 points Interior Elevations – sheet 920 points Measuring Exercise # 530 points Final Exam (No Show Fails Class)200 TOTAL POSSIBLE POINTS25 POINT BREAKDOWN:LNSDLGRADE10 points for line quality and neatness5 points for scaling5 points for directions and specifications met5 points for letteringPOINTSSTANDARDA200 -179Very superior achievement and high quality workB178 -159Highly satisfactory achievement and above average workC158 -139Competent achievement and average workD138 -119Poor achievement — work is late or incompleteF118 - 0Very low achievement — work is late or incomplete andattendance is poorReminder: All assignments must be turned in to pass the class!Page 4 of 17
idi200 Architectural DraftingLetteringLegible lettering on a drawing fulfills an important requirement. Information that cannotbe revealed by graphic shapes and lines alone must be included in the form of notes,title, dimensions and identifications to make the drawing informative and complete. Thelettering can either enhance the drawing by making it simple to interpret and pleasantto look at or ruin an otherwise good drawing by making it difficult to read and unsightly inappearance.The basic block letter is the foundation of a variety of alphabets. It has the greatadvantage of being a pure and neutral style, easily adaptable later on to your ownpersonality or that of any architecture office.IT IS VERY IMPORTANT THAT A STUDENT THOROUGHLY LEARN THE BASIC BLOCK ALPHABETSelect an “F” drafting lead for lettering and keep the point medium sharp at all times.Rotate the pencil continually between strokes to maintain a uniform pencil point. Apoint that is too sharp is difficult to control and it breaks. A pencil that becomes too dullproduces ragged strokes.ALL LETTERING IS DONE WITH THE AID OF PENCILED GUIDELINES. Even experienceddrafters carefully draw horizontal and vertical guidelines for their lettering. In pencillettering, the guidelines are always left on the drawing; therefore, care should be takenin placing the lines neatly and lightly on the paper with a sharp “2H” lead or a non-photopencil.USE A TRIANGLE FOR DRAWING ALL VERTICAL STROKES. Simply slide the triangle alongthe parallel bar with your left hand as you letter; when a vertical stroke is needed, quicklyset the triangle into place and draw a perfect vertical stroke. All other strokes are madefreehand. Do not use the parallel bar for horizontal lines.The beginning and ending of each stroke are important — emphasize them with a slightpressure of the pencil to bring the strokes to sharp and clean-cut terminations. Eliminatecareless gaps in lettering by carefully intersecting the strokes. Make each vertical strokedefinite and firm and each curve smooth and quick. Going over a stroke twice ruins theappearance of the letter.Capitals are used for the majority of the lettering done on architectural drawings. Oneeighth inch letters are good for notes and one-fourth inch letters are used for titles.Three-sixteenth inch letters can be used for minor titles such as room names. It is useful tothink of block letters as being the same size and approximately square.Page 5 of 17
idi200 Architectural DraftingLetteringPage 6 of 17
idi200 Architectural DraftingBordersPage 7 of 17
idi200 Architectural DraftingExercise #1LETTERINGOn 8 ½ x 11 sheet of vellum with a border and your name and date, copy the followingusing guidelines and all capital letters. Letters should be 1/8" high with 1/8" spacebetween each of the lines and 1/4" between each paragraph.The first known people to develop a system of characters similar to the ones weuse for the purpose of communication were the Phoenicians. Through the ages,these original characters have been embellished and refined but their basicstrokes and shapes have remained. We, in this country, have becomeaccustomed to seeing and reading a style of letter understandable to us. Tochange these shapes and develop a new system of communication wouldcreate confusion. Therefore, it is better for the drafter to learn the basic letteringstyles. This will also allow him or her to have a similar style to others working on thesame project.As a beginning or junior drafter, your job will generally consist of makingcorrections to drawings that have been drawn by others. There may not be a lotof mental stimulation to making changes but it is a very necessary job. It is also agood introduction to the procedures and quality standards within an office.As your line and lettering quality improve, your responsibilities will expand. As yougain an understanding of the drawings that you are making and confidence inyour ability, sketches will be given to you for drafting. The sketches will becomesimpler as time goes by and your knowledge increases. Eventually you will bereferred to similar drawings and will be expected to make necessary adjustmentsto fit these drawings to the new application.To advance as a drafter, you will need to spend time at the construction sitesobserving the buildings being built. Understanding what a craftsman must do as aresult of what you have drawn is necessary if you are to advance as a drafter.Never forget that your drawings are a set of instructions for the builder to follow.Using guidelines and all capital letters, copy the following using 1/4" high letters and 3/16"spaces between each line.FLOOR PLANEAST ELEVATIONSECOND LEVEL FLOOR PLANMECHANICAL PLANFINISH, DOOR AND WINDOW SCHEDULESSECTIONSPage 8 of 17
idi200 Architectural DraftingEXERCISE #2LETTERINGOn 8 ½ x 11 sheet of vellum with a border and your name and date, copy the followingusing guidelines and all capital letters. Letters for titles should be 1/4" and letters in thetext should be 1/8" high. Spaces between the lines should be 1/8" and 1/4" between theparagraphs.LETTERINGIn architectural drafting, as in mechanical drafting, hand-lettered workingdrawings may not always be a reality. A variety of different types of mechanicaldevices have been coming on the market in recent years and large engineeringand aircraft firms have been using the computer.However, the interior design industry is and may always be a small crafts industry.Interior Design firms usually contain three to six employees and consequentlycannot afford the expense to computerized drafting and lettering machines. Forthis reason it is important that each design student be proficient in lettering. Infact, good lettering and good line quality help obtain the first job for the student.SCALEMost plans, elevations and sections are drawn at a very small scale. Details areusually drawn at a large scale, such as the following:3/4" 1'-0"1" 1'-0"1 1/2" 1'-0"3" 1'-0" (quarter size)6" 1'-0" (half size)Full SizeListed below are suggested typical scales for use in detailing:FootingsIntersections of roof to wallWindow and door detailsCabinet detailsOthers3/4" 1'-0"1" 1'-0"1 1/2" 1'-0"3" 1'-0"3" 1'-0"3" 1'-0"3/4" 1'-0"Page 9 of 17
idi200 Architectural DraftingEXERCISE #3ARCHITECTS SCALEOn 8 ½ x 11 sheet of vellum with a border and your name and date, draw the followinglines horizontally on the page with the first line at the top of the page. Begin each line1/2" in from the left hand border. Use the scale /4" 1'-0"1/4" 1'-0"1/4" 1'-0"1/4" 1'-0"1/2" 1'-0"1/2" 1'-0"1/2" 1'-0"3/4" 1'-0"3/4" 1'-0"1" 1'-0"1" 1'-0"1 1/2" 1'-0"1 1/2" 1'-0"3" 1'-0"3" 1'-0"1/8" 1'-0"1/8" 1'-0"1/8" 1'-0"1/8" 1'-0"1/4" 1'-0"LENGTH & LOCATION OF THE LINE24'-0" long, 1'-0" below top border20'-0" long, 1'-6" below line 118'-6" long, 1'-0" below line 211'-3" long, 1'-6" below line 310'-2" long, 1'-6" below line 49'-1" long, 1'-8" below line 512'-5" long, 0'-9" below line 66'-6" long, 0'-7" below line 78'-2 1/2" long, 0'-9 1/2" below line 84'-0" long, 0'-8" below line 95'-4 1/4" long, 0'-7 1/2" below line 102'-3 1/2" long, 0'-5 1/2" below line 113'-8" long, 0'-2 1/2" below line 121'-10 1/2" long, 0'-2 1/2" below line 130'-11" long, 0'-1" below line 1444'-6" long, 1'-4" below line 1532'-4" long, 1'-10" below line 1615'-8" long, 0'-10" below line 1741'-2" long, 1'-0" below line 1817'-11" long, 0'-5" below line 19Page 10 of 17
idi200 Architectural DraftingEXERCISE #4Page 11 of 17
idi200 Architectural DraftingTitle BlockPage 12 of 17
idi200 Architectural DraftingFixture and Appliance Schedule / Lumber sizesFIXTURE AND APPLIANCE SCHEDULEREFRIGERATOR36"W 30"D 6'-0"HRANGE30"W 22"DRANGE HOOD30"W 9"HDISHWASHER24"W 24"DWASHER & DRYER30"W 26"D 36"HBATH TUB2'-9"W 1'-3"HLAV COUNTER (Bath #2)2'-0"D 2'-9"WKITCHEN SINK22"D 30"WWATER HEATER2'-0" DiameterF.A.U.1'-2"W 1'-9"DLUMBER SIZESStandard lumber sizes are defined as nominal size and actual (or surfaced) size. Thenominal size is the dimensional size of the rough lumber. The surfaced size is the actualsize after the rough lumber has been planed and finished. When designating the sizes ofwood members in a specific detail, the nominal size is used, but the actual size is drawnon the detail. For example, the call out for wood studs may be 2 x 4 while the actual sizeis 1 1/2" X 3 1/2".NOMINAL SIZEin inches1234568101214ACTUAL SIZEin inches3/4"1 1/2"2 1/2"3 1/2"4 1/2"5 1/2"7 1/4"9 1/4"11 1/4"13 1/4"Page 13 of 17
idi200 Architectural DraftingDrawing DetailsPage 14 of 17
idi200 Architectural DraftingDrawing DetailsPage 15 of 17
idi200 Architectural DraftingDrawing DetailsPage 16 of 17
idi200 Architectural DraftingDrawing DetailsPage 17 of 17
Week 5 Drawing a Floor Plan (con’t.) – Sheet 3 Week 6 Reading and Drawing Architectural Details – Sheet 12 DUE WEEK 6 – FLOOR PLAN – Sheet 3 Week 7 Drawing Architectural Details (con’t.) – Sheet 12 Week 8 Reading and Drawing Interior Elevations - Sheet