Transcription
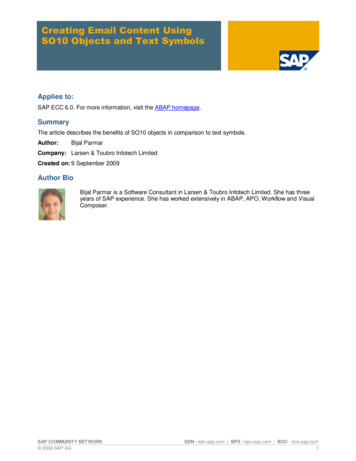
A tutorial: Creating and analyzing a simple model2. A tutorial: Creating and analyzing a simple modelThe following section leads you through the ABAQUS/CAE modeling process by visiting each of themodules and showing you the basic steps to create and analyze a simple model. To illustrate each of thesteps, you will first create a model of a steel cantilever beam and load its top surface (see Figure 2 1).Figure 2 1 A loaded cantilever beam.You will then analyze the beam and plot the resulting stresses and displacements. The entire tutorial takesapproximately 90 minutes to complete.If you are following the tutorial but are unsure how to proceed at any point, click the highlighted andunderlined text in the help window to view more extensive documentation of the task you are attempting.Clicking highlighted text (a hyperlink) takes you to a different section of the ABAQUS/CAE User’sManual; clicking the Go Back buttonin the toolbar across the top of this window returns you to youroriginal point in "Getting started with ABAQUS/CAE." For example, click ‘‘Overview of the mainwindow,’’ Section 5.2 to see detailed information on the components of the main window and click theGo Back button to return here.The following topics are covered: ‘‘Understanding ABAQUS/CAE modules,’’ Section 2.1 ‘‘Starting ABAQUS/CAE,’’ Section 2.2 ‘‘Getting help,’’ Section 2.3 ‘‘Creating a part,’’ Section 2.42 1
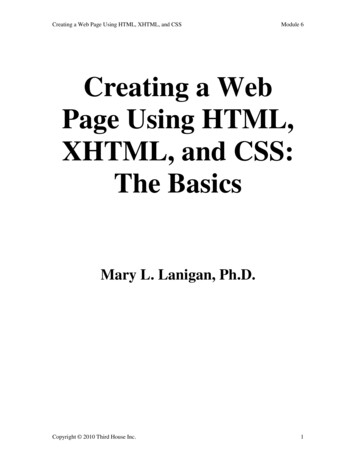
A tutorial: Creating and analyzing a simple model ‘‘Creating a material,’’ Section 2.5 ‘‘Defining and assigning section properties,’’ Section 2.6 ‘‘Assembling the model,’’ Section 2.7 ‘‘Defining your analysis steps,’’ Section 2.8 ‘‘Applying a boundary condition and a load to the model,’’ Section 2.9 ‘‘Meshing the model,’’ Section 2.10 ‘‘Creating and submitting an analysis job,’’ Section 2.11 ‘‘Viewing the results of your analysis,’’ Section 2.122.1 Understanding ABAQUS/CAE modulesABAQUS/CAE is divided into modules, where each module defines an aspect of the modeling process;for example, defining the geometry, defining material properties, and generating a mesh. As you movefrom module to module, each module contributes keywords, parameters, and data to form an input filethat you submit to the ABAQUS/Standard or ABAQUS/Explicit solver for analysis. For example, you usethe Property module to define material and section properties and the Step module to choose an analysisprocedure; the ABAQUS/CAE postprocessor is called the Visualization module.You enter a module by selecting it from the Module list under the toolbar, as shown in Figure 2 2.Figure 2 2 Selecting a module.2 2
A tutorial: Creating and analyzing a simple modelFor the cantilever beam tutorial, you will enter the following ABAQUS/CAE modules and perform thefollowing tasks:PartSketch a two dimensional profile and create a part representing the cantilever beam.PropertyDefine the material properties and other section properties of the beam.AssemblyAssemble the model and create sets.StepConfigure the analysis procedure and output requests.LoadApply loads and boundary conditions to the beam.MeshMesh the beam.JobCreate a job and submit it for analysis.Visualization2 3
A tutorial: Creating and analyzing a simple modelView the results of the analysis.Although the Module list under the toolbar lists the modules in a logical sequence, you can move backand forth between modules at will. However, certain obvious restrictions apply; for example, you cannotassign section properties to geometry that has not yet been created.A completed model contains everything that ABAQUS/CAE needs to generate an input file and start theanalysis. ABAQUS/CAE uses a model database to store your models. When you start ABAQUS/CAE, theStart Session dialog box allows you to create a new, empty model database in memory. After you startABAQUS/CAE, you can save your model database to a disk by selecting File Save from the mainmenu bar; to retrieve it from a disk, select File Open.For a complete listing of which module generates a particular keyword, see ‘‘ABAQUS keyword browsertable,’’ Section A.1.For information on related topics, click any of the following items: Part III, "Working with ABAQUS/CAE model databases, models, and files." ‘‘What is a module?,’’ Section 5.32.2 Starting ABAQUS/CAEYou may find it easier to follow the printed version of the tutorial. This will reduce clutter on the screenand allow you to focus on the task at hand. If you do follow this tutorial online, you should resize andmove the online documentation window and the ABAQUS/CAE window so both are visible while youwork through the tutorial.Tip: To open a separate window containing any of the figures in the online documentation, click thefigure itself.To start ABAQUS/CAE and display the online version of this tutorial:1. If you did not already start ABAQUS/CAE, type abaqus cae.2. From the Start Session dialog box that appears, select Start Tutorial.The ABAQUS/CAE main window and the online documentation window, turned to the chapter"Getting Started with ABAQUS/CAE," appear.2.3 Getting helpYou may want to read additional information about ABAQUS/CAE features at various points during thistutorial. The context sensitive help system allows you to locate relevant information quickly and easily.To obtain context sensitive help:2 4
A tutorial: Creating and analyzing a simple model1. From the ABAQUS/CAE main menu bar, select Help On Context .The cursor changes to a question mark.2. Click any part of the main window except its frame.After a short delay, a window containing information about the item you selected appears. Subsequenthelp requests will not experience this delay, since the server is now running in the background,waiting for more help requests.3. In the Find text field at the bottom of the help window, type any word that appears in the text of thehelp window and press [Enter].All occurrences of the word you typed are highlighted. You can enter any phrase to search for, and thehelp system will locate precisely that phrase; for example, searching for the word "element" yieldsdifferent results than searching for the word "elements." Use the [*] character as a wildcard; forexample, searching for "element*" will find occurrences of the words "element," "elements,""elemental," and "elementary."4. Scroll to the bottom of the help window.At the bottom of the topic, a list of blue, underlined items appears. These items are hyperlinks to theABAQUS/CAE User’s Manual.5. Click any one of the items.An online book window appears. The online version of the ABAQUS/CAE User’s Manual isavailable in the right side of the window, turned to the item that you selected. A table of contents isavailable on the left side of the window, and a Find text field similar to the one in the help window isavailable at the bottom of the window.6. Click any item in the table of contents.The right side of the book window changes to reflect the item you selected.7. From the main menu bar of the book window, select File Close View.The book window disappears.8. In the upper left corner of the context sensitive help window, double click the close button.The help window disappears.Note the following key points: Context sensitive help is available for every item in the ABAQUS/CAE main window and in all itsdialog boxes.2 5
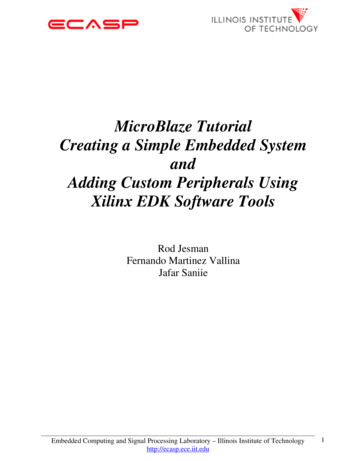
A tutorial: Creating and analyzing a simple model You can search individual help windows or the entire online manual for information. The online book windows provide a hyperlinked table of contents for easy navigation throughout thebook.2.4 Creating a partYou use the Part module to create each of the parts you will analyze. You can create parts that are nativeto ABAQUS/CAE, or you can import parts created by other applications either as a geometricrepresentation or as a finite element mesh.You will start the cantilever beam tutorial by creating a three dimensional, deformable solid body. Youdo this by sketching the two dimensional profile of the beam (a rectangle) and extruding it.ABAQUS/CAE automatically enters the Sketcher when you create a part.ABAQUS/CAE often displays a short message in the prompt area indicating what it expects you to donext, as shown in Figure 2 3.Figure 2 3 Messages and instructions are displayed in the prompt area.Click the cancel button to cancel the current task. Click the backup button to cancel the current step in thetask and return to the previous step.To create the cantilever beam:1. If you did not already start ABAQUS/CAE, type abaqus cae.2. From the Start Session dialog box that appears, select Start Tutorial.3. In the Module list located under the toolbar, click Part to enter the Part module.The cursor changes to an hourglass while the Part module loads. When the Part module has finishedloading, it displays the Part module toolbox in the left side of the ABAQUS/CAE main window. Thetoolbox contains a set of icons that allow expert users to bypass the menus in the main menu bar. Eachmodule displays its own set of tools in the module toolbox. As you select items from the main menubar, the corresponding tool is highlighted in the module toolbox so that you can learn its location.4. From the main menu bar, select Part Create to create a new part.2 6
A tutorial: Creating and analyzing a simple modelThe Create Part dialog box appears. ABAQUS/CAE also displays text in the prompt area near thebottom of the window to guide you through the procedure.You use the Create Part dialog box to name the part; to choose its modeling space, type, and basefeature; and to set the approximate size. You can edit and rename a part after you create it, but youcannot change its modeling space, type, or base feature.5. Name the part Beam. Accept the default settings of a three dimensional, deformable body and asolid, extruded base feature. In the Approximate size text field, type 300.6. Click Continue to exit the Create Part dialog box.ABAQUS/CAE automatically enters the Sketcher. The Sketcher toolbox appears in the left side of themain window, and the Sketcher grid appears in the viewport. The Sketcher contains a set of basictools that allow you to sketch the two dimensional profile of your part. ABAQUS/CAE enters theSketcher whenever you create or edit a part. To finish using a Sketcher tool, click mouse button 2 inthe viewport or select a new tool.Tip: Like all tools in ABAQUS/CAE, if you simply position the cursor over a tool in theSketcher toolbox for a short time, a small window appears that gives a brief description of thetool.The following aspects of the Sketcher help you sketch the desired geometry: The Sketcher grid helps you position the cursor and align objects in the viewport. Dashed lines indicate the X and Y axes of the sketch and intersect at the origin of the sketch. A triad in the lower left corner of the viewport indicates the relationship between the sketchplane and the orientation of the part. When you select a sketching tool, ABAQUS/CAE displays the X and Y coordinates of thecursor in the upper left corner of the viewport.7. To sketch the profile of the cantilever beam, you need to draw a rectangle. To select the rectangledrawing tool, do the following:a. Note the small black triangles at the base of some of the toolbox icons. These trianglesindicate the presence of hidden icons that can be revealed. Click the Line tool in theupper right corner of the Sketcher toolbox, but do not release mouse button 1. Additionalicons appear, as shown below.2 7
A tutorial: Creating and analyzing a simple modelb. Without releasing mouse button 1, drag the cursor along the set of icons that appear until youreach the rectangle tool. Then release the mouse button to select that tool.The rectangle drawing tool appears in the Sketcher toolbox with a pink background indicating thatyou selected it. ABAQUS/CAE displays prompts in the prompt area to guide you through theprocedure.8. In the viewport, sketch the rectangle using the following steps:a. Notice that as you move the cursor around the viewport, ABAQUS/CAE displays the cursor’sX and Y coordinates in the upper left corner.b. Click one corner of the rectangle at coordinates ( 100, 10).c. Move the cursor to the opposite corner (100, 10) so that the rectangle is twenty grid squareslong and two grid squares high as shown in Figure 2 4.Figure 2 4 Sketch of the rectangle.d. Click mouse button 1 to create the rectangle.e. Click mouse button 2 anywhere in the viewport to finish using the rectangle tool.Note: If you are a Windows user with a 2 button mouse, press both mouse buttons simultaneously whenever youare asked to press mouse button 2.2 8
A tutorial: Creating and analyzing a simple model9. If you make a mistake while using the Sketcher, you can delete lines in your sketch, as explained inthe following procedure:a. From the Sketcher toolbox, click the Delete tool,.b. From the sketch, click a line to select it.ABAQUS/CAE highlights the selected line in red.c. Click mouse button 2 in the viewport to delete the selected line.d. Repeat steps b and c as often as necessary.e. Click mouse button 2 in the viewport to finish using the Delete tool.10. From the prompt area (near the bottom of the main window), click Done to exit the Sketcher.Note: If you don’t see the Done button in the prompt area, continue to click mouse button 2 in the viewport until it appears.11. Because you are creating an extruded part, ABAQUS/CAE displays a text field in the prompt areaasking you to define the distance through which the sketch should be extruded. In the text field, erasethe default value of 30.0 and type a value of 25.0. You can either press [Enter] or click mousebutton 2 in the viewport to accept this value.ABAQUS/CAE displays an isometric view of the new part, as shown in Figure 2 5.Figure 2 5 Isometric view of the beam.To help you orient the cantilever beam during the modeling process, ABAQUS/CAE displays a triadin the lower left corner indicating the orientation of the X , Y , and Z
1. From the ABAQUS/CAE main menu bar, select Help On Context. The cursor changes to a question mark. 2. Click any part of the main window except its frame. After a short delay, a window containing information about the item you selected appears.
![Unreal Engine 4 Tutorial Blueprint Tutorial [1] Basic .](/img/5/ue4-blueprints-tutorial-2018.jpg)