Transcription
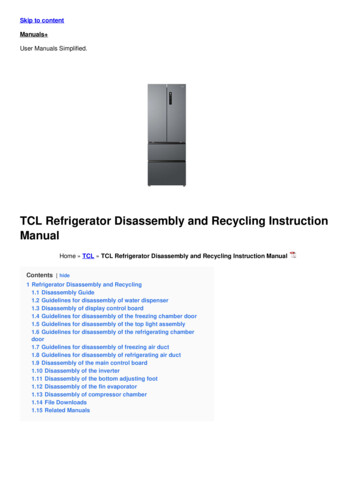
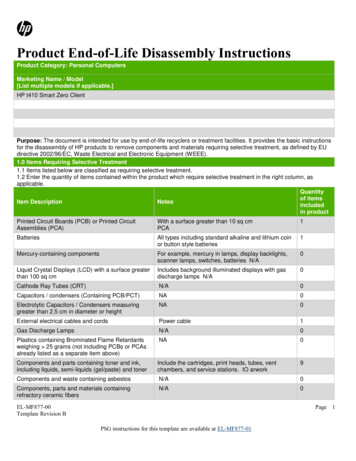
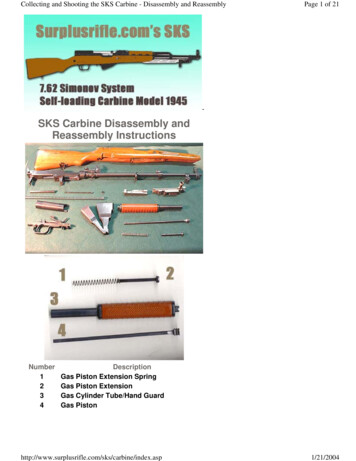
Collecting and Shooting the SKS Carbine - Disassembly and ReassemblyPage 1 of 21-SKS Carbine Disassembly andReassembly InstructionsNumber1234DescriptionGas Piston Extension SpringGas Piston ExtensionGas Cylinder Tube/Hand GuardGas x.asp1/21/2004
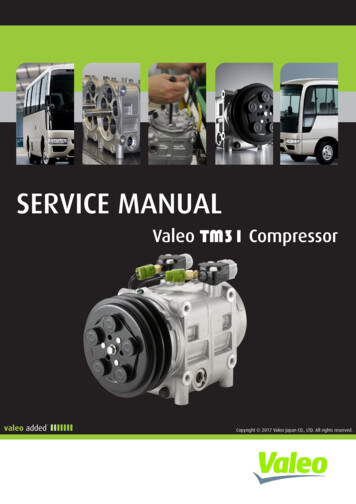
Collecting and Shooting the SKS Carbine - Disassembly and ReassemblyPage 2 of 21NumberDescription5Receiver Cover6Bolt Carrier7Bolt AssemblyNumber891011DescriptionLarge Recoil Spring GuideRecoil SpringRecoil Spring RetainerSmall Recoil Spring sks/carbine/index.asp1/21/2004
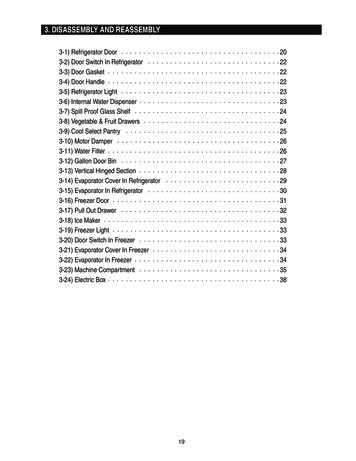
Collecting and Shooting the SKS Carbine - Disassembly and Reassembly12Page 3 of 21Trigger AssemblyNumberDescription13Magazine AssemblyNumber14Gas CylinderDescriptionDisassembly Instructions1) Make sure the SKS carbine is pointed in a safedirection and then set the safety to the safe position (asshown in figure sp1/21/2004
Collecting and Shooting the SKS Carbine - Disassembly and ReassemblyPage 4 of 212) Depress the magazine latch shown in figure 2 andopen the magazine. Make sure the magazine is empty ofcartridges. Leave the magazine open.3) Pull bolt handle to the rear, cocking the trigger.Examine the bore and receiver and make sure that thecarbine is unloaded. Once you are certain the carbine issafe, close the bolt and continue.4) Rotate the take-down lever on the receiver covercounter-clockwise and then pull it out (as shown in ndex.asp1/21/2004
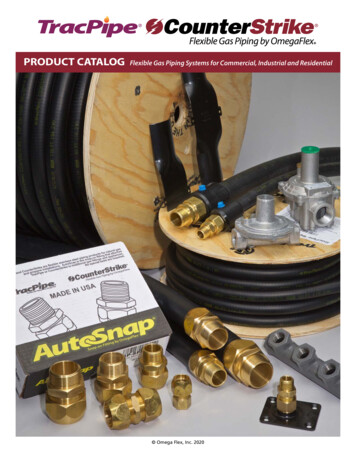
Collecting and Shooting the SKS Carbine - Disassembly and ReassemblyPage 5 of 215) Remove the receiver cover and set it aside.6) Remove the recoil spring assembly by pulling it outfrom the rear of the bolt carrier.7) Note that the coiled end of the recoil spring assemblyinserts into the rear of bolt carrier when ne/index.asp1/21/2004
Collecting and Shooting the SKS Carbine - Disassembly and ReassemblyPage 6 of 218) Compress the recoil spring assembly on a firmsurface (while holding the coiled end pointed upward).Remove the recoil spring retainer and then allow therecoil spring to expand out to its full length. Separate thesmall and large recoil spring guides and set themaside.9) Slide the bolt and bolt carrier to the rear of thereceiver.10) The bolt carrier rests on top of the bolt and is easilyseparated. Remove and then separate the bolt carrierand the bolt and then set both x.asp1/21/2004
Collecting and Shooting the SKS Carbine - Disassembly and ReassemblyPage 7 of 21Note: The Carbine's trigger should be cocked and thesafety lever turned to the safe position before attemptingthis step.11) Using a punch or other semi pointed object (cartridgeor screwdriver will also work), depress the trigger releasebutton behind trigger assembly (as shown in figure 11).12) Remove the trigger assembly and set it aside.Note: Leave the trigger assembly cocked and thesafety lever turned to safe position.13) Remove the magazine assembly and set it x.asp1/21/2004
Collecting and Shooting the SKS Carbine - Disassembly and ReassemblyPage 8 of 2114) Pivot the barrel/receiver apart from the stock and setthe stock aside.15) Rotate the gas cylinder tube latch clock-wise until itpoints to the 10 o'clock position if looking at the right sideof carbine (as shown in figure 17).16) Figure 16 shows the gas cylinder tube latch in theclosed and locked ndex.asp1/21/2004
Collecting and Shooting the SKS Carbine - Disassembly and ReassemblyPage 9 of 2117) Figure 16 shows the gas cylinder tube latch in the10 o'clock position that is required to remove the gascylinder tube.18) Pivot the gas cylinder tube at the front and lift therear upwards.19) Pull the gas cylinder tube off of the gas cylinder.Take care not to allow the gas piston to fly asp1/21/2004
Collecting and Shooting the SKS Carbine - Disassembly and ReassemblyPage 10 of 2120) Remove the gas piston from the gas cylinder tube.21) Make sure you hold your hand to prevent the gaspiston extension from flying out of the carbine as it isspring loaded. Rotate the gas cylinder latch (as shownfigure 22) to remove the gas piston extension.22) Figure 16 shows the gas cylinder tube latch in therequired position to remove the gas piston extensionand ex.asp1/21/2004
Collecting and Shooting the SKS Carbine - Disassembly and ReassemblyPage 11 of 2123) Remove the gas piston extension and spring.24) Separate the gas piston extension and spring andthen set aside.25) Figure 25 shows the disassembled SKS carbine.Reassembly e/index.asp1/21/2004
Collecting and Shooting the SKS Carbine - Disassembly and ReassemblyPage 12 of 2126) Slide the gas piston extension spring over the gaspiston extension.27) Insert the gas extension rod and spring back intothe carbine.28) Rotate the gas cylinder latch to 10 o'clock position tokeep the gas extension rod inside while you completethe next x.asp1/21/2004
Collecting and Shooting the SKS Carbine - Disassembly and ReassemblyPage 13 of 2129) Place the gas piston into gas cylinder tube.30) Attach the gas cylinder tube to gas cylinder (asshown in figure 30).31) Make sure the end of the piston rod is flush with theend of the gas cylinder tube and then snap in down andinto place (as shown in figure asp1/21/2004
Collecting and Shooting the SKS Carbine - Disassembly and ReassemblyPage 14 of 2132) Rotate the gas cylinder tube latch counter clockwise.33) Lock the gas cylinder tube latch in place (as shownin figure 33).34) Place the receiver and barrel assembly back intostock (as shown in figures asp1/21/2004
Collecting and Shooting the SKS Carbine - Disassembly and ReassemblyPage 15 of 2135) Turn the carbine over and insert the magazine intothe carbine.36) Figure 36 shows the correctly installed magazine.37) Take trigger assembly and line it up with slotted theguides inside of the receiver. See figure 38 below dex.asp1/21/2004
Collecting and Shooting the SKS Carbine - Disassembly and ReassemblyPage 16 of 2138) Figure 38 shows how the trigger assembly attachesto the receiver at below and at the rear of magazine.39) Pivot the trigger assembly back once engaged inguides inside receiver and then lock down the triggerassembly firmly with hand.40) Figure 40 shows how the bolt carrier mates with dex.asp1/21/2004
Collecting and Shooting the SKS Carbine - Disassembly and ReassemblyPage 17 of 2141) Install the bolt and bolt carrier into rear of receiver.42) Slide the bolt and bolt carrier towards the front ofreceiver.43) Place the small recoil spring guide into the largerecoil spring guide (flared end of the x.asp1/21/2004
Collecting and Shooting the SKS Carbine - Disassembly and ReassemblyPage 18 of 2144) Use the bottom of the gas piston, a cleaning rod, or aslender slotted screwdriver to push the small recoilspring guide as far as it will go in the large recoil guidetube.45) Slide the recoil spring over small recoil springguide and large recoil spring guide.46) While placing the supported (by what you inserted)bottom of the large recoil spring guide, compress therecoil spring and place the recoil spring retainer intoplace (as shown in figure 46). Then allow the recoilspring to slowly expand and apply pressure against therecoil spring ndex.asp1/21/2004
Collecting and Shooting the SKS Carbine - Disassembly and ReassemblyPage 19 of 2147) Make sure the coiled end of the recoil springassembly is installed into the rear of the bolt carrier first,leaving the straight end of the spring exposed (as shownin figure 47).48) Slide the recoil spring assembly all the way forwardinto rear of the bolt carrier.49) Reinstall the receiver cover (as shown in figure asp1/21/2004
Collecting and Shooting the SKS Carbine - Disassembly and ReassemblyPage 20 of 2150) Compress the recoil spring forward using thereceiver cover. Hold the receiver cover in place withyour hand.51) Push the receiver cover retaining pin in until thetake-down lever is flush with the receiver cover. Turnthe take-down lever on the receiver cover clock-wiseand lock in place.52) Cycle the bolt handle several times to ensure there isno binding and everything functions properly.You have successfully completed a disassembly andreassembly of an SKS dex.asp1/21/2004
Collecting and Shooting the SKS Carbine - Disassembly and index.aspPage 21 of 211/21/2004
12 Trigger Assembly Number Description 13 Magazine Assembly Number Description 14 Gas Cylinder Disassembly Instructions 1) Make sure the SKS carbine is pointed in a safe direction and then set the safety to the safe position (as shown in figure 1). Collecting and Shooting the SKS