Transcription
intellij-idea#intellij-idea
Table of ContentsAbout1Chapter 1: Getting started with intellij-idea2Remarks2Examples2Installation or Setup2Windows & Linux2OS X / macOS2Arch Linux3Ubuntu3Other4Hello, World!Migrating from EclipseChapter 2: Database ToolsExamplesCreating new data sourceChapter 3: ExportingExamplesBuilding a .jarChapter 4: Hibernate HQL console and 30Configuring HQL InspectionsChapter 5: How to Install Plugins3031Introduction31Examples31To download and install a repository plugin31To install a plugin from the disk31Chapter 6: IdeaVimRemarks3434
Examples34Showing line numbers34Allocating conflicting keystrokes to IdeaVim34Chapter 7: Inspections36Introduction36Examples36@NotNull / @Nullable inspections36Chapter 8: Little-known features38Examples38Language injection38Quick Preview38Check screencast video on YouTube about this featureChapter 9: Live TemplatesExamples384242Add a test method easily42Insert the name of the current class43Chapter 10: OptimizationExamplesCustomizing the VM OptionsChapter 11: Useful ShortcutsExamplesCompile and RunMake project (compile modifed and dependent)45454546464646Windows: Ctrl F946OS X / macOS: Cmd F946Compile selected file, package or module46Windows: Ctrl Shift F946OS X / macOS: Cmd Shift F946Select configuration and run46Windows: Alt Shift F1046OS X / macOS: Option Shift F1046
Select configuration and debug46Windows: Alt Shift F946OS X / macOS: Option Shift F946Run46Debug47Run context configuration from editor47Windows: Ctrl Shift F1047OS X / macOS: Cmd Shift F1047Code CompletionBasic code completion (the name of any class, method or variable)4747Windows: Ctrl Space47OS X / macOS: Cmd Space47Smart code completion (filters the list of methods and variables by expected type)47Windows: Ctrl Shift Space47OS X / macOS: Cmd Shift Space47Overwriting code with a suggestion47Adding code from a completion suggestion47Search/Replace48Search everywhere48Find48Windows / Linux: Ctrl F48OS X / macOS: Cmd F48Find next48Find previous48Replace48Windows / Linux: Ctrl R48OS X / macOS: Cmd R48Find in path48Windows / Linux: Ctrl Shift F48OS X / macOS: Cmd Shift F48
Replace in path48Windows / Linux: Ctrl Shift R49OS X / macOS: Cmd Shift R49Refactoring49Copy49Move49Safe delete49Windows / Linux: Alt Delete49OS X / macOS: Cmd Delete49Rename49Extract Method49Windows / Linux: Ctrl Alt M49OS X / macOS: Cmd Option M49Extract Field49Windows / Linux: Ctrl Alt F50OS X / macOS: Cmd Option F50Extract Variable50Windows / Linux: Ctrl Alt V50OS X / macOS: Cmd Option V50Extract Constant50Windows / Linux: Ctrl Alt C50OS X / macOS: Cmd Option C50Extract Parameter50Windows / Linux: Ctrl Alt P50OS X / macOS: Cmd Option P50OtherSurround with5050Windows / Linux: Ctrl Alt T50OS X / macOS: Cmd Option T50Basic navigation50
Go to editor (from tool window)50Switching focus to corresponding tool window51Windows: Alt tool window number 51OS X / macOS: Cmd tool window number 51For example switching focus to the project window51Windows: Alt 151OS X / macOS: Cmd 151Recent files popup51Windows: Ctrl E51OS X / macOS: Cmd E51Find Action51Windows: Ctrl Shift A51OS X / macOS: Cmd Shift A51Navigate to51File :51Windows: Ctrl Shift N51OS X / macOS: Cmd Shift N52Class :52Windows: Ctrl N52OS X / macOS: Cmd N52Symbol (class/method/variable/constant name) :52Windows: Ctrl Alt Shift N52OS X / macOS: Cmd Option Shift N52Everywhere :52Windows: Shift Shift52OS X / macOS: Shift Shift52Go to line number52Windows: Ctrl G52OS X / macOS: Cmd L52Go back to last edit location52
Windows: Ctrl Shift Backspace53OS X / macOS: Cmd Shift Backspace53Usage SearchFind usages / Find usages in file5353Windows / Linux: Alt F7 / Ctrl F753OS X / macOS: Option F7 / Ctrl F753Highlight usages in file53Windows / Linux: Ctrl Shift F753OS X / macOS: Cmd Shift F753Show usages53Windows / Linux: Ctrl Alt F753OS X / macOS: Cmd Option F753Show Method Parameters53Windows / Linux: Ctrl P53OS X / macOS: Cmd P53Selection54Windows: Ctrl W54OS X / macOS: Cmd W54Windows: Ctrl Shift W54OS X / macOS: Cmd Shift W54Windows: Alt54OS X / macOS: Opt54Windows: Alt Shift55OS X / macOS: Opt Shift55Windows: Alt J55OS X / macOS: ctrl G55Credits57
AboutYou can share this PDF with anyone you feel could benefit from it, downloaded the latest versionfrom: intellij-ideaIt is an unofficial and free intellij-idea ebook created for educational purposes. All the content isextracted from Stack Overflow Documentation, which is written by many hardworking individuals atStack Overflow. It is neither affiliated with Stack Overflow nor official intellij-idea.The content is released under Creative Commons BY-SA, and the list of contributors to eachchapter are provided in the credits section at the end of this book. Images may be copyright oftheir respective owners unless otherwise specified. All trademarks and registered trademarks arethe property of their respective company owners.Use the content presented in this book at your own risk; it is not guaranteed to be correct noraccurate, please send your feedback and corrections to info@zzzprojects.comhttps://riptutorial.com/1
Chapter 1: Getting started with intellij-ideaRemarksintellij-idea is an IDE made as the spiritual successor for the widely-adopted Eclipse IDE used forJava development. Eclipse, although extremely powerful, is often criticized for being extremelyclunky and difficult to use.Intellij IDEA attempts to build an IDE with similar power to Eclipse, but with a finishing polish ontop. Developers would be at an advantage using IDEA because of the many tools and hooks it hasto save time on all projects. Smart code completion, native unit test integration and native Gradlemanagement are just a few of the highlights of Jetbrain's Java IDEExamplesInstallation or SetupThere are two main versions of IntelliJ IDEA: the Community edition and the Ultimate edition. TheCommunity edition is free and is not lacking for features in terms of Java SE development.Windows & LinuxDownload IntelliJ IDEA from the JetBrains website, and follow installation procedures. If the JavaDevelopment Kit (JDK) is not installed, download and install the JDK. Note that you need the JDK,only having the Java Runtime Enviroment (JRE) is not enough.Once IntelliJ IDEA has been downloaded:1. Run the installer2. Press next3. Choose a folder to install IntelliJ IDEA to (In most cases, leave this as the default)4. Choose a start menu folder to crete IntelliJ IDEA shortcuts (In most cases, leave this as thedefault)5. Choose whether to create a desktop shortcut, and choose whether to associate various Javafiles with IntelliJ IDEA6. Press next, and wait for it to installOS X / macOSDownload IntelliJ IDEA from the JetBrains website, open the disk image (*.dmg) file downloaded,and drag and drop the application to the alias to your /Applications folder.https://riptutorial.com/2
Arch LinuxIntelliJ IDEA can be installed on Arch Linux using its package manager, pacman. Open a terminaland enter the following command.sudo pacman -S intellij-idea-community-editionUsing sudo is not required if you're running as the root user.Ubuntuhttps://riptutorial.com/3
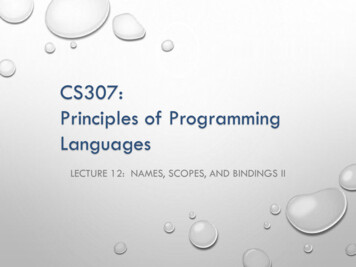
(1) Install ubuntu-make package.For ubuntu 16.04 and later,sudo apt install ubuntu-makeFor previous versions of ubuntu,sudo add-apt-repository ppa:ubuntu-desktop/ubuntu-makesudo apt-get updatesudo apt-get install ubuntu-make(2) After installing Ubuntu Make, do aumake ide ideaDefault installation path: ow hello world project listed above.Follow ubuntu-make page to change default installation and to install other IDEs.OtherFurther installation details can be found stalling-and-launching.htmlHello, World!This will teach you how to make your first project using IDEA.Launch IDEA, and click Createhttps://riptutorial.com/New Projectfrom the startup screen:4
Click Next on the next screen. We're creating a simple Java project, so we don't need any addonsor extras to this projecthttps://riptutorial.com/5
Use the next screen to create the Javahttps://riptutorial.com/Hello Worldtemplate project:6
Finally, name your project and select a location on disk, and click Finish:https://riptutorial.com/7
You should end up with a window that looks something like this:https://riptutorial.com/8
https://riptutorial.com/9
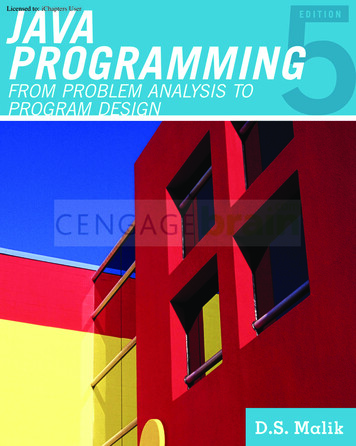
At this point, the project is all ready to go, simply click the Run button or go to Runhttps://riptutorial.com/- Run 'Main'10
https://riptutorial.com/11
And you're done! The console will automatically pop up, giving it's salutations to the globe!https://riptutorial.com/12
https://riptutorial.com/13
Migrating from EclipseIntellij IDEA attempts to appeal to the wide Java fanbase which uses Eclipse for their developmentby allowing developers to migrate their Eclipse projects over to an IDEA structure with a fewsimple clicks!First, start IDEA and click ImportProjectfrom the startup window:Then, select your Eclipse project using the explorer windowhttps://riptutorial.com/14
Intellij will prompt you for the model you are importing from, make sure Eclipse is selected beforeclicking Nexthttps://riptutorial.com/15
The next screen will show a confirmation of the path you want to import, simply click Next:https://riptutorial.com/16
Next, select the modules you want created. In the particular example project, only the Alice andthe BuggyRos projects mattered when working in Eclipsehttps://riptutorial.com/17
Finally, make sure the correct version of the JDK is selected before Finishinghttps://riptutorial.com/18
And the Eclipse project has been fully migrated to Intellij! The project will still open in both IDEs,and will be fully functional in bothRead Getting started with intellij-idea online: l.com/19
Chapter 2: Database ToolsExamplesCreating new data source1. Open "Database Tool Window" if you don't have it opened:This what it looks like:https://riptutorial.com/20
2. Create new data source: By clicking on " " icon: Or by opening "Data Sources and Drivers" dialoghttps://riptutorial.com/21
And adding new data source by clicking " " there3. If you have not already downloaded JDBC driver, you will be prompted to do it:https://riptutorial.com/22
4. Enter connection parameters:https://riptutorial.com/23
5. Configure SSH tunnel if you need it:6. Configure SSL if you need it:https://riptutorial.com/24
7. Check that configuration successful, by pressing "Test Connection":Read Database Tools online: atabase-toolshttps://riptutorial.com/25
Chapter 3: ExportingExamplesBuilding a .jarEventually, when you're ready to release a version of your code to production, you'll need a .jarfile to distribute. Intellij makes building JARs quite easy.First, navigate to Filehttps://riptutorial.com/- Project Structureand click on Artifacts:26
https://riptutorial.com/27
public static void main()method):Click OK, verify that all the information regarding dependencies is correct, and click OK to finishsetting up the artifact.https://riptutorial.com/28
https://riptutorial.com/29
Chapter 4: Hibernate HQL console andinspectionsIntroductionIntellij IDEA supports HQL auto completion and running HQL queries on console. This is how youenable that support.ExamplesConfiguring HQL Inspections1. Go to File - Project Structure - Modules.2. Add new Hibernate module.3. Right click on the desired module - Add - Hibernate.4. Select the newly created Hibernate configuration option, and click the ( ) sign in the rightpane to create hibernate.cfg.xml file.5. Go to File - Project Structure - Facets, and add new JPA.6. Select the newly created JPA configuration option, and click the ( ) sign in the right pane toassign it your Hibernate configuration file.7. Open Persistence window, there you should see the list of your project modules.8. Expand the module name, and assign your data source to the hibernate.cfg.xml file.Now you can write queries on hibernate console and get HQL auto completion.Read Hibernate HQL console and inspections online: rial.com/30
Chapter 5: How to Install PluginsIntroductionPlugins help us to do things easier. Intellij provides a vast range of plugins for various technologies/ laguages. There are three ways to install plugin in Intellij.ExamplesTo download and install a repository plugin1. Go to File -- Settings (e.g. Ctrl Alt S ).2. In the left-hand pane, select Plugins.3.On the Plugins window, click "Install JetBrains plugin" or the "Browse repositories button".To install a plugin from the disk1. Go to File -- Settings (e.g. Ctrl Alt S ).2. In the left-hand pane, select Plugins.3. On the Plugins window, click "Install plugin from disk button".4. Select the desired plugin from your local machine.Click Apply button of the Settings/Preferences dialog.https://riptutorial.com/31
Or you can directly add pugins from the other venders by directly searching the repositories.1. Go to "Browse Repositories"2. Select the category (on the top of the window) that you need to search(or just search bythe name if you know it).3. Install it.https://riptutorial.com/32
Read How to Install Plugins online: ow-to-installpluginshttps://riptutorial.com/33
Chapter 6: IdeaVimRemarksIdeaVim is a plugin for IDEA products that aims in providing Vim functionality in editor viewsExamplesShowing line numbersAs of IntelliJ IDEA version 2016.2, and IdeaVim version 0.46, IntelliJ's native option for showing linenumbers is ineffective. When clicking Show line numbers, the line numbers immediately show anddisappear.This problem is caused by a bug in the IdeaVim plugin, which can be resolved by using the Vimcommand for showing line numbers::set numberand:set nonumberto hide.These commands can also be used as the shorthand :setnuand :setnonu.If you wish to activate the feature which shows relative line numbers instead you can use:set relativenumberor a shorthand :setrnu.Remember that you can mix setrelativenumberwith setnumber.Allocating conflicting keystrokes to IdeaVimBy default, some keystrokes that are useful in Vim contradict with the keystrokes of IntelliJ.For example, R in Vim is 'redo', but in IntelliJ it's the shortcut for RunTo decide which program interprets the keystroke, go to Preferences - Other Settings - VimEmulation and choose which keystrokes to use with IdeaVim and which to use with IntelliJ:https://riptutorial.com/34
https://riptutorial.com/35
Chapter 7: InspectionsIntroductionIntellij IDEA provides lots of code inspections, that can significantly simplify writing code.Inspections parameters can be found in Preferences Editor Inspections section. By default, IDEAhas lots of them enabled. And lots of inspections support auto-fixing options, that can be seen onpressing Alt Enter.To run inspections for your whole project (or some custom scope), you need to select Analyze Inspect code.Examples@NotNull / @Nullable inspectionsThese inspections are extremely useful for preventing NullPointerExceptions. By default they aredisabled. You can find these inspections in Inspections preferences: Java Probable bugs Constantconditions & exceptions and @NotNull/@Nullable problems. There you can also configure yourannotations. You can use this manual to add JetBrains annotations into your project.For example, consider this methods:If getString can't possibly return null, everything is fine. But if we enable our inspections and insome cases it can return null, we will immediately will see inspection triggered:which says 'null' is returned by the method which is not declared as @Nullable. And if we hit Alt Enter, there will be an option Annotate method as '@Nullable'. If we hit Enter again, our code willlook like that:https://riptutorial.com/36
with inspection triggered on length() method saying Method invocation 'length' may produce'java.lang.NullPointerException'. And if we go further and introduce the result of getString()method as a variable, after hitting Alt Enter IDEA will suggest a few ways to fix this inspection:This way you can inspect your code on-the-fly, and fix all potential NullPointerExceptions. If youwant to check your whole project (or some random scope), you can use Analyze Inspect code.Just make sure that your selected inspections profile has all necessary inspections enabled.Read Inspections online: nspectionshttps://riptutorial.com/37
Chapter 8: Little-known featuresExamplesLanguage injectionIf you want to write strings containing other languages (JSON, regexes), it's hard to keep up withescaping symbols, and it would be nice to get some code assist.1. Put your cursor inside an empty string2. ALT ENTER3. Pick "Inect language or reference"4. Pick the desirable language (RegExp in my case) from the pop-up5. Again use ALT ENTERand pick Editregex fragment6. In the new tool window enter the regex - note how it's automatically mapped to a properlyescaped Java string. Similarly for JSON the indents will be placed properly.Quick PreviewCheck screencast video on YouTube about this featurehttps://riptutorial.com/38
IntelliJ provides a quick-preview feature called Viewing Definition. Using this feature allows a userto quickly see the contents of a method/class without navigating into the class itself OS X - ( Y) or ( Space) Unix / Windows - Ctrl Shift IExample: Looking into Arrays.copyOfRange():Verifying if you've selected the right class in Search:https://riptutorial.com/39
https://riptutorial.com/40
ittle-known-featureshttps://riptutorial.com/41
Chapter 9: Live TemplatesExamplesAdd a test method easily@org.junit.Testpublic void should name () { END }Make sure to check the Shorted FQ names box when creating this template.When you type "should" (the abbreviation), this will add the necessary importstatement at the top of the file, and this code:org.junit.Test;@Testpublic void should () {}It is thanks to the Shorten FQ names option that @org.junit.Test is reduced to simply @Test.The name variable is irrelevant, it could be named something else. The purpose of that variable isthat when the template is inserted in the class, the cursor will be placed in the position of name ,asking you to enter something.https://riptutorial.com/42
After you entered a value for name (effectively the name of the test method), the cursor will finallyjump to END , a built-in variable, so that you can carry on and implement the test case.Insert the name of the current classConsider the utility class pattern: a class with only static methods and no fields. It's recommendedto prevent instantiation of such classes by adding a private a constructor.This live template example makes it easy to add a private constructor to an existing class, usingthe name of the enclosing class.private className () {throw new AssertionError("utility class, forbidden constructor");}Applicable in Java: declaration scope.Click Edit variables to define the className variable as the built-in className() expression, andcheck the Skip if defined box to avoid prompting for a custom name, which is unnecessary in thisexample.https://riptutorial.com/43
For example, inside a class like this:class ListUtils {// .}When you type "utility class" (the abbreviation), this will insert a constructor like this:class ListUtils {private ListUtils() {throw new AssertionError("utility class, forbidden constructor");}// .}Read Live Templates online: ive-templateshttps://riptutorial.com/44
Chapter 10: OptimizationExamplesCustomizing the VM OptionsYou can override the default vmoptions with your own personal settings by choosing Help EditCustom VM Options from the toolbar. This will create a local copy of the file which you are free toedit.For example, if you double the value set for Xmx, the maximum size of the memory allocation poolwill be doubled after you restart the IDE. On many machines this will lead to faster performance.See the options here for a description of each parameter.Read Optimization online: ptimizationhttps://riptutorial.com/45
Chapter 11: Useful ShortcutsExamplesCompile and RunMake project (compile modifed anddependent)Windows: Ctrl F9OS X / macOS: Cmd F9Compile selected file, package or moduleThis is useful to know, as when debugging this shortcut can be used to quickly reload / hotswapclasses.Windows: Ctrl Shift F9OS X / macOS: Cmd Shift F9Select configuration and runWindows: Alt Shift F10OS X / macOS: Option Shift F10Select configuration and debugWindows: Alt Shift F9OS X / macOS: Option Shift F9https://riptutorial.com/46
RunShift F10DebugShift F9Run context configuration from editorWindows: Ctrl Shift F10OS X / macOS: Cmd Shift F10Code CompletionBasic code completion (the name of anyclass, method or variable)Windows: Ctrl SpaceOS X / macOS: Cmd SpaceSmart code completion (filters the list ofmethods and variables by expected type)Windows: Ctrl Shift SpaceOS X / macOS: Cmd Shift SpaceOverwriting code with a suggestionTabhttps://riptutorial.com/47
Adding code from a completion suggestionEnterSearch/ReplaceSearch everywhereDouble ShiftFindWindows / Linux: Ctrl FOS X / macOS: Cmd FFind nextF3Find previousShift F3ReplaceWindows / Linux: Ctrl ROS X / macOS: Cmd RFind in pathWindows / Linux: Ctrl Shift FOS X / macOS: Cmd Shift Fhttps://riptutorial.com/48
Replace in pathWindows / Linux: Ctrl Shift ROS X / macOS: Cmd Shift RRefactoringCopyF5MoveF6Safe deleteWindows / Linux: Alt DeleteOS X / macOS: Cmd DeleteNote that the Delete key on OS X / macOS is the equivalent of the Backspace key on otheroperating systems.RenameShift F6Extract MethodWindows / Linux: Ctrl Alt MOS X / macOS: Cmd Option MExtract Fieldhttps://riptutorial.com/49
Windows / Linux: Ctrl Alt FOS X / macOS: Cmd Option FExtract VariableWindows / Linux: Ctrl Alt VOS X / macOS: Cmd Option VExtract ConstantWindows / Linux: Ctrl Alt COS X / macOS: Cmd Option CExtract ParameterWindows / Linux: Ctrl Alt POS X / macOS: Cmd Option POtherSurround withSurrounds a code block with an if, for, editor-fold. and more.Windows / Linux: Ctrl Alt TOS X / macOS: Cmd Option TBasic navigationGo to editor (from tool window)https://riptutorial.com/50
EscSwitching focus to corresponding toolwindowWindows: Alt tool window number OS X / macOS: Cmd tool window number For example switching focus to the projectwindowWindows: Alt 1OS X / macOS: Cmd 1Recent files popupWindows: Ctrl EOS X / macOS: Cmd EFind ActionWindows: Ctrl Shift AOS X / macOS: Cmd Shift ANavigate toFile : Windows: Ctrl Shift Nhttps://riptutorial.com/51
OS X / macOS: Cmd Shift NClass : Windows: Ctrl N OS X / macOS: Cmd NSymbol (class/method/variable/constantname) : Windows: Ctrl Alt Shift N OS X / macOS: Cmd Option Shift NNote that you can use class name to narrow down the method/variable/constant search, forexample to find symbol usersCollection in class UserDAO type:UserDAO.usersCollectionEverywhere : Windows: Shift Shift OS X / macOS: Shift ShiftTo search for something that has multiple words, e.g., InetAddressCachePolicy you can just typeInAddCacPo or something similar that contains parts of words in the whole name.Go to line numberWindows: Ctrl GOS X / macOS: Cmd Lhttps://riptutorial.com/52
Go back to last edit locationWindows: Ctrl Shift BackspaceOS X / macOS: Cmd Shift BackspaceUsage SearchFind usages / Find usages in fileWindows / Linux: Alt F7 / Ctrl F7OS X / macOS: Option F7 / Ctrl F7Highlight usages in fileWindows / Linux: Ctrl Shift F7OS X / macOS: Cmd Shift F7Show usagesWindows / Linux: Ctrl Alt F7OS X / macOS: Cmd Option F7Show Method ParametersWindows / Linux: Ctrl POS X / macOS: Cmd PShows what parameters a method and all of its overloads accepts.https://riptutorial.com/53
SelectionSelection with increasing scopeThis comes handy when you want to select a block to extract a variable / method etc, no need todo a precise bracket matching, just put the caret somewhere in the statement and keep doing thisWindows: Ctrl WOS X / macOS: Cmd WSelection with decreasing scopeWindows: Ctrl Shift WOS X / macOS: Cmd Shift WThis feature is also very useful when editing / playing with json documents in your IDE.Vertical selectionPress and holdWindows: AltOS X / macOS: Optand select normally using mouse / trackpad (the way you select a word in a row etc)This is how it should look likehttps://riptutorial.com/54
Multiple caretsPress and holdWindows: Alt ShiftOS X / macOS: Opt Shiftand click where all you want to put a caret. You can choose to put multiple carets in a single line oracross lines at different positions.Now you can perform all operations that you would have been able to perform on a single selectedword (hold Ctrl (windows) or option (mac OS) and use Left or Right keys to jump across words)and all those will affect all caret positions.You can even cut / paste multiple selections from one place to another.Having multiple carets is very usefult when you want to change the structure of text across manylines / many positions in same line.Selecting duplicate occurencesSelect some text and pressWindows: Alt JOS X / macOS: ctrl Gto select the next occurance of the same text.You get one caret at each of the selected occurrence that could be used to change eachoccurrence simultaneously.E.g., I've tried to put an example in this gif, hope it helpshttps://riptutorial.com/55
Read Useful Shortcuts online: seful-shortcutshttps://riptutorial.com/56
CreditsS.NoChaptersContributors1Getting started withintellij-ideaCommunity, CraftedCart, foxtrot9, Harmelodic, Jeeter2Database Toolskassak3ExportingJeeter4Hibernate HQLconsole andinspectionsShai Givati5How to InstallPluginsPriya, RamenChef, Sudeepa Nadeeshan6IdeaVimJeeter, Mateusz Piotrowski, mnoronha, sevenforce7Inspectionsesin888Little-known featuresAnton Dozortsev, Jeeter, mszymborski, Prateek9Live Templatesjanos10OptimizationKevin Cooper11Useful ShortcutsCraftedCart, karel, mszymborski, Nadim Bahadoor, Prateekhttps://riptutorial.com/57
Community edition is free and is not lacking for features in terms of Java SE development. Windows & Linux Download IntelliJ IDEA from the JetBrains website, and follow installation procedures. If the Java Development Kit (JDK) is not installed, download