Transcription
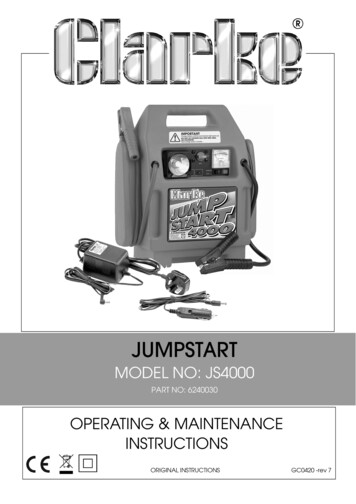
JUMPSTARTMODEL NO: JS4000PART NO: 6240030OPERATING & MAINTENANCEINSTRUCTIONSORIGINAL INSTRUCTIONSGC0420 -rev 7
INTRODUCTIONThank you for purchasing this CLARKE Jump-start.Before attempting to use this product, please read this manual thoroughly andfollow the instructions carefully. In doing so you will ensure the safety of yourselfand that of others around you, and you can look forward to your purchasegiving you long and satisfactory service.Please keep these instructions in a safe place for future reference.SPECIFICATIONSItemSpecificationWeight17 kgDimensions (L x H x D) mm345 x 390 x 190Insulation ClassClass IIMax Output CurrentStarting 1100APeak 2200ABattery TypeSealed re-chargeable lead-acid12V/40AHLighter Socket output12V DC /1.9A for 20 hoursEstimated engine starting capacity Up to 4.0 litres (diesel)Up to 6.0 litres (petrol)Working lampScrew-in 12V/0.3AmpPlease note that the details and specifications contained herein, are correctat the time of going to print. However, CLARKE International reserve the rightto change specifications at any time without prior notice.2Parts & Service: 020 8988 7400 / E-mail: Parts@clarkeinternational.com or Service@clarkeinternational.com
GENERAL SAFETY RULES1. Always ensure when jump-starting that there is air circulating around themachine.2. Never allow the negative and positive leads on this unit, to touch eachother or to touch the same metal object.3. Although the jump-start is water resistant and may be used outdoors, DONOT leave it exposed to the elements. Avoid direct sunlight, direct heat,rain/moisture etc.4. The JS4000 jump-start is designed for use with 12V systems.5. Do not operate the jump-start if any of the cables are damaged. Consultyour CLARKE dealer for repair or replacement of the parts.6. Do not operate the jump-start if the case is damaged. Consult yourCLARKE dealer or a qualified person for inspection and repair.7. Ensure the vehicle battery posts and battery clamps are perfectly cleanbefore use.8. When connecting the jump-start leads to a battery, ensure the ON/OFFswitch is OFF, and ALWAYS connect the RED, (positive’ ’) output conductorto the UNEARTHED ( ) battery terminal FIRST, then connect the BLACK,(negative) conductor to a suitable earthing point on the chassis, well awayfrom any fuel lines.9. To prevent the battery overheating and consequent damage, do notexceed our recommendations for the duration of jump starting.10. Always wear suitable protective clothing and eye protection when workingwith lead-acid batteries.11. The jump-start is NOT designed to be used as a replacement for a vehiclebattery.12. DO NOT attempt to BOOST CHARGE the jump-start's sealed battery.13. Never allow the battery to become completely discharged.14. Never jump-start the engine whilst the jump-start is being charged.15. Never allow the cables to become wrapped around the operator or anyother person.16. Never attempt any repairs yourself. If you have a problem with the jumpstart contact your local CLARKE dealer.17. Always keep your body and clothing dry. Never work in damp area withoutadequate insulation against electric shock.3Parts & Service: 020 8988 7400 / E-mail: Parts@clarkeinternational.com or Service@clarkeinternational.com
18. Always store the jump-starter out of reach of children.19. Always wear safety glasses when working with lead acid batteries.20. If splashed by battery acid, immediately flush the area of the splash withclean water. If a burning sensation is felt or any blistering occurs, seekmedical help.21. If acid comes into contact with the eyes, flush the eyes with clean watercontinuously and seek medical help.WARNING: ALL LEAD ACID BATTERIES GENERATE HYDROGEN GASDURING NORMAL OPERATION. THIS PROCESS INCREASES DURING APERIOD OF RAPID DISCHARGE, SUCH AS WHEN USING FOR JUMP STARTING.WARNING: HYDROGEN GAS AND BATTERY ACID (SULPHURIC ACID) CANBE: EXPLOSIVE, CORROSIVE TO SKIN, EYES AND HAIR, DAMAGING TOCLOTHING AND METALS, FLAMMABLE, POISONOUS TO BREATHEENVIRONMENTAL RECYCLING POLICYThrough purchase of this product, the customer is taking on theobligation to deal with the WEEE in accordance with the WEEEregulations in relation to the treatment, recycling & recovery andenvironmentally sound disposal of the WEEE.In effect, this means that this product must not be disposed of with generalhousehold waste. It must be disposed of according to the laws governingWaste Electrical and Electronic Equipment (WEEE) at a recognised disposalfacility.ELECTRICAL SYMBOLS DISPLAYEDThe meanings of the safety markings and symbols which may be displayed onthis product are shown below.Class II appliance without an earth connectionAlways read instructions before useElectrical hazard due to exposed live terminalsChemical Hazard from battery acid4Parts & Service: 020 8988 7400 / E-mail: Parts@clarkeinternational.com or Service@clarkeinternational.com
ELECTRICAL CONNECTIONSThis product is provided with a 13 amp, 230 volt (50Hz), charging adaptor forconnection to a standard, domestic electrical supply. Should the plug needchanging at any time, ensure that a plug of identical specification is used.This product is of double insulated design. No earth conductor isprovided.No earth conductor is provided. The two wires in the mains lead should bewired up in accordance with the following colour code:Blue— NeutralBrown— LiveConnect the BROWN coloured cable to the plug terminal marked a letter “L”.Connect the BLUE coloured cable to the plug terminal marked a letter “N”.If the battery charger for this appliance is fitted with a plug which is mouldedon to the electric cable (i.e. non-rewireable) please note:1. The plug must be thrown away if it is cut from the electric cable. There is adanger of electric shock if it is subsequently inserted into a socket outlet.2. Never use the plug without the fuse cover fitted.3. Should you wish to replace the fuse cover, ensure that the correctreplacement is used (as indicated by marking or colour code).4. Replacement fuse covers can be obtained from your local CLARKE dealeror most electrical stockists.FUSE RATINGThe fuse in the plug must be replaced with one of the same rating and thisreplacement must be ASTA approved to BS1362.If in any doubt, consult a qualified electrician. DO NOT attempt any electricalrepairs yourself.5Parts & Service: 020 8988 7400 / E-mail: Parts@clarkeinternational.com or Service@clarkeinternational.com
COMPONENT IDENTIFICATIONThe JS4000 is a rechargable power supply which can be used to start a car inthe event of a flat battery. The unit can also be used to power electricalappliances via a cigarette lighter type socket using the adaptor supplied. Theunit also incorporates a built-in lamp and may be used as a stand alone lightsource. An audible warning will sound in the event of low battery voltage, or ifthe clamps are incorrectly fitted for jump starting (wrong polarity).1 Positive Battery Connecting Lead to 7connect to positive battery terminalVoltage Meter to indicate the voltage level of the units battery.2 Lamp to provide light for roadsiderepairs or emergency situations.Cigar Lighter Socket for use withthe cigar lighter adapter provided.83 12 DC Socket connects the 230 Volt 9charger for mains charging.Voltage Test Switch. Press to indicate the internal battery powerlevel.4 230 Volt Charger to charge theinternal battery pack10 Lamp ON/OFF Switch. Switches thelamp ON or OFF.5 Cigar Lighter Adaptor completewith 5 Amp fuse.11 Negative Battery Connection Leadto connect to the negative batteryterminal.6 ON/OFF Switch12 Charging Light (red)6Parts & Service: 020 8988 7400 / E-mail: Parts@clarkeinternational.com or Service@clarkeinternational.com
INITIAL BATTERY CHARGING1. Charge your jump-start battery before using it for the first time.2. Recharge the jump-start battery after every occasion of use if possible,and thereafter, at least every 30 days.3. Always avoid leaving your jump-start in a discharged state.FOLLOW THE ABOVE POINTS TO ENSURE MAXIMUM LIFE FROM THE BATTERY.Two means of charging the battery are provided:1. Via a 230V mains electricitysupply, using the mains adaptor,as shown.2. Via a 12V supply using the vehiclecigar lighter adapter with cableand plug provided.NOTE: Using a 12V vehicle supply,the battery will not charge tomaximum, but only toapprox. 50% of its capacity.NOTE: A 5 amp fuse is fitted into the cigarette lighter plug adaptor,accessed by unscrewing the end cap of the adaptor. Take carenot to loose the spring when unscrewing this cap.CHARGING USING THE 230V MAINS ADAPTOR1. Plug the cable into the socket atthe rear of the unit, then plug theadaptor into the mains supplyand switch on. The red CHARGING light on thejump-start will come on toindicate charging is in progress.2. Continue to charge until the REDcharging light changes from redto green. It is important to notethat this could take several days,dependant upon the state ofcharge of the battery.REVERSENOTE: Pressing the ‘TEST’ voltagetest switch with the chargerdisconnected, will cause the7Parts & Service: 020 8988 7400 / E-mail: Parts@clarkeinternational.com or Service@clarkeinternational.com
needle on the voltage meter to indicate the state of charge ofthe battery. Once the charger is disconnected, it will be notedthat the voltage will slowly settle back. This is quite normal andshould not cause alarm. When the LED extinguishes, charging willautomatically stop, indicating that the battery is fully charged.IMPORTANT: DO NOT allow the needle to enter the RED zone while pressingthe test switch as this could damage the battery.CHARGING USING THE 12V ADAPTOR1. Plug the jack plug into the charging socket at the rear of the unit, then intothe cigar lighter socket on the vehicle and start the engine. The red LED onthe jump-start will indicate that charging is in progress.2. Continue to charge until the “Internal Battery Status” gauge registers ‘OK’when the ‘TEST’ button is pressed, WITH THE CHARGING CURRENTDISCONNECTED. i.e. disconnect the cigar lighter adapter from the socketon the vehicle before pressing the TEST button.NOTE: We recommend that you use this system only when necessary, asprolonged use will reduce the life expectancy of the battery, dueto the fact that this method can only charge the battery toapprox. 50% of its capacity.NOTE: For maximum battery life, we strongly recommend that youmaintain the battery in a fully charged state at all times.NOTE: If charging does not take place, check the green LED on theadapter. Ensure all connections are clean and free of grease etc.8Parts & Service: 020 8988 7400 / E-mail: Parts@clarkeinternational.com or Service@clarkeinternational.com
OPERATIONWARNING: FAILURE TO FOLLOW THE INSTRUCTIONS BELOW AND THESAFETY INSTRUCTIONS ON PAGES 3/4, MAY RESULT IN PERSONAL INJURY,DAMAGE TO THE VEHICLE, OR THE POSSIBILITY OF AN EXPLOSIONAlways carry out the following preliminary checks before connecting thejump-start to the car battery: Ensure the vehicle ignition and ALL ancillary equipment - lighting,radio etc, is switched off. Ensure the vehicle battery is rated at 12V and is not damaged in anyway. Ensure the battery terminals are clean and the clamps are firm andsecure. Remove any vehicle battery filler plugs and check the electrolytelevel. If necessary, top up with distilled water. Ensure the area is well ventilated. Take great care not to touch the red positive ( ) clamp against theblack negative (-) clamp.1. Ensure the ON/OFF switch is in the OFF position.2. Connect the red positive ( ) clamp to the positive ( ) battery terminal first.Take care the clamp does not contact any moving parts or fuel lines.3. Connect the black negative (-) clamp to the negative (-) battery terminalor to a suitable earthing point on the vehicle chassis ensuring theconnections are firm and secure. If the polarity is incorrect, and audible warning will sound.Disconnect IMMEDIATELY and reverse the clamp connections.4. Switch the Jump-start, then the vehicle ignition ‘ON’ and leave in thiscondition FOR APPROX TWO MINUTES. (This will provide the vehicle batterywith a short ‘boost’ charge to allow for easier starting).5. Switch the ignition to ‘start’, for NO MORE than 6 seconds. If the engine does not start, within this time, SWITCH OFF the ignitionand wait for at least 3 minutes before trying again to preventdamage to the jumpstarter due to overheating before trying again.After this cooling off period, it is safe to resume trying to start thevehicle.6. Once the vehicle has started, turn the jump-start ON/OFF switch OFF.9Parts & Service: 020 8988 7400 / E-mail: Parts@clarkeinternational.com or Service@clarkeinternational.com
7. Once the engine is running, disconnect the earthed clamp FIRST i.e. thatconnected to the chassis or Negative terminal etc, and return it to itsstorage position, then disconnect the Positive clamp from the batteryterminal, and restore to its storage position.8. After use, always recharge the jump-start. If the battery is allowed toremain in a discharged state, its life may be shortened.9. Regularly check the charge level of the battery by pressing the TEST pushbutton on the front panel.WARNING: IT IS POSSIBLE THAT SOME ELECTRONIC EQUIPMENT COULD BEDAMAGED BY JUMP STARTING. ALWAYS CHECK WITH THE CARMANUFACTURER’S HANDBOOK TO DETERMINE WHAT PRECAUTIONS IFANY SHOULD BE TAKEN.USING AS A 12VOLT POWER SUPPLYThe unit has a cigar lighter type socket located on the side of the casing (seepage 6), that allows connection via a standard DC connector to other DCelectrical equipment.WARNING: Be Aware that a fully charged 12V battery can have an output ofapprox.13.5V. Consult the appliance handbook to ensure it is safe to operatefrom a 12V battery.The table below indicates the approx. operating time from a fully chargedbattery.ESTIMATED OPERATING PERIOD PROVIDEDEstimated UseElectrical Appliance30 hoursMobile phones21 hoursRadios, fans12 hoursCam-corder, VCR, Spotlight7 hoursElectrical tools, bilge pump10Parts & Service: 020 8988 7400 / E-mail: Parts@clarkeinternational.com or Service@clarkeinternational.com
MAINTENANCEAlways inspect the jump-start before use to ensure the cables are in goodcondition and the clamps are clean and free from corrosion. If damaged theyshould be replaced.Keep the unit clean by wiping with a dry cloth. DO NOT use solvents as acleaning agent.GENERAL CAREKeep the unit at HIGH or FULL CHARGE status at all times.Always turn the jump-start OFF during storage and store in an upright position,away from direct sunlight, moisture or sources of extreme heat or cold.NEVER attempt any repair unless your are a qualified technician. If you have aproblem with the machine contact your local CLARKE dealer.Your CLARKE jump-start has been designed to give long and trouble freeservice. If, however, having followed the instructions in this booklet carefully,you encounter problems, take the unit to your local CLARKE dealer.REPLACING THE BATTERY1. Unscrew and remove the self tapping screws securing the back cover. Liftoff the cover to expose the battery and other components.2. Lift out the battery from the battery compartment, and detach the heavyduty, and other cables, from the battery terminals.3. Taking great care not to short across the battery terminals, connect theRED heavy duty cable, and other cable with red sheath, to the batteryterminal painted RED, and the black cables to the other battery terminal.4. Gently slide the new battery into position in its compartment, taking carenot to damage the printed circuit board5. Replace the back cover and secure with the self tapping screws.CHANGING THE LIGHT BULB1. Gently squeeze the sides of the lens bezel together, or very carefully use ascrewdriver to disengage the clips at either side, and pull the lens andbezel out.2. Unscrew and remove the burned out bulb and screw in a replacement.3. Snap the lens and bezel back into place and replace the back cover.11Parts & Service: 020 8988 7400 / E-mail: Parts@clarkeinternational.com or Service@clarkeinternational.com
REPLACING THE 13 AMP PLUGShould the transformer’s 13 amp plug require changing, take note thattransformer is DOUBLE INSULATED, i.e. NO earth lead. The new plug must be13amp, BS1363 approved.Connect the Blue lead to the plug’s Neutral terminal and the Brown lead tothe live terminal.IMPORTANT: The old, moulded plug MUST be thrown away. DO NOT RE-USE.GUARANTEEThis product is guaranteed against faulty manufacture for a period of 12months from the date of purchase. Please keep your receipt which will berequired as proof of purchase.This guarantee is invalid if the product is found to have been abused ortampered with in any way, or not used for the purpose for which it wasintended.Faulty goods should be returned to their place of purchase, no product canbe returned to us without prior permission.This guarantee does not effect your statutory rights.12Parts & Service: 020 8988 7400 / E-mail: Parts@clarkeinternational.com or Service@clarkeinternational.com
DECLARATION OF CONFORMITY13Parts & Service: 020 8988 7400 / E-mail: Parts@clarkeinternational.com or Service@clarkeinternational.com
COMPONENT PARTS DIAGRAM14Parts & Service: 020 8988 7400 / E-mail: Parts@clarkeinternational.com or Service@clarkeinternational.com
COMPONENT PARTS LISTSpare parts are available as follows.NoDescriptionPart Number1HousingHT400001N2LabelHT400002N3Working Light HolderHT400003N4Working Light BaseHT400017N5Working Light BulbHT400005N6Working Light MirrorHT400006N7Working Light CoverHT400007N8On/off Switch -1HT400008N9On/off Switch -2HT400009N10Voltage MeterHT400010N11Connection CableHT400011N12F2G Booster CableHT400012N13Cigarette Cable - NegativeHT400013N14Protective CoverHT400014N15Cigarette Cable - PositiveHT400015N16Cigarette 8N19SwitchHT400019N20PC BoardHT400020N21Battery (2 x 20Ah)HT400021N22Rear HousingHT400022N23Battery RetainerHT400023N15Parts & Service: 020 8988 7400 / E-mail: Parts@clarkeinternational.com or Service@clarkeinternational.com
4. The JS4000 jump-start is designed for use with 12V systems. 5. Do not operate the jump-start if any of the cables are damaged. Consult your CLARKE dealer for repair or replacement of the parts. 6. Do not operate the jump-start if the case is damaged. Consult your CLARKE d