Transcription
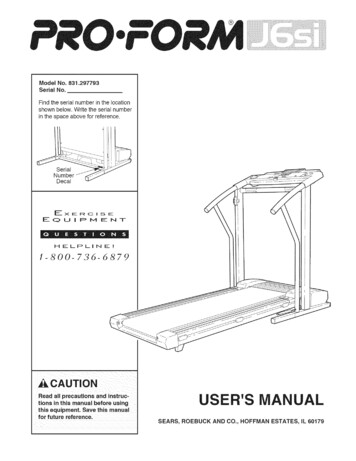
Model No. 831.288282Serial 800-736-6879Patent PendingCAUTIONRead all precautions and instructions in this manual before usingthis equipment. Keep this manualfor future reference.SEARS, ROEBUCK AND CO, HOFFMAN ESTATES, IL 60179
TABLE OF CONTENTSIMPORTANT PRECAUTIONS.BEFORE YOU BEGIN .ASSEMBLY .HOW TO USE THE PROFORM 975S .HOW TO USE THE PULSE SENSOR.MAINTENANCE AND STORAGE .CONDITIONING GUIDELINES .PART LIST .EXPLODED DRAWING .ORDERING REPLACEMENT PARTS .LIMITED WARRANTY.23481112131415Back CoverBack CoverIMPORTANT PRECAUTIONSWARNING: To reduce the risk of serious injury, read the followingusing the PROFORM 975s.1.Read all instructions in this manual beforeusing the 975s.2.It is the responsibility of the owner to ensurethat all users of the 975s are adequatelyinformed of all precautions. Use the 975sonly as described in this manual,10. The 975s is intended for in-home use only.Do not use the 975s in a commercial, rental,or institutional setting.Use the 975s indoors on a level surface.11. CAUTION DECAL PLACEMENT: The decal3.9.important precautions beforeKeep the 975s away from moisture anddust. Place a mat under the 975s to protectthe floor or carpet.4.Inspect and tighten all parts regularly.Replace any worn parts immediately.5.Keep children under the age of 12 and petsaway from the 975s at all times.6.The 975s should not be used by personsweighing more than 250 pounds.8.If you feel pain or dizziness at any timewhile exercising, stop immediately andbegin cooling down.shown below has been placed on the 975s.If the decal is missing, or if it is not legible,please call our toll-free HELPLINE to order afree replacement decal. Apply the decal inthe location shown.&CAUTIONWear appropriate clothing when exercising;do not wear loose clothing that couldbecome caught on the 975s. Always wearathletic shoes when using the 975s.Decal shown at75% actual sizeAlways keep your back straight when usingthe 975s. Do not arch your back.WARNING: Before beginning this or any exercise program, consult your physician. This is especially important for persons over the age of 35 or persons with pre-existing health problems. Readall instructions before using. SEARS assumes no responsibility for personal injury or propertydamage sustained by or through the use of this product.2
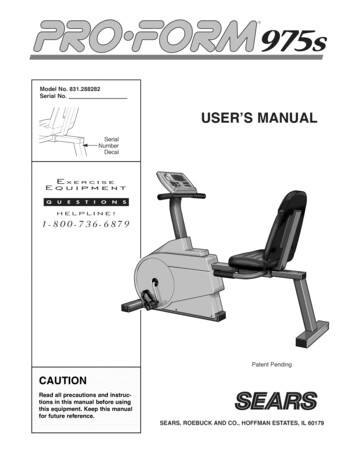
BEFORE YOU BEGINThank you for selecting the innovative PROFORM '975s. The PROFORM 975s offers a unique form oflow-impact exercise that offers greater cardiovascularbenefits and increased muscle toning. The 975sfeatures adjustable resistance to let you tailor yourexercise to the level that's perfect for you. And whenyou're not exercising, the 975s can be folded forcompact storage.1-800-736-6879, Monday through Saturday, 7 a.m.until 7 p.m. Central Time (excluding holidays). To helpus assist you, please note the product model numberand serial number before calling. The model numberis 831.288282. The serial number can be found on adecal attached to the 975s (see the front cover of thismanual for the location of the decal).Before reading further, please look at the drawingbelow and familiarize yourself with the parts that arelabeled.For your benefit, read this manual carefully beforeyou use the PROFORM 975s. If you have additionalquestions, please call our toll-free HELPLINE atConsoleHandlebar with -Pulse Seat HandleBACKPedalLEFT SIDE3
ASSEMBLYPlace all parts of the PROFORM 975s in a cleared area and remove the packing materials. Do not dispose ofthe packing materials until assembly is completed.Assembly requires the included tools and your own adjustable wrenchPART CHARTUse the part drawings below to identify the small parts used in assembly. The number in parenthesis beloweach drawing refers to the key number of the part. The second number refers to the quantity used in assembly.Note: Some small parts may have been pre-attached for shipping. If a part is not in the parts bag, checkto see if it has been pre-assembled.M6 Split Washer (67)-4M10 Split Washer (26)-3M6 Nylon Locknut (66)-4M10 Nylon Locknut (72)-4#8 x 5/8" Screw (22)-4M6 x 16mm Hex Head Screw (24)-8M6 x 38mm Button Head Bolt (18)-4M10 Flat Washer (71)-4M4 x 16mm Screw (34) -- 1M6 x 25mm Hex Head Screw (14)-4M10 x 25mm Button Head Screw (25)-3M10 x 105mm Button Head Bolt (70)-44
Loosen the Lock Knob (68) on the right side of theFrame (1). Slide the Seat Frame (3) out until itstops. Tighten the Lock Knob.,Attach the Upright (2) to the FrameM10 x 25mm Button Head ScrewsM10 Split Washers (26). Be carefulthe Reed Switch Wire (13) or theCable (10).(1) with three(25) and threenot to pinchResistance225,Route both Extension Wires (41) up through theUpright (2) as shown.3Attach the Handlebar (4) to the Upright (2) with twoM6 x 25mm Hex Head Screws (14) and two M6 SplitWashers (67), but do not tighten the Screws yet.Make sure that the Screws are threaded into theindicated holes. Note: Two additional Screws willbe attached,67414in step 5.Connect the Reed Switch Wire (13) and the twoExtension Wires (41) to the corresponding wires onthe Console (8).4ConsoleWiresIf your Console (8) has a ground wire, attach it tothe Upright (2) with an M4 x 16mm Screw (34).41Next, attach the Console (8) to the Upright (2) withfour #8 x 5/8" Screws (22).,," GroundWire0Press the Resistance Knob (9) onto the ResistanceControl (10). Be sure that the mark on the Knob iscorrectly aligned.5
5.,Finish attaching the Handlebar (4) to the Upright (2)with two more M6 x 25mm Hex Head Screws (14)and two more M6 Split Washers (67). Tighten allfour Hex Head Screws.5Attach the Seat Bracket (69) to the Seat Frame (3)with four M10 x 105mm Button Head Bolts (70), fourM10 Flat Washers (71), and four M10 NylonLocknuts (72).672,Attach the Seat (16) to the Seat Bracket (69) withfour M6 x 16mm Hex Head Screws (24).724,Attach a Seat Handle (17) to the Seat Bracket (69)with two M6 x 38mm Button Head Bolts (18) andtwo M6 Nylon Locknuts (66).8Attach the other Seat Handle (17) to the SeatBracket (69) in the same manner.6917618
9. Attach the Backrest (15) to the Seat Bracket (69)with four M6 x 16mm Hex Head Screws (24).9IIi692410. Identify the Left Pedal (45) (there is an "L" on theLeft Pedal for identification). Using an adjustablewrench, tighten the Left Pedal counterclockwise intothe left arm of the Crank (29).1027Tighten the Right Pedal (not shown) clockwise intothe right arm of the Crank (29).Adjust the Pedal Strap (27) on the Left Pedal (45) tothe desired position. Press the Pedal Strap onto theadjustment tab on the Left Pedal.Adjust the Pedal Strap on the Right Pedal (notshown) in the same manner.11. The Console (8) requires either two or three "AA"batteries (not included); alkaline batteries arerecommended. Open the battery cover (not shown)on the back of the Console. Press the batteries intothe battery clip. Make sure that the negative (-)ends of the batteries are touching the springs.Close the battery cover. Note: If the battery clipholds three batteries, you must insert three batteries.11@BatteryClip12. Make sure that all parts are properly tightenedbefore you use the PROFORM "975s.7Batteries
HOW TO USE THE PROFORM 975SHOW TO ADJUST THE POSITION OF THE SEATFRAMEHOW TO ADJUST THE PEDAL STRAPSTo adjust each Pedal Strap (27), first pull the end ofthe Pedal Strap off the adjustment tab on the Pedal(45). Align a different hole in the Pedal Strap with theadjustment tab. Press the Pedal Strap onto theadjustment tab.The Seat Frame (3) can be adjusted to the positionthat is the most comfortable for you. To adjust theSeat Frame, first loosen the Lock Knob (68) on theright side of the Frame (1). Slide the Seat Frame forward or backward to the desired position. Tighten theLock Knob.168Adjustment Tab45HOW TO ADJUST THE PEDALING RESISTANCEThe pedalingresistance canbe adjustedwith theResistanceKnob (9)located on theConsole (8). Toincrease theresistance, turnthe Resistance Knob clockwise; to decrease the resistance, turn the Resistance Knob counterclockwise.8
DIAGRAM OF THE CONSOLEO000000000000000o o -O.OCAl.P DTIMLAPSDIST.ON/ R ;TPROGRAMNote: If there is a thinsheet of clear plastic onthe face of the console,remove it.DESCRIPTIONOF THE CONSOLEtors even. Important: The target pace is a goalpace. Your actual pace may be slower than the tar get pace, especially during the first few months ofyour exercise program. Be sure to exercise at apace that is comfortable for you.The innovative console offers a manual mode andthree pacer programs. The pacer programs aredesigned to help you achieve your exercise goals bypacing your exercise. The programs include an 18MPH/90 RPM program, a 12 MPH/60 RPM program,and a 6 MPH/30 RPM program. The console also features five monitor modes that provide continuous exercise feedback, Note: On some consoles the programs are listed in MPH and on others in RPM.Both sets of programs are identical.HOW THE PACER PROGRAMSThe graphs on the left side of the console show howthe target pace will change during each program (seethe drawing above). Each graph is divided into tencolumns, and each column represents 1/10 of a mile.The bars in each column show what the target pacewill be during that 1/10 of a mile. For example, in thefirst column of the 12 MPH/60 RPM graph, there isone bar. This shows that during the first 1/10 of a milein this program, the target pace will be 6 MPH (30RPM). In the second column, there are two bars, indicating that the pace is now 12 MPH (60 RPM).OPERATEWhen you use aActualTargetpacer program, anPace,Paceindicator will lighton each track of0O/000the RA.C.E.R.000 000display. The outertrack shows a target pace; the innertrack will showoo oooyour actual pace.The target pacewill change periodically during the 18 MPH/90 RPMand 12 MPH/60 RPM programs; as the target pacechanges, simply adjust your pace to keep both indica-DESCRIPTIONOF THE MONITOR MODESThe five monitor modes provide continuous exercisefeedback. The modes are described below. Speed--Thishour.mode shows your pace, in miles per Time--This mode counts the length of time youhave exercised. Note: If you stop exercising for tenseconds or longer, the time mode will pause.9
Distance (DIST)--This mode shows the total number of miles you have cycled, up to 999. The displaywill then reset to zero and continue counting.If you selected apacer program, twoindicators on theP.A.C.E.R. track will Laps--This mode shows the number of quarter-milelaps you have completed.light. The indicatoron the inner track Calories (CAL)--This mode shows the approximatenumber of calories you have burned.will show your actualpace. The indicatoron the outer trackSTEP-BY-STEPTurn on the powerpower, press theon/reset button orBsimply begin exercising. When theON/ RESETPROGRAMpower is turned on,the entire displaywill appear for two seconds. The console will thenbe ready for use. Note: If batteries were justinstalled, the power will already be on.JManualFollow your progressWhen the power isturned on, the console will scanthrough the fivemodes automatically,A flashing mode indicator will show whichPacewith the monitor modesCALLAP5I 7 r .:a :elE;PffffDTlrffDINE.Mode Indicatormode is currently displayed. When the Laps mode is displayed, an "L"will also appear. If desired, the display can bereset by pressing the on/reset button.elect oneof the three pacer programs or themanualmodeWhen the power isfirst turned on, theconsole will be inthe manual mode.To select one of theIremain even. As the program progresses, the target pace will change periodically; as the targetpace changes, you should also adjust your pace.Important: The target pace is a goal pace. Youractual pace may be slower than the targetpace, especially during the first few months ofyour exercise program. Be sure to exercise ata pace that is comfortable for you.To turn on theBo owill move around the track at the programmedpace. As you exercise, adjust your pace so thatthe indicators on the inner and outer tracksCONSOLE OPERATIONBefore the console can be operated, the batteriesmust be installed. (See assembly step 11 on page 7for installation instructions.) Follow the steps below tooperate the console.[IITarget0The PROFORM 975s also featuresan innovative hand-Iv,, 41grip pulse sensor.The pulse displayallows you to monitoryour heart rate during your workout. To use thepulse sensor, see page 11.PULSEpacer programs,repeatedly pressthe program button.The program indicator will showwhich program youhave selected. The0programs will be selected in the following order:the manual mode, the 6 MPH/30 RPM program,the 12 MPH/60 RPM program, and the 18 MPH/90 RPM program. Note: Once you select a pacerprogram, you can reselect the manual mode byrepeatedly pressing the program button.Turn off the powerTo turn off the power, simply wait for about sixminutes. If the pedals are not moved and theconsole buttons are not pressed for six minutes,the power will turn off automatically.Begin your workoutIf you selected the manual mode, one indicator onthe inner P.A.C.E.R. track will light. As you exercise, this indicator will move around the quartermile track.10
HOW TO USE THE PULSE SENSORThe convenient pulse sensor allows you to measureyour heart rate periodically. You can measure yourhe
changes, simply adjust your pace to keep both indica-Actual Target Pace, _ Pace 0 O_ _/00 0 000 000 tors even. Important: The target pace is a goal pace. Your actual pace may be slower than the tar get pace, especially during the first few months of your exercise program. Be sure to exercise at a pace that is comfortable for you.