Transcription
DAS TRADER USER MANUALTABLE OF CONTENTSLOGGING ON, OPENING & SAVING DESKTOP .2FOUR ESSENTIAL WINDOWS .3OPENING OTHER WINDOWS 15CONFIGURING WINDOWS 21MAIL 22CHART 22HOT KEYS .26ALERT AND TRIGGER .26PREDEFINED OR BASKET ORDERS .28STOP ORDERS .29REDISTRIBUTE POSITIONS .30MISCELLANEOUS FEATURES .31FUNDAMENTAL AND IMBALANCE DATA .32SCREEN RECORDER .33TRADE SIGNAL . .34ECNS ORDER MATCHING 36PREPARING TO ENTER AN ORDER 38ENTERING AN ORDER 44OPTION TRADING 48FUTURES TRADING AND FOREX TRADING .511
DAS TRADER USER MANUALLOGGING ONClick on the Start button and go to Programs. Select the program, or, double click onthe program icon on your desktop. If the logon screen does not appear automatically,select “FILE” then “Logon” from the menu bar. In the “User ID” textbox, type in theUser ID that was supplied to you by your broker. Next, type your password in the“Password” textbox. Check the checkbox for “Remember ID/PWD” and click on theOK button. Checking the “Open Order Only” box allows you to only view open orders.Figure 1OPENING A DESKTOP SCREENUpon successfully logging into the application, your software opens to a default desktopscreen. If you wish to open a desired desktop screen after you have logged on, go to“FILE” in the menu bar and perform a left mouse click on “Open Desktop” from thedropdown menu, then double click on the desktop screen file you want to open.Desktop screen files have the extension .”dsk.”CREATING AND SAVING A DESKTOP SCREENTo create your own desktop, first close all windows by going to the top menu bar andselecting “FILE” then “Clear Desktop.” Then, begin opening the windows you needfor trading. You can personalize your own screen using any windows you choose.When you are satisfied with your desktop, go to “FILE” on the menu bar and select“Save Desktop.” Enter a file name and click “Save.” You can save as many differentscreens as you like. To retrieve your screen, go to the menu bar and select “FILE” then“Open Desktop” and double click on your desktop screen file name. Saving yourdesktop screen as “default” will set it to open automatically whenever logging in.2
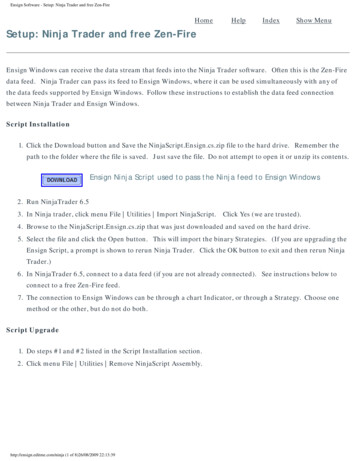
DAS TRADER USER MANUALCHANGE THE NETWORK ENVIRONMENTYou can check your network status by double clicking on the “Network Icon” on thebottom right of your platform. If you are experiencing lagging/connection issues, youcould try switching to a different Quote Server IP and Order Server IP. Go to “FILE” onthe menu bar, select “Switch Quote Server,” then select the available Quote Server andclick the “Connect” button to switch to the selected quote server. For the Order ServerIP, go to “SETUP” menu and select “Network,” then on the top right section select thenew Order Server and click the “Select & Quit” button to save your new configuration.You can also modify some other network settings through this window by clicking“Commit” to implement the changes.SET A DEFAULT ACCOUNTGo to “SETUP” on the menu bar, and select “Order Templates.” Select the exchangesyou trade on from the drop down menu following “Exchange.” There you select youraccount from the “Account” drop down menu. You may also set your default numberof shares, as well as preferred Route, AON/ANY and Time in Force settings in theother boxes or drop down menus. Be sure to set your default for each exchange youtrade on. Click “OK” when you are satisfied with the new changes.SET TRADING DEFAULTGo to “SETUP” and select “Trading Settings.” There you can enable various settingsto make your trading experience smarter or with greater risk management. See sectionon Preparing to Enter an Order in this manual for more information on Trade Settings.FOUR ESSENTIAL WINDOWSThere are four essential windows for trading: Trade Montage, Accounts, Position andOrders.1. TRADE MONTAGE WINDOWThis is your order entry and Level II quote window. Type the stock symbol in the“Stock box” as shown on figure 2 and hit Enter. The Title Bar of the TradeMontage window displays the stock symbol and the current inside market (thebest bid and ask). Previous close (PCL), day's high-low (H/L), last trade (Last),Volume (Vol), and Volume Weighted Average Price (VWAP) are displayedbelow the Title Bar. Net change compared to the previous day's close is displayedin red/blue. A maximum of ten Trade Montage windows may be opened. Seefigure below:3
DAS TRADER USER MANUALTitle BarStock BoxLink IconStudy FieldMessageBooksShare BoxRouteLock BoxPreferencePrice BoxReserveAccountFigure 2a) UPPER SECTION of the MONTAGE WINDOWThe following describes the functions of the boxes and icons on the top portion ofthe Montage window.Title BarDisplays the NASDAQ Inside Market. (Best bid / best ask).Stock BoxType a security symbol here and press Enter.VWAP FieldRight mouse clicking on this field allows you to change this field to display otherstudy data such as Today’s Total Trades, Today’s Dollar Volume, Imbalance Data,LULD (Limit Up Limit Down), etc.Link or Blue AnchorThis icon is used to link the Trade Montage window to other windows such as charts,time and sales. Place your cursor on the Anchor icon of the Trade Montage window,hold the left mouse button, and drag the cursor to the target window (such as a chart).Then, release the mouse button (point, click, drag and drop) to complete the link.4
DAS TRADER USER MANUALSecurity Symbol StatusThe area/icon under the Anchor icon displays the security symbol status such as S,SS, SSR, etc. Clicking on the icon will generate a pop-up window explaining themeaning of that security symbol status, such as Symbol is Not Shortable, Short SaleRestriction, etc.Market DesignatorMarket designation code is located above the blue Anchor icon and represents theExchange that particular security is traded on. The various letter codes are asfollows:·Q – NASDAQ·U – NASDAQ OTCBB·N – NYSE. New York Stock Exchange·A – AMEX. American Stock Exchange. Uses order template for N·u – Pink Sheet·O – Options·F – Futures·T – TSX or VSE· – Currency·X – Complex Orderb) MIDDLE SECTION of the MONTAGE WINDOWThis is the Level II montage. It contains Market Maker (MM) and ElectronicCommunication Network (ECN) identification (ID) symbols (designated by #). Tothe right of each MM or ECN ID is the Bid or Ask along with its corresponding size.Size is abbreviated and you can multiply it by 100 to get the actual number of shares.Left mouse click on any MM or ECN ID to load the Trade Montage window with anorder to that specific MM or ECN at the quoted price. The MM or ECN ID appearsin the Preference Box, and the quoted price appears in the Price Box. Click on thedisplayed share size to load the shares box if desired. When directing an order to aMM or ECN, you must send buy orders at the MM or ECN Ask, and send sell ordersat the MM or ECN Bid.c) LOWER SECTION of the MONTAGE WINDOWThe Green Message BarThe Green Message Bar displays the status of your order in real time.NOTE: Some actions will generate multiple messages. Only the last message willremain in the Green Message Bar. To see the rest of the messages, press and holdthe left mouse button on the Green Message Bar. If you want to release the mouseclick while reading it, continue to hold your mouse click and slide the cursor over tothe message box region and release. To close the message box, click on the GreenMessage Bar. You can also review your trades by clicking on “Trade Log” under“TRADE” in the menu bar.Shares BoxThe preset default is 1000. There are four ways to adjust the number of shares.5
DAS TRADER USER MANUAL1. Use the up /down arrows to the right of the Shares Box. Left mouse click on theappropriate arrow, hold down the left mouse button or use the mouse wheel.2. Use the forward / back arrow keys on the keyboard. (This is a hotkey function)3. Move the mouse cursor to the Shares Box and left mouse click to make the field"live" and type in the number of shares.4. Left mouse click on the quote size on the Level II montage.To delete the Shares, do a Right mouse click on the down arrows to the right of theShares BoxPreference BoxThis field is located to the right of the Route drop-down box. Type in the MM orECN you prefer. For more information on preferred Market Makers and ECNs seesection Order Matching.Reserve BoxThis field is located to the right of the Position button. This feature is useful if youare sending a large amount of stock to the market but you do not want to display theentire amount of shares. You can put the amount you want to display in the ReserveBox and the true amount in Shares Box. This feature is not supported by allexchanges, MMs, and ECNs.Price BoxThis field is located to the right of the Reserve Box. There are four ways to set aprice:1. Left click on any Bid or Ask on the Level 2 montage.2. Use the arrows to the right of the Price Box in the Trade Montage window. Theup arrow increases the price by .01, the down arrow decreases the price by .01.Left mouse click on the appropriate arrow, hold down the left mouse button oruse the mouse wheel. When the Price Box is blank, the price always starts at theASK price.3. Use the up / down arrow keys on the keyboard to change the price in .001increments. Up adds .001 to the best Level II Bid. Down removes .001 fromthe best Level II Ask. (this is a hotkey function)4. Type the price directly in the Price Box.To delete a price, right mouse click on the arrows to the right of the Price Box.Route Drop-down BoxClick on the arrow to open the dropdown menu. Select the exchange, ECN, or MMyou wish to send your order to. Routes ending in M are for market orders, L is forlimit, S is for stop and those ending in P are for pegged orders.Account Box6
DAS TRADER USER MANUALThe account number you are trading for is shown in the Account Box. If you tradefrom more than one account, click on the arrow to select the account to be traded.Any account that begins “TR” denotes a training account.Always select the account after entering the security symbol.NOTE: Every time you enter a stock on a Trade Montage window, your Order Boxresets to its default order setting.Time In Force (TIF)TIF box is located to the right of Preference Box. The preset default is DAY. Allunexecuted Day orders on all ECN routes are cancelled at 4:00 pm ET. Day: Orders are only good for the regular trading session (9:30am-4:00pm ET). Day : Orders good for regular plus extended-hours sessions, which is before9:30am ET and after 4:00pm ET. IOC: IOC stands for Immediate-Or-Cancel, where any part of the order that canbe filled immediately will be filled, while the remaining shares will becancelled. GTC: GTC stands for Good-Till-Cancelled, where the order will stay activeuntil you’ve decided to cancel it. Like DAY orders, GTC orders remain activeonly during the regular 9:30 a.m. to 4:00 p.m. ET trading session. At Open: This configures the order to be filled at market open. Any unfilledorder is otherwise cancelled. At Close: This requires the order to be filled at market close. Any unfilledorder is otherwise cancelled. FOK: FOK stands for Fill-or-kill, which requires that the order be filledimmediately in its entirety, or cancelled. 1Min, 2Min, 3Min, 5Min, and 10Min: This stands for the maximum amount oftime that the order remains open for execution before being automaticallycancelled.AON/ANY/N Hold boxAON/ANY/N Hold Box is located to the right of TIF Box. ANY (any availableshares) is the preset default. (AON stands for All-or-None, and N Hold stands forNot Hold). Please select ANY if you are unsure if your desired route supports AONand N Hold orders.BUYClick here to send a buy order to go long, or to cover a short position.SELL/ Short (shown as “SHRT”)Click here to send a sell order to liquidate a long position or to enter an order for ashort position. Shorting rules must be observed. The system will reject any illegalshort sell orders.Shorting Rules: UPTICK - May short at the bid or higher.7
DAS TRADER USER MANUAL DOWNTICK - Must short at least .01 above the bid, if the price increment isin one cent. However, the specialist on the trading floor won't actually place theorder until the stock has an uptick.IPO - Initial Public Offerings are not shortable.The software automatically checks availability when a short sale order is entered.The message "Send Rej Shrt Sec isn't Shortable" will be shown if the security isnot available to short. Furthermore, traders can check short availability byentering the symbol in the Shortlist window under the TRADE tab options.CXLClick here to cancel the order that is loaded on the Trade Montage window. Anotherway to cancel your open order is by clicking on the “X” in the X column of theOrder window. You can also use the Hotkey to help you to cancel your order,especiallyif you have more than one open order and wish to cancel themsimultaneously. In Hokey, there are several options, such as canceling all orders, orjust canceling all open orders for the same security as the order you selected, or justcanceling all buy/sell open orders etc.(Hint, go to Setup menu and select Hot Key to open the Hotkey window, then in theHot Key Script Builder window select “Trade” in Command Categories and select“CANCEL” in Sub Categories to view all available cancel commands we have.)TMPThis button, otherwise known as the Order Template, restores your default settingsto the Montage window.P (Position) ButtonLeft mouse click here to automatically load the Shares Box with the number ofshares you currently hold for the security you are trading. Use it immediately afterany execution, or anytime you call up a stock to which you hold a position. It is alsopossible to set your default order to automatically display the number of shares youhold whenever you call up a security (go to SETUP on the menu bar and selectTrading Settings).Lock ButtonThe Lock Button is identified as a green checkmark located to the right of the “?”icon. You may lock your Trade Montage windows to prevent sending a buy or sellorder inadvertently. Doing a left mouse click on this button will turn it into a red “X,”indicating a locked Trade Montage window that prohibits any orders from being sent.Doing a left mouse click once more will remove the lock on the montage.Route ConfigureThis function allows you to select your most often used routes, for example ARCAL.To configure your routes, do a right mouse click on the route drop down box oranywhere between the SELL, CXL or BUY buttons. Type in the new route in theorder you wish for them to appear in the list. Click Apply to save any changes.8
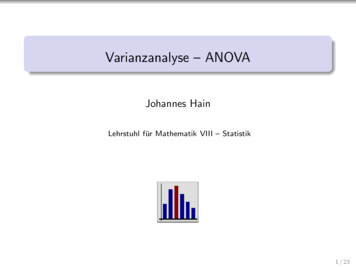
DAS TRADER USER MANUALPlease note that you must set your route list for each exchange you trade on, seeFigure 3 for exchange select in the Route Box Setting window. To see all availableroutes, go to TRADE and select Route Status. Available routes are in blue fonts,while unavailable routes are in gray.ExchangeSelectorFigure 3CONFIGURING THE LEVEL II MONTAGERight mouse click over the Level II montage and select “Level2 Config” to bring up the“Level 2 Configure” dialog window. The following parameters can be configured: Tier Color – Each price level on the Level II montage is color-coded. These colorscan be configured to your preference by doing a left mouse click over the color band. Font – Left mouse click on the Font field to open the “Font” window. Tier Color Grouping – You may opt to group price ranges by certain colors insteadof assigning them to every change in price level. For example, if .0625 is entered,color grouping would include all quotes within .0625, or what was formerly a 16th. Price Format – Use the dropdown menu to select the amount of decimal placesprices are displayed in the Level II section. Show Grid – Left mouse click on this checkbox to view the Level II in grid form.9
DAS TRADER USER MANUAL Show ECN # – Selected by default. ECNs are designated with # following themarket participant ID (known as MPID). Uncheck this to hide the #. Only Show ECN – Left click the check box to show only ECN quotes in the LevelII section of the montage. Hide Column Header – Left mouse click the checkbox to hide the column’s headeron the Level II section of the montage. No Scroll Bar – Left mouse click the checkbox to remove the scroll bar on the LevelII section of the montage. Show Order – Left mouse click the checkbox to incorporate open orders on theLevel II section of the montage. Ladder View – Left mouse click the checkbox to change the Level II section to aladder view style. Show Lv2 Dynamic Scale Bars – Left mouse click the checkbox to add dynamicscale bars to the Level II section of the montage window. Optimized Paint (for slow computer) – Left mouse click the checkbox to improvehanging data due to the data feed. (Hint, only if you are using a slow computer.) Less Flicker – Left mouse click the checkbox to reduce flicker in quotes. Fast Paint – Left mouse click the checkbox to increase the paint speed. Don’t change order size when click on level 2 – Left mouse click the checkbox todisable loading the order volume when clicking on order size in the Level II. Don’t change route when click on level 2 – Left mouse click the checkbox toprohibit the selected route from changing when clicking on the Level II quotes. Level 2 Type – Left mouse click on the down arrow to open the drop down menuwhich allows you to change the level 2 type/book. Show Lv2 Selector – Left mouse click the checkbox to add tabs to the Montagewindow which allows you to view/change the data book. Show quote size in number of shares – Left click the checkbox to display theactual share size in the Level II section. Default setting is shown in share lots of 100. Tiers section – Sets the depth (or price levels) of INET, ARCA and other Books thatare displayed on the Level II section of the Montage window.10
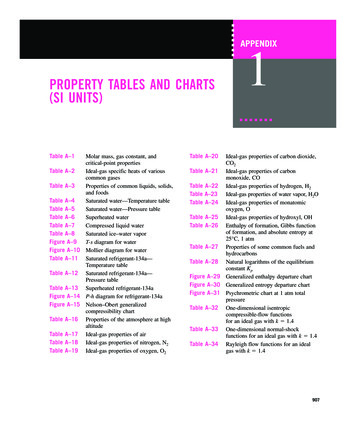
DAS TRADER USER MANUAL Set As Default – Sets the current Level II configuration as the default setting for allMontage windows. Load Default – Left mouse click to load your default Level II montageconfiguration on any Trade Montage window. Monitor Group (1 and 2) – Two Market Participant IDs may be monitored byentering the MPID in the monitor field. Use the left mouse click over the appropriatefield to select text and background colors to make them stand out.NOTE: Be sure to hit Commit prior to exiting to save your Level II settings.D) ADD HOTKEY BUTTONS INTO MONTAGE WINDOWFigure 4The following steps will add new hotkey buttons into your montage window.1) Right mouse click on the Montage window and select “Layout Config”2) Add Hotkey into the box on the right-side and click OK button. (All four itemsrecommended: Level 1, Level 2, Trade, Hotkey)3) Montage window will display a new row with the message “Right mouse click hereto add a button.” Perform a right mouse click on it and select “Add Row” to addhotkey buttons. Button Number - Indicates the number of buttons in this new row. Add Button - Adds one more button into this row. Delete Button - Removes the selected button. Edit - Allows you to modify the selected button. Add Row - Adds another row. Delete Row - Deletes the selected row.2. POSITION WINDOW11
DAS TRADER USER MANUALDisplays all open positions. Right mouse click on a symbol to load a Trade Montagewindow with that security, the number of shares, and the account the position is held in.Figure 5Columns on the Position window are as follows: Symb: The security symbol. Right mouse click on the symbol to load a TradingMontage window with that security, the number of shares, and the account number. Account: Your account number. Shares: Number of shares. Avgcost: Average cost. Realized: If you have sold part of your position, the realized P&L on the sale isdisplayed here. Unrealized: This is your P&L if you were to close the entire position at the currentmarket price. Bid and Ask: The current inside market on that security. Type: Cash, Margin or Short. Withhold BP: The amount of buying power used in this position. InitShare: Initial number of shares to start the day. MktVal: Current market value of the position. Diff: The difference between the average cost and the current market Bid/Ask. Day Unreal: Shows the P&L between the previous day’s closing price and currentBid/Ask price. PClose: Previous day’s closing price. Last: Last price traded. Company Name: Company name. Account Notes: Notes that your administrator/broker added to your account. Create Time: Date and time the position was created. %Change: Displays the difference between the average cost and the current marketBid/Ask in percentage terms. VWAP: Volume Weighted Average Price. Includes the premarket and aftermarketdata.Right mouse click window and select Config to add additional columns. (Hint: Go to“TRADE” menu and select “Closed Positions PL” to create an additional PositionWindow using the same configurations.)12
DAS TRADER USER MANUAL3. ACCOUNT WINDOWDisplays account information. You can also modify your training account’s buying powerand equity by doing a left mouse click on your training account, then doing a right mouseclick over it and selecting “Reset BP/Equity.”Figure 6Columns in the Account window are as follows: Account: Your account number(s). Note: Any account that begins with “TR” is atraining account. Type: Account type: 1 cash 2 margin Realized: P&L for the current day on exited positions. Unrealized: Total change in value of all current positions combined. Init BP: Daytrading Buying Power, loaded daily for your account(s). BP: Current Buying Power. Balance will fluctuate as you send orders and open/closepositions. OverNight BP: Overnight Buying Power. It is displayed as a guide. If any positionthat was opened during the current trading day exceeds your overnight buying power,this field turns red, alerting you of that fact. Exceeding Overnight BP (ONBP) mayresult in a margin call.NOTE: Software does not prohibit you from exceeding your ONBP. Tickets: The number of trades for the day. Shares: The number of shares traded for the day. LiqShr: Amount of shares added to liquidity of market. Status: Account status EcnFee: Electronic Communication Network fee Equity: Account Equity MarginEq: Margin Equity OrderHoldBp: Order Hold Buying Power SecFee: Securities and Exchange Commission fees NasdFee: National Association of Securities Dealers fees Commission: Commission NetPL: Net Profit & Loss ONBP: Leftover OverNight Buying Power. A minus sign and red field colorindicates if you have exceeded your overnight buying power. PL Daily: P&L for the current day. Unreal Daily: Total change in market value for current positions on the day.13
DAS TRADER USER MANUAL EQ%: EQ% displays the relationship between the equity and total positions value.The equation is “Current Equity/Market Value*100.” (Hint, it is one of the riskparameters and lower value means higher risk.)CurrEquity: Current EquityAccount Notes: Notes that your administrator/broker added to your account.Max Total Loss: Displays the max total loss value that had set to your account.(Hint: when max total loss reached, no new orders are allowed.)TotalLoss%: Display total loss in percentage.MktVal: Display total market value of all current positions.Curr Equity Lmt: Displays the current equity limit set on your account. (Hint:When account’s current equity limit reached, no new orders are allowed.)Right mouse click in the Account window and select Config to add additional columns.4. ORDER WINDOWDisplays all open orders. Orders may be modified if the routes and your broker allows it.Double click the open order to load it onto the Montage window, make your changes, andthen use the “RPL” button to replace the order. Right mouse click on the order and select“Edit Trigger Order” to add or edit a Trigger Order in this primary order.Figure 7Right mouse click on the row containing the order to open the Config window. Columnson the Order window are as follows: X: Left mouse click to cancel an order. Status: Sending means the order has not reached the market yet; Accepted means theorder has reached the market and Canceling means order has not been canceled yet. Symb: Security symbol. Side: B Buy S Sell Qty: Number of shares on the original order. Open: Number of shares currently open. Price: Price of order. Route: Route selected for the order. Type: L Limit, M Market, S Stop. Time: Time the order was entered. TIF: Time period that the order is active (i.e. DAY, 1, 2, 3, 5 or 10 min.)14
DAS TRADER USER MANUAL Broker: Preference Broker.Account: Your trader ID.Cloid: Order Close ID (Hint, for system use only)NoRR: No order rerouting.Triggers: Displays the Trigger Order that is attached to the order.OrderID: Order ID.Notes: Notes about the order.Company Name: Company name.Sec Type: Security type.Expire Time: Expire time of the order.Minimum: Minimum number to be executed.Tags: Fix Tags (Hint: it is for admin/broker use).Display: Displays the shares indicated for Reserve Order.Right mouse click in this window, select “Config” to add additional columns. You mayalso go to “TRADE” menu and select “Trigger Order” to open the Triggers window,which displays all your open Trigger Orders.OPENING OTHER WINDOWSAs mentioned previously, the essential windows for trading are: Trade Montage, Account,Position and Orders. The following is a description of additional windows you may wishto utilize:Trades WindowDisplays current day’s trades. The columns on the Trades window are basically thesame as those on the Orders window. Doing a right mouse click and selectingConfigure will allow you to add more columns. You may also use the filter tool todisplay just the data you wish to see.Figure 8Trade Log WindowDisplays all the messages generated in the Green Message Bar on the Trade Montagewindows. This log is stored locally on your computer's hard drive and records everyaction you performed on the trading platform for the day. Switching computers duringthe day will create a separate log on the other computer.15
DAS TRADER USER MANUALFigure 9Event Log WindowRecords all the events that happened in the platform during the day, including yourtrading activity. Tabs are located on the bottom to help you select/filter the events.Figure 10Route Status WindowDisplays all routes. The blue color means the route is connected with server while thegrey color means it is not. (Hint: Admin users have the authority to block or add newroutes during the day, which may not sync to this window immediately.)Figure 11Short List WindowThis feature will check to see whether a particular stock is shortable through your broker.Enter the stock symbol in the Symb column and hit Enter. If the stock is shortable, thenumber of shares available will be displayed. In some cases, additional shares as well asadditional securities may be located by calling your broker.Market: Market Designator. See section on Market Designator.HiRisk: Y Yes N No. Stocks designated as HiRisk have a 50% margin maintenancerequirement. It is recommended that you check with your broker for margin requirements.ShortSize: Number of shares available to sell short.16
DAS TRADER USER MANUALFigure 12Short Locate WindowThis feature allows you to instantly request locations of hard-to-borrow securities. In thePrice Inquiry section, enter the security symbol, desired shares, the route, then click the“Inquire” button to view the available/remaining share size along with its cost to borrow.To finalize the request, go to the Locate Order section, select your account, enter thedesired shares and click the “Locate Order” button to submit your request. The status ofyour request will appear in the lower section. The “Cancel Order” button allows you tocancel the selected order/request.All short locate requests are valid for same-day trading, and new locate requests arerequired for each trading day. Any approved requests for shares that are not used by theend of the current trading day will expire. Short locate requests can be placed at any timeduring standard trading hours between 8 a.m. and 4 p.m. EST.(Hint: Not all brokers are compatible with this feature. Please contact your broker toconfirm whether or not they support this feature.)17
DAS TRADER USER MANUALFigure 13Time & Sale WindowReports trades as they occur. The first column shows the price of the trade. The secondcolumn indicates the number of shares (multiply by 100 for the actual number of shares).The third column shows the time of the trade. The fourth column shows the exchange thatthe shares traded on. The fifth column contains a Flag code. Right mouse click on thewindow and select “Config” to add more columns.Figure 14ECN Time/Sale WindowGo to “QUOTES” on the menu bar, select “ECN Time/Sale.” The ECN Time/Salewindow displays only ECN trades. (Hint: the B means buy side order, S means sell sideorder, Bh means the buy side’s hidden order, and Sh means the sell side’s hidden order.)18
DAS TRADER USER MANUALFigure 15Standalone feature - The Time & Sale window can function alone and does not need to belinked to a Trade Montage window to function. Click on the title bar, type in a symboland press enter. The full number of shares may be displayed instead of being displayed inlots of 100 by doing a right mouse click to open the “Time and Sale Config” dialogwindow and unchecking “Share / 100.”Linking Time & Sale to a Trade Montage windowPut your mouse cursor on the Anchor icon on the Trade Montage window and hold downthe left mouse button. While holding down the left click, drag the cursor to the Time &Sale window and release the mouse button (point, click, drag and drop).
This icon is used to link the Trade Montage window to other windows such as charts, time and sales. Place your cursor on the Anchor icon of the Trade Montage window, hold the left mouse button, and drag the cursor to the target window (such as a chart). Then, release the mouse button (poi