Transcription
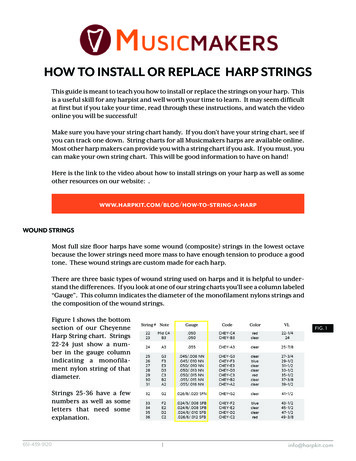
HOW TO INSTALL OR REPLACE HARP STRINGSThis guide is meant to teach you how to install or replace the strings on your harp. Thisis a useful skill for any harpist and well worth your time to learn. It may seem difficultat first but if you take your time, read through these instructions, and watch the videoonline you will be successful!Make sure you have your string chart handy. If you don’t have your string chart, see ifyou can track one down. String charts for all Musicmakers harps are available online.Most other harp makers can provide you with a string chart if you ask. If you must, youcan make your own string chart. This will be good information to have on hand!Here is the link to the video about how to install strings on your harp as well as someother resources on our website: .www.harpkit.com/blog/how-to-string-a-harpWOUND STRINGSMost full size floor harps have some wound (composite) strings in the lowest octavebecause the lower strings need more mass to have enough tension to produce a goodtone. These wound strings are custom made for each harp.There are three basic types of wound string used on harps and it is helpful to understand the differences. If you look at one of our string charts you’ll see a column labeled“Gauge”. This column indicates the diameter of the monofilament nylons strings andthe composition of the wound strings.Figure 1 shows the bottomsection of our CheyenneHarp String chart. Strings22-24 just show a number in the gauge columnindicating a monofilament nylon string of thatdiameter.String # NoteGaugeCodeColorVLFig. 1Strings 25-36 have a fewnumbers as well as someletters that need someexplanation.651-439-91201info@harpkit.com
SFBSteel Core, Fiber Bedding, Bronze WrapFig. 2These strings have steel core, surrounded by afiber bedding, and finally a bronze wrap. Figure 2shows a C string so the wrap has been colored red.You’ll notice that the windings or wrap extendall the way to the end of the strings. The bronzewinding will hold its shape even if cut. If you wereto unwrap some of the winding you would exposethe plain steel core.026/6/.012 SFN indicates a .026” diameter steel core, 6strands of fiber bedding, and a .012” diameter wrapSFNSteel Core, Fiber Bedding, Nylon WrapFig. 3These strings have a plain steel core, a fiber bedding, and a nylon wrap. You’ll notice that thewrapping does not extend all the way to the endof the string, leaving the core exposed. The nylonwrapping won’t hold its shape and must be tiedoff below where the strings need to be cut. If youcut into the nylon wrapping, the entire wrappingwill unwind and the string will be useless.026/8/.020 SFN indicates a .026” diameter steel core,8 strands of fiber bedding, and a .020” diameter nylonwrapN/NNylon Core, Nylon WrapFig. 4These strings have a nylon core and a nylon wrap.The nylon wrapping does not extend to the end ofthe string and must be tied off below where youwill cut the string. Do not cut into the wrappingon these strings.055/.018 indicates a .055” diameter nylon core with a.018” diamteter nylon wrap.p651-439-9120It’s important to note that you must not cut into the nylon windings of the SFN andN/N strings. If you do, you will render the string useless.2info@harpkit.com
SFB STRINGS1.Start at the bass (lowest) end of the harp and install the wound strings first. Thesestrings come with a ball and washer so you don’t have to tie any knots on the bottomof the strings.Insert the string through the back of the harp through the lowest hole inside the soundboard. Pull it all the way until the knotted end contacts the back side of the soundboard.2.Thread the other end of the string through the corresponding tuning pin, pulling itthrough the pin. Clip the wire string about 1-1/2” to 2” above the pin. This will leaveenough slack in the string to allow 2-3 windings before coming taut.3.Use the tuning wrench to turn the pinclockwise (from the viewpoint of theback of the tuning pin) and guide thewindings neatly around the tuning pin.(fig. 5)4.Fig. 5NiceWindings!As the string begins to tighten, place itin the groove of the bridge pin. Whenyou are satisfied with the installation ofthe string, use a wire cutter to clip offthe excess tail, close to the tuning pin.SFN STRINGS5.Figure 6 shows SFN and N/N strings successfully installed on the harp.Fig. 6SFN StringString any SFN strings the same wayyou installed the SFB strings. Be careful with the exposed wire core of thesestrings. They can easily scratch the surface of your harp.N/N StringN/N STRINGS6.N/N strings require a little extra attention. Pull the string straight throughthe hole in the soundboard, not at anangle, to avoid scratching the nylonwrap against the brass eyelet.Before you trim the tail, you will needto “cross the windings.” Crossing thewindings is what anchors the top of thestring to the tuning pin. Read the nextstep before attaching the N/N strings tothe tuning pins.651-439-91203info@harpkit.com
CROSS THE WINDINGS7.When attaching the N/N and monofilamentnylon strings to the tuning pins, follow thesame procedure as you did for the bass strings.However, with nylon, it is necessary to alsoanchor the tops of the strings securely to thetuning pins, as follows:Fig. 7Crossyourwindings!Thread the string through the hole in the tuning pin. Do NOT trim the string yet.Leave yourself enough slack to guide 1-1/2windings of string on the tuning pin away fromthe neck.Then guide the next winding back over theothers (toward the neck) so the string helps“pinch” itself tightly to the pin as you tune itup to pitch. (fig. 7) If you don’t do this, you willsurely experience string slippage and breakage,especially in the upper half of the instrument.Once the windings are crossed and the string istaut, you can clip the tail off the string.MONOFILAMENT STRINGSOverhand KnotFig. 8Monofilament nylon strings do not have knotstied in them yet. We find it easier to insert thesestrings from the front of the harp and thenreach inside the back to find the end and tiethe knot.The knots we tie in the strings prevent the stringfrom being pulled through the soundboard.So we have to tie progressively larger knots asthe diameter of the strings gets smaller.Overhand Knot with tail tucked into knot.060”, .055”, & .050 STRINGSFig. 9For these strings, tie a simple overhand knot atthe end, as shown in fig. 8.Leave enough tail at the end of the string topush back into the overhand knot’s loop. (fig. 9)This knot is sufficient to prevent the stringfrom pulling through the soundhole. You cantighten the knot by pulling it firmly against theback of the soundboard.651-439-91204info@harpkit.com
.045” THROUGH .025” STRINGSFig. 108.For the remaining nylon strings (.045” to .025” diameters) you will need to bulk up the knot with a small wooden dowel. Begin by threading the strings through thesoundboard.Tie an overhand knot near the end of the string and pullit tight. Then lay the string on top of the dowel forminga ‘T’. (fig. 10)Next you’ll form two half hitch knots and loop them overthe dowel one at a time. (figs. 11 - 16)Fig. 11Fig. 12Fig. 15Fig. 13Fig. 16Once both loops are over the dowel (fig. 17), pull the longpart of the string tight against the dowel. The overhand knotwill snug up to the dowel and prevent the string from pulling through the two half hitch knots. The dowel preventsthe strings from pulling through the soundboard.9.Fig. 14Fig. 17Attach the rest of the nylon strings to the tuning pins asdescribed in Step 7.651-439-91205info@harpkit.com
SOME FINAL TIPSBe sure to check out the video about chaning/installing harp strings on our website. Allof these steps are explained and demonstrated in that video.Do not accumulate a lot of windings around the tuning pins, especially with the thickbass (low) strings lest they become bulky and cumbersome. If you have that problem, turn the tuning pin backward to unwind the string, then pull more of the stringthrough the hole and tighten again.Wound harp strings are custom made for each model of harp. Some people break thefirst one they install by over-tightening. They don’t expect it to come up to pitch soquickly. Take care to avoid that costly mistake. It is very helpful to pluck the string asyou tighten it, so you can hear the pitch go up as your increase the tension.Musicmakers provides full length nylon strings. Many of the smaller diameter nylonstrings are long enough to provide you with 2-3 spare strings. Hang on to the cutting,label the string with the diameter, and save in case you need a replacementTUNING10.When all the strings are installed, you can begin tuning the strings up to pitch. Expectit take around 50 tunings before the harp will fully stabalize. We recommend tuning ittwo or three times a day. Persevere, and be patient! It should get better each day.The strings should all be tuned to the natural C major scale (white keys on the piano.)All the red strings will be C notes and the blue strings with be F notes.Many people are not certain if they are tuning their harp strings to the correct octave.Tuning the strings an octave too low will result in flabby harp strings that don’t providemuch volume. Tuning the strings too high will cause strings to break. To make sure youare tuning your harp strings to the correct octave, you can double-check the pitch onour website with our “online tuner” at www.harpkit.com/freetuner.You can also check your string chart. You’ll see notes listed with a number after them(C4 or D5 for an example.) This is called Scientific Pitch Notation and is used to identifythe octave of any given note. Middle C on the Piano is C4.The octave number changes at every C. (fig. 18)Fig. 18651-439-91206info@harpkit.com
This guide is meant to teach you how to install or replace the strings on your harp. This is a useful skill for any harpist and well worth your time to learn. It may seem difficult . can make your own string chart. This will be good information to have on hand! . pulling it through t