Transcription
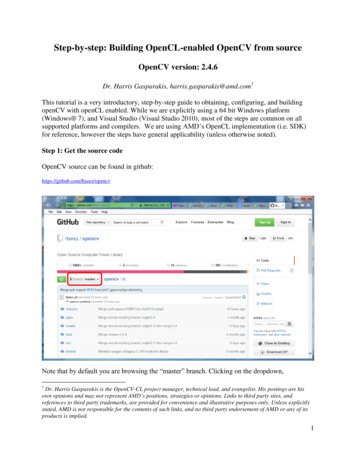
Step-by-step: Building OpenCL-enabled OpenCV from sourceOpenCV version: 2.4.6Dr. Harris Gasparakis, harris.gasparakis@amd.com1This tutorial is a very introductory, step-by-step guide to obtaining, configuring, and buildingopenCV with openCL enabled. While we are explicitly using a 64 bit Windows platform(Windows 7), and Visual Studio (Visual Studio 2010), most of the steps are common on allsupported platforms and compilers. We are using AMD’s OpenCL implementation (i.e. SDK)for reference, however the steps have general applicability (unless otherwise noted).Step 1: Get the source codeOpenCV source can be found in github:https://github.com/Itseez/opencvNote that by default you are browsing the “master” branch. Clicking on the dropdown,1Dr. Harris Gasparakis is the OpenCV-CL project manager, technical lead, and evangelist. His postings are hisown opinions and may not represent AMD’s positions, strategies or opinions. Links to third party sites, andreferences to third party trademarks, are provided for convenience and illustrative purposes only. Unless explicitlystated, AMD is not responsible for the contents of such links, and no third party endorsement of AMD or any of itsproducts is implied.1
Exposes the option to change branches and tags:Select tag 2.4.6.1 (the last stable release, as of this writing):After the selecting the branch/tag you want, the easiest is to just click the “zip” button there. Itwill make a zip file, and download it for you. The default name for the master branch is “opencv2
master.zip.” The default name for tag 2.4.6.1 is opencv-2.4.6.1.zip. Extract the zip file at afolder of your choice. This folder will be referred to as OPENCV ROOT. In the currentexample, we have chosen this directory to be:OPENCV ROOT D:\opencv-2.4.6.1The source code is platform independent, meaning that one more step is needed to createmakefiles for any particular platform (e.g. Windows or Linux). The step uses cmake, and it willbe explained later.The directory structure below OPENCV ROOT looks like:Under “modules,” look for “ocl.” This is where the ocl implementation is placed. Under “src”you will see multiple cpp files, wrapping kernel invocations. There is also a “opencl” directoryunder “src,” containing the openCL kernels.3
Step 2 [optional, but recommended]: Download APPMLOn AMD platforms you can (and should) enable use of clAmdBlas and clAmdFFT, which arepart of AMD’s APPML (ML stands for Math Libraries). Those are optional, you can configure,compile and run the openCV-CL without them.They can be downloaded libraries/As of this writing, the last available version is 1.10.274.It is recommended that you choose default installation paths and that you write them down foreasy reference. Also, you should ensure that the path is modified to include the APP ML dlls,with default location, for the 64 OS, in:C:\Program Files (x86)\AMD\clAmdBlas\bin64C:\Program Files (x86)\AMD\clAmdFft\bin644
Step 3: Download cmakeDownload and install cmake version 2.8.9 or later fromhttp://www.cmake.org/cmake controls the openCV build process, and can work on a variety of platforms and compilers.In particular, it creates the appropriate makefiles for your platform/compiler. On Windows, withVisual Studio installed (and selected), it will create a Visual Studio solution, and associatedprojects.Step 3: Run cmake to create makefiles specific to your OS/platform.Run cmake. On a windows platform with visual studio installed, cmake will create visual studiosolutions and projects for you.In the cmake gui, input the OPENCV ROOT from above in the “where is the source code” field.5
Also, invent a directory for “where to put the binaries”. We will refer to this directory asOPENCV BUILT. This is where the visual studio solution will be placed.We have selected:OPENCV BUILT D:/opencv-2.4.6.1-builtClick “Configure”. After it is done (in a few secs), you will likely still have some red lines. Incmake, you fix issues (red lines), and then you click “Configure” again, until there are no moreissues left to fix. After you are done with “Configure” you click “Generate” to actually create themakefiles.Next steps: If appropriate, disable WITH CUDA, WITH CUFFT.Make sure that WITH OPENCL is enabled (which is the default in 2.4.6.1). Press “Configure”6
Look for OPENCL ROOT DIR. If this line is red, then set the path to your OpenCLSDK’s root (e.g. C:/Program Files (x86)/AMD APP), and observe that the OpenCLinclude and libraries are found:7
.Note: Older versions would allow you to set OPENCL INCLUDE DIR, andOPENCL LIBRARY directly. For example:OPENCL INCLUDE DIR: C:/Program Files (x86)/AMD APP/includeOPENCL LIBRARY: C:/Program Files (x86)/AMD APP/lib/x86 64/OpenCL.lib Verify that, in the output window (below “Configure”), if you scroll down to “other thirdparty libraries”, the “use opencl” should say “yes”. If you have installed AMD’s math libraries, make sure that WITH OPENCLAMDBLAS,WITH OPENCLAMDFFT is enabled, and that the include and directory paths are setcorrectly (and they are not red). If they are red, fix them appropriately and press“Configure.”8
Finally, enable BUILD EXAMPLES and BUILD TESTS. Click “Configure” again. If everything is fine, click “Generate”. You are done! Your OPENCV BUILT directoryshould now be populated, and should look like:9
Step 4: Build the sourceOn windows, with cmake using Visual Studio to generate code, please find openCV.sln, whichyou can now open and build. Select your target (e.g. Debug build, 64 bit), and press F7, to buildthe solution. Binaries and dlls are placed under OPENCV BUILT\bin. You will see Release orDebug subfolders in there, depending on your built configuration.In particular, look for opencv ocl246d.dll in the Debug built, and/or opencv ocl246.dll in theRelease built. The size of the ocl dll is less than 5 MB.Also, please note the OPENCV BUILT\lib, with Debug and/or Release subdirectories. You canfind import libraries, in case you are creating projects that depend on openCV.10
In particular, look for opencv ocl246d.lib in the Debug folder, and/or opencv ocl246.lib in theRelease folder. The size of the ocl lib is less than 0.5 MB.Step 5: Run some sample programs:In Visual Studio, you can find the OpenCL samples in:11
You can find the binaries in OPENCV BUILT\bin\[Debug or Release]. Usually, whenyou run a sample with a “-h” option, you will get a description of the command lineoptions needed (such as how to specify an image file, or a feature descriptor file). As anexample, run the Viola-Jones face detection sample as follows:ocl example-facedetect.exet [OPENCV ROOT]\data\haarcascades\haarcascade frontalface alt.xmli [OPENCV ROOT]\samples\cpp\lena.jpg12
This tutorial is a very introductory, step-by-step guide to obtaining, configuring, and building openCV with openCL enabled. While we are explicitly using a 64 bit Windows platform (Windows 7), and Visual Studio (Visual Studio 2010), most of the s