Transcription
User GuideAT&T Wireless Internet
Welcome To AT&TThank you for purchasing the AT&T Wireless Internet device (Model: IFWA-40).To get the most from your new device, check out our videos and interactivetutorials at att.com/devicehowto.I
II
ContentsGetting Started.1In The Box.1Getting To Know Your Device. 2How It Works.4Installation. 5Voicemail.12Setup.12Message Waiting.12Retrieving Messages.12Remote Retrieval.12Transferring A Phone Number.13AT&T Wireless Internet Manager.13Using Your Device. 16Calling.16Making Calls.16Placing A Call On Hold.16Three-Way Calling.16Call Forwarding.18Call Log.18Internet Access.19Connect Other Devices.19Changing Wi-Fi Network Name And Password.20Important Messages.20Managing Connected Devices.20Parental Control.20III
Checking Your Voice And Data Usage.21Helpful Tips.23Home Answering Machines.23Adjusting Volume.23Powering On/Off.24TTY Support.24Important Information.25E911 Service.25Power Outages.25Backup Battery.26Device Compatibility.26In-Home Wiring.27Frequently Asked ternet.35IV
Device Configuration.38Navigating The User Interface.38Help.39Status.39Connected Devices.40Wi-Fi Settings.41Messages.45Networking.46Data Usage.54Call Log/Blocking.55Parental Control.56System.58Safety Information.62FCC regulations.63RF Exposure Information.64CTIA.65Warranty.66V
VI
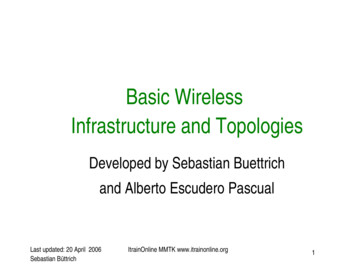
Getting StartedIn The BoxThe package contains the following items:AT&T Wireless Internet DeviceBackupBatteryPhone Cable(Optional)Power CordEthernet Cable(Optional)Also included:Let’s get startedAT&T Wireless InternetQuick StartUser Guide1
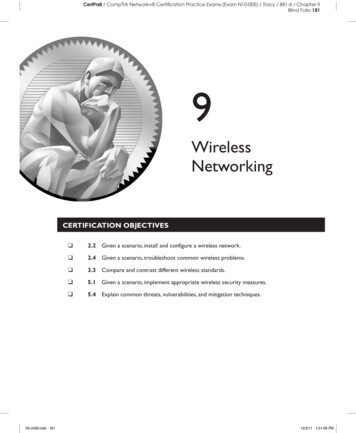
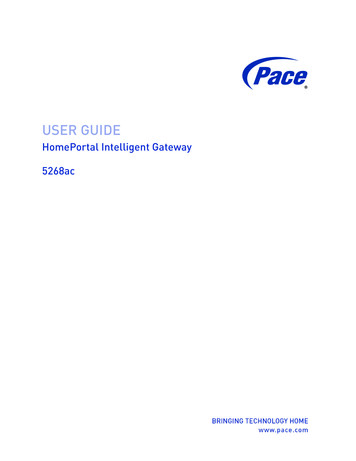
Getting To Know Your DeviceWPSPowerSignal StrengthVoicemailNetwork Status IndicatorWi-FiBattery LevelInformation(See AT&T Wireless Internet Manager on page 13)EthernetOn/OffAntenna PortAntenna Port(Optional)(Optional)TelephonePorts2PowerInput
LED Indicator LightsThe table below describes possible states for each of the indicator BatteryLevelStatusMeaningGreen solidOn (AC power)Green blinkingOn (battery power)OffNo powerGreen blinkingNew voicemailOffNo new voicemailGreen solidWi-Fi onGreen flickering Wi-Fi on, data transferringOffWi-Fi offGreen blinkingCheck the AT&T Wireless Internet Manager new message(s)OffNo unread messagesGreen solidBattery level 50%Yellow solidBattery level 20% to 50%Red blinkingBattery level 20%OffBattery not installed or needs replacing3
tatusMeaningOffNo SIMRed blinkingSIM errorRed solidNo serviceBlue solid3G/HSPA serviceGreen solidLTE serviceGreen solidor OFFMore bars indicates higher signal strengthHow It WorksThe AT&T Wireless Internet device uses the AT&T cellular network to provide phoneservice to your cordless or corded home phone(s) and Internet access to yourcomputer and Wi-Fi enabled devices. It does not require the use of a home phonewall jack, unlike a traditional home phone service. Place it anywhere in your homewhere you have a strong wireless signal. The AT&T Wireless Internet device providesmany calling services for your home phone(s), such as Voicemail, Caller Number ID,Call Waiting, Call Forwarding, and Three-Way Calling. It also features a backup batteryto provide service in the case of a power outage.4
InstallationBefore You BeginThe AT&T Wireless Internet device works exclusively with the AT&T cellular networkand DOES NOT use your home phone wall jacks.Your device should be located: Where you have a strong signal from a celltower, typically near a window or outer wall.Signal strength may vary in different partsof your home. Near an electrical wall outlet. In the general area where you’ll be usingyour home phone, computer, or Wi-Fienabled devices.Select which phone and computer/Wi-Fi enabled device you will use with the AT&TWireless Internet device: A cordless phone system with multiple handsets should be used to place phonesthroughout your home. If using an existing phone, unplug it from the wall jack. For Internet access, you can simultaneously connect up to twenty (20) devicesper Wi-Fi network (2.4 GHz and 5 GHz), forty (40) total, and one (1) via Ethernet.5
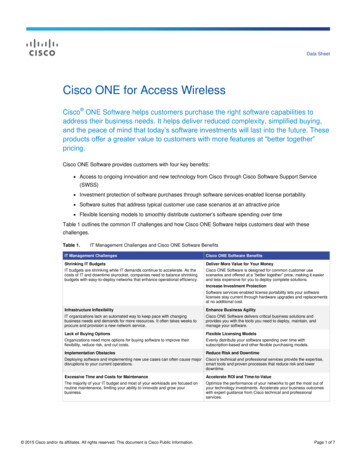
Step 1: Setting Up The AT&T Wireless Internet DeviceA Install The Backup Battery1.Open the battery compartment by pushing the tab in and then lifting upthe cover.Ports2.Insert the backup battery.Battery3.Replace the cover.NOTES:6 The backup battery is intended for backup purposes only and can take upto four (4) hours to fully charge. Charge time may be impacted by environmental factors; the backupbattery will stop charging when the ambient temperature is outside of thetemperature range allowed for charging: 32 F (0 C) - 131 F (55 C)
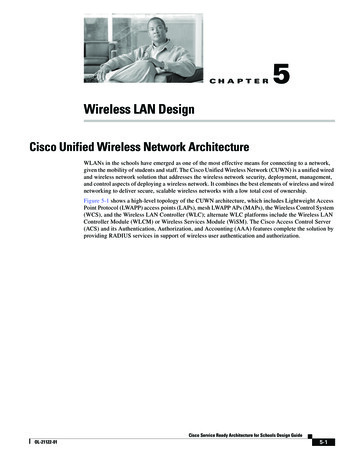
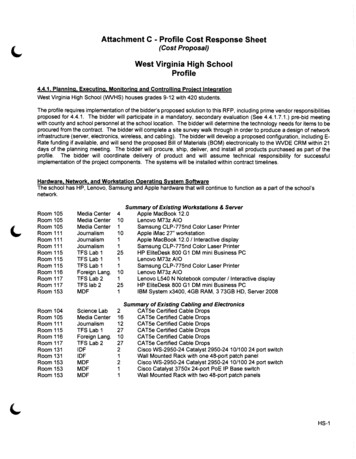
Step 1: Setting Up The AT&T Wireless Internet Device(continued)B Turn On Your Device1.Plug the power cord in to an electrical wall outlet.2.Connect the other end of the power cord to the Power Input port on theback of your AT&T Wireless Internet device.3.Press the On/Off button so that it is depressed. The Power light turnssolid green.C Check the Wireless SignalWait a few seconds for the SignalStrength light to turn on, while yourdevice connects to the cellular network.Confirm Signal Strength light has four (4)lit bars for optimal performance. Fewerbars indicate a moderate signal, whichmay be sufficient.NOTE: If you do not see four (4) lit bars, you may want to choose another locationin your home, such as near a window or outer wall.7
Step 2: Connecting Your PhoneA Unplug Your Phone From The Wall JackThe AT&T Wireless Internet device is not used with your home phone wall jack.NOTE: If you have a cordless phone, keep it plugged into a power outlet.B Connect Your Phone To The DevicePlug your phone into the “Phone” port on the AT&T Wireless Internet device usingyour existing phone cable or the included phone cable.NOTE: Do not plug the AT&T Wireless Internet device or your phones into yourwall jacks.8
Step 2: Connecting Your Phone(continued)C Place A Test CallPlace a test call from your connected home phone. Make sure to dial the 10-digitphone number, including area code.For best results, place the cordless phone base at least twelve (12) inches fromthe AT&T Wireless Internet device.Important Phone Tips Voicemail is included with your service. Dial 1 to set up and access your voicemail. If you choose to use an answering machine instead, set it to fewer than four (4)rings. To place phones throughout your home, use a cordless phone system withmultiple handsets. Wall jacks are not used with the AT&T Wireless Internet device. The second Phone port can be used to connect an additional phone orstandalone answering machine. It uses the same phone number as the firstPhone port. Your AT&T Wireless Internet device does not support incoming/outgoing faxservice or home alarm systems. Your AT&T Wireless Internet device does not support rotary or pulse-dialingphones. Details on using voicemail and transferring a landline phone number can befound on pages 12-13.9
Step 3: Connecting To The Internet(Requires purchase of a Wireless Internet Data plan)A Select Your Internet ConnectionTo Connect via Wi-Fi:1.Open the Wi-Fi network manager on yourcomputer or Wi-Fi enabled device.2.Find and select the AT&T Wireless Internet Wi-Finetwork name (SSID) (e.g., AWI-XXXXXX).To connect via WPS, see page 19.To Connect via Ethernet:Use an Ethernet cable to connect your computer or other device to the Ethernetport on the back of your AT&T Wireless Internet device. Go to att.net (or yourfavorite website) to confirm your Internet connection. Skip Steps 3B and 3C.B Enter Wi-Fi Network PasswordWhen prompted, enter the Wi-Fi password found on the bottom of the AT&TWireless Internet device.XXXXXXXXXXXXXXXXXXXXX10XXXXXXXXX
Step 3: Connecting To The Internet(continued)C Confirm Internet ConnectionGo to att.net (or your favorite website) to confirm your Internet connection.When your device is transmitting to and from the Internet, the Wi-Fi light willflicker green.Important Internet Tips To check your data usage or manage your account, go to att.com/myatt. To customize your device settings and view important messages about yourAT&T service plan, use the AT&T Wireless Internet Manager. On any deviceconnected to the AT&T Wireless Internet device, enter http://attwirelessinternetdirectly into your browser address field. Use “attadmin” as your login. To set up a free AT&T email account, go to att.net/signup.11
VoicemailYour AT&T Wireless Internet device comes with standard wireless voicemail. Followthe steps below to set up and use your voicemail.SetupDial 1 on any home phone connected to the AT&T Wireless Internet device and waitfour (4) seconds to be connected to your AT&T wireless voicemail. Simply follow thevoice prompts to complete setup. To enable remote voicemail retrieval and for addedsecurity, be sure to create a password during setup.Message WaitingThere are two indications that a new message is waiting: 1) the Voicemail light and2) an intermittent dial tone.The Voicemaillight on your AT&T Wireless Internet device blinks green whena voicemail message is waiting. You will also hear an intermittent dial tone on anyconnected phone handset before placing a call.Retrieving MessagesTo retrieve voice messages, dial 1 on any home phone connected to the AT&TWireless Internet device, and wait four (4) seconds to be connected to your AT&Twireless voicemail box. Simply follow the voice prompts to listen to and manage yourmessages. Alternatively, you may dial your 10-digit home phone number to accessyour voicemail box.Remote RetrievalTo retrieve voicemail messages from a phone not connected to the AT&T WirelessInternet device, dial the number associated with your AT&T Wireless Internetservice. When voicemail picks up press the * key. You will then be prompted to enteryour password. Simply follow the prompts to listen to and manage your voicemailmessages.12
Transferring A Phone NumberTransferring a landline phone number to your AT&T Wireless Internet device cantake about four (4) days. Outgoing calls can be made immediately using your AT&TWireless Internet device; however, incoming calls (including 911) will continue throughyour old service until the transfer is complete. Keep a phone connected to yourwall jack or prior service to continue to receive incoming calls until the transfer iscomplete. To check the status of your transfer, visit att.com/port.AT&T Wireless Internet ManagerThe AT&T Wireless Internet Manager allows you to easily manage your AT&T WirelessInternet device. You can: Customize settings Change your Wi-Fi network name andpassword Check signal strength, data usage, andimportant messages from AT&T Get help and informationTo access the AT&T Wireless Internet Manager, first connect to your AT&T WirelessInternet device. In your browser address field, enter http://attwirelessinternet andlog in using “attadmin”.NOTE: You can customize the login that is used to access the AT&T Wireless InternetManager by going to System Administration.The AT&T Wireless Internet Manager includes a navigation panel on the left side ofthe screen, which contains the following sections: Status – Displays general device information and help (see Status on page 39). Connected devices – View devices currently connected to your AT&T WirelessInternet device and block/unblock Wi-Fi devices from connecting (see ConnectedDevices on page 40).13
Wi-Fi – Customize your device’s Wi-Fi and security settings (see Wi-Fi Settings onpage 41). Messages – View messages from AT&T about your service plan (see Messages onpage 45). Networking – Access a wide range of network and security settings (seeNetworking on page 46). Data usage – Check your data usage details (see Data Usage on page 54). Call log/blocking – View incoming, outgoing, and missed calls placed to andfrom your AT&T Wireless Internet device and manage your call block list (see CallLog/Blocking on page 55). Parental control – Control days and times a device can connect to the Internetand limit the permitted websites (see Parental Control on page 56). System – Manage system administration functions such as set Date/Time,change Password, Backup/Restore, reboot, etc. (see System on page 58). Logout – Click to log out of the AT&T Wireless Internet Manager.14
Status IndicatorsIn addition to the indicators on the device itself (see LED Indicator Lights on page 3),you can find information about your device’s current status at the top of the AT&TWireless Internet Manager page.Battery LevelGreen: HighService ProviderYellow: MediumAT&T or No ServiceRed: Low or no chargeCharging: Lightning bolt iconGray: No batteryPowerWi-FiGreen: OnGreen: OnGray: OffGray: OffVoicemailGreen: New VoicemailGray: No new VoicemailInformationGreen: Unread message(s)Gray: No unread messagesLanguage SelectorEnglish or EspañolNetwork Status IndicatorTechnology Icon: 4G LTE or 4GNo Service: No ServiceSignal StrengthGreen Antenna & 4 Green bars: Strong& 1-3 Gray bars: Poor-Medium& 4 Gray bars: No signalRed Antenna & 4 Gray bars: No Service15
Using Your DeviceCallingMaking CallsUsing a phone connected to your AT&T Wireless Internet device, place and receivecalls as you normally would. The AT&T Wireless Internet device supports dialing witheither a cordless or corded phone.NOTE: Make sure to dial the 10-digit phone number, including area code.Placing A Call On HoldWhile on a call, you can press the Flash (or Phone/Talk) key to put the other partyon hold.Three-Way CallingInitiate A Three-Way Call1.While on a call, press the Flash (or Phone/Talk) key to put the first party on hold.2.When you hear a dial tone (wait up to four [4] seconds), dial the second number.3.When the second party answers, press the Flash (or Phone/Talk) key again tocomplete the three-way connection. If the second party does not answer, pressthe Flash (or Phone/Talk) key to end the connection and return to the first party.16
Call WaitingYou will hear two tones if someone calls while you are already on a call. When thishappens, you have several options: To hang up on the first call and connect the incoming call, press the 1 key andthen the Flash (or Phone/Talk) key. To continue the first call and reject the incoming call, press the 0 key and thenthe Flash (or Phone/Talk) key. To place the first call on hold and connect the incoming call, press the 2 key andthen the Flash (or Phone/Talk) key. To talk with both parties at the same time, first press the 2 key and then theFlash (or Phone/Talk) key, and then press the 3 key and then the Flash (orPhone/Talk) key to merge the three calls.NOTES: Your AT&T Wireless Internet device comes with standard call waiting and threeway calling. Operation of these features will vary depending on your homephone equipment. If your phone does not have a Flash (or Phone/Talk) key, use the off-hookmechanism supported by your phone.17
Call ForwardingTo forward all calls, dial: *21* The 10-digit number to which you wish to forward your calls #(For example: dialing “*21*1234567890#” would forward your calls to the phonenumber 123-456-7890.)Please wait at least three (3) seconds to hear a confirmation tone before hanging up.To stop forwarding calls, dial #21#, and wait at least three (3) seconds to hear aconfirmation tone before hanging up.NOTE: Applicable wireless minute plan rates apply to forwarded calls.Call LogYou can view incoming and outgoing calls placed to and from your AT&T Wireless Internetdevice at att.com/myatt, or on the AT&T Wireless Internet Manager. To view call detailson the AT&T Wireless Internet Manager, enter http://attwirelessinternet directly intoyour browser address field on any device that is connected to your AT&T Wireless Internetdevice. Log in using “attadmin” (or your customized login) and go to Call Log.You can also block certain numbers so that you no longer receive calls from them(see Call Log/Blocking on page 55).18
Internet AccessConnect Other DevicesYou can simultaneously connect up to twenty (20) devices per Wi-Fi network (2.4 GHzand 5 GHz), forty (40) total, including smartphones, tablets, and laptops, to your AT&TWireless Internet device.1.Open the Wi-Fi network manager on your Wi-Fi enabled device.2.Find and select the Wi-Fi network name (SSID): AWI-XXXXXX or AWI-XXXXXXGUEST (guest network disabled by default).NOTE: The AT&T Wireless Internet device supports both 2.4 GHz and 5 GHz WiFi networks. You can simultaneously connect up to twenty (20) Wi-Fi enableddevices on each network.3.When prompted, enter the Wi-Fi password found on the bottom of the AT&TWireless Internet device.Connect WPS DevicesWi-Fi Protected Setup (WPS) allows WPS-enabled devices to be connected to a Wi-Finetwork without having to type a Wi-Fi password.1.With the AT&T Wireless Internet device powered on, press and hold the WPSbutton for one (1) second.2.Within two (2) minutes, press the WPS button on the wireless device you want toconnect.3.Your AT&T Wireless Internet device and the wireless device will communicate andestablish the connection.Connect Via EthernetTo connect via Ethernet, plug one end of your Ethernet cable in to the Ethernet porton your computer and the other end in to the Ethernet port on the back of the AT&TWireless Internet device.19
Changing Wi-Fi Network Name And PasswordYou can customize your AT&T Wireless Internet device’s Wi-Fi network name (SSID) andpassword using the AT&T Wireless Internet Manager. On any device that is connected tothe AT&T Wireless Internet device, enter http://attwirelessinternet directly into yourbrowser address field. Log in using “attadmin” (or your customized login). Go to Wi-Fi 2.4GHz EDIT or Wi-Fi 5GHz EDIT to change your network name and password.NOTE: You will need to reconnect all Wi-Fi devices using the new information.Important MessagesYour AT&T Wireless Internet device is able to receive important messages from AT&Tregarding new software updates and your service plan. You cannot respond to thesemessages.To view your messages, use any device that is connected to the AT&T WirelessInternet device and enter http://attwirelessinternet directly into your browseraddress field. Log in using “attadmin” (or your customized login) and go to Messages.Managing Connected DevicesYou can view devices currently connected to your AT&T Wireless Internet device andblock/unblock devices using the AT&T Wireless Internet Manager. On any device thatis connected to the AT&T Wireless Internet device, enter http://attwirelessinternetdirectly into your browser address field. Log in using “attadmin” (or your customizedlogin) and go to Connected Devices.Parental ControlWith Parental Control, you can manage blocked websites and set time restrictions.To manage Parental Controls, use any device that is connected to the AT&T WirelessInternet device and enter http://attwirelessinternet directly into your browseraddress field. Log in using “attadmin” (or your customized login) and go to ParentalControl. From here, you can: Select a connected device and add it to the Parental Controls Device List. Manage blocked websites and restricted time settings.20
Checking Your Voice And Data UsageYou can check your voice and data plan usage for your current billing cycle by eitherdownloading the free myAT&T app to your smartphone or tablet, or visitingatt.com/myatt on your computer. To download the myAT&T app, go to your device’sapp store, or go to att.com/myattapp from your smartphone or tablet. Data andmessaging rates may apply.You will need to log in to manage your account and review usage details.If you don’t already have a user ID and password, select Create one now (on acomputer) or Register (on the myAT&T app), and then follow these steps: Enter your AT&T phone number or account number and billing zip code. If prompted, enter additional verification information. If you receive a validation code, enter it. You may be prompted to indicate whether you are the account owner, meaningyour name is on the bill. If you don’t own the account, provide the accountinformation to gain access. Create your User ID and Password. Agree to the Terms & Conditions.21
You can view your voice and data usage once you have logged in to your account.You may need to select the tab for your wireless plan and See all usage to see theusage details for your AT&T Wireless Internet device’s phone number.If you did not provide an email address for email notifications when you purchasedyour AT&T Wireless Internet device, you can choose to do so at att.com/myatt. Onceyou have logged in to your account, go to Profile and enter
To retrieve voice messages, dial 1 on any home phone connected to the AT&T Wireless Internet device, and wait four (4) seconds to be connected to your AT&T wireless voicemail box. Simply follow the voice prompts to listen to and manage your messages. Alternatively, you may dial your 10-digit