Transcription
JROTC Virtual LearningLET 3 & 4/ One Rope Bridge Knotsand Swiss SeatApril 28, 2020
Lesson: April 28, 2020Objective/Learning Target:Students will learn how to tie the knots used in a one ropebridge including the Square Knot, Bowline, Wireman’s Knotand a Swiss Seat.Let’s Get Started:Watch Video: Optional Knot (3:27 Min)https://www.youtube.com/watch?v TUHgGK-tImY&feature youtu.be
Knots to be LearnedSquare KnotBowlineSwiss SeatWireman’sKnot
Learning Knot Tying is Muscle Memory
Learning to Tie Knots Learning to tie knots is a muscle memory skill. Other musclememory skills include riding a bike, shooting a basketball,throwing a ball, and playing a musical instrument. Muscle memory skills are difficult to learn at first and onlyget better with practice. The good news is once you master a muscle memory skillyou remember it for a very long time. In order to get the most out of this lesson you must get arope and practice the knots many times over days or weeks. Knowing how to tie some of these knots could save your lifesomeday. The knots that I learned as a boy I have used mywhole life. Many times I have trusted my life in my ability toproperly tie knots.
Square KnotRight over Left; Left over Right The Square Knot is used to tietwo same sized ropes together It is the primary knot in theSwiss seat. It is one of the most usefulknots most people know Watch video and practice tyingwith your own ropeHow to Tie a Square Knothttps://www.youtube.com/watch?v LOAxiQk8wj8
BowlineThe rabbit comes out of the hole goes around the tree and back in the hole. The Bowline is used to tie a loop thatwon’t constrict at the end of a rope It is a rescue knot used to securepeople to the end of a rope It is one of the most important knotsto know because it can save lives Watch video and practice tying withyour own ropeHow to tie a Bowlinehttps://www.youtube.com/watch?v x9G2N3y ztY
Wireman’s KnotCenter over Left, Center over Right, Center over Left, Pull up Center The Wireman’s Knot is used to tiea loop in the middle of a rope It is used to make the tighteningmechanism in the one rope bridge It is easy to untie because it has aquick release Watch video and practice tying withyour own ropeHow to Tie a Wireman’s Knothttps://www.youtube.com/watch?v m -T06IVE8EAnother Good Wireman’t Knot Videohttps://www.youtube.com/watch?v lpGW6hQIvPo
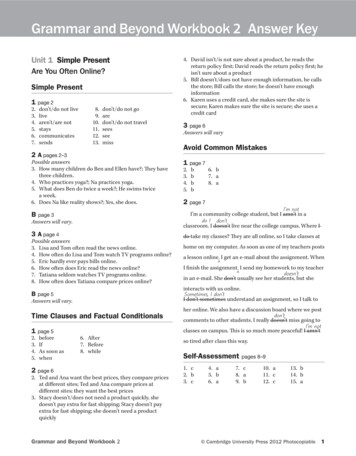
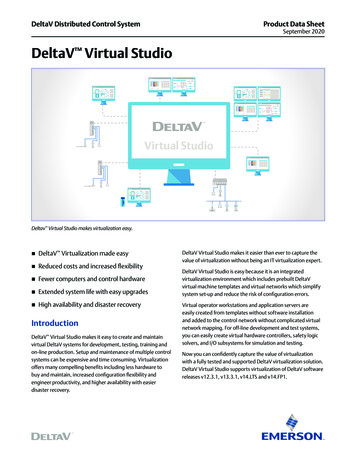
Swiss Seat The Swiss Seat is used to secure aperson to another rope with a carabiner(snaplink) The US Army uses the Swiss Seat torappel and cross one rope bridges It is a very safe security harness thatrequires minimal equipment Watch videos and practice constructinga Swiss Seat with your own ropeHow to Tie a Swiss Seathttps://www.youtube.com/watch?v ssmYruwGTzMHow to Tie a Swiss Seat 2https://www.youtube.com/watch?v zH9F09Dr3lUInstructional Diagrams continue on next slides
Swiss Seat Diagram (Continued)
Swiss Seat Diagram (Continued)
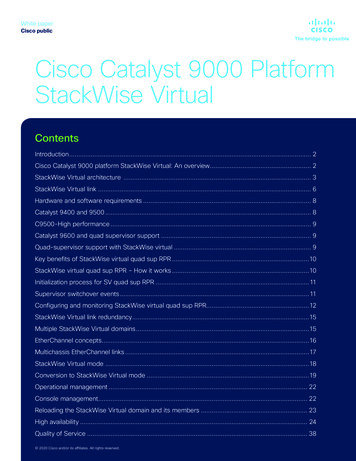
Swiss Seat Diagram ExplainedThe diagrams and this description is from the US Army Training Circular TC 21-24Rappelling. Using this and the videos should help you learn how to construct a Swiss SeatSEAT-HIP RAPPEL a. The rappel seat is constructed as follows (Figure 1-3A through 1-3T):(1) Place the midpoint (center) of the length of the sling rope on the hip opposite the brakehand (the brake hand is the strong hand) (Figure 1-3A, B, C). (2) Bring the sling rope aroundthe waist above the hip bone. Tie a double overhand knot over the navel (Figure 1-3D, E, F,G, H). (3) Let the two free ends of the sling rope fall to the ground in front (Figure 1-3I). (4)Bring the two free ends of the sling rope down between the legs and up over the buttocks.Ensure that the two free ends do not cross (Figure 1-3J). (5) Pass the ends of the ropes overthe rope that is tied around the waist at the two points above the center of the two rear seatpockets (Figure 1-3K). (6) Grab the free end of the rope that is on the left side of the bodywith the left hand, and the free end of the rope that is on the right side of the body with theright hand. (7) Squat down and simultaneously pull on both running ends of the ropes andstand up. This will tighten the seat. (8) Take the two running ends of the rope down and backover the waist rope from the inside. Bring the running ends back under the ropes that aregoing across the buttocks (Figure 1-3L).
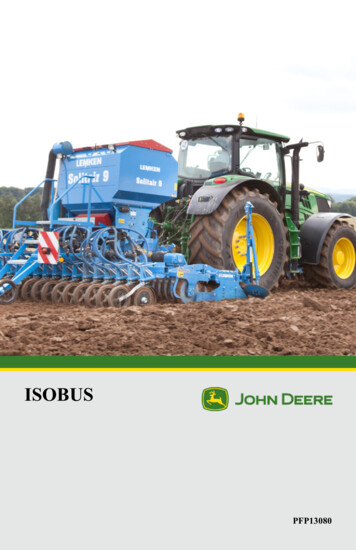
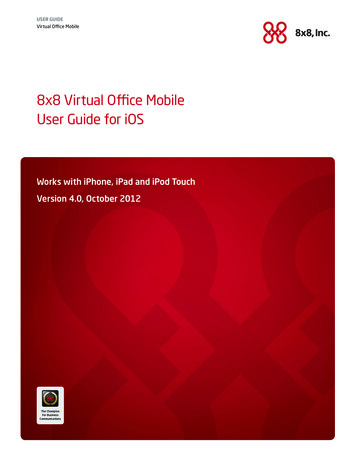
Swiss Seat Diagram Explained (Continued)SEAT-HIP RAPPEL (Continued) (9) Tie the two running ends with a square knot andtwo overhand knots on the hip opposite the brake hand (Figure 1-3M, N). (10) Placeany excess rope in the trouser pocket near the square knot (Figure 1-3O, P). (11) Withthe gate down and the hooked end of the snaplink against the navel, place the end ofthe snaplink through the single rope that is around the waist and the two ropesforming the double-hand knot (Figure 1-3Q). (12) Rotate the snaplink a half turn sothat the gate is facing up and will open away from the body (Figure 1-3R, S, T).
Knot Tying Conclusion This lesson has presented the knots needed to construct aone rope bridge. These knots are useful for many purposes but in order to usethem in the future you must practice them. Once you use thediagrams and the videos to figure out how to tie each knot youmust practice. I recommend starting with one knot and learning it well. andMaster that one knot it before starting the next knot. Learn theSwiss Seat last.
two overhand knots on the hip opposite the brake hand (Figure 1-3M, N). (10) Place any excess rope in the trouser pocket near the square knot (Figure 1-3O, P). (11) With the gate down and the hooked end of the snaplink against the navel, place the end of the snaplink through the single