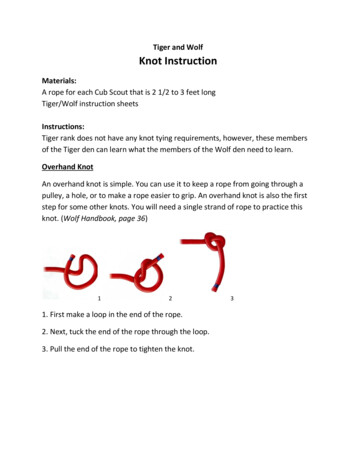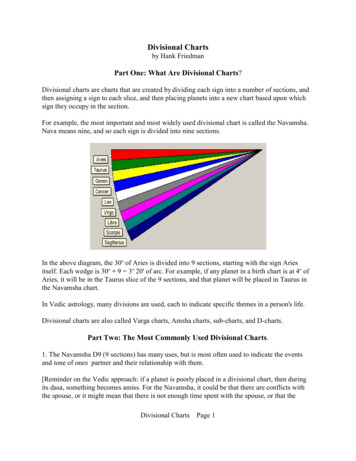
Transcription
International Guild of Knot TyersKnot ChartsTable of ContentsBack Mooring Hitch . 3Back Splice - 3 Strand Rope . 4Basic Picture Frames . 5Bead Puzzle . 6Bottle (or Jar) Sling . 7Bowlines - Multiple . 8Carrick Bend & Mat Variations . 9Celtic Knot Design . 10Chain Splice. 11Chinese Lanyard Knot . 12Circular Mat . 13Clove Hitch Variations . 14Coach Whipping . 15Common Whipping Variations. 16Connecting Knots . 17Constrictor Knot . 18Cowboy Belt . 19Crown Knots Part 1 . 20Crown Knots Part 2 . 21Diagonal Lashing. 22Endless Three-Part Plait . 23End Of The Rope . 24Eye Splice 3 Strand Rope . 25Eye Splice (Sailmaker’s) . 26Eye Splice with Collar . 27Figure of Eight with Forceps . 28Four Strand Sinnets (Braids) . 29Highwayman’s Hitch . 30Hunter’s Bend . 31Knob Covering . 32Lanyard Knot . 33Macrame Knots 1 . 34Macrame Knots 2 . 35Macrame Knots 3 . 36Macrame Knots 4 . 37-1-www.igkt.net
Mat Tied With Single Cord . 38Monkeys Fist . 39Necklace in Chinese Knotting . 40Netting Knots . 41Ocean Plait Mat . 42Overhand Knot with Forceps . 43Perfection Loop . 44Pole Hitches . 45Prolong Knot . 46Rosenthal Zeppelin Knot . 47Rustler’s or Friendship knot . 48Scaffold Hitch . 49Sailmakers Wippings . 50Sheepshank Variations . 51Sheet Bend Variations . 52Simple Lanyard . 53Spectacles neck - cord . 54Sheer Lashing . 55Square Lashing . 56Square Mat . 57Star Knot . 58Surgeon’s Knot with Forceps . 59Theodore Knot on Hand . 60True Lovers’ Knot . 61Tumbling Thief Knot . 62Turk’s Head (3 bight, 4 lead). 63Turk’s Head (4 bight x 3 lead on Hand . 64Turk’s Head (5 bight 3 Lead) . 65Turk’s Head (5bight x 4 lead on Hand) . 66Turk’s Head (7 bight x 5 lead on Hand) . 67Turk’s Head Mat (12 Bight 5 Lead) . 68Turk’s Head & Hitch Mat. 69Versatackle . 70Wire Splice . 71-2-www.igkt.net
Back Mooring HitchOriginal Drawing ByGeoffrey Budworth-3-www.igkt.net
Back Splice - 3 Strand RopeOriginal Drawing ByPercy W. Blandford-4-www.igkt.net
Basic Picture FramesOriginal Drawing ByEric Franklin-5-www.igkt.net
Bead PuzzleOriginal Drawing ByPercy W Blandford1Wood about 125 x 30 x 6mm.Cord about 3mm dia. x 500mm long.Two beads about 20mm diameter.Drill centre hole smaller than beadsand outer holes to suit cord.Make Lark's head knot at centre, putone bead each side, knot ends behind holes.Object:- To move one bead to sameloop as the other.2Slacken the Lark's head enough topull through the bead to be movedwith part of the loop it is on (A).3Push all the turns from the backthrough the centre hole to the front.Pass the bead along the cord throughthe loops (B & C).4Pull loops B & C back through thehole. Slacken the Lark's headand pass the bead through the bottomof it to join the other bead.To return the bead: perform thesame actions in the opposite direction.-6-www.igkt.net
Bottle (or Jar) SlingOriginal Drawing ByGeoffrey Budworth-7-www.igkt.net
Bowlines - MultipleOriginal Drawing ByEric Franklin-8-www.igkt.net
Carrick Bend & Mat VariationsOriginal Drawing ByEric Franklin-9-www.igkt.net
Celtic Knot DesignOriginal Drawing ByGeoffrey Budworth- 10 -www.igkt.net
Chain SpliceOriginal Drawing ByPercy W BlandfordThe traditional chainto keep down the bulka small hole. As onlyit is not intended tosplice in three-strand rope is intendedof the splice to pull the chain throughtwo strands go through the chain linktake a full load.AUnlay one strand for a greater distance than will be needed in the eye.BTake the remaining two strands through the chain.CTuck one end under amain strand.DLay the other end intothe space vacated by thethird strand. Knot thesetogether, taper and tuckeach once, then cut off.ETuck the other endfrom around the eyethree times and cutoff.For yacht anchor cables it is better to use a normal eye splice around a thimbleand attach to the chain with a shackle, having its pin locked with wire.- 11 -www.igkt.net
Chinese Lanyard KnotOriginal Drawing ByGeoffrey Budworth- 12 -www.igkt.net
Circular MatOriginal Drawing ByEric Franklin- 13 -www.igkt.net
Clove Hitch VariationsOriginal Drawing ByPercy W BlandfordBasic Clove HitchTake end overstanding partSame way roundand tuck underown partDraw tightChange directionand make a CowHitch or Lark'sHead KnotMagnus HitchGives increasedgrip on pole.Working end goesover two turnsbefore final halfhitch. (Do notconfuse withRolling hitchbelow).Rolling HitchTo take a loadlengthwise on aspar. Make twoturns over theloaded part, thenthe final halfhitch. Theworking end maybe taken furtheralong the sparand be seized toit.Round Turn andTwo Half HitchesFor the end of arope to a spar orring. The twohalf hitches forma Clove hitcharound thestanding part.Anchor BendA Round turn andtwo half hitches,but the first halfhitch takes upthe centre of theround turn. Usedto secure a cableto an anchor.Oklahoma HitchUsed on a fencepost. The ends ofa Clove hitch arepulled theopposite ways tonormal.- 14 -www.igkt.net
Coach WhippingOriginal Drawing ByEric Franklin- 15 -www.igkt.net
Common Whipping VariationsOriginal Drawing ByPercy W BlandfordA1. Lay end under and put tight turnsover it.2. Lay in separate loop of line.3. Make three or more turns over it andput working end through loop.4. Pull tight and cut off end.B5. Start in same way butcovering a long end.6. Turn back end to make loop.7. Put on more turns and passworking end through loop.8. Pull back and cut off ends.C9.Put on turns covering starting end andmake working end into a large loop.10. Hold down end and put on more turnswith loop over it.11. Pull through surplus from loop and cutoff.D12.Double back loop longer thanwhipping.13.Put on turns over it and passworking end through loop.14.Pull back linking loops tohalfway.- 16 -www.igkt.net
Connecting KnotsOriginal Drawing ByEric Franklin- 17 -www.igkt.net
Constrictor KnotOriginal Drawing ByGeoffrey Budworth- 18 -www.igkt.net
Cowboy BeltOriginal Drawing ByEric Franklin- 19 -www.igkt.net
Crown Knots Part 1Original Drawing ByGeoffrey Budworth- 20 -www.igkt.net
Crown Knots Part 2Original Drawing ByGeoffrey Budworth- 21 -www.igkt.net
Diagonal LashingOriginal Drawing ByPercy W Blandford1. Used where two braces cross and loads onthe structure would put a bending load oneither of them, then the other brace helpsresist the load.Diagonal lashing (all other lashings in this structure are square)2. Pull the spars together with aTimber hitch.4. Change to the same number oftight turns the other way.3. Put on at least three tightturns in the same direction as theTimber hitch.5. Put on at least three frapping turnsvery tightly and finish with a tightClove hitch with its crossing close up.- 22 -www.igkt.net
Endless Three-Part PlaitOriginal Drawing ByPercy W BlandfordThis plait is worked in cut leather or plastic.It may be short, made with one set of actions, thenused with press-studs at the ends to make a scarf ring.The actions may be repeated to any length for a belt orsimilar long plait.ABCCut slots to divideinto three equalstrands.Put the right handstrand under the left.Push the bottom from thefront to back through gap 1.DPush the bottom from thefront to back through gap 2.FEFor a longer plait, repeatas often as necessary. Holdfirm at the end of each setof actions.Flatten each strand.- 23 -www.igkt.net
End Of The RopeOriginal Drawing ByEric Franklin- 24 -www.igkt.net
Eye Splice 3 Strand RopeOriginal Drawing byPercy W BlandfordA.Open more than enoughfor tucking. Place ends sotwo nearer eye are across thelay of the rope and the thirdis behind.D. Turn splice over and tuckstrand 3 under the only mainstrand without an end underit, going the same way aroundthe rope as the other twotucks.G.H.B.Tuck strand 2under a main strand.E.There will now beone end projecting fromeach space in the rope.Pull the ends through togive an even tension and aclose joint.C. Tuck strand 1 under thenext main strand, going inwhere strand 2 comes out.F.Tuck strand 2 again,over and under one mainstrand.Do the same with the other ends. Pull to an even tension.Do this again for a total of three tucks in natural fibre and four in synthetic rope.- 25 -www.igkt.net
Eye Splice (Sailmaker's)Original Drawing ByPercy W BlandfordUsed on rope sewn to a sail, maintaining lay of rope right up to theeye for neat stitching. Not suitable for a load-bearing eye in theend of a free rope.ADPut two end strands overin direction of lay.Turn splice over and tuck end3 under the remaining mainstrand, with the lay.BTuck end 2 under amain strandCTuck end 1 where end 2comes out and under thenext main strand.EWrap each end back around the main strandit is already under. Taper the ends aftertwo wraps. Make four wraps in natural fibreand six in synthetic fibre rope.FRoll smooth and cut off ends.- 26 -www.igkt.net
Eye Splice with CollarOriginal Drawing ByPercy W BlandfordDecorative and suitable where the rope eye hasto pull close to a block or hole.Strength should be comparable to a normal eyesplice.ATuck the end strands as for anormal eye splice and pull tight.CWork a Crown knot above the Wallknot, in the same direction – eachstrand goes over and down throughthe loop of its neighbour. Pullfairly tight.BWith the ends work a Wall knot in thedirection of the lay – each strand under andup through the loop of its neighbour. Pullfairly tight.D- 27 -Follow round again, witheach end keeping alongsidethe strand it is alreadyadjoining. Pull tight andcut off ends.www.igkt.net
Figure of Eight with ForcepsOriginal Drawing ByDavid Crossley- 28 -www.igkt.net
Four Strand Sinnets (Braids)Original Drawing ByEric Franklin- 29 -www.igkt.net
Highwayman's HitchOriginal Drawing ByPercy W BlandfordQuick-release hitch for a rope underload and attached to a spar, ring orany solid object.1. Put loop behind sparor through ring.2. Pass loop of loadedpart through this loop andpull end to tighten.3. Pass loop of end partthrough loop of loaded partand pull that tight.4. Hitch is secure solong as there is apull on the loadedend.5. Pull end to releasehitch.- 30 -www.igkt.net
Hunter’s BendOriginal Drawing ByPercy W Blandford- 31 -www.igkt.net
Knob CoveringOriginal Drawing ByEric Franklin- 32 -www.igkt.net
Lanyard KnotOriginal Drawing ByEric Franklin- 33 -www.igkt.net
Macramé Knots 1Original Drawing ByGlad FindleyThis chart shows the names given to the knots in macramé work.Initials in brackets are abbreviations used in instructions.Holding cord (HC)Lark's Head knot(LHK)Left Hand Halfknot (LHHK)Reversed Lark'sHead knot (RLHK)Right Hand Halfknot (RHHK)Overhand knots(OHK)Left Hand Squareknot (LHSQK)Right Hand Squareknot (RHSQK)- 34 -Alternating Square knots(ASK)www.igkt.net
Macramé Knots 2Original Drawing ByGlad FindleyfrontHalf hitch(HH)Double Halfhitch(DHH)backDouble Half hitchon rodTriple Half hitch(THH)Single Half Chainknot (SHCK)Tatted bar knot (TBK)Lark's Head with Halfhitches each sideWrap knot (WK)1. Put onturns over alooppull2. After sufficient turns, put working endthrough the loop and pull other end todraw it halfway.Chinese crown knot(CCK)3. Cut off ends.Initials in brackets are abbreviationsused in some instructions.- 35 -www.igkt.net
Macramé Knots 3Original Drawing ByGlad FindleyQuick SquareKnotting(particularlyfor longcords)324151AddingaSquareknot inacolumn.1Adding a Squareknot at one side.22- 36 -www.igkt.net
Macramé Knots 4Original Drawing ByGlad Findley1234AccumulatingEdge knot (AK)Coilknot(CK)51Accumulating Edge knot workedfrom both edges.23Initials in brackets are abbreviationsused in some instructions.132Josephine knot (JK)4- 37 -www.igkt.net
Mat Tied With Single CordOriginal Drawing ByGeoffrey Budworth- 38 -www.igkt.net
Monkeys FistOriginal Drawing ByEric Franklin- 39 -www.igkt.net
Necklace in Chinese KnottingOriginal Drawing ByEric Franklin- 40 -www.igkt.net
Netting KnotsOriginal Drawing ByPercy W BlandfordLoad this type inthe directionshown.NETTING NEEDLESrod or ropeRelease thumband pulltightheld bythumbMESH STICK(controls depthof mesh)CompletecorrectknotBe careful thatknot does notpull out ofshape in thisway- 41 -www.igkt.net
Ocean Plait MatOriginal Drawing ByEric Franklin- 42 -www.igkt.net
Overhand Knot with ForcepsOriginal Drawing ByDavid Crossley- 43 -www.igkt.net
Perfection LoopOriginal Drawing ByGeoffrey Budworth- 44 -www.igkt.net
Pole HitchesOriginal Drawing ByPercy W Blandford- 45 -www.igkt.net
Prolong KnotOriginal Drawing ByJohn SmithFig. 1 – Form a loop in a clockwise direction.Then cross the loop, dividing it in half.Fig. 2 – Get weaving! Still going clockwise, pass the endunder, over, under, over, under.Fig. 3 – Pull some slack from the two ends to enable thetwo lower loops to be extended downwards. Give the lefthand loop a twist to the right.(You're making a highly decorative yet practical matwhich will please the eye and do all sorts of jobs)Fig. 4 – Lay the left hand end under the left hand loop.Give the right hand loop a twist to the right.Fig. 5 – Take the righthand loop and weave itover, under, over. Besure not to twist it oruntwist it.Fig. 6 –Check thatthe partmarked by the* arrow is inposition.Weave theright handend over,under, over,under, over.Fig. 7 –Pass one end into the knot, where the other end comes out.Follow alongside the other cord exactly. Continue, using bothends, until the whole knot is doubled. Continue to followround to treble the knot, and so on. Or, at stage 6, go backto stage 3 and repeat the procedure to PROLONG the knot stillfurther.- 46 -www.igkt.net
Rosenthal Zeppelin KnotOriginal Drawing ByPercy W BlandfordThis was the only knot permitted for joining mooring lines used with the rigidairships and blimps used by the U.S. Navy until 1962. Named after the admiralconcerned. It is an easy knot to make, secure in use and easily cast off, evenafter being heavily loaded.1. Put bights of the meeting endsover each other, opposite ways, withthe ends outside.2. Locate the bights so they match.3. Take each end over both bights andthrough the centres, to come out onopposite sides.4. Pull tight.5. To release, pull the bights thatare over the standing parts.- 47 -www.igkt.net
Rustler’s or Friendship knotOriginal Drawing ByEric Franklin- 48 -www.igkt.net
Scaffold HitchOriginal Drawing ByPercy W BlandfordFor use as one of a pair of ropes for slinging a plank as a seat.A.Wrap rope around plank sothere are three parts on top.B.Lift the inner part (1) soit comes between the otherparts.C. Draw up some slack on what isnow the inner part (2) and takeit over the end of the plank.D. Pull tight and joinend into standing partwith a Bowline.- 49 -www.igkt.net
Sailmakers WhippingsOriginal Drawing ByPercy W BlandfordOn three-strand rope, openstrands and put in linewith loop and ends hanging.On four-strand rope,open and put loopsover oppositestrands.Lay up strands, holdloop and short endalong rope, whileputting on turns. Liftloop over end ofstrand it is alreadyencircling and tightenby pulling short end.Lay up and put onturns. Lift loopadjoining shortend over its ownstrand. Pullother loop.For palm and needlewhipping, which lookssimilar, secure startingend through strand andput on turns.Lift that loopover its strandand pull theshort end.Go through rope and downoutside space betweenstrands.- 50 -Take short endoutside remainingspace betweenstrands to join longpart with Reef knotin centre of ropeend.Take the shortend overwhipping tojoin long partwith Reef knotin centre ofthe rope end.Take needle throughstrands to do the sameover other spaces.Finish through the rope.www.igkt.net
Sheepshank VariationsOriginal Drawing ByPercy W Blandford- 51 -www.igkt.net
Sheet Bend VariationsOriginal Drawing ByPercy W BlandfordCommon, or Sheet BendTurn back one end(thicker if different),bring other end upthrough it, behind back,across front and underits own standing part.Double Sheet BendWhen there isconsiderable differencein thickness or lines areslippery.Make a Sheet bend, thentake the end aroundagain, across the frontand under its ownstanding part.Binder TurnFinishes with both endsthe same way, so are lesslikely to catch whenpulled past anobstruction.Make as a normal Sheetbend, but take theworking end the other wayunder its own part.Slipped Sheet BendQuick release version ofan ordinary Sheet bend.Make as for a simpleSheet bend, but make finaltuck with a bight of theworking end.Heaving Line BendFor hauling very heavyrope with a much lighterline.Turn back thick rope andtake light line over andunder many times, thenfinish similar to a Sheetbend.- 52 -Weaver's KnotA quick method used tomake a Sheet bend inthread without stoppingthe loom.(One of severalvariations)www.igkt.net
Simple LanyardOriginal Drawing ByEric Franklin- 53 -www.igkt.net
Spectacles neck – cordOriginal Drawing byGeoffrey BudworthTHE SMART YET CHEAP ACCESSORY FOR BUSY PEOPLE1. Form loops with 2-strand MatthewWalker knots;2. Make them adjustable with tightfitting glass or ceramic beads.- 54 -www.igkt.net
Sheer LashingOriginal Drawing ByPercy W Blandford1. Used to join two spars that have to be opened toform sheer legs.2. A second version is used to join spars toincrease length.3. For sheer legs put aclove hitch on one spar andtwist in its end.4. Put turns around the two sparsfirmly, but not excessively tightly.The length of the lashing should notbe more than the combinedthicknesses of the spars.5. Put very tightfrapping turns onthe lashing turns.The spars may haveto be openedslightly to makeentry of the ropepossible.7. For joining tolengthen, use two widelyspaced lashings on eachpair of overlapped spars(see 2 above).6. Finish with a Clove hitch onthe other spar, with itscrossing close to the end ofthe last frapping turn.9. Put on tightturns - enough toequal the combinedthicknesses of thespars should beadequate.8. Put a Clove hitch aroundboth spars and twist in itsend.10. Finish with a Clove hitch.Tuck in a bight of the end.Further tightening can be withwedges.- 55 -www.igkt.net
Square LashingOriginal Drawing ByPercy W BlandfordUsed when two spars cross, not always squarely, and any load would make one spartend to slide over the other.1. Put a Clovehitch around theupright spar underthe other and twistin the end.2. Go around thespars withoutcrossing the line,pulling very tightas you progress.3. Put on atleast threeturns, takingthem insideprevious turnson one spar andoutside them onthe other.4. Change to frappingturns between the spars,starting at thecompletion of the lastordinary turn.5. Form a Clovehitch, by firstmaking a halfhitch with itscrossing close tothe end of thelast frappingturn.6. Complete the Clovehitch. For security tucka bight of the end intothe lashing.- 56 -www.igkt.net
Square MatOriginal Drawing ByEric Franklin- 57 -www.igkt.net
Star KnotOriginal Drawing ByGeoffrey Budworth- 58 -www.igkt.net
Surgeon’s Knot with ForcepsOriginal Drawing ByDavid Crossley- 59 -www.igkt.net
Theodore Knot on HandOriginal Drawing ByCharles S Smith- 60 -www.igkt.net
True Lovers’ KnotOriginal Drawing ByEric Franklin- 61 -www.igkt.net
Tumbling Thief KnotOriginal Drawing ByGeoffrey Budworth- 62 -www.igkt.net
Turk’s Head (3 bight, 4 lead)Original Drawing ByEric Franklin- 63 -www.igkt.net
Turk’s Head (4 bight x 3 lead on HandOriginal Drawing ByCharles S Smith- 64 -www.igkt.net
Turk’s Head (5 bight 3 Lead)Original Drawing ByEric Franklin- 65 -www.igkt.net
Turk’s Head (5bight x 4 lead on Hand)Original Drawing ByCharles S Smith- 66 -www.igkt.net
Turk's Head (7bight x 5lead on Hand)Original Drawing ByCharles S SmithClose up and follow round asrequired.- 67 -www.igkt.net
Turk’s Head Mat (12 Bight 5 Lead)Original Drawing ByGeoffrey Budworth- 68 -www.igkt.net
Turk’s Head & Hitch MatOriginal Drawing ByEric Franklin- 69 -www.igkt.net
VersatackleOriginal Drawing ByGeorge Aldridge- 70 -www.igkt.net
Wire SpliceOriginal Drawing ByPercy W BlandfordThis method gives the greatest strength, but is not as neat astucking with the lay. For 7-strand wire rope.Thorough preparation (A to D) is essential.ABCDEFPut on a temporary whipping at the limit to be unlaid. Allow plenty of end length.Whip ends of strands, twist them with pliers or seal by soldering.Identify heart strand (no twist). Cut off if fibre, bend out of way if wire.Temporarily seize at point to be tucked. If using thimble, seize it in.Use a hollow spike or screwdriver (turned after entering), leave in while tucking.Tuck strand 3under one mainstrand.GHTuck strands 1 and 2 inwhere strand 3 comes out,taking strand 1 under two.KAt the other side, tuckthe remaining strands inturn, each under one.Pull tight and check that oneend projects from each space.LContinue tucking, eachend over one and under one.Bury the heart after each roundof tucks.MAfter four completetucks, cut off alternate endsand tuck the remainder oncemore.JNUse a mallet to truethe shape.Push the heart into themiddle.- 71 -www.igkt.net
This chart shows the names given to the knots in macramé work. Initials in brackets are abbreviations used in instructions. Holding cord (HC) Reversed Lark's Head knot (RLHK) Left Hand Half knot (LHHK) Right Hand Half knot (RHHK) Overhand knots (OHK) Right Hand Square knot (RHSQK) Left Hand Square knot (L