Transcription
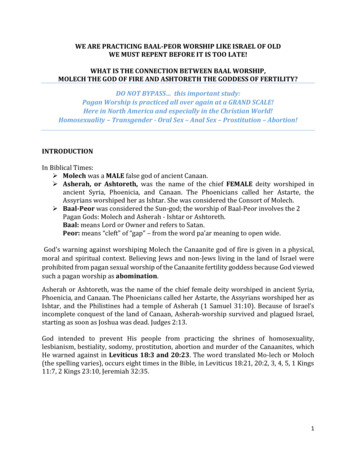
Unit 6Practicing theDouble -Overhand KnotUnit 6The Double-Overhand Knot is the X-shaped knot thatforms when one Overhand Knot is tied into another. The basicknots. They are identified (on page 19) as the Left NosebandKnot, Right Noseband Knot, Throat Knot, Right Crown Knot, andCrown Loop Knot.As you follow along and tie the Double-Overhand knot, you’llbecome familiar with how this knot is constructed. The length ofrope you’ll be tying your halter from can be used for this knottying practice session. (In the future, the handy guide inside thebook’s back cover offers a quick knot-refresher Knot22Sample Unit From: Halter-Tying Success, Second Edition Copyright 2009 Horse Owner Success Books, All Rights ReservedOrder Halter-Tying Success, Second Edition on the web http://hosbooks.netrope halter being tied in this book has five of these intertwined
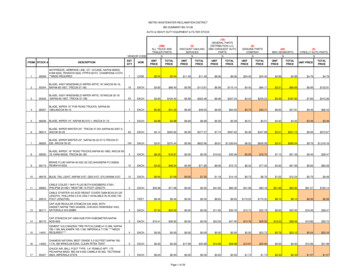
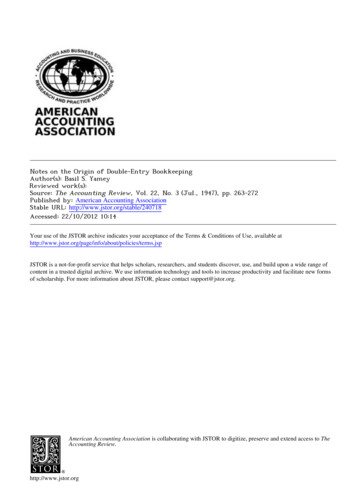
Practicing the Double-Overhand KnotForming an OverhandLoop Correctly Central to the halter-tying approachused in this book is an Overhand Loopthat has the rope held by the Left HandOrder Halter-Tying Success, Second Edition on the web http://hosbooks.netLeftHandUnit 6crossing over on top of the rope held bythe Right Hand. This Overhand Loop forms the baseon which the First Overhand Knot, asillustrated on the next page, is then tied.RightHandabout 7 inches (17.5 cm)LeftHand Bring your Left Hand up and overtoward your Right Hand and then down to form anOverhand Loop.Key Point:For the Overhand Loop towork with the halter-tyingapproach used in this book,the rope held by the LeftHand must cross over ontop of the rope held by theRight Hand. LeftHandRightHandOverhandLoopRightHandSample Unit From: Halter-Tying Success, Second Edition Copyright 2009 Horse Owner Success Books, All Rights Reserved23
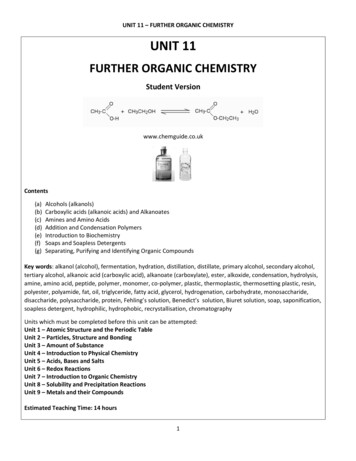
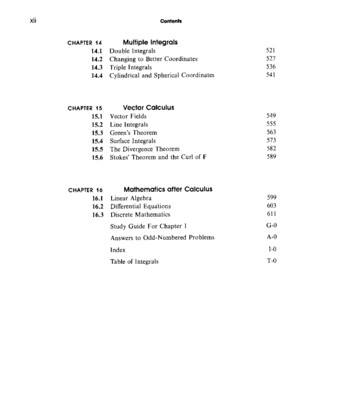
Unit 6Practicing the Double-Overhand KnotDouble-Overhand KnotStep 1ShortEndStep 2ShortEnd Because it’s shorter and easier to handle,bring the Short End up from behindand poke it through the Overhand Loop.(Note: From the front, the Long Endmay be poked through instead, but thelonger rope is not as easy to work with.) Bring the Short End on through the loopto complete the First Overhand Knot. So you’ll be able to tie back into them toform the Double-Overhand Knots whentying a halter, all First Overhand Knotsmust be configured exactly as shown.24OverhandLoopLongEndKey Point:For it to work in thehalter, this knot must betied exactly as shown.ShortEndFirstOverhand Knot Step 3LongEndThe Overhand Loop isformed about8 inches (20 cm) from theend of the rope. This loop sets the foundation for theFirst Overhand Knot. The Short Endmust come across on top of the LongEnd, otherwise your knot will end upbackwards from what’s needed to workwith this book’s halter-tying instructions.OverhandLoopLong EndSample Unit From: Halter-Tying Success, Second Edition Copyright 2009 Horse Owner Success Books, All Rights ReservedOrder Halter-Tying Success, Second Edition on the web http://hosbooks.net About 8 inches (20 cm) from the end ofthe Short End, form an Overhand Loopthat’s roughly 2 inch (5 cm) across.The Short Endcomes acrosson top. Select one end of the rope. This end willbe called the Short End. The other endwill be referred to as the Long End.Key Point:The Short Endmust comeacross on top.
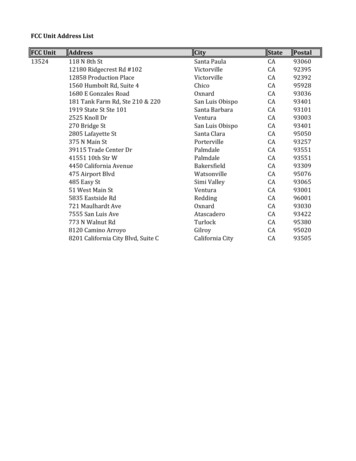
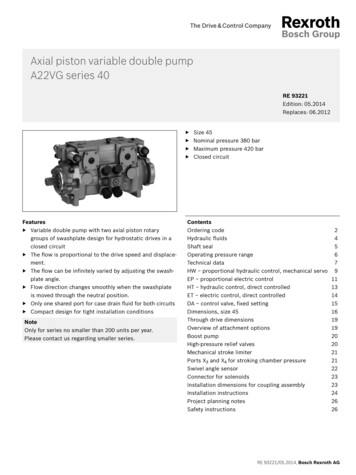
Practicing the Double-Overhand KnotUnit 6Step 4FirstOverhand Knot Take the very end of the Long End andthread about 10 inches (25 cm) of ropethrough the center of the First OverhandKnot.Long EndFirstOverhand KnotLong End Bring the Long End down behind thecrossed portion of the First OverhandKnot and up over itself. (Notice thatyou’ve just formed an Overhand Loop.)Step 6FirstOverhand KnotLong End Order Halter-Tying Success, Second Edition on the web http://hosbooks.netStep 5 Bring the Long End on around itselfand exit out through the First OverhandKnot. (You’ve now formed the SecondOverhand Knot.)FirstOverhand KnotStep 7 Position the two Overhand Knots sotheir crossed sections line up across fromeach other. SecondOverhand KnotSample Unit From: Halter-Tying Success, Second Edition Copyright 2009 Horse Owner Success Books, All Rights Reserved25
Practicing the Double-Overhand Knot Correct - As you work the slack out ofthe two entwined Overhand Knots, theyform the Double-Overhand Knot shown. Wrong - If your finished DoubleOverhand Knot ends up with an “X”that crosses the knot from the upperright to the lower left, the knot hasbeen tied incorrectly.This is correct. Wrong!This is wrong. Tie the Double-Overhand Knot again.Pay close attention to how the OverhandLoop is formed in Step 1—that loop’sstructure dictates the “X’s” structure.Key Point:The “X” is checkedwith the knot in thishorizontal position—and the ropes goingout to each side.Why Focus on the “X” ?As you tie a halter using the approach presented in this book, you’ll be tyingback into each First Overhand Knot in a left-to-right direction to form the DoubleOverhand Knots. But this will be possible only if each Overhand Loop has beencorrectly configured to the “standard” introduced on page 23.When the “X” is checked—with the knot in its horizontal position—the upperleft-to-lower-right “X” is an effective check. It indicates that the Double-OverhandKnots will work with the halter-tying instructions presented in the pages ahead.26Sample Unit From: Halter-Tying Success, Second Edition Copyright 2009 Horse Owner Success Books, All Rights ReservedOrder Halter-Tying Success, Second Edition on the web http://hosbooks.netSPECIAL NOTE:Correct! Check the knot by viewing it in itshorizontal position—with the ropesgoing out to each side. In this position,the “X” on the knot always crosses fromthe upper left down to the lower right. Key Point:The “X” is checkedwith the knot in thishorizontal position—and the ropes goingout to each side. Step 8 Unit 6
the “X” on the knot always crosses from the upper left down to the lower right. SPECIAL NOTE: Wrong - If your finished Double-Overhand Knot ends up with an “X” that crosses the knot from the upper right to the lower left, the knot has been tied incorrectly. Tie the Double-Overhand Kno