Transcription
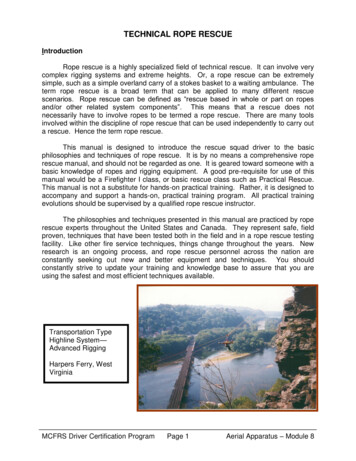
TECHNICAL ROPE RESCUEIntroductionRope rescue is a highly specialized field of technical rescue. It can involve verycomplex rigging systems and extreme heights. Or, a rope rescue can be extremelysimple, such as a simple overland carry of a stokes basket to a waiting ambulance. Theterm rope rescue is a broad term that can be applied to many different rescuescenarios. Rope rescue can be defined as “rescue based in whole or part on ropesand/or other related system components”. This means that a rescue does notnecessarily have to involve ropes to be termed a rope rescue. There are many toolsinvolved within the discipline of rope rescue that can be used independently to carry outa rescue. Hence the term rope rescue.This manual is designed to introduce the rescue squad driver to the basicphilosophies and techniques of rope rescue. It is by no means a comprehensive roperescue manual, and should not be regarded as one. It is geared toward someone with abasic knowledge of ropes and rigging equipment. A good pre-requisite for use of thismanual would be a Firefighter I class, or basic rescue class such as Practical Rescue.This manual is not a substitute for hands-on practical training. Rather, it is designed toaccompany and support a hands-on, practical training program. All practical trainingevolutions should be supervised by a qualified rope rescue instructor.The philosophies and techniques presented in this manual are practiced by roperescue experts throughout the United States and Canada. They represent safe, fieldproven, techniques that have been tested both in the field and in a rope rescue testingfacility. Like other fire service techniques, things change throughout the years. Newresearch is an ongoing process, and rope rescue personnel across the nation areconstantly seeking out new and better equipment and techniques. You shouldconstantly strive to update your training and knowledge base to assure that you areusing the safest and most efficient techniques available.Transportation TypeHighline System—Advanced RiggingHarpers Ferry, WestVirginiaMCFRS Driver Certification ProgramPage 1Aerial Apparatus – Module 8
Technical Rope Rescue EquipmentThere is a vast array of equipment available for use during technical rescueincidents. Most of the basic equipment is very versatile, and can be used for manydifferent purposes. Some equipment, however, is task specific and only suitable for acertain operation. It is important to note that most technical rescues can be carried outusing simple, basic equipment. Through regular practice, you can learn to improvisewith your equipment and maximize its usefulness. Use caution when purchasingequipment, as many vendors will try to sell you specialized gadgetry that is expensive,only good for one purpose, and probably something you don’t need.Rescue RopeRescue rope is a very important tool and is without a doubt very versatile.Through the use of various knots, auxiliary equipment, and an open mind, much can beaccomplished with a rescue rope. Rope can be used to construct raising and loweringsystems, highline systems, mechanical advantage, travel restrict systems, and much,much more. It is important to have a thorough understanding of what you can and can’tdo with a rope, because every piece of equipment has its limitations. This should beginwith an understanding of the construction of modern rescue rope.Most rescue ropes in use today are constructed of synthetic fibers such as nylon,polyester, and kevlar. A large majority of rescue professionals are using nylon becauseof its superior strength, tolerance of impact or shock loads, and resistance to abrasionand heat. It also performs well when wet, with a minimal loss of strength (approximately10%) which is only present while the rope is wet. Nylon rescue ropes are usually ofkernmantle construction—kern meaning core, and mantle meaning sheath. The sheathprotects the core from abrasion, UV rays, dirt, and anything the rope comes in contactwith. The sheath is generally braided, and covers one of two types of nylon cores. Lowstretch rope, the most common type used in rescue, has core strands that run parallel toeach other. High stretch rope, most commonly used by climbers, has multiple twistedcore strands. Both types contain a majority of their strength in the core, usually about75%-90%.NFPA 1983, the Standard for Fire Service Life Safety Rope and SystemComponents, has established recommended standards for rescue rope, as well asother technical rescue equipment. According to that standard, a one-person load isconsidered 300 lbs., and a two-person load is considered 600 lbs. They recommend a15:1 safety factor be used in all systems, which means that you should multiply theweight of a given load by 15 to determine the strength of the rope to be used.Therefore, a rope used for one-person loads should have a breaking strength of at least4500 lbs. (3/8” rope), and conversely, 9000 lbs. (1/2” rope) for two persons. Thisassumes that only one rope is being used to conduct a rescue or training evolution. Aswill be discussed in the Belay Systems section, many rescue authorities recommend theuse of a two-rope system. Each rope in the system is engineered for a 10:1 safetyfactor, therefore yielding a total safety factor of 20:1.MCFRS Driver Certification ProgramPage 2Aerial Apparatus – Module 8
Care and maintenance of rescue rope is actually quite simple. The best care ofany piece of rescue equipment is prevention of situations that require repairs ormaintenance. The biggest enemy of nylon rescue rope is UV rays, with abrasionscoring a close second. Proper storage in a rope bag out of direct sunlight will eliminatethe UV ray problem. Padding any sharp edge that the rope comes in contact with canprevent abrasion, prolong the life of the rope, and possible prevent a catastrophicfailure. Proper care will help a rescue rope to last several years. However, even withproper care, ropes should be carefully inspected after each use. A log should bemaintained with the date and type of use, any shock or impact loading, any damage,etc. It should also include the date of purchase, manufacturer, size, length, lot number,color, etc. Each end of the rope should be marked with the length and other informationas required. It is recommended that rescue ropes and training ropes be separate ropes,labeled as such.Carabiners/Screw LinksCarabiners and screw links also constitute a critical component of any rescuesystem. They are the metal connectors that link the several parts of a rope rescuesystem together. Although they are quite similar, carabiners and screw links have twomajor differences. First, carabiners have a self-closing, or spring-loaded gate thatallows them to close automatically. Screw links have a screw gate that must be closedmanually. Second, carabiners are designed to be loaded on the spine side only. Thespine is the long axis of the carabiner, or the side opposite the gate opening. Loadingcarabiners on any side other than the spine can cause failure of the carabiner atsignificantly less than the rated strength. The following pictures illustrate the differenttypes of carabiner loading. Again, note that the only acceptable method is spineloading.Spine LoadingTri LoadingCross LoadingGate Loading-Gate UpMCFRS Driver Certification ProgramPage 3Diagonal LoadingGate Loading-2” WebAerial Apparatus – Module 8
Delta Link (Tri-link)Oval Screw LinkThe proper loading of carabiners is referred to as carabiner etiquette. There aremany things that can cause a carabiner to be loaded improperly. Some of the thingsthat happen frequently are attaching a carabiner to an object that is too large, andorienting the carabiner incorrectly. The largest object that should be inserted into acarabiner is about 1” in diameter. That means that 2” webbing should not be usedunless you are using screw links or large rigging hardware such as shackles. Whenloading carabiners during operations, always orient them down and down, or down andaway. This means that the gate opening should face towards the ground, with thelocking collar screwing down. There are two reasons for this. First, the carabiner isheavier than webbing or rope. Gravity will pull the carabiner down and cause thewebbing or rope to slide towards the top, or spine of the carabiner. Second, if thelocking collar must screw down to lock, gravity prevents it from unscrewing due tovibration or gravity. When designing a rope rescue system, keep in mind whichdirection a carabiner will face once the system is in operation (as opposed to which wayit faces during setup). Carabiners should also be oriented so that the gate is facingaway from any object that may come in contact with it.Most carabiners are made of either steel or aluminum. Steel carabiners areusually much stronger than aluminum. For this reason, steel carabiners should be usedfor “system” applications, such as belay systems, hauling systems, lowering systems, oranywhere two-person loads will be encountered. Aluminum carabiners should bereserved for “personal” applications, such as anywhere a single person is attaching to arope (rappelling, ascending, etc.). NFPA 1983 categorizes carabiners as either “generaluse” (9000 lbs.), or “personal use” (6000 lbs). These two categories can be linked tosteel, and aluminum, respectively, since few aluminum carabiners have a breakingstrength greater than 6000 lbs.WebbingWebbing is a very versatile tool used for rope rescue. It is a flat material made ofnylon. The most common size used in rope rescue is 1” wide, although it ismanufactured in a 2” width also. It is constructed either of tubular, (hollow) weave, orflat (solid) weave. 1” tubular webbing has a breaking strength of about 4000 lbs., and 1”flat about 6000 lbs. The 1” tubular type is the most common type used for rope rescueapplications.MCFRS Driver Certification ProgramPage 4Aerial Apparatus – Module 8
Webbing can be used for a multitude of things, from constructing anchorsystems, to makeshift harnesses, to patient packaging and lashing. Due to its narrowthickness, it will fit into many small areas that a rope will not. Also, for this reason, itdoes not lose significant strength when bent around small diameter objects such ascarabiners. However, unlike rope, webbing does not have a core and sheathconstruction to protect it. Great care must be taken when placing it around sharpobjects. Taking the time to pad sharp corners and objects will not only increase of thelife span of the webbing, it may very well prevent a catastrophic failure (and increaseyour life span as well).When tying webbing into different configurations, the overhand family of knotsshould be used. This provides for the creation of a flat knot, which has greater holdingpower in webbing, and will provide a knot that can be untied after loading. Do not use asquare knot or any of the figure 8 family of knots when tying webbing. When used inwebbing, square knots will not hold, and figure 8 knots will become so tight that they willbe impossible to untie. The most common knots used in webbing are the overhand knot(for creating fixed loops), and the overhand bend (for tying the ends together).Simple OverhandOverhand on a BightMCFRS Driver Certification ProgramPage 5Aerial Apparatus – Module 8
Overhand BendStep 1Overhand BendStep 2Overhand BendStep 3Complex Webbing AnchorSystemPulleysPulleys are a multi-functional tool used in rope rescue. Their primary function isto change the direction of a rope with a minimum of friction, but they can also be used tocreate mechanical advantage and as a traveling device in highlines. Selection ofpulleys is very important, as they are not all created equal.Pulleys are constructed in one of two basic styles: the plastic or bronze bushing,and the sealed ball bearing. Ball bearing pulleys run much more freely than do bushingpulleys, and are therefore more efficient. Pulley efficiency is very important when itcomes to the construction of mechanical advantage systems. Some pulleys can reduceefficiency as much as 30-40%. Equally as important is the size of the sheave, or wheel.The greater the size, the greater the efficiency. In addition, a pulley sheave must be atleast four times the diameter of the rope used in order to maintain 100% of the rope'sstrength. Most rescue pulleys come in sizes from 2-5". Use caution when purchasingpulleys, as some manufacturers sell pulleys based on the size of the side plate and notthe actual sheave.Pulleys can be purchased in single, double, and triple sheave designs. Thisallows a single pulley to accommodate multiple ropes. This can be useful whenconstructing simple (block and tackle type) mechanical advantage systems, highlines,and other complex rigging systems. Care should be taken not to stack multiple singlesheave pulleys into a single carabiner, as this can load the gate side of the carabiner,reducing its strength considerably. In addition, it can cause the pulleys to be situated atan angle to each other, or bind, causing increased friction and reduced efficiency.MCFRS Driver Certification ProgramPage 6Aerial Apparatus – Module 8
Some pulleys are designed to "mind" a prusik, or allow the rope to be pulledthrough the pulley with a prusik attached to one side. This is a very useful feature whenconstructing mechanical advantage systems, belay systems, and knot passing systems.Beware, however, that in some cases, the prusik can become jammed inside the pulleyand restrict the passage of the rope. Other pulleys have a built in cam, such as thoseused in ascenders, to grip the rope. This device is also useful; however, these metalcams can severely damage or even cut the rope under shock or impact loads. Useextreme caution when using these devices with live loads.Another important fact to consider about pulleys is their ability to multiply the loadplaced on their anchor. Anytime a change of direction is placed in a rope, and the anglebetween the ropes exceeds 120 degrees, the load on the pulley and its anchor will begreater than the load on the rope itself. If the angle between the ropes is 0 degrees, theload on the pulley is twice the load on the rope.2” Single Sheave PulleysPrusik Minding PulleyDouble Sheave PulleyCamming PulleyDescent Control DevicesThere are two main types of descent control devices used in rescue: the figure 8and the rappel rack. Each has distinct advantages and disadvantages that must beconsidered. In general, however, the rappel rack is considered the device of choice bymost rescue teams. Both devices may be attached to a harness and used to descend,or rappel, and can also be attached to an anchor and used to lower other rescuers.MCFRS Driver Certification ProgramPage 7Aerial Apparatus – Module 8
The figure 8 was designed for short rappels, generally 100' or less. It is generallyused for single person loads only, however it can be rigged for two person loads. It isquick and easy to use, lightweight, and inexpensive. Some models have "ears", whichassist when locking off the device for hands free operation. Problems with figure 8'sinclude the inability to vary the friction once the device is loaded, poor heat dissipation,a twisting of the rope that occurs while in use, and difficulty locking and unlocking thedevice. In addition, the device must be unhooked from the users harness beforerigging, and then reattached. Deaths have occurred when users have forgotten toreattach the device to the harness after rigging it.The rappel rack is a much more user-friendly device with significant advantagesover the figure 8, especially when dealing with rescue sized loads. The biggestadvantage of the rappel rack is the ability to vary the friction while the device is loaded.This is very important when "picking off" a victim while on descent. In addition, the rackhas better heat dissipation, doesn't twist the rope, and is easy to lock and unlock.Unlike the figure 8, the rack remains attached to the harness while it is rigged, reducingthe occurrence of failing to reattach it.Deaf Figure “8”Rescue Figure “8” w/EarsRappel RackFigure “8” RiggedRack RiggedRope Grab DevicesA rope grab device is one that is used to grip or grab the rope for pulling,ascending, attaching other equipment, etc. Prusiks and mechanical ascenders are thetwo most popular rope grab devices. You should note, however, that there are some“grave” differences between the two.MCFRS Driver Certification ProgramPage 8Aerial Apparatus – Module 8
PrusiksPrusik cords are fixed loops of accessory cord, tied together with a doubleoverhand bend. Accessory cord is simply a small diameter of kernmantle life safetyrope (3-9mm). Prusiks are very useful devices for gripping the rope, such as forascending, mechanical advantage systems, and belay systems. Material used for theconstruction of prusiks should be about 2/3rds the diameter of the host rope they areplaced on (8mm for 1/2" rescue rope). Soft, supple accessory cord is preferred overstiff cord, as it provides better holding power.Prusiks may be placed on the rope in a two-wrap or three-wrap configuration.The two-wrap prusik is used for "personal", or single person loads. An example of thiswould be the ascent of a fixed rope. Three-wrap prusiks are used for "system", orrescue loads, which are usually defined as two or more persons. Examples of this aremechanical advantage systems, belay systems, etc. Prusiks, unlike mechanicalascenders, will hold great amounts of weight. In addition, they are designed to slipbefore failure occurs. This is especially important during shock or impact loading.Prusik Wrapping—Step 1Prusik Wrapping—Step 2Prusik Wrapping—Step 3Bridge8mm PrusikMCFRS Driver Certification Program2-wrap PrusikPage 93-wrap PrusikAerial Apparatus – Module 8
Mechanical AscendersAscenders are mechanical devices designed for single person ascents of fixedropes. They work very well for this purpose, especially the handled ascenders. Theyare not designed for rescue loads, and therefore should not be used in rescue systems.In addition, they can and will severely damage or cut a rope if overloaded. This canoccur during slow, static loading, and/or shock or impact loading. It is worthemphasizing that ascenders are used for ascending, and THAT'S ALL.Handled AscenderHard Shell StyleAscenderMiscellaneousMiscellaneous equipment is equipment that does not necessarily fit into one ofthe other categories of rope rescue equipment. There numerous pieces of equipmentthat fit into this category, of which some are very useful and some are not. The scopeof this manual does not cover every piece of such equipment, as some of which is onlyused for advance level rigging. The rigging plate, however, is a very useful basic pieceof equipment.A rigging plate is a flat metal plate, with multiple holes drilled into it, for attachingmultiple carabiners to. Its use's are infinite, but some of its main functions are toseparate pulleys in a mechanical advantage system, and to construct "back tied" or"focused" anchor systems.Rigging PlateMCFRS Driver Certification ProgramPage 10Aerial Apparatus – Module 8
KnotcraftKnotcraft is the combination of knots, bends, and hitches used in rope rescue.However, sometimes the term “knot” is used generically in place of bend or hitch. It isimportant that all members of a rescue team or crew be familiar with and use the correctterminology of knotcraft. This can prevent a costly mistake, and provide for moreefficient and expedient operations. It is also important to note that all knotcraft willreduce the strength of a rescue rope and/or webbing by approximately 10-40%. Inorder to allow for a minimum static system safety factor (SSSF) of at least 10:1, itshould be assumed that all knots, bends, and hitches will reduce the strength of a ropeby a conservative 50%.All knots, bends, and hitches should be dressed, set, and inspected. Dressing aknot means to “clean it up” so that there are no twists, the rope flows smoothly throughthe many turns and bights, and the tension will be on the correct strand. Setting a knotis the process of placing tension on the strands before the knot is put into use. Thisassures that all slack is removed, and makes the knot easier to inspect. All knotsshould be inspected prior to a load being placed on them. Inspecting a knot correctlyrequires someone to physically touch the knot and inspect each segment.There are many knots, bends, and hitches outlined in this chapter. They arelisted to give you several examples for each category of knotcraft. As a rescue squaddriver, you will not be required to be able to tie all of them. A list is provided in theobjectives at the beginning of the chapter which outlines the knots, bends, and hitchesyou will be required to proficient in. Keep in mind, however, that the more you knowabout knotcraft, and the more knots, bends, and hitches you can tie, the better you willbe in the rope rescue environment.KnotsA knot is used to form a loop or point of attachment in the middle or end of a ropeor piece of webbing (some exceptions do exist to this definition, such as the simpleoverhand and simple figure 8, which are also called stopper knots, and can be used asthe “root” knot to construct other knots, bends, and hitches.) Some examples of knotsare as follows:Pictured below are some of the more frequently used knots:Simple Overhand—StartMCFRS Driver Certification ProgramMiddlePage 11FinishAerial Apparatus – Module 8
Simple Figure 8—StartMiddleFigure 8 Knot—On aBightStartFinishButterfly KnotInline Figure 8The bowline family of knots is quite large, and they make an excellent choice fortying fixed loops. Some may argue that the bowline should not be used for life safetyapplications because it is not as strong as the figure 8 and it requires the use of asafety. However, the strength difference is only about 5%, and there are several safeand acceptable methods of tying a safety on the bowline. In addition, if the 50% rule ofstrength reductions is used for all knots, then both knots are considered to be the samestrength. Many rescue professionals are using the bowline in place of the Figure “8”because of its superior qualities.MCFRS Driver Certification ProgramPage 12Aerial Apparatus – Module 8
There are eight reasons to tie the bowline instead of the Figure “8”. They include:Easier to untieEasier to tie around large objectsEasier to recognizeSelf-dressingEasier to adjust without untying the safetySmaller/more compact Uses less rope Lynn Hill Syndrome (improper retracing)As mentioned before, there are many types of bowlines, including:BowlineYosemite BowlineLongtail BowlineDoubled BowlineTwo Loop Bowline Bowline on a BightBowline with a BightTriple BowlineBowline on a CoilHigh Strength BowlineDoubled Longtail BowlineBowline w/ Yosemite Finish/Safety (also called a Yosemite Bowline)MCFRS Driver Certification ProgramPage 13Aerial Apparatus – Module 8
Bowline w/ Double Overhand SafetyLongtail BowlineDoubled Longtail BowlineBowline on a BightMCFRS Driver Certification ProgramPage 14Aerial Apparatus – Module 8
Bowline w/out a BightBendsA bend is used to join the ends of two ropes or pieces of webbing.examples of bends are as follows:SomeSheet (becket)Double SheetFigure 8 (Flemish)Overhand (ring)Double Overhand(fisherman’s)Double OverhandDouble Overhand BendMCFRS Driver Certification ProgramPage 15Aerial Apparatus – Module 8
Sheet Bend (Becket Bend)Double Sheet BendOverhand (ring) BendHitchesA hitch is used to attach a rope or piece of webbing to an object. If the object isremoved, the hitch will fall apart, and therefore the object must remain in place. SomeHalfBachmanSlip HalfClovePrusikTimberMunterLoad ReleasingGirthBasketKleinheist (Italian)Rapid Release PrusikHalf HitchMCFRS Driver Certification ProgramChimneyMarinersClove HitchPage 16Aerial Apparatus – Module 8
Clove HitchMunter Hitch3-Wrap Prusik—StartTimber Hitch3-Wrap Prusik—Middle2-Wrap PrusikMCFRS Driver Certification Program3-Wrap PrusikPage 173-Wrap Prusik—End“Bridge”Aerial Apparatus – Module 8
Load Releasing HitchRapid Release Prusik HitchAnchors/Anchor SystemsThe anchor is the backbone of most rescue systems. Without a good anchor, wecannot operate safely, and therefore can't conduct a rescue or training evolution. Thereare many types of anchors and anchor systems, which can all be broken down into twobroad categories—single-point and multi-point. No matter which type of anchor is used,the ultimate goal is to create a "bombproof" anchor. The term bombproof simply meansthat the anchor will withstand any force that could possibly be placed upon it, eitherintentionally or unintentionally. Anchors that are not considered bombproof are calledmarginal. Marginal anchors are usually considered capable of holding part of a load,but not all. For this reason, marginal anchors must be tied together into an “anchorsystem”, generally a multi-point anchor system.Single-Point AnchorsSingle-point anchors are preferred and should be used when there is one anchorpresent that is considered bombproof. It may be bombproof to hold one part of thesystem, such as the main line, or it may be adequate to hold the total rescue package.Some examples of bombproof single point anchors would be large trees, concrete andstructural steel columns, very large boulders, and fire apparatus. Once the appropriateanchor is selected, it must be rigged with the necessary equipment so it can be utilizedin the system.For anchoring fixed lines, it is usually easiest just to tie the rope to the anchorwith a Yosemite bowline. For anchoring other objects, such as pulleys and fixedbraking systems, an anchor constructed of webbing works best. One of the best andstrongest webbing anchors is called the “wrap 3, pull 2”. It is constructed in thefollowing sequence:MCFRS Driver Certification ProgramPage 18Aerial Apparatus – Module 8
1.) Utilizing 1” webbing, wrap it around the anchor three times.2.) Tie the ends together with an overhand bend.3.) Place the strand of webbing with the bend in it against the load so that it faces thedirection of pull.4.) Nest the remaining two strands together to form the point of attachment and attach acarabiner.5.) Make sure that there are no twists in the webbing, and that all sharp edges arepadded. In addition, make sure that the angle of the webbing strands at thecarabiner does not exceed 90 .By placing the bend against the anchor, and facing it in the direction of pull, the bendwill be isolated so that it will not see much, if any, tension. Therefore, the strength ofthe webbing will not be reduced by the overhand bend. This means that the anchor hasthe full strength of all the webbing.Wrap Three/Pull Two AnchorWrap Three/Pull Two AnchorMCFRS Driver Certification ProgramPage 19Aerial Apparatus – Module 8
Multi-Point AnchorsMulti-point anchors are used when there is concern that a single anchor will nothold the intended load. A multi-point anchor is basically several, marginal single-pointanchors tied together to make one bombproof anchor. Some examples would be smalltrees, small rocks and boulders, wedge-type eyebolts set in concrete, picket systems,etc. Multi-point anchors should only be used when there is not a single suitablebombproof anchor. Like single-point anchors, multi-point anchors can be constructed ofwebbing, and they can also be constructed of rope or accessory cord. The steps toconstruct a multi-point anchor are as follows:1.) Run the webbing or cord around each anchor. If the individual anchors are large,or spread out over a large area, it is a good idea to tie a wrap-3, pull-2 around eachone before starting the multi-point.2.) Tie the ends of the webbing or cord together with the appropriate bend.3.) Reach between each two anchors and pull the strands forward, focusing themtoward the anticipated direction of pull.4.) Nest the strands together and tie the end of the webbing or cord into an overhandknot.This type of anchor is called a load-distributing anchor, and is considered thebest and safest method of multi-point anchor construction. (Note: it is a good idea toplace an object—carabiner, pen, stick, etc.—inside the overhand knot to prevent it frombecoming too tight to untie.) It is extremely important that the angle between theindividual anchors not exceed 120 .The anchor below is the same as theanchor at left, except the anchor at leftuses individual wrap 3/pull 2’s on eachmarginal anchor, and the anchor belowdoes not.2-point Distributing AnchorMCFRS Driver Certification ProgramPage 20Aerial Apparatus – Module 8
2-Point Distributing Anchor3-Point Distributing Anchor4-point Distributing Anchor6-point Distributing AnchorStokes Basket OperationsStokes baskets can be used in a number of different ways, including raisings,lowerings, and simple carries. Depending on the type of terrain, the basket can beoriented horizontally, vertically, or diagonally (sloped). Terrain can be categorized asflat (0-15 ), low angle (15-40 ), steep angle (40-60 ), or high angle (60 ). Eachoperation requires the basket to be rigged in a different fashion. No matter whichoperation is conducted, a two-rope system utilizing a main and belay line must be used.The main and belay lines should be integrated by the use a doubled longtailbowline. Then, the tails will continue on to another purpose. In most instances, one tailbecomes the back-up for the rescuer, and the second tail becomes the back-up for thepatient. The principal difference in the three methods is the length of the tails, and themethod that is used to attach the basket to the rope. (This section will only cover howto connect the ropes to the basket. Belay systems are covered in the next section.)MCFRS Driver Certification ProgramPage 21Aerial Apparatus – Module 8
Horizontal Raise/LowerThe horizontal raise or lower is probably the most commonly used method forhigh angle terrain (vertical or near vertical environments). The
Rescue rope is a very important tool and is without a doubt very versatile. Through the use of various knots, auxiliary equipment, and an open mind, much can be accomplished with a rescue rope. Rope can be used to construct raising and lowering systems, highline systems, mechanical