Transcription
2013Notepad User ManualJonathan KnightUNT7/3/2013
Table of ContentsiiiTable of ContentsTable of Contents .iiiIntroduction . vInstallation and Configuration of Notepad . 3NppFTP File System. 9Features and Usage . 13Index . 25
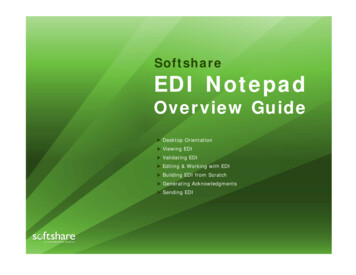
IntroductionIntroductionMy name is Jonathan Knight I am a student at the University of North Texas andmajoring in computer science. The courses that I have to take require the use of atext editor to create the programs. However the courses do not recommend aparticular one. Notepad is a powerful text editor and can make programmingmuch simpler. This manual will cover the installation, features and, shortcuts inNotepad that will be useful for students entering into the computer sciencemajor. After reading this manual the user will be able to install Notepad effortlessly and gain the knowledge needed to use Notepad to its full potential.v
Installation and Configuration of Notepad Installation and Configuration of Notepad Background InformationNotepad is a source code editor for windows. Notepad can be used with a variety of differentprogramming languages. Notepad has many advantages over the built-in text editor for windows(Notepad) such as supporting tabbed editing and allows the user to work on multiple files at the sametime. The software is available free online at notepad-plus-plus.org where it has been downloaded over 27million times. The requirements for download and instructions on installation are listed below.System Requirements Internet Connection Internet Browser 12 MB Hard Disk Space available on your computer3
4Notepad User ManualInstallationDownloading the Installer1. Go to notepad-plus-plus.org2. Click on the download tab on the left side of the page (shown in figure 1.1)Figure 1.13. Click on the Notepad Installer (Shown in figure 1.2)Figure 1.24. Once the file downloads in your browser click the download to open the installer
Installation and Configuration of Notepad Installing Notepad 1.2.3.4.5.6.Select a language from the drop down list (Figure 1.3)Click nextRead the license agreement then click “I Agree”Choose the location which you want to place notepad then click nextSelect “custom” (this manual will go over customization later) then click nextCheck the box that says “Create shortcut on desktop: then click install (Figure 1.4Figure 1.3Figure 1.45
6Notepad User ManualConfigurationChoosing a language1. Click on the “languages” tab on the top of the screen2. Select the language you will be using from the drop down list (Figure 1.5)Figure 1.5
Installation and Configuration of Notepad Connecting to the CSE machinesThe CSE machines at The University of North Texas are Linux based computers that allow students tocompile their code for their programming assignments. The instructions on how to connect to the CSEmachines follows.1. Click on the “Plugins” tab2. Navigate to the “NppFTP” tab and click “Show NppFTP window” (Shown in figure 1.6)Figure 1.63. Click on the gear icon on the right side of the NppFTP window4. Click on “Profile Setting” from the drop menu (Figure 1.7)7
8Notepad User ManualFigure 1.75. Input the hostname you wish to connect to (example cse01.cse.unt.edu)6. Enter the password for the entered hostname7. Click “Close” (Profile setting’s window shown in figure 1.8)Figure 1.88. Click on the blue link icon inside of the NppFTP window9. Select the profile you created and it will connect you to the CSE machines
NppFTP File SystemNppFTP File SystemThe NppFTP is a file system built-in Notepad this system allows the user to connect to the UNT CSEmachines and enables the user to transfer files back and forth between the user’s computer and the CSEmachines. Useful tips on file management with NppFTP is below.File ManagementUploading file to CSE machine1. Open the NppFTP window2. Click the upload button (Shown in figure 2.1)Figure 2.1Note: The file that you are currently working on will upload to the CSE machines.9
10Notepad User ManualCreating new file on CSE machine1. Right-click inside of the NppFTP window2. Select “Create new file”3. Enter the directory and name of the file4. Click create
Features and UsageFeatures and UsageThe features of Notepad is what sets it apart from the other source code editors out there. Notepad has a vast variety of features that makes programming and debugging code extremely simple. Someuseful features and their usage are below.Multi-editing1.2.3.4.Click on the “Settings” tab at the top of the screenSelect “Preferences.” from the drop down menuSelect the “Editing” tabCheck the box next to “Enable(Ctrl Mouse click/selection)” (Shown in figure 3.1)Figure 3.113
14Notepad User ManualColumn Mode Editing1. Hold the Alt key2. Drag the mouse down the column you wish to editAn example of column mode editing is shown in figure 3.2Figure 3.2Note: Column mode editing will enable the user to change the highlighted selection from figure 3.2 atthe same time
Features and Usage15BookmarkingBookmarking is useful when writing a large program that is difficult to navigate. Bookmarking allows theuser to place a bookmark and a specific section of the code and will enable the user to return to thebookmark or flip back and forth through all of the placed bookmarks.1. Press the Ctrl F2 key on the keyboard to set bookmark on the current line of code2. Press F2 to move forward through the bookmarks3. Press Shift F2 to move backwards through the bookmarksAn example of bookmarking is shown in figure 3.3Figure 3.3
16Notepad User ManualMacrosMacro which is short for macroinstruction is a very useful shortcut for computer science majors. Macrosallow the user to record a task then the user is able to do that task by simply clicking a button. Theinstructions on how to record a macro in Notepad is below.1. Click the record button at the top of the screen (Shown in figure 3.4)Figure 3.42. Type the task for the macro to perform3. Click the stop button next to the record4. Press play when the task is needed to be performedNote: The task will be performed at the cursors current location.
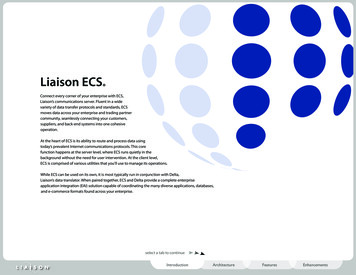
Features and Usage17Document MapWhen writing large programs sometimes it can seem difficult to locate specific sections of code. Thedocument map feature in Notepad helps the user by showing the entire program on the right side of thescreen and highlighting the section that the user is currently viewing. The instructions on how to displaythe document map in Notepad follows.1. Click the view tab at the top of the screen2. Select “Document Map” from the dropdown menuThe document map view is shown in figure 3.5Figure 3.5
18Notepad User ManualFunction ListThe function list feature in notepad shows the user all of the created functions in a program anddisplays them on the right side of the screen for easy navigation. The instructions for how to enable thefunction list in notepad is listed below1. Click the view tab at the top of the screen2. Press “function list”The function list view is shown in figure 3.6Figure 3.6File Comparison
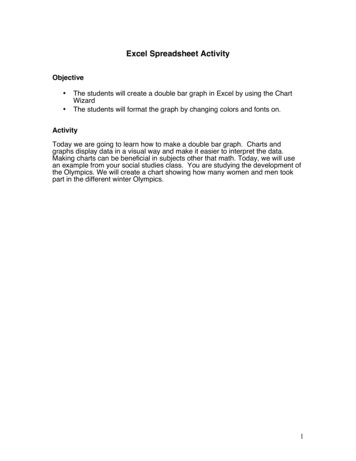
Features and Usage19File comparison is used to compare two or more computer files finding the similarities or the differences.This feature is useful for computer science majors to compare their written code to already establishedworking code and check out the differences. Steps on how to compare files in Notepad are below.1. Open up two files that are being compared in Notepad 2. Click Plugins at the top of the screen3. Click on the compare buttonThe two files will show up side by side and the user will be able to spot the differences.An example of a file comparison is shown in figure 3.7Figure 3.7Speech Synthesis
20Notepad User ManualA great feature in notepad is speech synthesis which allows the user’s computer to dictate the writtencode. This feature is especially important to students with disabilities. The steps to activate speechsynthesis in notepad is below.1. Click the view tab at the top of the screen2. Click the speech settings button on the drop down menu3. Press the “Start text-to-speech” button on the right of the window
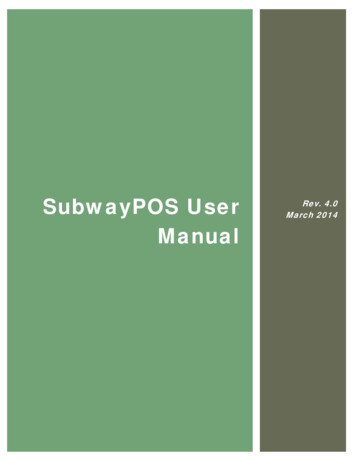
Features and UsageFind and ReplaceThe find and replace feature in Notepad allows the user to find every instance of a certain text andchange each instance simultaneously. The steps on how to find and replace in notepad are below.1.2.3.4.Press (Ctrl F)Enter the text to findEnter the replacement textClick “Replace all”An example of the find and replace window in Notepad is shown in figure 3.8Figure 3.921
22Notepad User ManualGUI CustomizationA great feature in Notepad is the ability to personalize the theme and layout to fit the user’s style.Some useful instructions on how to personalize notepad follows.ThemesIf the user does not want to customize each element for their own theme there is several options of builtin themes that the user can use. Instructions on how to change the theme of Notepad is below.1. Click the settings tab at the top of the screen (shown in figure 3.9)Figure 3.102. Select “Style Configurator” from the drop down menu3. Click the down arrow where it says “Select theme” (Shown in figure 3.10)Figure 3.114. Select the theme to use
Features and UsageChanging Fonts1.2.3.4.5.Click the settings tab at the top of the screenSelect “style configurator” from the drop down menuClick the down arrow next to “Fonts” (Shown in figure 3.11)Select the fontClick “Save and Close”Figure 3.1123
Features and Usage25IndexCustomization, 24editing, 3, 15, 16Features, iii, 15File, iii, 11, 21function, 20instructions, 3, 7, 18, 19, 20, 24NppFTP, iii, 7, 8, 11, 12Settings, 15
1. Go to notepad-plus-plus.org 2. Click on the download tab on the left side of the page (shown in figure 1.1) Figure 1.1 3. Click on the Notepad Installer (Shown in figure 1.2) Figure 1.2 4. Once the file downloads