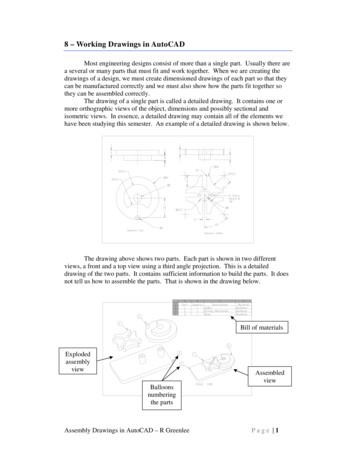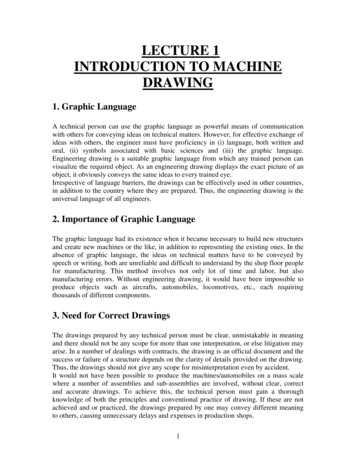
Transcription
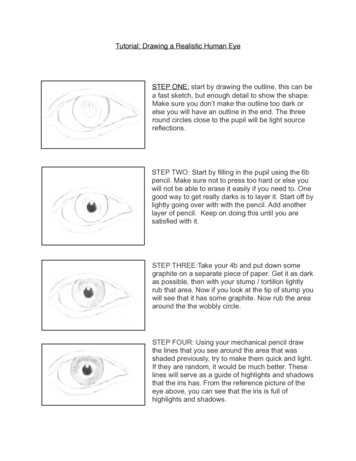
Tutorial: Drawing a Realistic Human EyeSTEP ONE: start by drawing the outline, this can bea fast sketch, but enough detail to show the shape.Make sure you don’t make the outline too dark orelse you will have an outline in the end. The threeround circles close to the pupil will be light sourcereflections.STEP TWO: Start by filling in the pupil using the 6bpencil. Make sure not to press too hard or else youwill not be able to erase it easily if you need to. Onegood way to get really darks is to layer it. Start off bylightly going over with with the pencil. Add anotherlayer of pencil. Keep on doing this until you aresatisfied with it.STEP THREE:Take your 4b and put down somegraphite on a separate piece of paper. Get it as darkas possible, then with your stump / tortillon lightlyrub that area. Now if you look at the tip of stump youwill see that it has some graphite. Now rub the areaaround the the wobbly circle.STEP FOUR: Using your mechanical pencil drawthe lines that you see around the area that wasshaded previously, try to make them quick and light.If they are random, it would be much better. Theselines will serve as a guide of highlights and shadowsthat the iris has. From the reference picture of theeye above, you can see that the iris is full ofhighlights and shadows.
STEP FIVE: Using your mechanical pencil lightly fillin the area around the pupil. Then with with the stumpblend from the center of the pupil out. This will alsopull some darks from the center of the pupil, givingthat area some shadows.STEP SIX: The area outside of the iris layered underthe rest of the iris, adding these shadows gives theiris much more depth. Lightly draw them under andblend them with the rest of the dark area. You don’thave to put shadows all the way around, just onrandom areas.STEP SEVEN: Using your stump pull from the edgeof the inner area outside. This will give a nice patternand will be a guide for the highlights and shadows onthe outer area. Make sure you don’t shade thehighlights or else you will lose them. You can alwayserase those areas after so they wont be as bright.You can now begin to see the eye come to life,layering is a big part of pencil drawing and learningwhat goes on top and bottom is very important. It might take a while to go through allthese steps, but the time pays off in the end. After practicing, it will become much easierwith each one.STEP EIGHT: Draw around the whole iris with the 4bpencil, don’t press too hard. This will outline thewhole iris. Take your kneaded eraser between yourindex finger and your thumb then squeeze. This willgive the kneaded eraser a fine edge. You will usethis to pull some highlight from the area outside ofthe pupil. Make the highlights going around the area,don’t add too many, just enough that they stand out.If you pull too much graphite, just add more with thepencil, blend it with stump and use kneaded eraser again. You will probably need tomake new edge on eraser after each time you pull graphite because it will stick to theedge. If you don’t, next time you try to make a highlight it will not pull as much graphite.These little erasers are amazing and all pencil artists should have them in their tools.
STEP NINE: Now blend the area that you outlined onthe previous step. If its not dark enough just put downmore pencil and blend it, it should look like the imageabove. On the previous step we pulled out somehighlights with the kneaded eraser. Now randomlydarken between some of those highlights using yourmechanical pencil. This will bring out some of thehighlights much more and will also add someshadows. Outline the edges of that area, this will make it stand out. Using your blenderblend the edge of the pupil with the area outside. Don’t blend it too much, just enoughso the end of the highlights blend out nicely.STEP TEN: Using your pencil draw out that shapethat you see on the image above, it doesn’t have tolook exactly, but it should be random. Don’t draw theoutline too dark, just enough for you to see it. Darkenthe area below that outline, don’t make it too darkthat it will stand out too much from the rest of the iris.Blend it just a bit in some areas so that it blends a bitinto the rest of the iris.STEP ELEVEN: Using your kneaded eraser addsome highlights around the outer iris. Thesehighlights will be larger than the ones in the center.You can also make some that start from the outeredge of the pupil to the end of the iris, but don’tmake too many of these.STEP TWELVE: On the previous step we addedhighlights going straight down, here you will addhighlights with kneaded eraser in an angle. You’ll bemaking “W” shaped highlights, just make enough thatit will give the iris some texture. After making thesehighlights, you will add shadows, under some ofthese highlights. In the image above you can see avery clear “W”, below that you can see a darker area,this will be the shadow for this highlight. Add theseshadows to some of the highlights around the iris, not all of them, make it as random aspossible. Using your color blender, blend the ends of the these highlights so they don’tlook like white lines. In this step we will also start working on the sclera, which is thewhite part of the eye. The tip of the color blender should still have some graphite, so use
that to put down some graphite around the sclera like the image above. The two circlesthat you see on the right side will be highlights that will suggest wetness.STEP THIRTEEN: Taking your mechanical pencil,darken the shadows around the edge of the iris. Addsome dark lines in between some of the highlights forso the highlights can jump out more. In this step youcan also experiment with highlights, add more or takeaway. We now have the basic design for the iris, fromhere on we can start to darken the whole iris by addinglight layers of graphite using 2h pencil. If you’redrawing and eye that is blue, green or light in color, youwould leave it like this. We also shaded the fold thats under the eyebrow and above theeyelash. Using your kneaded eraser you can erase between the glare spots to blendthem together.STEP FOURTEEN: Here we will darken the iris.Before we do that we will add some eyelashreflections, you don’t have to add this to all yourdrawings, but if the drawing is big enough you can.Over the 3 glare spots you can draw some eyelashreflections. The reflection from eyelashes would bereflected on the surface of the eye, since the glarespots are at the top and are white you can draw overthem the tips of the eyelashes. Once you have donethis, you lightly put down a layer with the 2h pencil over the whole iris. This will darkenthe highlights, darken the top section of the iris a bit more because this part will be a bitmore darker because of shadows of the top of the eye and eyelashes. I added someother details like the reflections on the corner of the eyes. With the 2h pencil i alsoadded some light blood vessels that run out from the corners of the eye. These littledetails make a big difference in drawing a realistic eye. Look at the reference photo atthe beginning so you can see those blood vessels. Darken the sclera, the white part ofthe eye a bit with the blender, especially the corners. This will give the eye more depthand realism with the subtle blood vessels.STEP FIFTEEN: The eyelashes are added, take a lookat the angle that they are drawn, they are not drawnstraight down,except for the ones in the center. Theseare drawn last because they are on top of the of theother features. Using your kneaded eraser you can addsome highlights,which would be some hairs reflectingsome light. You can play around with them to get amuch realism. Just make sure you make sure to curvethem, they are not straight. The ones in the center don’t have much of a curve becauseyou’re looking straight at them.
STEP SIXTEEN: Now add the lower eyelashes, these should be a bit lighter so you canuse a 2h pencil to draw them or use the mechanical pencil and then use an edgedkneaded eraser to tap along the hair to remove some graphite. Like the top eyelashes,the center ones curve down and you go either left or right so you start to see the curveon the hair.Well that is about it, it might seem long but with time you will be drawing them with ease.Don’t worry if the first time it doesn’t come out right, keep practicing and you will seeresults. The more you draw it, the more you will understand each step and it willbecome much easier. Don’t be scared to experiment, study the reference eye and lookat the features. Using the same tools that were used try different ways to put downthose details. Be creative with the process, before you know it you’ll your eyes will beglistening and staring at you!
Tutorial: Drawing a Realistic Human Eye STEP ONE: start by drawing the outline, this can be a fast sketch, but enough detail to show the shape. Make sure you don’t make the outline too dark or else you will have an outline in the end. The three round cir