Transcription
V-PACK VIRTUAL BELTPACKINSTRUCTION MANUAL
V-Pack Instruction Manual 2005 Vitec Group Communications Inc.All Rights ReservedPart Number 810304, Rev. AVitec Group Communicatons Inc.4065 Hollis StreetEmeryville, CA 94608-3505U.S.AClear-Com is a registered trademark of Vitec Group Communications Inc.The Clear-Com Logo is a registered trademark of Vitec Group Communications Inc.Windows is a registered trademarks of Microsoft Corp.
CONTENTSGETTING STARTED1-1What is V-Pack ? . . . . . . . . . . . . . . . . . . . . . . . . . . . . . . . . . . . . . . . . . . . . 1-1About this Manual. . . . . . . . . . . . . . . . . . . . . . . . . . . . . . . . . . . . . . . . . . . . . 1-2Minimum System Requirements . . . . . . . . . . . . . . . . . . . . . . . . . . . . . . . . . . 1-2Installing V-Pack on Your Computer . . . . . . . . . . . . . . . . . . . . . . . . . . . . . . . 1-3Starting Up V-Pack . . . . . . . . . . . . . . . . . . . . . . . . . . . . . . . . . . . . . . . . . . . . 1-3Getting Help . . . . . . . . . . . . . . . . . . . . . . . . . . . . . . . . . . . . . . . . . . . . . . . . . 1-4Getting Technical Support. . . . . . . . . . . . . . . . . . . . . . . . . . . . . . . . . . . . . . . 1-4QUICK START2-1Navigating V-Pack: An Overview. . . . . . . . . . . . . . . . . . . . . . . . . . . . . . . . . . 2-1For More Information . . . . . . . . . . . . . . . . . . . . . . . . . . . . . . . . . . . . . . . . . . 2-2THE VIRTUAL BELTPACK3-1Going Online to V-Pack . . . . . . . . . . . . . . . . . . . . . . . . . . . . . . . . . . . . . . . . 3-1Operating A Beltpack Remotely in Real Time . . . . . . . . . . . . . . . . . . . . . . 3-1Working Offline with V-Pack . . . . . . . . . . . . . . . . . . . . . . . . . . . . . . . . . . 3-2Customizing Your Beltpack Options . . . . . . . . . . . . . . . . . . . . . . . . . . . . . . . 3-2Understanding the Default Options . . . . . . . . . . . . . . . . . . . . . . . . . . . . . 3-2Understanding Modes . . . . . . . . . . . . . . . . . . . . . . . . . . . . . . . . . . . . . . . . 3-2Giving a Mode a New Name . . . . . . . . . . . . . . . . . . . . . . . . . . . . . . . . . . . 3-3Choosing Custom Options . . . . . . . . . . . . . . . . . . . . . . . . . . . . . . . . . . . . 3-4Using V-Pack Online . . . . . . . . . . . . . . . . . . . . . . . . . . . . . . . . . . . . . . . . . . . 3-5Using V-Pack Offline. . . . . . . . . . . . . . . . . . . . . . . . . . . . . . . . . . . . . . . . . . . 3-6CHOOSING OPERATIONS OPTIONS4-1Operation Options for a Single-Channel Beltpack. . . . . . . . . . . . . . . . . . . . . 4-1Call Signaling Options . . . . . . . . . . . . . . . . . . . . . . . . . . . . . . . . . . . . . . . 4-2Talk Button Options . . . . . . . . . . . . . . . . . . . . . . . . . . . . . . . . . . . . . . . . . 4-3Remote Microphone Kill (RMK) Option . . . . . . . . . . . . . . . . . . . . . . . . . 4-4Operation Options for a Dual-Channel Beltpack . . . . . . . . . . . . . . . . . . . . . 4-5Call Signaling Options . . . . . . . . . . . . . . . . . . . . . . . . . . . . . . . . . . . . . . . 4-5Talk Button Options . . . . . . . . . . . . . . . . . . . . . . . . . . . . . . . . . . . . . . . . . 4-8Talk Function Options . . . . . . . . . . . . . . . . . . . . . . . . . . . . . . . . . . . . . . 4-10Listen Function Options . . . . . . . . . . . . . . . . . . . . . . . . . . . . . . . . . . . . . 4-11Remote Microphone Kill (RMK) Options. . . . . . . . . . . . . . . . . . . . . . . . 4-11Channel Exclusive Options . . . . . . . . . . . . . . . . . . . . . . . . . . . . . . . . . . . 4-12Channel Position Options . . . . . . . . . . . . . . . . . . . . . . . . . . . . . . . . . . . . 4-13V-PACK INSTRUCTION MANUALiii
CHOOSING HEADSET OPTIONS5-1Headset Options for a Single-Channel Beltpack . . . . . . . . . . . . . . . . . . . . . . 5-2Main Headset Microphone Options . . . . . . . . . . . . . . . . . . . . . . . . . . . . . 5-2Auxiliary Headset Microphone Options . . . . . . . . . . . . . . . . . . . . . . . . . . 5-3Main Headphone Options. . . . . . . . . . . . . . . . . . . . . . . . . . . . . . . . . . . . . 5-3Auxiliary Headphone Options . . . . . . . . . . . . . . . . . . . . . . . . . . . . . . . . . . 5-4Headset Options for a Dual-Channel Beltpack . . . . . . . . . . . . . . . . . . . . . . . 5-4Main Headset Microphone Options . . . . . . . . . . . . . . . . . . . . . . . . . . . . . 5-4Auxiliary Headset Microphone Options . . . . . . . . . . . . . . . . . . . . . . . . . . 5-6Main Headphone Options. . . . . . . . . . . . . . . . . . . . . . . . . . . . . . . . . . . . . 5-6Auxiliary Headphone Options . . . . . . . . . . . . . . . . . . . . . . . . . . . . . . . . . . 5-8Microphone Noise Gate . . . . . . . . . . . . . . . . . . . . . . . . . . . . . . . . . . . . . . 5-9Level/Noise Gate Smoothing . . . . . . . . . . . . . . . . . . . . . . . . . . . . . . . . . . 5-12CHOOSING ADVANCED SETUP OPTIONS6-1Advanced Setup Options for a Single-Channel Beltpack . . . . . . . . . . . . . . . . 6-1Setup Accessibility Options . . . . . . . . . . . . . . . . . . . . . . . . . . . . . . . . . . . . 6-2PC Communications Port . . . . . . . . . . . . . . . . . . . . . . . . . . . . . . . . . . . . . 6-3Advanced Setup Options for a Dual-Channel Beltpack . . . . . . . . . . . . . . . . . 6-3Setup Accessibility Options . . . . . . . . . . . . . . . . . . . . . . . . . . . . . . . . . . . . 6-4PC Communications Port . . . . . . . . . . . . . . . . . . . . . . . . . . . . . . . . . . . . . 6-5Intercom Line Level. . . . . . . . . . . . . . . . . . . . . . . . . . . . . . . . . . . . . . . . . . 6-5SAVING AND CLONING SETUPS AND OTHER V-PACK FEATURES7-1Saving a Beltpack Setup as a Computer File. . . . . . . . . . . . . . . . . . . . . . . . . . 7-1Cloning a Beltpack Setup . . . . . . . . . . . . . . . . . . . . . . . . . . . . . . . . . . . . . . . 7-2Restoring Default Settings . . . . . . . . . . . . . . . . . . . . . . . . . . . . . . . . . . . . . . . 7-4GLOSSARY8-1VITEC GROUP COMMUNICATIONS WARRANTY9-1Technical Support . . . . . . . . . . . . . . . . . . . . . . . . . . . . . . . . . . . . . . . . . . . . . 9-1Exceptions . . . . . . . . . . . . . . . . . . . . . . . . . . . . . . . . . . . . . . . . . . . . . . . . . . . 9-1Warranty Repairs . . . . . . . . . . . . . . . . . . . . . . . . . . . . . . . . . . . . . . . . . . . . . . 9-2Non-Warranty Repairs. . . . . . . . . . . . . . . . . . . . . . . . . . . . . . . . . . . . . . . . . . 9-2ivV-PACK INSTRUCTION MANUL
1GETTING STARTEDWHAT IS V-PACK ?With V-Pack , you can create a custom setup of desired beltpack features on acomputer, and transfer the setup to a connected beltpack. The computer’s V-PackWindows interface becomes, in effect, a “virtual” beltpack, allowing you tooperate and program a connected beltpack remotely.With V-Pack you can:With V-Pack software,you can create, edit, andstore beltpack setup optionson a computer, and thentransfer the custom setupsto a connected beltpack. Select and activate beltpack features in “real time.” As you select a feature onthe computer screen, it immediately goes into effect at the connected beltpack. Create up to four sets of features, called “modes,” to transfer to a connectedbeltpack and store in its non-volatile memory. Select between the four setups with a beltpack’s onboard controls.When thebeltpack is disconnected from power, the custom setups remain in non-volatilememory. Save setups to a computer file to upload to a beltpack in the future. “Clone” a custom setup for quick uploading to one or more beltpacks. Assign a unique identification code to a beltpack. You can then change theidentification code as needed. Quickly return a beltpack setup to the factory default setup by simply clickinga button onscreen.You connect a beltpack tothe computer with a VPC-1cable, available fromClear-Com. Instruct beltpack to send a call signal automatically each time a talk button ispressed Choose how a talk button latches—with a single or double tap; automaticallyon power-up; continuously; or not at all. Select for use with an electret or dynamic mic-equipped headset. Adjust the headset microphone’s gain. Prevent headset levels from exceeding a maximum. Select between binaural and monaural operation on selected beltpacks. Lock-out onboard beltpack functions. And more features.Two-channel belpacks add the following features: Send call signals as either 20 kHz AC, DC, or both. Program “listen-with-talk” on one or both channels. Set a minimum headset listen level.V-PACK INSTRUCTION MANUAL1-1
Send and receive 24 kHz RMK signals. Contour the audio for maximum intelligibility in noisy environments. Reduce background noise with full-function Noise Gate. Select the earphone level for an auxiliary headset.When the VPC-1 cable isconnected, and V-Packstarted, you can selectbeltpack features in V-Packand upload them to thebeltpack. Choose how a call signal occurs—as a steady, flashing, or dimmed light; as anAC or DC signal; and/or as an audible tone in the headset. Or you can selectnot to indicate call signals at all. Activate one or both talks. Temporarily interrupt a latched talk with Clear-Com’s exclusive“bounce-back” feature. Listen on both channels simultaneously, or only on one channel, regardless ofwhich channel you are talking on. Operate on only one of the two channels. Reverse the position of the channel controls.V-Pack gives you unprecedented versatility in programming a beltpack for anyoperating environment.When you start V-Pack, theconnected beltpack’ssettings automaticallydownload to V-Pack anddisplay on the computerscreen.ABOUT THIS MANUALThis manual presents information about V-Pack so that new users canunderstand and start operating the program as quickly as possible. Experiencedusers with questions can refer to the manual as a reference.The manual complements the online help system. Both the manual and the helpfiles assume that you are familiar with the Windows operating system. If you arenew to Windows, you may find the Windows online help system useful.MINIMUM SYSTEM REQUIREMENTSV-Pack requires the following minimum system requirements: Microsoft Windows 98, ME, NT4, 2000, or XP. Personal computer with Pentium 2 or higher processor. 20 megabytes (MB) of free hard disk space. 64 MB RAM. Computer RS-232 serial port for connecting the beltpack programming cableto the computer (if you only have USB ports, adaptors are available.) VPC-1 cable for connecting the beltpack to the computer. This cable isavailable from your Clear-Com dealer or distributor as well as directly fromthe factory. If you wish to wire your own cable, Table 1 gives the pinassignments.1-2V-PACK INSTRUCTION MANUAL
PINWhen you start V-Pack, youcan program a beltpackonline or offline. SeeChapter 3 for details.FUNCTION2tip3ring5sleeveTable 1: Pin Configuration for VPC-1 Programming CableNOTE: Cable wiring should only be performed by qualified personnel. The cableused should be shielded, twisted pair.INSTALLING V-PACK ON YOUR COMPUTERTo install V-Pack from a CD-ROM:1. Insert the CD-ROM into the computer’s CD-ROM drive.The V-Pack installation starts. The V-Pack installation dialog box appears onthe screen.2. Follow the prompts displayed on the screen to install the program.3. When the installation is complete, eject the CD-ROM.NOTE: You need a VPC-1 programming cable to upload setups to a beltpack. Thiscable is available from your Clear-Com dealer or distributor as well as directly fromthe factory. If you wish to wire your own cable, see Table 1 for the pin assignments.Clear-Com providestechnical support 24 hoursa day, 7 days a week.To install V-Pack from the Clear-Com Web site, go towww.clearcom.com. Select Support, then Downloads, and follow theonline instructions.STARTING UP V-PACKTo program a beltpack, first connect it to the computer with a VPC-1 cable. Thiscable is available from your Clear-Com dealer or distributor (Part# 73023) aswell as directly from the factory. The beltpack must be connected to aClear-Com channel with power and termination.Attach the cable to the beltpack’s 3.5 mm (1/8 inch) tip-ring-sleeve plug and tothe computer’s DB-9 connector (RS-232 serial port). If your computer only hasUSB ports, adaptors are available from computer suppliers.NOTE: Alternatively, you can start V-Pack and create a setup offline, withoutconnecting a beltpack to the computer. To upload the setup to a beltpack, you mustthen connect the VPC-1 cable to the beltpack and the computer.After you connect the beltpack to the computer, you can start up V-Pack byusing the Start menu on your Windows desktop, or by using Windows Exploreror My Computer.From the Start menu:1. On the Windows taskbar, click the Start button.2. From the Start menu, select Programs, then Clear-Com, then V-Pack.V-PACK INSTRUCTION MANUAL1-3
From Windows Explorer or My Computer:Use Windows Explorer or My Computer to navigate to the folder in whichV-Pack resides, then double-click the V-PACK.exe icon, or highlight it and pressENTER.Once you have started the program, you can choose to either operate theprogram online or offline to the beltpack. See Chapter 3 for details.To exit the program, click the Exit button. You can also click the V-Pack Closebutton in the upper right corner of the title bar.GETTING HELPOnce you have started V-Pack, you can use the Help files to explain settings andprocedures in the program. You can access the Help files by clicking the Helpbutton that appears on each screen in V-Pack.The V-Pack Help Files’ Table of Contents lets you search for general information.For more specific information, the Search feature lets you look up specific wordsor phrases.GETTING TECHNICAL SUPPORTClear-Com Communication Systems provides 24 hour, 7 day a week technicalsupport. You can contact Clear-Com Communication Systems in any of thefollowing ways:Internet:email to support@clearcom.comWeb Site:www.clearcom.com (Click the 24/7 support symbol)Telephone:From Europe, the Middle East, and Africa: 49 40 66 88 40 40 Monday through Friday 09:00–17:00 (GMT) 49 40 66 88 40 41 24 hrs, any day (But you must have your PINnumber ready)From the Americas and Asia: 1 510 496 6666 or 800 VITEC USAFAX: 1 510.496.6699Mail:4065 Hollis StreetEmeryville, CA 94608-35031-4V-PACK INSTRUCTION MANUAL
2QUICK STARTNAVIGATING V-PACK: AN OVERVIEWFor readers who want to getstarted quickly, this chaptergives an overview of V-Pack.For readers who want to get started quickly, this chapter gives an overview ofV-Pack. Subsequent chapters explain V-Pack in more detail.To begin navigating theinterface, decide whetheryou want to select featuresfor a beltpack online in realtime, or offline, to downloadto the beltpack later.Or, you can choose to stay offline while you select operating features for yourbeltpack. After you select and save the features you want, you can then go onlineand upload the complete setup to a beltpack.Figure 1 shows how to begin navigating the V-Pack interface, after you installand start the program. When you first start the program, the Virtual Beltpackdialog box appears. From here, you can go online to the computer to operate andprogram a beltpack remotely.1 To program options online, click Go On Line.To program options offline, click Setup.The Beltpack Setup dialog box appears.Virtual BeltpackBeltpack Setup3 Select a mode.4Select beltpack options forthe selected mode.Operations OptionsHeadset OptionsAdvanced Options2 Select a beltpack model.(Or a model will self-selectin plug-n-play mode.)5 (Optional) Save the mode setupas a computer file.Figure 1: Navigating the V-Pack InterfaceV-PACK INSTRUCTION MANUAL2-1
To create a custom setup for your beltpack:When you are online toV-Pack, the changes youmake onscreen to abeltpack’s operatingfeatures take effectimmediately at theconnected beltpack.1. From the Virtual Beltpack dialog box, do one of the following: Click Go Online to select and activate beltpack operating features in realtime. Click Setup to select beltpack operating features offline, so that you candownload the features to the beltpack later.The Beltpack Setup dialog box appears.2. From the Beltpack Setup dialog box, select a beltpack model, by doing one ofthe following: If you are online, with a beltpack connected to the computer, V-Pack displaysthe correct model, so that no action is required on your part. On theBeltpack Setup screen, all incorrect model names are dimmed, so that onlythe connected beltpack model is undimmed. If you are offline, you must select one of the beltpack models presented onthe Beltpack Setup screen.3. Select a mode.4. Select operating features for the selected mode.You select features from three categories: operation, headset, and advanced.Subsequent chapters in this manual describe each category in detail.5. Save the operating features you select to a computer file, if desired.FOR MORE INFORMATIONFor specific information about V-Pack, refer to the appropriate chapter in thismanual. Programming beltpack options either online or offline to the computer. SeeChapter 3. Selecting a beltpack model. See Chapter 3. Selecting a mode. See Chapter 3. Selecting operating features for your beltpack. See Chapters 4, 5, and 6. Saving operating features to a computer file or “cloning” operating features.See Chapter 7.2-2V-PACK INSTRUCTION MANUAL
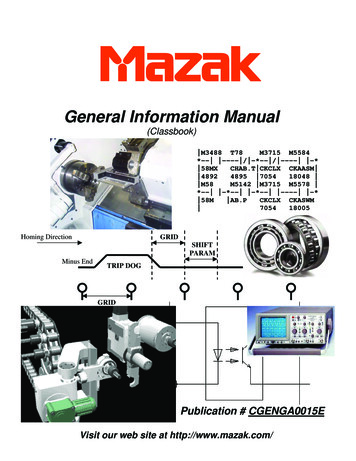
3THE VIRTUAL BELTPACKGOING ONLINE TO V-PACKWhen you first start V-Pack, the Virtual Beltpack Control Panel appears. Figure1 shows a control panel for both a single-channel beltpack and for a dual-channelbeltpack.2-Channel Beltpack1-Channel BeltpackThe Virtual Beltpack ControlPanel takes you either onlineto V-Pack or lets you createsetups offline.Click to go to Beltpack SetupClick to go onlineClick to go to Beltpack SetupClick to go onlineFigure 1: Virtual Beltpack Control PanelYou go “online” to V-Packwhen you connect a VPC-1cable from the beltpack tothe computer, and then clickthe Go Online button on theVirtual Beltpack ControlPanel.To go “online” to the computer, first connect a beltpack to the computer with theVPC-1 cable, and then click the Go Online button on the Virtual BeltpackControl Panel, as shown in Figure 1. The beltpack then actively connects to theV-Pack programming software and is “online” to the computer.When you first go online, data about the beltpack’s current settings “downloads”from the beltpack to the computer and displays on the various screens of theV-Pack program.OPERATING A BELTPACK REMOTELY IN REAL TIMEAfter you connect a beltpack to the computer and go online, you can operate thebeltpack from the Virtual Beltpack Control Panel in real time: When you click a channel’s Talk button on the computer screen, the effect isthe same as if you had pressed the talk button on the beltpack itself—the talkfunction goes into effect immediately. Similarly, you can send a call signal by clicking a channel’s Call button on theVirtual Beltpack Control Panel. The call signal transmits from the connectedbeltpack immediately in real time. On dual-channel beltpacks, you adjust listen levels by moving the sliderbuttons on the Virtual Beltpack Control Panel.V-PACK INSTRUCTION MANUAL3-1
Note: When you are using V-Pack, the volume controls on the beltpack do notfunction. They are replaced by the slider buttons in V-Pack.WORKING OFFLINE WITH V-PACKThe beltpack must beconnected to a Clear-Comchannel with proper powerand terminations.You can also create beltpack setups while a beltpack is “offline”—or notconnected—to the computer. Then, when you connect the beltpack to thecomputer and go online, you can upload the entire custom setup to the beltpackat one time.The advantage of creating custom setups while offline to the computer is thatyou can experiment with a setup until you are sure it is complete, and thenupload the entire setup to the beltpack. The disadvantage of creating customsetups offline is that the changes do not take effect in real time. For completeinstructions on creating a custom setup offline, see “Using V-Pack Offline” laterin this chapter.CUSTOMIZING YOUR BELTPACK OPTIONSUNDERSTANDING THE DEFAULT OPTIONSYour beltpack is preprogrammed at the factory with a “default” setup that willmeet the needs of most beltpack users. Clear-Com programs your beltpack withthe options that are most frequently used by our customers so that when youreceive your beltpack you can begin operating it immediately. No advanced setupor programming is required.However, if you wish to customize the beltpack to better meet the needs of youroperating environment, the V-Pack software offers many powerful tools to helpyou do so.UNDERSTANDING MODESThe beltpack is “offline”when it is either notconnected physically to thecomputer or not connectedelectronically so that datacannot transfer between thebeltpack and the computer.A mode is a specific set of operating features for a beltpack. Each beltpack’smemory holds four complete modes. You select and activate a mode either fromthe beltpack itself or from the V-Pack software.When you receive your beltpack, each of the four modes is preprogrammed withthe Clear-Com default options. The default options are those features mostfrequently used by Clear-Com customers.Appendix A lists each mode’s operating features. You can change these optionswith the V-Pack software.BELTPACK MODELMODE 1MODE 2MODE 3MODE 4RS-601CCCustom 2Custom 3Custom 4RS-602 and RS-622CCCustom 2Custom 3Custom 4RS-603, RS-623,RS-603R, RS-623RCCRTSOne TapGatedTable 1: Beltpack Modes3-2V-PACK INSTRUCTION MANUAL
V-Pack lets you customize each mode for your specific needs. You select customoptions for a mode in the V-Pack software, and upload the new mode to abeltpack connected to the computer. You can rename a mode to reflect itsfunction.You go “online” or stay“offline” through the VirtualBeltpack Control Panel.Customized settings help a beltpack user to quickly adapt to the needs of anoperating environment.GIVING A MODE A NEW NAMEWhen you install V-Pack, each mode is given a name based on the beltpackmodel you are using. A mode may be named Clear-Com, RTS, Custom 2,Custom 3, Custom 4, One Tap, or Gated.You can easily rename a mode to reflect its function. For example, you canrename a mode “Rehearsal,” or “Show1.”A beltpack setup consists offour modes.Clicking one of these four buttons selects a mode.Figure 2: Modes are Custom SetupsTo rename a “mode”:1. On the Beltpack Setup dialog box, place the cursor over a mode button andright-click.The Mode Button Names dialog box appears. (See Figure 3.)2. Type the desired name next to the mode or modes you want to rename.Each mode’s name can be up to six alphanumeric characters.3. Click OK.The mode’s name on the Beltpack Setup screen changes to the name youtyped in the Mode Button Names dialog box, and on all other V-Pack screenswhenever that mode is referred to.V-PACK INSTRUCTION MANUAL3-3
Figure 3: Mode Button Names Dialog BoxTo restore the original mode name:1. Right-click a mode button.The Mode Button Names dialog box appears. (See Figure 3.)2. Delete the mode name and leave the space blank.3. Click OK.The original default name is restored. It appears in the Mode area of the Beltpack Setup screen and on all other V-Pack screens whenever that mode isreferred to.CHOOSING CUSTOM OPTIONSWith V-Pack, you can modify how the beltpack operates to reflect the needs ofyour operating environment. V-Pack has three types of settings for customizingyour beltpack: operations options, headset options, and advanced options. Toaccess these options, click one of the three Settings buttons on the BeltpackSetup dialog box, as shown in Figure 4.Clicking one of these threebuttons brings up one of threescreens of beltpack options tochoose from.Figure 4: Accessing Beltpack Options3-4V-PACK INSTRUCTION MANUAL
The next three chapters explain these settings: Chapter 4 describes Operations Options; Chapter 5 describes Headset Options; Chapter 6 describes Advanced Options. Chapter 7 describes other helpful tasks you can accomplish with V-Pack, suchas saving custom setups to a computer file, and “cloning” custom setups forquick uploading to one or more beltpacks.USING V-PACK ONLINETo program your beltpack directly in real time:1. Attach the VPC-1 cable to the beltpack’s 3.5 mm jack and to the computer’sDB-9F serial port.NOTE: If your computer has only USB ports, adapters are available from computer parts suppliers.2. Start V-Pack. From the Windows Start menu, select Programs, then600-Series Beltpack, then V-Pack.The Virtual Beltpack Control Panel appears.3. Click Go Online from the Virtual Beltpack Control Panel.The light under the Go Online button turns green and the Go Online buttonreads “Online Now.” The beltpack’s current operational settings download toV-Pack and display on V-Pack’s dialog boxes.4. If you wish to operate the beltpack remotely in real time, you can do so fromthe Virtual Beltpack Control Panel.Click Talk to talk on a channel. Click Call to send a call signal on a channel.On dual-channel beltpacks, move the slider buttons to adjust headphone volume levels in real time.5. To program beltpack options in real time, click Setup.The Beltpack Setup dialog box appears. A green light illuminates next to thebeltpack’s model type.6. Select a mode by clicking a button in the Mode area.7. In the Settings area of the Beltpack Setup dialog box, click Operation,Headset, or Advanced to access these options settings. Chapters 4, 5, and 6describe these options settings.As you select an option on the screen, that option goes into effect immediatelyon the beltpack. Click OK to exit any screen and return to the Beltpack Setupdialog box.8. If you wish to save the settings in a computer file, click Save File on theBeltpack Setup dialog box. Chapter 7 explains how to save a file.9. Click OK on the Beltpack Setup dialog box.10.Click EXIT on the Virtual Beltpack Control Panel.V-PACK INSTRUCTION MANUAL3-5
USING V-PACK OFFLINETo program a beltpack offline:1. Start V-Pack. From the Windows Start menu, select Programs, then600-Series Beltpack, then V-Pack.The Virtual Beltpack Control Panel appears.2. Click Setup on the Virtual Beltpack Control Panel.The Beltpack Setup dialog box appears.3. In the Model area of the Beltpack Setup dialog box, click the correct beltpackmodel type.4. In the Mode area of the Beltpack Setup dialog box, click the desired Mode forwhich you are selecting options.5. In the Settings area, click Operation, Headset, or Advanced to access theseoption settings. Chapters 4, 5, and 6 describe these option settings.Unlike using V-Pack online, when you select an option when you are offlineto V-Pack, the option does not go into effect immediately. This allows you toedit your choices until you are satisfied with the complete configuration. ClickOK to exit any screen and return to the Beltpack Setup dialog box.6. When you are satisfied with your choices, there are two ways to upload theoptions to a beltpack. Do one of the following: Save one or more modes to a computer file and then upload the mode ormodes to a connected beltpack. Chapter 7 explains how to upload a savedfile. “Clone” the four modes from the Virtual Beltpack Control Panel and uploadthem directly to one or more beltpacks. Chapter 7 explains how to clone abeltpack setup.7. Click OK on the Beltpack Setup dialog box.8. Click EXIT on the Virtual Beltpack Control Panel.3-6V-PACK INSTRUCTION MANUAL
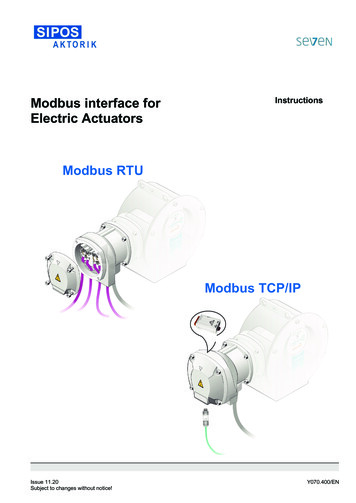
4CHOOSING OPERATIONS OPTIONSWith V-Pack, you can customize how your beltpack operates. For example, youcan decide how a call signal appears on your beltpack, or how a talk buttonlatches.Single-channel beltpacks offer a different set of customizing options thandual-channel beltpacks. The following sections first discuss the options availablefor single-channel beltpacks, and then discuss the options available fordual-channel beltpacks.OPERATION OPTIONS FOR A SINGLE-CHANNELBELTPACKA single-channel beltpack offers three categories of beltpack options to choosefrom: Call Signaling Options Talk Button Options Remote Mic Kill (RMK) OptionWhen you click Operation on the Beltpack Setup screen, the Operation Optionsscreen appears on your computer display. Figure 1 shows the Operations Optionsscreen for a single-channel beltpack.Figure 1: Operations Options Screen for a Single-Channel BeltpackV-PACK INSTRUCTION MANUAL4-1
CALL SIGNALING OPTIONSWhen you press a beltpack’s call button, the beltpack sends an electronic signalon the intercom line that causes a visual or audible signal to occur on the otherbeltpacks on that intercom line. The signal can be sent to cue other beltpackusers to perform an action, or it can be sent to activate a device such as a relay orradio transmitter.You can customize how a beltpack sends and receives call signals by selectingoptions in the Call Signaling area of the Operations Options screen. Thefollowing sections describe the options for single-channel beltpacks.Figure 2 shows the call signaling options for a single-channel beltpack, with thetwo default options, “Call Button,” and “Steady Call Light,” selected. Thefactory programs the default options into all single-channel beltpacks, so that abeltpack is ready to operate when you receive it.Figure 2: Call Signaling Options for a Single-Channel BeltpackCall Button Selecting the Call Button check box turns on the beltpack’scall-signaling capability. You can send a call signal by pressing the beltpack’s callbutton. If you clear the check box by clicking it, you cannot send a call signalfrom the beltpack.Steady Call Light When you select the Steady Call Light check box, thebeltpack’s call light remains on for the duration of the call signal.Flashing Call Light When you select the Flashing Call Light check box, thebeltpack’s call light flashes for the duration of the call signal.Call Light Dim When you select the Call Light Dim check box, the beltpack’scall light does not glow as brightly as usual for the dura
1-4 V-PACK INSTRUCTION MANUAL From Windows Explorer or My Computer: Use Windows Explorer or My Computer to navigate to the folder in which V-Pack resides, then double-click the V-PACK.exe icon, or highlight it and press ENTER. Once you have started the program, you can choose to eith