Transcription
HAL LEONARDBASS METHODContains books 1,2, and 3 bound together in one easy-to-use volumeBY ED FRIEDLANDEach track on the accompanying CDs is recorded in stereo, with bass panned hard right.To remove the bass, adjust the balance control on your CD player.All instruments performed by Ed Friedland.Edited by Doug DowningISBN 978-0-7935-6383-8HAL'LEONARD'CORPORATION7777 W BLUCMOUND RD. P.O.BOX I3B1* MILWAUKCC, Wl 53213Copyright 2004 by HAL LEONARD CORPORATIONInternational Copyright Secured AJI Rights ReservedFor all works contained herein:Unauthorized copying, arranging, adapting, recording or public pertormanee is an infringement of copyrightInfringers are liable under the law.Visit Hal Leonard Online atwww.halleonard.com
The Bectric Bass.6The Bass Amp.6Tuning .7Playing Positions.8Musical Symbols.9Right-Hand Technique.10Rngerstyle.10Pick Style.11Left-Hand Technique.11The 1-2-4 fingering System.11Open-String Exercises.12The Rake.13Notes on the E String.14Little Rock.15Kinda Folky.15More Notes on the E String.16Lookin' Sharp.17The Shift.17Notes on the A String.18You Go, Slav.19Repeat Sign.19One More Time.19Cattle Crossing.19More Notes on the A String.20The finger Roll.21Roll It.21Roily.2112-Bar Blues.22A Little Heavy.22Notes on the D String.23Private Eye.24Minor League.24D-Lite.24More Notes on the D String.25Three-String Review.26Crossin' Three.26The Octave.27Octa Gone.27Notes on the G String.28Gee Whiz.29All Right.29More Notes on the G String.30All Four One.31F/X.31More Octaves.32Octave Blues.32Ties.33Taiwan On.333/4 Time & the Dotted Half Note.34Three s a Crowd.34Tell It.35Changin’ Times.35Rests.36Rock n’ Rest.36D.C. al Fine.37Three Play.37Eighth Notes.38Movin' 8 s.39Eight Ball.39Eighth Rests.40Rok Gmv.40Bop Bop.40D.C. al Coda.41Coda Pendant.41Dee Dee.42Using a Metronome.42The Classic Rhythm.43Down Home.43Raitt On.44Minor's Tale.44A Classic Variation.45Classic Blues.45Petty Thief.45Third Position.463rd Watch.47Flying Leap.480 and 3.49Shifty.50Shift-Crazy Blues.50Stones-y.51Etude Brute.51
The Box Shape.52The Classic Blues Line.74E.A & B Box.53Gee Blues.74Box Lunch.53Aay, Blues!.74Box-E Blues.53Low Down.75Movable Boxes.54Understanding Bass Lines.75Your Move.55Syncopated Eighth Notes.76Move It.55Off Beat.77Movie Star.55Funky Soul Groove.775th Position.56That 70s Thing.77On the G String.56The Major Triad.78Shift Practice.57Tri Again.81Shifty Henry.57Funky Li’l Blues.81On the D String.58The Minor Scale.82Dee Gee.58Minor Scale Sequence.825-3-1.59Relative Minor and Major.82Dig It.59House O’ Horror.85On the A String.60Noir.85Introducing Tablature.60Jazz Minor.85Tab Hunter.61Modulation.86Pay the Tab.61Minor Modulation.86On the E String.62Mod Crazy.86Open/Closed.63Minor Triads.87Da Blues.63Bogey Man.90All Together Now.64Roots.90Swing lime.65Gypsy Swing.91One Rnger Per Fret.65Room-ba with a View.91The Major Scale.66Eighth-Note Triplets.92Scale Sequence #1.67The '50s.93Scale Sequence #2.6712/8 Time.93Key Signatures.68Bumpin'.93Universal Fingerings.70The Shuffle Rhythm.94Scale Sequence #3.71Old Days.94Scale Sequence #4.71One- and Two-Measure Repeats.95Pasta Mon.72Bad Bone.95D-Lish.72Uptown Down.95A-Rat Tire.72Classic Flat 7.96Open L.73Rollin'.96G3.73Go On.97B-Flat Jump.73
The Chromatic Walkup.98Playing Off Chord Symbols .126Open Up.99Just Roots.126Staccato.100Roots 8 8ths.126Double Up .100Jumping Octaves.126Rez-Q. 100Your Turn.127Curtis.101Adding the 5th.127Kickin'It.101Use the 5.127Sixteenth Notes.1025 By 8 .128One Drop .103Root-5-8 .128Dada Dadat.103You Got It.128Jog Wheel .103Chromatic Approach.129Sixteenth Rests.104Chromatic R-5-8.129Layin' Back.105It's Up to You.129Nazz-T.105Scale Approach.130Plutonic.105Scale R-5-8.130Funky 16th-Note Syncopation.106All Yours.130Ookachu Wha?.106Dominant Approach.131Groove.107Dominant to the 5th.131Combo .108You Go. Hugo.131Minor Glitch .109Using Triads to Create Bass Lines.132Do It Now.110Walking Triads.132Soul Groove.110Walk This Way .132D-Troit.IllSimple Triads.133Seventh Chords .112On Your Own.133Floaty.113Triads & Dotted Quarters.133Vanilla .113Uh Huh.134L'il Thing.115Locking In to the Groove.134Funk Time.115Groove Jam.135Little M .117Time 2 Groove.135Shufflin'.117Slap Funk .136Middle Man .118Slap This.137On the Verge.118Pent Up .137Slides.119The Pop.138Slippin'& Slidin’ .119Combining Slap and Pop.138Minor Pentatonic .120Octave Slap.139Venture Forth.121Chromatic Octaves.139Deja View.121Gritty.140Hammer-Ons & Pull-Offs.122The Pressure Roll.140Hammerhead.122Dead Notes.141X-Tender .123Dead End .141Major Pentatonic .124Keep It Together.142Just Like My Girl.125Its an Eyeful! .143N'awlins Beat.125
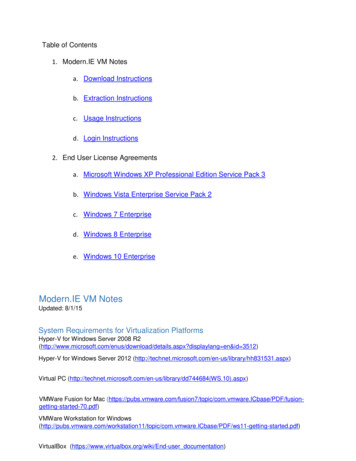
THE ELECTRIC BASSback (bridge)bodytone controlsTHE BASS AMPTo hear yourself clearly, it is necessary to play an electric bass through an amplifier. Though there are many different sizes, asimple, self-contained unit (“combo’’) will work fine. Use a patch cord, or cable, to connect from the output of the bass to theinput of the amp. Make sure the amp's volume knob is turned off, or all the way counterclockwise. The tone controls shouldbe set “flat,” or at 12 o'clock. Turn on the power, and slowly adjust the volume to an appropriate level. Be careful; too muchvolume could blow out the speaker!6
TUNINGTUNING TO THE CD TRACK 1To tune your bass, adjust the tuning pegs. Tightening a peg will raise the pitchof a string, loosening a peg will lower it.On CD Track 1, each string is played four times. The first string you’ll hear isthe G (1st) string. Check your string with the CD; if it sounds lower than therecording, tighten the tuning peg until you get closer to the pitch on the CD. Ifyour string is higher, then loosen the peg. Once the G string is in tune, repeatthis process with the D, A, and E strings (2,3, and 4).EADGEADGUSING AN ELECTRONIC TUNERElectronic tuners have become very affordable, so it’s a good idea to have one.There are generally two types available: a “bass" (or “guitar”) tuner, which willonly read the open strings of your instrument, or a “chromatic" tuner, whichwill read any pitch. Either will do the job. Plug your bass into the input of thetuner and play your open G string. The tuner will read the pitch and tell you ifthe string is sharp (too high) or flat (too low). Adjust the tuning peg until thetuner indicates you are in tune. Repeat the process with the D, A, and E strings.TUNING TO A KEYBOARDUse the appropriate key on a piano/keyboard to check your open strings.middle tringRELATIVE TUNINGHere’s another way to tune your bass. It is less accurate, as it assumes that your starting string is in tune—and it is harder forthe ear to hear the low pitch of the bass as well as a tuner can—but this method works when there are no other alternatives.It's also a good way to check your tuning. Start with your open G string. If there is an accurate G available, use it; otherwise, assume the G string is tuned tothe correct pitch. Play the D string at the 5th fret, and see if that note matches the open G. Tune the D string up or down until thetwo notes match. Play the A string at the 5th fret; compare it to the open D. Tune the A string up or down until the two notes match. Play the E string at the 5th fret; compare it to the open A. Tune the E string up or down until the two notes match.1st string2nd string3rd string4th stringThis is called relative tuning because the strings are tuned relative to one another.7
PLAYING POSITIONSSTANDING Buy a comfortable strap between 2Vz and 3 inches wide. Leather or wovencotton are good choices. A padded, stretchy neoprene strap will helpabsorb the weight of the instrument. Adjust the strap so that both hands can be comfortable on the bass. With yourleft arm at your side, bend the elbow, bringing your forearm up. This is youroptimal position for the left hand. Hold your right arm straight out in front of you at shoulder height, and let thehand hang down naturally. Bend your elbow, and bring your arm in towardsyour body. That is the optimal position for your right hand. Be sure to avoid any extreme bends in either wrist.TIP: Run the cable under your strap to avoid pulling it out of the jack while standing.SITTING8 It’s best to use a strap while sitting to keep the instrument at theproper height. Without a strap, rest the bass on your right leg. It may help to use asmall footstool under your right foot. Keep your left arm off your leg. Angle the neck slightly away from the body.
MUSICAL SYMBOLSMusic consists of two basic elements: rhythm and pitch. Pitch is notated using a set of lines (and spaces) called a staff. Thehigher a note appears on a staff, the higher its pitch; the lower a note appears, the lower its pitch. At the beginning of the staffis a clef sign. Bass music is written in the bass clef or “F clef."BASSCLEFSTAFFThe two dots in the clef sign surround the line on which the pitch “F" is written; hence the term “F clef.”The musical alphabet uses the letters A, B C, D, E, F, and G. After G, the sequence repeats starting with A. In bass clef, thenotes written on the lines of the staff are G-B-D-F-A. You can remember this sequence as “Good Boys Do Fine Always." Thenotes on the spaces are A-C-E-G. “All Cows Eat Grass” may help you remember this.o »LINESDFoSPACES 9A0« ACEGRhythm, the other basic element of music, is notated using measures (also known as “bars”), which contain a set number ofbeats (the pulse of the music). Each measure is separated from the next by a bar line. A double bar line is used to show theend of a section of music. The final bar line is used to show the end of a piece of music.MEASURE-11-MEASUREBAR LINEBAR LINEDOUBLE BAR LINEFINAL BAR LINE(end of section)(end of song)The number of beats in each measure is indicated by the lime signature, which appears at the start of a piece after the clefsign. The time signature looks like a fraction. The top number tells us how many beats there are in a bar, and thebottom number tells us what type of note is to be counted. Most of the examples in this book will be in 4/4 time.four beats per measureTIMESIGNATUREa quarter note ( ) gets one beatIn the first part of this book, you will see three different kinds of note values. They are:NOTE VALUESJQUARTER NOTE 1 beatjHALF NOTE 2 beatsoWHOLE NOTE 4 beats9
FINGERSTYLERIGHT-HAND TECHNIQUEThe most common approach for playing electric bass is fingerstyle—i.e., using the index (i) and middle (m) fingers of the righthand to play the strings. The fingers give you a warm, full sound that can be controlled easily by developing touch sensitivity. Let your fingers hang comfortably, straight over the strings; don't curl them. Start by resting the tip of the thumb gently on the pickup. Using the fleshy pad of your finger, place it on top of the string.E STRINGGently push down and across the top of the E string, letting your finger come to rest against thepad of the thumb. Alternate strokes between the index and middle fingers. Repeat this until youfeel comfortable. Play lightly; too much force will give you a distorted sound.—r-r—rFingers:imiM1mright-hand positionA STRINGMove your finger to the A string. Push down and across the string, letting your finger come torest against the E string at the end of the stroke. Alternate fingers; repeat several times.—r-r-r-M1Fingers:imimend of fingerstrokeD STRINGDrop your thumb to the E string. Move your finger to the D string, push down and across, lettingyour finger come to rest against the A string. Alternate fingers and repeat.Fingers:imimG STRINGmuting the E stringDrop your thumb onto the A string, and make it lean against the E string. This mutes both stringsto prevent unwanted ringing. Put your finger on the G string. Push down and across the string,letting your finger come to rest against the D string. Alternate fingers and repeat.—r-r-r-MFingers:imimTIP: As you alternate fingers, place each finger down for the next stroke just slightlyahead of time, to mute the previous note. This will give you a more controlled bass sound.10muting the E and A strings
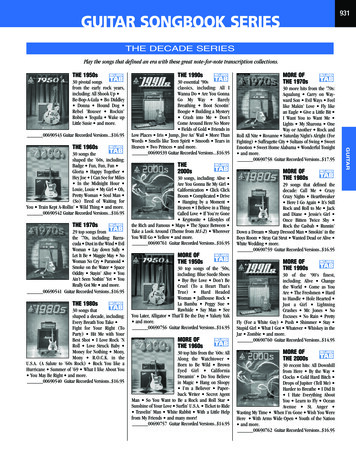
PICK STYLEPick style produces a clear, distinct sound, and is a very popular technique for playing rock bass. While most bassists tend touse their fingers, pick style is a good skill to have.The thickness of the pick will affect the tone: A thin pick may be too floppy to produce astrong tone; a heavy pick may not be flexible enough. See what gauge feels right to you. Curl your index finger and place the pick on it, letting just the tip stick out. Place your thumb over the top of the pick, holding it securely—but not too tightly. Make sure the pick is flat against the string; don't use the edge of the pick. Rest your pinky against the face of the bass, or on the lower edge of the pickup.The pick can be used to play downstrokes (n) and upstrokes (V). The downstroke has astrong attack and works well for hard rock. Play the previous examples again, this time witha pick, using downstrokes ( ). Use a light wrist motion with a little bit of forearm movement.TIP: To get a full sound from each string, make sure the pick connects fully; let the pick “travel through” and come to restagainst the next string after the stroke. Be careful, however, not to play too hard (especially on strings D and G); overplayingcan make the string “flap out," producing a weak tone.NOTE: While you will eventually develop a preference, it’s important to play both fingerstyle and pick style to be a wellrounded bassist. Readers are encouraged to learn fingerstyle first—as it presents many unique challenges to the begin ning player—and then, at a later time, to try pick style. Any example can be played either fingerstyle or with a pick.LEFT-HAND TECHNIQUENow it’s time to start using the left hand. The fingers are numbered 1 through 4 as shown.1-2-4 FINGERING SYSTEMThe 1-2-4 fingering system allows us to keep the hand relaxed and com fortable, particularly when playing in the lower regions of the bass wherethe frets are farther apart. Start with the pad of your thumb in the middleof the neck; make sure it doesn't stick up over the top. The thumb is posi tioned between the first and second fingers. Place your first finger directly behind the 1st fret of the E string,pressing down lightly. Place your second finger on the 2nd fret. Place your fourth finger on the 3rd fret.1st positionNotice that we have access to three frets—thisis called a position. We’ll study three playingpositions in this book: 1st position (with theindex finger at the 1st fret), 2nd position (withthe index at the 2nd fret), and 3rd position(index at the 3rd fret).TIP: Keep your left hand relaxed when youplay. Never forcibly stretch your hand or holda position that feels strained.2nd position3rd position11
OPEN-STRING EXERCISESThe following exercises are played on the open strings and will help you with basic rhythms, fingerstyle technique, and cross ing the strings. Here are the notes for the open strings as written on the staff.E A D GThe open E string is written on an added line below the staff, called a ledger line.Each exercise below is played on a single string. Count the rhythms out loud at first, and then play them. As you play, con centrate on alternating between index (i) and middle (m) fingers, as shown.E STRINGImim1 *** j j j jCOUNT: 1234im11- .tzz.Imim— -—i1i-“J . J4-J1-23-4123-41-2-3-4A STRINGimimimimim——4)fm a Ld-d-d-d—MJZ. 4 2 M-COUNT:23m14123-41234i 411-2-3-4D STRINGCOUNT: 12mimiiA9-f-0-3-41-2341-2-3-412331-2341123-4y tr 3— mim-o-0-0-0-0——-h114G STRING4 COUNT:1-2--4234When playing fingerstyle, the most important thing to remember is to alternate fingers. Once you get used to it, this techniqueallows you to play notes quickly and easily. You may begin your alteration with either finger—index or middle. Try playing theabove exercises again, beginning with “m” instead of “i."12
Now let’s try playing on more than one string. These exercises move up the open strings. Continue to alternate fingers as youmove up from one string to the next. Remember to let your fingers “travel through” on each stroke.imimimimimimimimWhen moving down a string, use the same finger to playboth strings—this is called the rake technique.The idea is to use as little effort as possible to get fromone string to the next. The rake actually helps keep yourright hand relaxed as you move down to the lower string.Try these exercises moving down the open strings. (Use your left hand to mute the higher open strings.)i/\L—mi 'imF COUNT: 1-234imimCOUNT: 1234immi:-1 -1I-1 ——Sf—mI1-23--(ml fl—G 141mlmmi11-2342342m3-4mi111-2-3-4mm1-23-4This example mixes ascending and descending motion through the strings. It starts on “m,” but you could also switch andbegin with “i.” Remember: When crossing to a higher string, alternate fingers: when crossing to a lower string, use the samefinger (the “rake technique”) on both strings.mimiCOUNT: 1234mimilimm1-23-41123-423-413
NOTES ON THE E STRINGOPENOPENThese notes are in 141st position,1st FRETwith the first finger of the left hand on the 1st fret. Here are a few tips:Place your finger directly behind (not on top of) the fret.Experiment with different amounts of pressure; it takes less than you think.Keep each note ringing until you’re ready to play your next note.COUNT:1COUNT:1COUNT:1233rd FRET
Say the names of the notes out loud while you play, like “E. F. G. F. (etc.)". Remember to alternate i and m fingers inthe right hand as you play.This example skips a space when going from E to G.COUNT: 1-23-41-2341-2Practice keeping the count going on your own.15 gf7700COUNT: 13-This next example is 8 measures long. When you reach the end of the first line, continue on to the second line without a pause.The count-off for the track is two measures long: “1. 2. 1,2.3.4.” LITTLE ROCKTRACK 2a- l.-/ i4r .,3J .r,i» * * * y—dCOUNT: 1Q2-3*iiiii\ d-—*iii-i4KINDA FOLKYTRACK 3-:-1- - Z3ki —i-i-i-1 -fS 4J-1-1-*- &-o- H- *-&-0-0 03aV-r1- d0,0J»r0-*1—II.163 ?o15
MORE NOTES ON THE E STRINGThese notes are shown in 2nd position, with the first finger of the left hand on the 2nd fret.F*/G G#/A Why does each note above have two different names? Read on.So far, the notes you have learned have all been natural notes—they have a letter name, and that’s all. Notes that occurin between natural notes have names with sharps (#) or flats (b) next to them. When you go up one fret from a natural note, its name becomessharp (#). For example: Play 1st fret F, then move up to the 2nd fret.That note is called F-sharp (F*). When you move down one fret from a natural note, the name be comes flat (k- For example: Play 3rd fret G, then slide down to the2nd fret. That note is now called G-flat (G ).You just noticed that the 2nd fret on the E string has two different names: When you move up from F, we call it F*; whenyou move down from G, we call it Gk That is called an enharmonic equivalent.16
In written music, a sharp (#) or flat ( ) placed in front of a note affects every note on the same line or space in that measure.It is automatically cancelled out in the next measure.FtA natural signft) cancels a previous sharp or flat. In this example, the G natural is played with the second finger.Fingering: 01240124210In the above example, the natural sign “cancels” a sharp from the previous measure. Though not strictly necessary, this helpsto avoid any confusion over the intended pitch. This is known as a courtesy accidental.THE SHIFTIn order to play all the notes on the E string comfortably, you need to learn how to shift from 1st position to2nd position. You can shift on any finger: Play the first note, then lighten up on the pressure and slide yourhand up or down one fret. Try the following examples, each of which shifts using a different finger.17
Practice slowly, to get the notes securely under your fingers. When you feel comfortable with an example, gradually increasethe speed.QYOU GO. SLAVTRACK 527 9: Jm3 - TY— L 1—riiaar .j7 E1 w -11I--Gw1io—nLiiiIIREPEAT SIGNWhen a section of music needs to be repeated, a repeat sign (: ) is used. When you reach the repeat sign, goback to the beginning and play the section again, ending at the last measure. ONE MORE TIMETRACK 6 J 4d J J J.The next group of exercises will use notes on the E and A strings. Go back and review the E string notes if you need to. Usethe rake technique—marked with an asterisk (*)—when crossing from the A string down to the E string.This exercise adds Ft in measure 6. Use the fingering shown. Take the repeat.CATTLE CROSSINGTRACK 719
MORE NOTES ON THE A STRINGJust like the E string, the A string has notes that occur in between the natural notes.A#/B C#/D A#/B is in 1st positionC#/D is in 2nd positionThis example uses A# with the first finger. It is in 1st position.FNG:012This example is also 1st position; it uses442010with the first finger.This example is in 2nd position (make sure your first finger is on the 2nd fret).FNG:20012441010
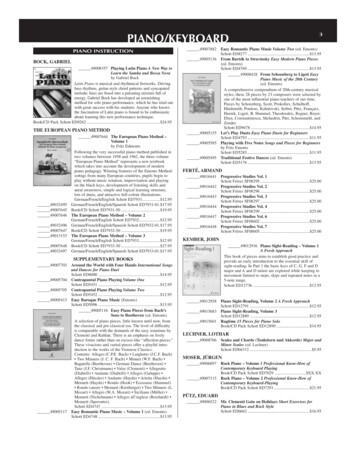
THE FINGER ROLLA special technique for the left hand is the finger roll. This helps you whenplaying notes on adjacent strings located at the same fret. The goal is tocross smoothly from one string to the next. To do this when moving froma lower to a higher string, play the note on the lower string using the tip ofthe finger (with the small knuckle slightly bent); then, flatten the knuckleand roll your finger across, playing the note on the higher string with thepad of the fingerThis example thoroughly works the finger roll on all fingers. Observe the position shifts indicated.Q)ROLL ITTRACK 8FNG: 4442 — :/k.1»aitI2211122211 j 1 Ui’i: ifj*-5-This 2nd position exercise has several string crossings (and usesthere are finger rolls between G and C. on the way down from open A). In measures 3 and 4,ROLLYTRACK 9FNG: 035 yj j0y d4J41042tJ J i,ji,jij0 43*10-1- *f 222J- . j11-J- JJ 0oEg— 21
THE 12-BAR BLUESLet’s play a longer song form, a 12-bar blues. This is a common progression in rock, jazz, blues, and many other stylesof music. The bass line corresponds directly to chords that a guitarist or pianist plays. They will be written above eachmeasure so that your teacher or a friend can play along with you. If you examine the bass line, you will see that whenthe chord symbol says E7, the bass starts the measure with an E; when the chord changes to A7, the bass plays A; etc.You are playing the roof of the chord, a very important aspect of functional bass playing.This line is mostly in 2nd position, with an occasional shift down to 1st position. There are only a few fingerings and shift in dications written in to help you. Measure 4 has a pattern called a triad—three notes that “spell out” the contents of a chord.Q12-BAR BLUESTRACK 10E7ftJUm—1— —1— —1—J lJ j (shift to 1st POS.) 0B742100J4-shift-O1 J-j.—j—(shift to 2nd)"T#T . 'lt-.-HT1(shift to 2nd POS.) JIt2lj—%**I IJj -4 -S4E" fA7J J4 Jl»TTJ PP«J1j4*TTE7A72Here is another 12-bar blues. This one changes chords in the 2nd and the 12th measures, a common variation in blues form. A LITTLE HEAVYTRACK 11F*22BFt
OPRIVATE EYETRACK 12This 1st position example crosses the A and D strings. The chord names are included so others can play along. You are play ing the root when each chord changes. The symbol “Dm" is for a D minor chord. Minor chords sound dark while major chords(without the “m”) sound happy and bright. Listen for the difference. Watch out for the finger roll in the last measure.OMINOR LEAGUETRACK 13Ai„m’COUNT: 1-1-1—--— —H—1-1— -1--h3'—-*— -W—0--0—0EEf2-3nLmm*3j4Dm1ST and 2ND ENDINGSThe next song has a 1st and 2nd ending (indicated with brackets and the numbers “1" and “J "). Play through the1st ending like a standard repeat sign, and go back to the beginning. The second time throug h, skip the entire 1stending and go directly to the 2nd ending section.r-1 - qi J -1-111.This example starts and ends on D; it outlines the sound of the key of D. D is the tonic or “home base” of the piece. Noticehow the bass is not always playing the root when the chords change. You can play other notes that belong to the chord. (Thiswill be explained in depth in Book 2.)I.Ay t i24DG2.AE ill IH JDG-«1 #E AD fl]
MORE NOTES ON THE D STRINGD*/E Remember to start in 2nd position.This example shifts between 1st and 2nd positionFt/G
Here are ail the notes you have learned so far. Review each note and solidify your understanding of where it is playedon the fingerboard and how it is written on the staff.DD* /EFA# / B BCFt /A STRINGACt / D E STRINGEFFt /GG* / A’This 2nd position example crosses the three strings you’ve learned so far. Make sure to follow the 1st and 2nd endings. CROSSIN' THREETRACK 15E26ADA
THE OCTAVEIt’s time to look at a musical pattern that is very common in bass playing, the “octave." An octave is the same note upor down eight letters in the musical alphabet. For instance, the last two notes in the previous example were both E, butone was high, and one was low—that is an octave.octavei-1musical alphabet - EFGABCDE1 2 3 4 5 6 7 8The octave follows a physical pattern on the fingerboard. From any note on the E (or A) string, move up2 frets, and across 2 strings. This pattern is consistent throughout the fingerboard.Fingering an octave (without an open string) requiresyou to play the low note with the first finger, and thehigh note with the fourth finger,For fingerstyle, use your index finger (i) for the low note of an octave and your middle finger (m) for the higher note.This example uses the octave shape. For fingerstyle, make sure to drop the right thumb onto the E string when making thejump across to play the D string. This example also shifts up with the first finger to 2nd position. Shifting around the octaveshape is a very common practice in bass playing. OCTA GONETRACK 16FNG:114114114427
FNG: 0 -shift- 41
MORE NOTES ON THE G STRINGGMA*/B TThis one begins in 2nd position, and then shifts between 1st and 2nd (shifts are indicated with a dashFNG: 41t): k ? J l 1-*0111 #* v—30422— —401-112 —V-h*—f—-1- —4p1-1——h*--0-1
Time for more practice playing across all four strings. This is mostly 2nd position, with one note in 1st position.Qall four oneTRACK 19EADGThis one is in 1st position, and uses F as the tonic. There is one shift to 2nd position; fingerings are indicated. F/XTRACK 20FBtFNG: 14-40n u j J r 1r j—f—FmuJ jJ,a"-f-—1Bi’FJim-m—U m---Bt j.r1t —1", 1 1V*r i'r r rr ri'rYimG major is the tonic. Start in 1st position, but shift in the 6th measure. Use the open D string to move to 2nd position.FNG: 440-10401214031
MORE OCTAVESPlaying across all four strings, there are more octave shapes available. Here are the new octaves you can play between the Aand G strings. Remember that A* andare enharmonic equivalents.FNG:02141r i,.i "r«»‘m iijL41bru4T mu1 st POSITION---.-.- - -.i 2nd POSITIONNow let’s use all the octaves you’ve learned so far. The shifts are indicated with a dashBecause both notes of an octave are the same letter, they can both be considered the root of a chord. On an E chord, forexample, both low and high E are the root. Understanding this concept will help you to create your own bass lines.This 12-bar blues uses the octave on each chord for the bass line. The chords are “seventh chords” (E7, A7, and B7). They area different type of chord than you’ve seen, but for now the important thing is to play the root (E, A, and B).Begin in 1st position; for the B7 chord, shift up to 2nd position. Remember, when playing octaves fingerstyle, the lower noteof the octave can be muted with the thumb as you move up to play the higher note on the A or D string. As a general rule, useyour middle finger (m) when jumping to the higher note, and your index finger (i) when jumping back down to the low octave. OCTAVE BLUESTRACK 21E7A7 gF p p f j jB7i- *J— 1/ j —mFNG: 132m* 9—m4ir mij j rj j rA7i—1-0E7i -r—r- —h*-t-rr 5 « iwj 1 rm rr m j-1-E7M J-20F jaB7 1 --0 —
A tie connects two notes of the same pitch. It is used to extend the note value across a bar line, or sometimes withina measure. Play the first note, and hold it for the combined value of both notes.COUNT: 1-23-4-123-43 BEATS-1-234 4 BEATS1-2-3-45 BEATSIn this example, some of the chords change on the first beat of a tie. The key is B minor; notice the darker quality of the song.QTAIWAN ONTRACK 22BmEBmF?7GBm33
3/4 TIME 8 THE DOTTED HALF NOTE3/4 time has three beats per measure, and the quarter note receivesone count.Q-* three beats per measurea quarter note (J) gets one beatA dot after a note extends the note’s duration by one-half. A dotted half note equals 3 beats.J two beatsIJ31.dthree beatsone beatJ132-3j1-23u. 1-2-3 11—1 -01j.LThis has a country waltz feel, and the tonic is C. THREE'S A CROWDTflACX 23m- —-t-o5G *OJm-G-— r34msr iJ— H—G-
This example is a gospel-flavored tune. The tonic is F.oTRACK 24
RESTSRests are spaces, or silences, in the music, and have specific durations just like notes. In fact, for every note value, there is acorresponding rest of equal value.WHOLE REST1-2-HALF RESTS3-4DOTTED HALF REST1-23-4QUARTER RESTS1-2-31234It’s important to make sure your notes are not still ringing during a rest. Mute the string with your right or left hand, whicheveris most convenient.COUNT: 12341-2341234123-4123-41234Although the count is written out only for the first line, keep counting on your own for lines 2-4. Make sure to hold the quar ter notes for their full note value. ROCK RESTTRACK 26ED69 71 p i i fCOUNT: 1i [i -23436i f ii f123-4C N.C.EDGN.C.B11» i j 1234EAD123-4DGA
The marking D.C. al Fine is short for "Da Capo al Fine," an Italian phrase meaning, “From the beginning until the end."When you see this marking in a piece of music, go back to the beginning (or “head") of the piece and resume playinguntil you reach the Fine marking (the “end”), and then stop.This piece has a jazz-waltz feel. Co
HAL LEONARD BASS METHOD Contains books 1,2, and 3 bound together in one easy-to-use volume BY ED FRIEDLAND Each track on the accompanying CDs is recorded in stereo, with bass panned hard right. To remove the bass, adjust the balance control on your CD player. All instruments performed by Ed